It is not difficult to level the washing machine, but this is a prerequisite for its safe operation. Some users do not pay due attention to the installation, so after a while they have to contact a service workshop to repair the unit and replace the bearings.
Level installation of the washing machine is important
Depending on the brand, the SMA has 2 or 4 adjustable legs. To install the washing machine, you must select a location that fully meets the installation requirements. Do not place the unit close to walls or furniture. The surface on which the SMA will be placed must be flat, without depressions or protrusions. It is good if the base is tiled. A rigid base will allow the unit to be leveled without additional shock-absorbing cups, which will simplify the process.
If the SMA will be located in a room with a wooden floor, it is necessary to prepare a sheet of plywood 8-10 mm thick or OSB boards. Due to the fact that the floorboards have different densities and are not rigidly fixed along their entire length, vibration of the base will occur during operation of the unit. This will negatively affect the washing process, especially in the spin mode. An additional platform will allow you to evenly distribute the load over the floor surface.
The concrete base must be smooth and not crumble. If pieces break off when you tap the material, it is better to cover it with tiles or install another rigid stand. A poorly adjusted machine will vibrate and shift during operation, which can lead to the protection tripping or rapid bearing wear and failure.
At high rotation speeds, the drum may touch the surface of the tank and, if the latter is plastic, damage the walls.
A correctly aligned unit will ensure safe and correct operation throughout the entire period of operation.
Installing a washing machine by level
Having set the building level parallel to the front wall, you need to adjust the front legs so that the air bubble is exactly in the middle. This will indicate that the front is level. After this, we rearrange the level parallel to the side wall and do the same operation with the rear legs. In this case, you need to make sure that the machine stands level and does not swing from the side. The end result should be a position where the body of the machine is stable, and the level shows a strictly horizontal position (both from the front and from the side).
Once we have achieved the correct position of the washing machine at its installation site, we can begin a test wash. If during washing (especially during acceleration of the drum) slight vibrations are observed, then this is considered normal. The main thing is that the washing machine does not move, trying to “jump” to the side.
Some specialists can install a washing machine using a glass of water standing on the top lid, but the accuracy of the building level is somewhat higher.
We recommend: Break down a wall in the house - without noise and dust
How to set it correctly
To install the washing machine level, you need to:
- Remove all transport bolts and check that the drum rotates easily.
- Loosen the locknuts on the legs using the wrench included in the kit.
- Fully tighten the supports.
- By adjusting the legs, achieve a stable position of the unit.
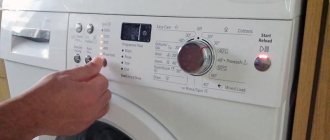
- Install a spirit level on the top cover of the SMA parallel to the control panel. If the air bubble of the device has moved to the right, then you need to adjust the legs on the left side, and vice versa. The machine is installed correctly when the ball is placed between the two middle marks.
- Position the level perpendicular to the previous position. You need to level the machine by twisting the front or rear legs.
Adjust the MCA until the device shows a horizontal position in both directions.
Sometimes, when moving the machine across the floor, you can find a position in which adjustments are not required. This is possible if the base is made as level as possible. After you have finished installing the unit, you need to use a wrench to fix the nuts in the upper position, otherwise if vibration occurs, the adjustment will be disrupted. This can lead to independent movement and damage to the washing machine.
What else you need to know about installing a washing machine
Now we know how to tighten the legs of a washing machine and achieve a stable position. But its installation will require following a number of additional recommendations:
• Always connect the water through a separate connection with its own tap - in case of a leak, you can quickly turn off the water; • The level of the drain hose (in height) should not exceed the norm - look at the passport and find out to what height the drain hose can be raised; • Do not connect the washing machine through extension cords - make a separate outlet for it and equip it with a circuit breaker; • Do not squeeze the inlet and drain hoses to avoid damaging them; • Do not place any heavy or fragile objects or equipment on the top of the machine - vibrations may cause them to fall and cause injury; • When installing the washing machine, do not forget to unscrew the shipping screws located on the back cover of the case - they are responsible for the safe transportation of the washing machine, and must be removed during operation.
Having fulfilled all the requirements and installed the machine according to the construction level, you can safely start washing.
Level check
The correct installation of the SMA is checked during washing with a full load and maximum spin speed. An incorrectly aligned machine will manifest itself immediately after the drum begins to rotate, and maximum - in the centrifuge operating mode. To prevent strong vibration and movement on the floor, you need to adjust the unit at the moment the defect begins to appear. The adjustment is carried out on a de-energized SMA. There is no need to drain the water.
It is recommended to remove minor vibration by installing rubber pads under the supports. In addition, they will prevent the machine from moving on the tiles. During operation, it is necessary to periodically check the horizontal installation and the tightness of the locknuts. If any comments are found, they should be corrected.
How to adjust a washing machine yourself
Did the store employees tell you that the machine should be installed by a technician? Give it up - following our instructions, you can install and adjust it yourself. The most important thing we need to do is to correctly adjust the legs of the washing machine. The tools we need are the most common building level.
The first step is to select the installation location. It is advisable to have a concrete floor that has good stability. In some cases, a separate concrete screed is created under the machine so that it stands on a solid foundation (this applies to houses and apartments with wooden floors).
As soon as the site for the machine is ready, we install it - we simply place it on the selected base and connect it to the water supply, sewerage and electrical networks. Make sure that the body of the device does not pinch the hoses going to the communications. By adjusting the height of the legs, we bring the car into such a state that it does not swing - we achieve a visually correct position. Accordingly, the leg is twisted in which direction the body falls when it swings.
Rotating clockwise, the legs screw in and become shorter. If you start twisting the legs in the opposite direction, they will become longer. What do we need to do with these legs in the end?
Having set the building level parallel to the front wall, you need to adjust the front legs so that the air bubble is exactly in the middle. This will indicate that the front is level. After this, we rearrange the level parallel to the side wall and do the same operation with the rear legs. In this case, you need to make sure that the machine stands level and does not swing from the side. The end result should be a position where the body of the machine is stable, and the level shows a strictly horizontal position (both from the front and from the side).
Once we have achieved the correct position of the washing machine at its installation site, we can begin a test wash. If during washing (especially during acceleration of the drum) slight vibrations are observed, then this is considered normal. The main thing is that the washing machine does not move, trying to “jump” to the side.
Installation
Installation of a washing machine is done in various ways. New equipment requires high-quality reliable support that will not break or warp over time. Saving on a strong foundation for household appliances will result in damage not only to the floor, but also to the washing machine itself, which was purchased quite recently. The ideal situation is installation on a concrete floor. If the floor is wooden, you need to work hard to make it just as reliable, stable, and strong. Vibration during operation of the washing machine is not allowed. It will cause many problems that will require financial costs and moral strength.
This article will reveal the main points that require attention when installing a Eurosoba washing machine on a wooden floor.
How to choose the right place to install household appliances
Choosing a place to install a washing machine must be done not only based on design decisions. You also need to take into account certain nuances that will allow you to use the equipment without problems. These include:
- Availability of an outlet near the installation site. This criterion must be taken into account, since the length of the washing machine cord is short. Usually it does not exceed 1.5 meters. And in this case it is inconvenient to use extension cords, especially if it lies on the floor next to the equipment. After all, sometimes machines can leak, which can easily cause a short circuit.
- The area where the machine will be installed must be level and level. Any, even minor, deviation in this case is unacceptable, as this can lead to rapid breakdown of the device or its poor performance. Experts say that to prevent the machine from vibrating and jumping during washing, it is best to install it on a flat concrete base.
If installed correctly on a wooden floor, taking into account all the requirements, you will be able to correctly install the device, which will work for a long time.
Why does the washing machine jump during the spin cycle and what can be done about it?
First of all, check whether everything was done according to the instructions during installation. Often the machine jumps simply because the transportation anchors were not removed before use. They can be called transportation bolts, but this is not entirely correct - in addition to the bolts, there are other parts, but this is not significant. They are installed in the machine to rigidly fix the tank, which, as the name implies, protects the machine from damage during transportation. Sometimes during installation they forget to remove them or simply do not understand why they need to be removed, and this leads to strong vibration during the spin cycle. When the anchors are removed, the tank hangs freely on shock absorbers, which soften vibration. If you have no idea how to do this, it is better to call a professional. Readers who are fairly confident in their abilities can simply use the instructions - they describe in detail and with illustrations how to remove the anchors when installing a washing machine.
Another reason for a jumping car could be that the legs are not adjusted. This can be dangerous: if it is not completely level, some parts may touch each other and become damaged. Check the machine for unsteadiness by shaking it from side to side - the fact that it gives way clearly indicates that the legs are not adjusted correctly. It's not at all difficult to fix it yourself. Most often, the legs of the machine are simply tightened like bolts, so anyone can do it correctly. The best option for adjustment is to put a building level on the machine (if you don’t have one, you can use a saucer with water, but it will not give such accuracy). You must first place a building level parallel to the front (the door is located on it) and back walls of the machine, check the tilt in this plane and adjust. After that, place it parallel to the side walls, that is, perpendicular to the previous position, and do the same.
We recommend: How to clean the print head and nozzles of an HP printer?
If the previous tips did not work, perhaps the reason is not the machine, but the unsuitable floor for it (too smooth, crooked or not strong enough). To fix this, you can buy a thick rubber mat, special rubber pads or suction cups. The pads will need to be glued on: check with the sellers on how to do this with the ones you purchased. You can probably find all this in any home goods store. In addition, the machine could simply move. Check to see if it is in contact with walls, pipes or other objects around it.
Still don't know why the washing machine is jumping? Some machines start to shake and make noise when they can't balance the laundry properly. It’s worth checking the instructions to see how much laundry they recommend loading. It is also recommended to add a couple of towels if you are washing one bulky item (for example, a jacket) so that the laundry is evenly distributed. When loading, try to distribute the items evenly throughout the drum and avoid washing too little or too much.
Shock absorber in a washing machine