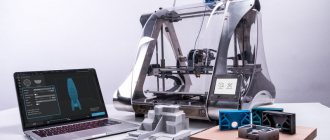
What can you print on your home printer?
You can’t even imagine how many possibilities open up to you when you have a color printer in your home, and even a multifunctional one. With this device you can easily convert electronic pictures, photos and text into printed form. The main thing here is to correctly set the parameters for printing - both for the object itself and for the printer as a whole. In addition to such basic printouts that even a beginner can handle, your device can implement several more incredible functions.
- Interesting activities for children, such as color pictures with tasks or mazes. Of course, this takes a lot of ink, but you can tinker with the settings and arrange for black and white printing. This is especially suitable for those who know how to work in a graphics editor.
- Stickers for baby by month. They are usually made in subtle shades, so they won’t waste much colored paint. At the same time, you must choose the right paper suitable for your printer model to ensure clarity and durability of the image.
- Portraits and interesting toys for children. Typically, such templates can be found on websites dedicated to educational crafts. You can download and send for printing animals, insects and any items necessary to get to know the world around you.
- Paper dolls with clothes for girls. Remember how we, parents, played with such dolls as children and independently built a house for them and dressed them? Now all these treasures can be found directly on the Internet and printed as templates.
- Various ideas for crafts, again with children or for a competition. Print out and keep in front of you the instructions that you will use to carry out Hand-Made.
In other words, a printer, even a black and white one, will be able to satisfy your and your child’s desires, and will also help pass the time usefully. You shouldn’t run to the store for “developers” when you can make them at home.
Interesting toys, useful tasks and puzzles that you can choose yourself can be easily printed at home.
GOOD TO KNOW!
If your printer has high-quality inks and is easy to refill, then you can print more serious things, from restoring old photographs to printing on fabric.
How to print a document from a computer?
First, let's look at the standard method of connecting and setting up for printing a document from a computer database. In the future, when describing methods of work, this method will be taken as a basis. First you need to perform the following manipulations:
- Connect the computer and printer using wires to a power source. After this, pair the devices with each other using any of the available connection methods.
- Using the special installation disk that comes with the purchased equipment, install software and drivers to ensure the workflow. Follow the installation wizard's instructions in the dialog box that opens when you launch the disk.
- Go to the printer menu and settings. Adjust all necessary values as desired. Typically, all settings are set to standard mode; if desired, you can change them in accordance with the requirements for the printed files.
Do not perform other actions during the connection and installation process, and do not turn off the computer until it is fully loaded. After this, you can start printing documents stored in the computer database. This can be done as follows:
- Go to the folder with the required document, you can also download files from a removable storage device.
- Open the desired file, go to Microsoft office to format.
- After that, submit the final version of the document for work by clicking the appropriate button.
- Confirm your actions in the print queue dialog box that opens.
- Wait until the file is completely printed, after which you can proceed with further actions.
Using this algorithm, you can print any document of the desired format. In the future, we will look at the printer’s capabilities when working with other files.
Important! Monitor the status of ink and paper supply in the feed slot. Don't forget to replenish these consumables to keep the printer running.
Rules for setting up a printer to print from a desktop computer
To do something useful with your existing printer, it is important to connect the device correctly and configure it to perform its functions correctly. To do this, follow the instructions below.
Often, Windows 10 automatically configures and makes the printer ready for use.
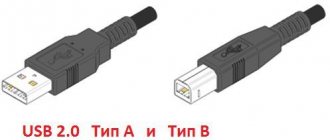
There are several ways to connect the printer to a computer: using a USB cable, via a wireless connection via Wi-Fi or Bluetooth, or via a dial-up Internet connection. Today we will look at one of the most popular methods, which is usually implemented at home.
- First of all, start the PC and be sure to wait until it finally boots (you can check this using the response to any operation, which should occur quite quickly after loading).
- Then plug the printer's power cord into a power outlet, and the USB cable into the corresponding output of the computer system unit.
- A device search notification will appear on the screen, and after the computer has searched for the necessary drivers, you will receive a “Device is ready to use” notification.
If such a message does not appear on the screen, then you will have to install the printer manually. To do this, insert the disk that came with the printer into the drive, or download the driver for your device model from the Internet.
Many printing devices require additional software installation in addition to drivers.
Printer drivers are responsible for the correct operation of the printer, as well as for high-quality printing, so pay special attention to this installation.
Next, you will see a software installation wizard that will install the application in just a few steps with confirmation. Almost every printer model offers to print a test page after installation to make sure that the installation was completed correctly.
How to type and print text on a computer with a printer installed
Almost every home computer has a text editor installed - a program designed to format text in various ways. This is often the Word office application, and of course the version may vary among different users. Let's see the whole process from A to Z in our photo instructions.
| Illustration | Description of action |
| We type the required text in the Word editor in normal mode and format it so that it is in perfect condition: after printing, it will not be possible to invisibly correct errors on paper - you will have to print a new version of the document. | |
| Once again, we carefully check everything and go to the “File” tab. | |
| In the list of this section, select the “Print” item, check that the printing device is connected, and then click the “Print” button if you do not need to make any additional print settings. |
GOOD TO KNOW!
Right in the Word text file, you can make print settings for multiple copies, as well as print multiple individual pages. This is done by the office application and the operation is not affected in any way by the printer model.
Printing text on your computer
In this short lesson I will tell you how to type text on a computer. Where to find a printing program and how to work in it.
Open Word. Perhaps there is a special icon on the Desktop (on the screen) of your computer that opens it.
If there is no such icon, click on the “Start” button in the lower left corner of the screen.
A list will open. Click on “Programs” (All Programs).
A new list will appear. Find the “Microsoft Office” item, click on it and in the small list that appears, click on “Microsoft Word”.
If you do not find the words “Microsoft Office”, then most likely the office software package (including Microsoft Word) is not installed on your computer. In this case, you can use the standard WordPad program (Start - All Programs - Accessories). Or you can use Writer from the OpenOffice package as Word.
The following window will open. This is a program for printing text in Microsoft Word.
We are interested in the central white part. This is an A4 sheet. This is where we will print.
Please note: the sheet appears to have been cut off. In fact, it simply did not fit - after all, the size of the computer screen is smaller than the size of an A4 sheet. The part that does not fit is “hidden” below. To see it, you need to turn the wheel on your mouse or drag the slider down on the right side of the program.
But we will print the text from the beginning of the sheet, so if you went to the end (down), go to the beginning (up).
In order to start typing text, you need to left-click on the sheet. Better to click somewhere in the center.
A black light should be blinking in the upper left corner of the program. Thus, the Word program “prompts” that you can already print the text.
By the way, it will be printed where the stick flashes. If you want it to be in a different location, double-click on the desired location with the left mouse button.
Now try typing something using the keyboard. But first, look at what language is installed. The alphabet that is selected on the computer is shown at the bottom right. It is shown in two English letters.
RU is the Russian alphabet, EN is the English alphabet.
To change the input language, click on these two letters with the left mouse button and select the desired alphabet from the list.
Try typing a little text. If it’s difficult for you to come up with it yourself, open any book and print a small piece from it.
To move to another line (for typing below), you need to press the Enter button on the keyboard. The flashing stick will move down a line - the text will be printed there.
It is also worth drawing your attention to one very important button in Word. This button is called "Cancel" and looks like this:
It is located at the very top of the program and allows you to undo the last thing you did in Word.
For example, you accidentally deleted the text or somehow damaged it (moved it, painted it over, etc.). By clicking on this wonderful button, the Word program will return your document (text) to the state in which it just was. That is, this button returns one step back. Accordingly, if you click on it twice, you will go back two steps.
Author: Ilya Krivosheev
What is text preview before printing and why is it needed?
The built-in preview option, which is found in all text and image editors, is a very useful tool that will help you see how a document will look in printed form. If you notice any error at this stage, it can be corrected directly electronically.
Only those pages that are selected for printing are included in the preview.
The preview is a whole page or a list of them, which we can see in the “File” section before printing.
Methods for printing text from a computer: solving problems in different ways
You can print text documents not only using applications that allow you to format text. Our experts have selected several more methods that you can perform on a personal computer.
Quick access to printing via keyboard shortcut
Not everyone uses keyboard shortcuts when printing or editing text. We present to you a more simplified version of calling a dialog box to redirect the selected text to print.
Please note that when printing text from the Internet, you capture on the sheet not only the necessary information, but also blocks with advertising.
To do this, enter any application for working with text, and then simultaneously press CTRL + P. A window will appear in front of you with a preview and some printing settings, regardless of whether you found the text on the Internet or used the edited material in Microsoft Word.
Organize printing through the quick access panel
After finishing working with text in Word, there is often a need to print the text without additional settings. To carry out such an operation, follow our algorithm.
| Illustration | Description of action |
| Let's find a checkbox in our open file at the top of the application, call the drop-down list in which we select “Other commands”. | |
| In the window that appears, select the “Quick Print” function, click the “Add” button, then confirm your actions by clicking the “OK” button. |
After these steps, a quick print icon will appear in the top panel. If you click on it, your document will automatically be printed without the possibility of previewing, so it is recommended to carefully check the document for errors before clicking the button.
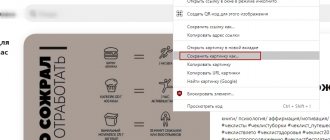
How to print using the context menu
You can quickly print the finished text using the context menu. To call it, you need to find the required file to convert to paper form, then right-click on it.
Printing by any of the methods is only available when the printer is turned on: make sure it is turned on in advance.
A context menu for this document will appear in front of you, in which you can click on the “Print” item. Activating the printer and printing the document will occur in the same way as in the previous method - without the possibility of configuration.
How to print a document - general information
Now let's get down to actually printing the documents. And first, let's look at where the print function is usually located in programs. In the process of conducting computer courses for beginner Windows users, I often observed how people spend a very long time looking for the print button. Let's look at this issue.
Remember: if you cannot find where in the program to print a document, then simply press the key combination Crtl + P (P is English; no need to switch to English). This is true for any program that allows you to print the data you are viewing. If the program has printing, a print dialog will appear. For example, this one.
The appearance of the print dialog may vary depending on the program you are working with. As a rule, regardless of the type of print window, it contains the following items:
- Selecting a Printer
- Selected printer settings
- Print range (makes sense for multi-page documents)
- Number of copies
- OK / Print button or similar in meaning, as well as a cancel button.
There may be other elements present depending on the program you are working with. However, in any case, the meaning of the print dialog is the same - specify the printer you will print on, as well as the print settings.
Press Crtl + P
If the print dialog does not appear, it means that the program most likely does not have a print function.
In addition to the Ctrl + P keyboard shortcut, you can print a document in other ways. For example, this could be the print button on the program toolbar. Typically, such a button has a standard icon in the form of a printer.
Also, very often the Print item is in the program’s File menu.
Special cases of printing: printing pictures and pages from the Internet to the printer
It is often possible not to convert information into a purely text format, but simply print it in the form in which you have it on your PC. Typically, such cases include printing pages from the Internet or using Internet browsers. Let's look at several popular ways to print information.
How to print a document on a printer on both sides
To perform duplex printing on your printer, you can either use Word to make the settings, or you can use the settings in the printer itself. They are set differently in each device model. As an example, we recommend that you watch the introductory video that our experts selected for you.
How to print pictures on a home printer: step-by-step instructions
Pictures or photos are printed on the printer without any special settings. To perform this operation, do the following.
- Open the selected image with two mouse clicks.
- Then, in the viewer tool or graphic editor that opens, click on the “Print” icon (usually located at the top of the window).
- A window for setting up printing photos and images has opened in front of you.
- Make the necessary changes in the wizard, set specific parameters.
- If necessary, select a printer and click on the "Print" button again.
GOOD TO KNOW!
Photo printing must be done with the right choice of photo paper, because how bright and natural the photo will be depends not only on the correct settings, but also on the quality of the media.
How to print an entire page from a website without editing
Outputting information to a printer without additional formatting is one of the simplest options. To print a page from the Internet, you need to right-click directly on the selected information, then select “Print” from the drop-down list.
You, of course, can make it easier: call up the print menu using the keyboard shortcut CTRL+P.
For Internet pages, it is better to use ink sparingly, which means setting the settings to black and white printing.
A settings window opens in front of you, which clearly displays the number of output pages, the printing device used and other parameters that can be edited if necessary.
GOOD TO KNOW!
If you use virtual printer settings in Google Chrome or Yandex, the time for printing output is halved. However, you should understand that the settings will differ depending on the type of browser.
How to print online?
Modern equipment has access to the network, this allows you to use additional capabilities of the technology. A network printer connects to a local group to quickly communicate with other users and perform consistent work. When printing pages from the Internet, you must use one of the following options:
- When you go to a website page, select the print version; usually this button is located on the page itself. After this, the file will open for printing.
- If this button is not there, you can try to take a screenshot of the screen, but in this case, advertising records will be saved along with useful information.
- Another example is using the copy function. Copy all or part of the text. After this, transfer the data to format and customize the resulting display on paper.
After selecting one of the options, connect the device to a power source and start printing the document. When working in a local group using network access, you need to check the system settings. From the “devices and printers” menu item, select the equipment to which the file will be output for printing.
Important ! When connecting multiple devices to one printer, you must turn on the main computer, which is the server for transmitting information.
PDF. The process of printing files in PDF format is practically no different from the classic method. You need to follow the steps described above to connect the equipment, then go to the settings:
- Click the appropriate button to send the file for printing.
- Select a work option: all pages, current or selected sheets.
- After this, configure the necessary parameters for location and size. Create the required number of copies.
- Start the printer and wait for the result.
Photo. There shouldn't be any difficulties with printing photos either. If you want to print an image, make sure you have color ink or toner, depending on your printer model. After that, select the file you are interested in and send it to the print queue.
You can also carry out this action using a regular text editor. To do this, copy the image, paste it into the editor field, change the size and location on the page. After that, start printing. To get high-quality photographs, use special photo paper for this purpose.
How to print on both sides. Sometimes you need to print documents so that both sides of the paper are used. This is necessary when creating postcards or simply to save materials. Most modern models have a two-sided printing function, but even if it is absent, this printing method can be carried out. To do this, use the step-by-step instructions:
- Go to the desired file that needs to be printed. Click on the "print" button, usually located in the upper left corner of the screen. Click on the options and from the proposed list, select the option of duplex printing (with a flip to the right or left edge of the sheet). Then load paper correctly into the feed slot.
- If this option is not available, set the page selection parameters to “1” to print odd-numbered pages first. Then load the sheets into the blank side fill compartment. Enter the page value “2”, this will fill the second half of the pages. After this, parse the finished document in the correct sequence.
- If the document is small, you can make a manual duplex printout. To do this, load one sheet of paper into the paper feed slot, then press the button. After an imprint appears on one side, turn the sheet over to fill in the second part. So make a printout of the entire document.
Important! Different models have features when applying a print, so the correct position of the paper can only be learned through experience.
How to print from your phone. Modern technologies never cease to amaze users. Nowadays, thanks to the use of advanced developments, almost any work can be completed in a short time. One of the important functions is printing documents or photos from the phone's memory. There are several ways to do this:
- The easiest way is to connect your phone using a USB data cable.
- If your devices support Wi-Fi, you can use this option.
- You can also download the necessary files from cloud storage.
After entering the data into the PC memory, you can begin editing documents. When the final look is ready, simply submit the file for rendering.
Why the printer does not print: searching for problems with the device
Do you need to urgently print a document from your computer, but the printer does not respond and refuses you or displays information on paper incorrectly? Perhaps the device has run out of paint, or it is completely disconnected from the desktop PC. Let's figure out what the problem is.
- If the device does not print after successful print settings on the PC, and does not give any signals at all, it is most likely due to incorrect settings. Check the reliability of all wired connections, check the software, replace or update drivers.
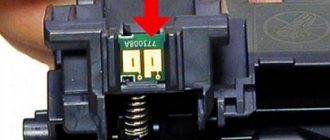
- Lack of ink in cartridges. You can understand this if a message is displayed on the printer or computer screen from the printing program, which clearly indicates that the ink cartridges are low. Refill or replace the cartridges and do a test print to ensure that excess ink remains on the draft.
- There is a problem with the print head or it is dirty. If all the sheets are printed with streaks or the text is not visible at all, and you clearly know that you recently changed the ink in the device, this is usually the reason. You need to go to print settings and clean the print head.
Recommendations
Working with the printer is not difficult even for beginners. Read the instructions to become familiar with the operating principle and operating features of the equipment. It will also be useful to use some tips:
- Once a month, conduct a complete inspection and diagnostics of the equipment in order to identify deficiencies and eliminate them if possible.
- Find out about new developments and gather information about technology capabilities to improve print quality and productivity.
- Periodically clean your equipment from accumulated debris, dust, ink residues and crumpled paper.
- Do not use the device with computers and removable media without an antivirus.
- Keep your software and drivers up to date.
- To maintain the warranty, do not repair or replace parts yourself; contact a service center for help.
Subscribe to our Social networks
Solving problems using the example of the Epson Stylus TX210/219 printer
Let's start with the simplest thing - checking drivers.
| Illustration | Description of action |
| We go to Device Manager on your computer, find the “Printers” item, open the device that is displayed there. | |
| In the window that opens there should be an entry “The device is working normally” if there are no problems with the software. If you see a yellow triangle with an exclamation point, try updating your current driver. |
Let's move on. Let's start cleaning the print head. Here you need to use the software that is installed on your PC when you connect the printer.
| Illustration | Description of action |
| We go into our printer via PC. We move to the “Printer Settings Wizard” and go to the “Service” tab. Here we press the “Print head cleaning” button and follow the instructions in the software. |
Replacing ink if there is insufficient ink for color or black and white printing is also done through the settings window.
| Illustration | Description of action |
| Go to the settings window again, where we click the “Replace ink cartridges” button. | |
| A window opens in front of you, in which you must follow the instructions to open the compartment with installed cartridges. After replacing them, be sure to click the “Finish” button to install the resource in its place. |
In addition, the problem of malfunction of any printer model can be caused by the hardware of the device. It is not recommended to disassemble the device yourself unless you are a master in this matter. There are many small parts inside the printing equipment that require delicate work, so it is better to entrust the matter to specialists.
Dear readers, leave your questions in the comments below the article. Our team is happy to receive feedback, so we will answer you as soon as possible and advise you on any thematic issue.