Disassembling and repairing the plug
A faulty plug is detected by kneading the incoming wire with your fingers. The headphones are connected to a mobile phone or computer, play a music file, and then begin diagnostics.
Typically, copper strands break at the entrance to the rubber or plastic casing of the plug and inside it. If, while kneading the cable, sound appears in the speakers from time to time, it means that the plug needs to be disassembled and repaired.
Recommendations: How to fix headphones yourself if one stops working
, The earphone does not work: fault diagnosis, repair methods
, DIY headphone repair
The plug restoration procedure consists of the following steps:
The plug is cut off with pliers from the headphone cable.
The purpose of the repair is to remove the metal part from the casing. The element is firmly soldered. Trying to save the old casing is unwise. It's easier to cut it lengthwise with a sharp knife.
The metal part of the plug is carefully removed from the casing so that the contacts do not break off. Soldered wires should also be saved. The color of the insulation makes it clearer where to solder the wires of the headphone cable.
In the event of a break in the wires from the contacts on the solder itself, the standard circuit shown in the photo is used for connection. The color of the insulation in the headset cable varies from manufacturer to manufacturer. Most often, the common core is in black or yellow insulation. To be sure, it is better to ring the tester from the speakers to the place where the cable is cut.
The headphones can be equipped with a microphone. In such models, instead of three, four wires are hidden under the cable braid. The connection occurs according to a different scheme, shown in the photo.
The cable cut off from the plug is stripped. First, remove the main braid and free the ends of the cores. The edges of thin wires are cleaned with a sharp knife. It is enough to remove 5 mm of the insulation length so that it is enough to solder the copper core to the plug contact.
The wires are twisted from thin veins, and they are all coated with a protective varnish. This coating prevents soldering. The varnish is removed by scraping with a knife or burned with fire from a lighter. The ends of pure copper wires must be tinned. The common wire will be connected at one contact, so it is immediately soldered together.
A new housing for the plug is made from the bottom cap of a ballpoint pen. The wire is inserted through the hole for the writing rod. The put on cap is moved along the cable further from the soldering point.
Following the cap, a piece of heat-shrinkable tubing is placed on the wire. The sleeve will protect the wire near the new plug casing from breaking.
The cable cores are soldered to the plug contacts. It is important not to forget about matching the wires to the color of the insulation. Functionality is checked by calling a tester. It’s easier to plug the plug into the connector of your mobile phone or computer.
If both headphones work normally, put heat-shrink tubing on the plug contacts. It is heated with the fire of a lighter. The tube will fit tightly around the plug contacts. To be safe, you can press it with your fingers while the plastic is hot.
Finally, the inside of the cap is lubricated with epoxy resin. A little glue is applied to the heat shrink tube. The cap is moved along the cable until the back of the plug is completely inserted into it up to the limiter. After a day, the resin will harden and the headphones can be used.
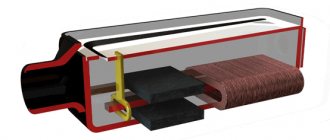
Disassembling vacuum headphones
The wire can break not only at the plug, but also near the speaker. To get to this part in vacuum headphones, perform the following steps:
A seam is found on the headphone body. They try to make a cut on it with a sharp knife. The body is lightly pressed with pliers so that the seam opens.
When the case falls apart into two parts, the back of the speaker with contacts will appear on view. Use a soldering iron to solder the damaged wires, but first mark the color of the insulation with a marker so as not to mix up the wires.
The damaged piece is cut off from the common headset cable. The conductors of a working wire are stripped, after which they are soldered to the speaker contacts, observing the insulation color markings.
The operation of the vacuum headset is checked by connecting it to the connector of a phone or computer. If uninterrupted high-quality sound comes from the speakers, the halves of the headphone housing are glued together.
Review: how to disassemble earbud headphones
Headphones can last a long time if you treat them well. But over time, any wires wear out and the contact comes off. Sometimes it can be so difficult to part with your favorite headphones that it’s easier to fix them and use them for some time. You need to be extremely careful when repairing headphones. Because one wrong move and the repair will be inappropriate.
You can disassemble the earbuds using tweezers.
You can repair headphones by disassembling them, but during disassembly you can also damage the membrane and capsule.
If cheap headphones break, it is almost impossible to take them apart because they are glued tightly together. To open a non-working earphone, you will need a scalpel or a sharp knife, which is used to pry up half of the case. After the halves open. You can clean the headphone housing.
How to open the headphones:
- Open in circles using sharp instruments.
- To separate the two halves, you need to make an effort, but so as not to break the body.
- There is no need to cut through the headphones to a great depth; half or one millimeter is enough.
- All actions must be performed carefully so as not to damage the headphone membrane.
Not all headphones can be repaired. For example, if a speaker is broken, it is likely that it cannot be repaired even by a service center. Many people face a problem when their iPhone headphones break. Before purchasing equipment, it is important to pay attention to the warranty from the manufacturer. Headphones that don't break are rare. To repair headphones at home, it is imperative to use a soldering iron, otherwise the entire repair will go down the drain.
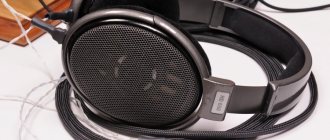
Disassembly and repair of large headphones
The speakers in large headphones are hidden inside the case, the disassembly of which is complicated by hidden screws and latches. If all the fasteners are not identified, the plastic elements of the headset will simply break from the applied manual effort. The methods for disassembling headphones from different manufacturers differ. For example, consider several popular models:
Disassembling the Sennheiser HD203 headset begins with removing the ear pads. The soft pads are held in place by snaps that can be easily removed with a plastic card.
There are four screws under the soft pads. They are unscrewed with a screwdriver.
The body halves are not glued together. After unscrewing the screws, the elements can easily be separated into two parts. There are speakers attached to the front panel, to the contacts of which a new wire will have to be soldered.
The manufacturer of the Steelseries Siberia headset glues the soft overlays. The ear pads are separated from the body with a screwdriver or knife. The housing halves are fastened in different models using screws or latches. In the second option, disassembly is not complete without breaking off the locks. The assembly of the case with broken latches is carried out using glue. In the future, it will not be possible to disassemble a tightly glued earphone.
Things are simpler with the soft pads in the Razer Kraken headphones. The ear pads are simply put on without being fixed with glue or latches. After removing the covers, a paper sticker becomes visible. Four screws are hidden under it.
Philips and Audio-Technica headphones have similarly unsecured ear pads. The pads are simply placed on the rim of the cup.
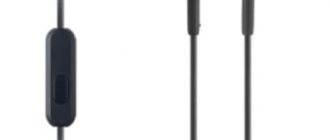
Disassembling the microphone housing with volume control
Headphones for computers are produced with a volume control and a microphone. The mobile phone headset is equipped with a call on/off button. All these elements are hidden in a small plastic case attached to a cord. To get to these elements you will have to perform similar actions that are used when disassembling vacuum headphones. The body is glued together, and it can only be separated into two halves by cutting it with a knife.
A malfunction of the volume control is determined by crackling sounds in the speakers and poor sound. The problem lies in the variable resistor. The part consists of a slider that moves along a resistive layer. You can extend the life of the resistor with graphite lubricant. Using a cotton swab, apply the paste to the resistive layer.
A microphone problem is identified by the deterioration in audibility experienced by the subscriber with whom the conversation is taking place. The reason often lies in clogging. The microphone is wiped with cotton wool or gauze soaked in alcohol. After repairing the resistor and microphone, the two halves of the housing are glued together.
Disassembling headphones of any brand is not difficult. The main thing is to be careful. Broken plastic parts cannot be repaired.
Thematic materials: Independent production of simple headphones and a headset with a microphone
, If water gets on the headphones or inside the mobile phone jack
How to properly set up a headphone microphone on a Windows computer
How to properly warm up your headphones and whether you need to do it
How to solder a headphone plug
, How to connect broken headphone wires
How to improve sound quality in headphones
, No sound in headphones
, Headphone pinout
How to fix a headphone wire with a microphone?
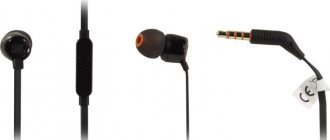
The headset has no fundamental differences from the standard system. The only difference in the plug is 3 contacts as in regular headphones and a 4th for the microphone. 4-pin Jack 3.5mm has two standards:
M- and M+ are microphone contacts. The other three: G - ground, R - right, L - left. These are standard colors used by manufacturers to differentiate wires.
Proceed according to the scheme described in the second section of the article. You can use a candle or lighter to remove insulation from wires. High temperatures will melt the plastic sheathing and protective varnish.
Not everyone has a soldering iron these days. But almost everyone has headphones, and even more than one. And as everyone knows, any headphones tend to die... And as always, at the wrong time. So today we will get out and you will learn how to fix headphones without a soldering iron. tools you need are a knife, a lighter and tape.