The prices for the services of an air conditioner installation technician are close to the cost of the equipment, so many people prefer to do it on their own. To perform technical work, you need to know how to install an air conditioner yourself in an apartment or office. The procedure is not complicated, but it requires care and attention.
Before installing the split system, check:
- Electrical wiring. If the house has old cables, aluminum wires, or no grounding, you cannot install an air conditioner. The power of electrical plugs is also important. They must withstand the current specified in the equipment passport + a small margin.
- The outer part of the walls. The method of fastening and the depth to which the brackets can be installed depend on the building material.
- Availability of socket. It should be no higher than 50 cm from the level of the floor, radiators, and various pipes.
If non-compliances with standards are identified, they must be eliminated before installing and connecting the equipment. Otherwise, the wiring will burn out or the equipment will not last long.
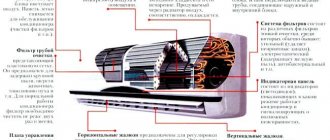
Standard equipment
After purchasing an air conditioner, the consumer receives:
- 2 blocks – indoor and outdoor;
- Filters;
- Remote control (batteries not included);
- Copper tube (the availability of such a part depends on the manufacturer, since not everyone includes it in the kit);
- Drainage pump (in expensive models);
- Warranty card and registration certificate.
The absence of elements necessary for installation of a split system is explained by the fact that the conditions for installation are different and differ significantly. It is impossible to provide for the length of the cable, drainage pipe, the entire route, as well as the installation location and method of fastening.
Some companies additionally equip systems with devices for operation in winter. This:
- Oil heater. It prevents the liquid from thickening and thereby ensures reliable lubrication of the engine. Otherwise, oil will not flow into the compressor and it will run dry. This situation leads to rapid wear of split systems and a decrease in the efficiency of equipment.
- Heater for drainage tube. It heats up the condensate, preventing it from freezing and blocking the hose.
- Regulating device for controlling condensate pressure. With its help, the operation of the fan is controlled and the outdoor unit is not covered with a crust of ice.
A winter kit is purchased if you plan to use the equipment all year round.
Installation materials and tools
To install a split system yourself you will need:
- 4-core cable with a diameter of 2 – 2.5 mm² (the exact parameter is indicated in the equipment passport);
- L-shaped brackets for installing the outdoor unit. Their load-bearing capacity should be 4 to 5 times the weight of the outer housing of the air conditioner. Before properly installing an air conditioner in an apartment, calculate the safety margin. This is necessary for reliable fastening in difficult weather conditions - snow, gusts of wind, icing. The dimensions of the brackets must correspond to the dimensions of the outdoor unit.
- Seamless copper tubes with thick walls (if they are not included in the factory configuration). Diameter in 2 options – larger and smaller. To install the air conditioner, choose special soft copper that can be easily flared. This material is used in the refrigeration industry. The length of the pipes corresponds to the length of the route + 30 cm. To prevent dust from getting inside the pipes, they are transported with capped edges.
- Rubber insulation for copper pipes. The length of the segments is equal to the length of the route. For each diameter of copper pipes, select a separate insulation material.
- Corrugated hose with an internal plastic spiral. This consumable is used as a drainage pipe. Sometimes a propylene pipe is installed instead. The length of the drainage tube is 80 cm longer than the length of the route.
- Plastic box for communications.
- Dowels, bolts, anchors. The quantity and dimensions depend on the type of walls and brackets.
In addition, to install the air conditioner yourself, stock up on a hammer drill, pipe cutters, flaring tools, and a drill.
Note! For the outdoor unit of the split system, buy a visor. It will protect the case from snow, rain, dust and other debris. Installing a canopy will extend the life of the air conditioner.
For residents of the first and second floors, it is recommended to install an anti-vandal casing.
If the tank is installed above the drain pipe, a pump will not be required, since the condensate will drain naturally. In another situation, you will have to buy a drainage pump that will pump the resulting liquid.
Tools for installing the air conditioner yourself
It is not advisable to purchase tools for one installation of an air conditioner yourself, since you will need not only general construction and plumbing equipment, but also special equipment. It’s good if the farm already has it or it can be borrowed or rented.
So, an approximate list of what may be needed when installing an air conditioner.
Building tools:
- perforator;
- drills, augers (Ø 45–65 mm, length at least 0.5 m) and drills (for metal and concrete);
- screwdriver;
- construction level;
- roulette.
Technological tools:
- example - for deburring a copper tube before flaring;
- device for flaring copper pipes;
- pipe bender;
- pipe cutter;
- vacuum gauge - measurements when evacuating the refrigerant route;
- vacuum pump - for evacuating the refrigerant route;
- if the route is long and refrigerant refilling is required, hoses for monitoring and filling, and a filling cylinder are needed.
Locksmith tools:
- screwdrivers: Phillips and slotted;
- hammer;
- hex wrench;
- adjustable wrench;
- torque wrench;
- pliers;
- knife.
Materials required for installation: screws, dowels, thermal insulation and electrical insulation tape, protective decorative electrical wiring boxes and refrigerant lines.
If work will be carried out at height, safety equipment and experience working at height will be required.
Selecting a mounting location for the indoor unit
Before choosing a location for installing the split system, keep in mind that the electrical cable should only be installed horizontally or vertically. In the first option, keep the distances to the cornice - 5 - 10 cm, to the ceiling 15 cm, to the baseboard - 15 - 20 cm.
When choosing a location for installing a split system, take into account the data specified in the equipment passport and technical requirements.
Installation of the indoor unit is carried out based on the following parameters:
- The distance from the case to the ceiling should not be less than 15 cm; some companies recommend placing the unit 20 - 30 cm below the ceiling;
- There should be no more than 30 cm to the side wall;
- To the nearest obstacle in the path of the air flow – 1.5 m.
The outer housing of the split system is placed on the wall as close as possible to the window, on the balcony frame, if it can support the weight of the housing. In the second option for installing a split system, an additional safety margin is taken into account for snow, gusts of wind, and ice accumulation. If the housing is located on the ground floor, the external building is installed above the reach level.
For apartments located on the second floor and above, this arrangement is not necessary and the outer casing is mounted under the window or on the side. The main criterion in this case is the distance between the two blocks of the split system.
Note! When choosing a location for installing the external housing of the air conditioner, consider the ability of the wall/balcony frame to withstand the load. This point is especially important if the outer wall of the house is finished with tiles or insulation.
Manufacturers indicate the maximum distance between blocks. This is 1.5 - 3 m. If the technical documentation does not specify the distance between the split system housings, they can be installed back to back. This makes installation easier and reduces material costs.
Where to determine the outdoor unit
In fact, it is not the easiest task to choose a location for an outdoor unit. Not all buildings allow them to be placed on the walls. In this case, there are only two options: install the outdoor unit of the split system in a specially designated place - the air conditioner. If there is no such room, only a balcony or loggia remains. In such buildings they are usually glazed, so the placement of the block does not affect the appearance.
But in this case, it is necessary to provide a system for cooling the equipment and removing exhaust air. If the balcony is spacious enough, open the windows for ventilation or provide access to fresh air in some other way for the entire time it is open. The solution is simple and straightforward, but it leads to overheating of the equipment, and this is fraught with breakdowns and frequent replacement of the damaged outdoor unit.
Installation on the balcony is sometimes the only way out
Installing fans for more active air exchange can improve the situation a little. It is correct to fence off a small room, make it effective ventilation, separate ventilation ducts for air removal and supply. Moreover, they must be separate. This is done using air ducts that lead out instead of part of the glazing. In general, in this case, installing an air conditioner with your own hands is a problematic task precisely in terms of ensuring normal operating conditions for the equipment.
On the balcony or loggia
If there are no prohibitions on placing foreign devices on the walls of the building, usually the outdoor unit of the air conditioner is hung on the balcony railing (on the side or front) or on the wall, but so that it can be reached for maintenance - wash, clean, check, repair.
If the balcony is glazed, there should be an opening window sash above it. Otherwise it will be very difficult to maintain it. To protect against precipitation and objects that may fall from the window, a canopy is placed above the block. The choice of materials is something similar to finishing a balcony or a white plastic canopy, but full-bodied. It is better not to use hollow and metal ones (including corrugated sheets and metal tiles), since during rain they turn into a drum, and during hail they can generally deafen.
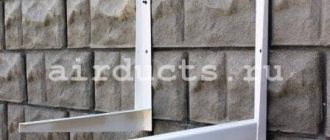
Standard methods for installing an outdoor split system unit on a balcony
If the block is placed on a loggia, of all the above options, only the one in the picture on the right remains. It is inconvenient to place it next to the wall, except perhaps under the window, but this already belongs to another section.
One more point: how to run the route - along the ceiling or along the floor? You will have to ditch in both cases, but in the case of the floor, it is possible that you will make it from boards, then the pipes and cables connecting the external and internal units can be laid on the surface, but better - in a box.
Under or next to the window
In those rooms where there is no balcony or loggia, the outer part of the split system is hung on the wall from the outside. It is more convenient if it is located under the window or to the side of it. Moreover, under or next to the opening part. In this case, service is possible without calling a climber.
The outdoor unit of the air conditioner can be installed under or next to the window
When installing the outdoor air conditioner unit with your own hands on the wall next to the window, consider the height of its installation. You can position the top surface of the block flush with the top edge of the window. In this case, leaning out of the window and securing yourself, you can carry out work while standing on the windowsill. The second option is to align the lower edge flush with the lower edge of the window opening. Here you can lie on your stomach on the windowsill, but you won’t be able to reach the exit point of the pipes. That is, you will still have to call industrial climbers.
Requirements for installation of the indoor unit
Before installing the unit indoors, check the location of hidden wiring and pipes. After choosing a safe location, taking into account the parameters specified by the manufacturer, mark the installation of fasteners. Check the location of the load-bearing elements with a level. They must be installed strictly horizontally.
When installing the indoor unit, pay attention to the bottom of the plate, as there are latches on it. They hold the body, so the fastening of this part must be rigid, without play.
How to install a split system yourself
There is nothing super complicated about installing a split system yourself, but there are a lot of nuances that can affect the durability and quality of operation of the equipment. First of all, before starting work, you should carefully read the installation and operating instructions that come with the equipment. You will compensate for the time spent by knowing exactly what and how to do with your air conditioner, because there are some nuances.
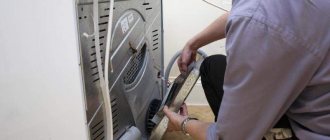
Do-it-yourself installation of air conditioner units
Before you begin installing air conditioner units with your own hands, you should look for hidden wiring or heating pipes in the intended installation location. Getting caught in them while working is very no fun. Next comes the actual installation of the air conditioner yourself. You need to start with installing the indoor unit. At the selected location we place a plate for its fastening. The block must hang strictly horizontally without the slightest deviation. Therefore, we approach marking and fastening carefully.
We apply the plate, level it, and mark the places for fastening. We drill holes, insert plastic plugs under the dowels, hang the plate and secure it with dowels. We especially carefully fasten the lower part of the plate - there are latches that hold the block, so they must be firmly fixed. No backlash. Then we check the horizontality again.
Having estimated where the route will be located (it must slope at least 1 cm per meter for normal drainage installation), we begin to drill a hole in the outer wall. We also drill the hole with a slope - again, so that condensation drains normally (the angle can be greater than that of the route).
The minimum diameter of the hole is 5 cm. If there is no drill of this size, you can make several holes of a smaller diameter, bringing out not a common bundle of communications, but each tube/cable separately. In any case, it is better to drill two holes - one for the copper and electrical cable, the second for the drainage pipe. It must be laid lower than the others so that it does not leak into communications in an emergency.
Then we install the brackets for the outdoor unit. If we are talking about a high-rise building, you will need climbing equipment and skills to work at heights. This block must also hang strictly horizontally, so when marking the holes we also use a level. When installing brackets, we install fasteners in each hole, no matter how many there are - this is a prerequisite. Standard fasteners are 10*100 mm anchors. More is possible, less is highly undesirable.
After the brackets are secured, the outdoor unit is installed. We also attach the block to all the fastenings that are available. This is the only way to guarantee that it will remain in place under any conditions.
Do-it-yourself installation of air conditioner communications
Do-it-yourself installation of air conditioner communications requires special attention. The two blocks are connected by an electrical wire and two copper tubes. There is also a drainage pipe leading through the wall. All these communications must be correctly selected, connected, laid and secured.
Do-it-yourself installation of copper air conditioner pipes
We start by installing copper air conditioner pipes with our own hands. One is larger in diameter, the other is smaller. The dimensions are indicated in the instructions for the air conditioner. We cut off a piece of the required length with a pipe cutter, remove burrs from the edges with a special tool, straightening and leveling the cut. It is undesirable to use a regular saw, as well as a file to remove burrs - there will definitely be sawdust inside the pipe, which will get into the system and quickly destroy the compressor.
Heat-insulating tubes are placed on the prepared pipes. Moreover, the thermal insulation must be continuous and extend inside the wall as well. The joints of pieces of thermal insulation must be glued with metallized tape, ensuring a very tight fit of the edges. The quality of thermal insulation is important, since condensation will form on uninsulated sections of the pipes, and it can drain inside the wall, causing frozen streaks, destroying the wall.
Installation procedure
Before installation, carefully read the manufacturer's instructions. Make markings on the walls or balcony frame to install the blocks, taking into account safety standards and technical conditions. First install the inner and then the outer casing of the split system. Think over the route, places for attaching cables. With both cases secured and cables connected, check the system's operation. If there are no leaks, the units are securely fastened, you can use the air conditioner.
Installation of the indoor unit
Installation of the indoor unit is carried out according to the following algorithm:
- Using a drill, make holes for the dowel plugs;
- Insert them into the slots;
- Install the plate that will hold the inner housing of the air conditioner;
- Secure it with dowels;
- Check the correct position using a level;
- Pay attention to the fastening - it should be rigid, without gaps;
- Plan the route based on a slope for communications of 1 cm per meter of length (this installation allows for normal drainage).
Preparation of communication channels
Before installing an air conditioner, study the operating instructions for the equipment yourself. For safe operation of the system, pay attention to the rules for working with electrical cables. Do not twist electrical wires or connect different materials together - copper does not connect to aluminum. With an external connection type, the cable is closed with a box. The wire is fixed with special clamps every 50–60 cm.
For internal wiring, make a small recess of the specified length. The cables are laid in a corrugated pipe secured with plastic clamps.
The interconnect cable is selected 4 - 5 cores, with a cross section of 2.5 mm². When laying pipes outside, fix the cable on the wall every 30–40 cm. After installation, it is covered with a protective box. Secure it to the wall with special glue or screws.
Air conditioner installation instructions
If the tools have been purchased, the air conditioner has been delivered and unpacked, you can get to work. The outdoor unit is installed first, and then the system is installed indoors. During the installation process, we must not forget about safety precautions, especially if the work is carried out at the level of the second floor and above.
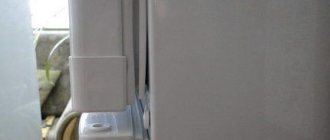
Mounting the outdoor unit
Installation of the outdoor unit
Choosing a location for installing an air conditioner
When installing an air conditioner in a private house, there are no particular difficulties in placing the outdoor unit, but in an apartment building, the location must be chosen very carefully. The unit body should not block the view of neighbors, and condensation should not flow down the wall of the house. In this case, the air conditioner should be mounted within reach from the balcony, since such equipment requires periodic maintenance.
Drilling
It is best if the block is fixed on the east or north side of the window or balcony, and preferably in its lower part. This way it won’t disturb anyone, and you can easily reach it through an open window. Using a level, mark the mounting locations for the brackets and drill holes in the wall for the anchor bolts. To lay interconnect communications, a through hole with a diameter of 80 mm is drilled. In a brick wall, it is recommended to drill along the seam between the bricks - this will take less time and the hole will be more accurate.
Installation of brackets
The brackets are installed according to the markings, aligned and the bolts are securely tightened. The outdoor unit itself is fixed so that at least 10 cm remains between the radiator and the wall surface. The connection is made a little later, and then the resulting gaps are sealed. If the block is securely attached to a vertical surface, you can proceed to the next step.
Installation of the outdoor unit
Installation of the indoor unit
The indoor unit must not be mounted behind curtains, above a battery, or in rooms with sources of electrical interference that could cause damage to the block processor. After choosing a location, be sure to check the wall for the absence of already laid communications - electrical wiring, water or heating pipes.
Installation of the indoor unit
Installation of the indoor unit How to attach the indoor unit panel
A mounting plate is attached to the installation location of the indoor unit
Installation of the indoor unit
If the area is free, attach a mounting plate: step back 10 cm from the ceiling, 5 cm from the corner of the wall and mark a horizontal line with a pencil. Drill holes for fasteners and securely screw the plate. The indoor unit of the air conditioner is mounted on the plate, after which a hole is drilled in the side wall for a communication connection - electrical wiring, pipes, hoses for condensate drainage.
Connecting electrical wiring
For the unit, they lay their own wiring indoors, the minimum cross-section of which is 1.5 square meters. mm. Be sure to install an automatic shutdown. When the wiring is laid, it is connected to the input panel: a yellow wire with a green stripe is connected to the neutral wire. To determine zero and phase, you should use an indicator.
After this, insulated stranded wires connect the terminals of both blocks, passing them through a hole in the wall. The names of the terminals must match the wires; the entire connection diagram is clearly described in the instructions supplied with the air conditioner.
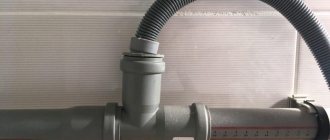
Pipe laying
Copper tubes must be cut, leaving a margin of about a meter for bends. When bending tubes, special tools are used to avoid wrinkles, dents and cracking of the metal. The prepared tubes are covered with thermal insulation - polyurethane foam hoses. Foam rubber is not suitable as a sealant, as it has a short service life.
Rolling for copper pipes
Threaded flanges are placed on insulated pipes, and the thread should be located at the end of the tube. The next stage is tube flaring. Flaring must be carried out very carefully so that cracks and grooves do not form on the tubes. The nut should fit easily onto the flared joint, and it is better to tighten it with a torque wrench - this will prevent the flared joints from being squeezed out of the nut.
The pipelines are alternately attached to the corresponding fittings, which are difficult to confuse due to different diameters. The flanges are screwed onto the fittings so that the connection is tight, but not pinched, otherwise there is a risk of damaging the tube. Finally, a piece of plastic tube with a reinforced body is connected to the drain pipe. Fastening is carried out with a piece of heat-shrinkable tubing or a threaded flange, if included in the kit. The drainage pipe should be taken away from the load-bearing wall as far as possible.
Pipe laying
Now the pipes are inserted into the hole, aligned, and secured from the outside tightly to the wall with clamps. The wiring cable is fixed nearby and the pipeline is connected to the external unit. The hole is blown out with polyurethane foam or filled with silicone. All external connections are checked for leaks using a bicycle pump and soap solution. If air is leaking somewhere, tighten the thread more tightly. After checking, the soap deposits are wiped off the threads with a clean cloth.
Wiring
Connecting wires to the outdoor unit of the air conditioner
Connecting wires to the outdoor unit of the air conditioner
Evacuating the system
Evacuating the system makes it possible to remove the smallest particles of dust and moisture. This process is carried out after sealing the threaded connections, otherwise it will not be possible to completely pump out the air. To do this, connect a vacuum pump to the system and pump out the air for an hour.
Evacuation of the air conditioner
Filling and testing the air conditioner
Connection diagram for vacuuming and refilling the air conditioner
It is very important to follow the basic rules for using an air conditioner.
The refrigerant from the cylinder must be pumped into the system. An adapter and a pressure gauge are connected to the cylinder, and then, strictly monitoring the pressure, the tank is filled. When the process is completed, the circuit breaker on the air conditioner is turned on, after which the system independently enters test mode. If everything works smoothly and the circulation of cold air becomes uniform, you can close the hole in the wall, remove the consequences of installation and enjoy the coolness.
Find out how to clean the air conditioner yourself, and also read the step-by-step guide from our new article.
Prices for the range of air conditioners
Air conditioners