How to change the membrane in a gas water heater: choose and install it yourself
The efficient operation of the water heater depends on the serviceability of all components and mechanisms. The membrane in the geyser is one of the important parts, but it wears out over time. How to do the replacement yourself? For this we have a detailed work plan.
Membrane functions, causes of malfunction
An elastic membrane is located at the base of the water unit and reacts to pressure changes in the system. As soon as you open the faucet, the rubber element bends under pressure and pushes out the stem. The rod in turn actuates the gas valve. This is how the fuel enters the burner.
With intensive use of the “Vector”, “Neva”, “Oasis” columns, the membrane wears out. Rubber stretches, becomes clogged and damaged. As a result, fuel does not enter the burner: the column does not ignite or ignites, but immediately goes out.
Signs of breakdown
How do you know when it's time to change the rubber diaphragm? You need to pay attention to:
- The pressure force of gas and water in the system. Open the tap and count how many liters are consumed per minute. Normally there should be at least two to three liters. The gas supply can be calculated visually by looking at the strength of the fire.
- Flame location. In devices with wick ignition, the fire should burn from the edge of the burner and be at least 3-5 centimeters high. Does not match? Then check the jets for blockages. After cleaning, look at the flame again. If the situation does not change, the problem is in the diaphragm.
- Equipment with piezo ignition should click when the button is pressed. This means that the diaphragm has worked. If you do not hear any sounds, the part may be damaged or torn.
- In some models, a rod that controls the operation of the control unit will help determine the breakdown. Remove the protective cover and open the water. If the rod does not move, the diaphragm needs to be replaced.
Once you have found the breakdown, you need to select the correct replacement part.
How to choose a new part
For each column (Termet, Ariston, Beretta), the membrane is selected individually. For foreign models, it is most difficult to find a replacement, since the product can only be purchased from an official supplier. In this case, you have a choice: spend money on a new element or buy a new speaker.
With domestic technology everything is simpler. Replacements can be found in stores or ordered online.
Experts recommend choosing a silicone diaphragm. It is more elastic and durable.
If you think that the principle of construction of all membranes is the same, this is not so. For example, in Ariston water heaters special elements are installed - “eights”. They are made of dense rubber and have a special shape. Their cost ranges from 300 to 500 rubles.
The membrane in Electrolux devices works according to the figure-eight principle. But its price is much lower - from 200 rubles.
The easiest membrane to operate and replace is “Neva” and “Astra”.
There are also universal options, but they are only suitable for temporary installation. It is impossible to fine-tune equipment without factory parts.
DIY repair
For repairs, you will need to disassemble the entire water-gas unit. You will need:
- slotted and Phillips screwdriver;
- wrenches 19 and 24;
- repair kit;
- new part.
First of all, turn off the water and gas supplies. After this, open the tap in the bathroom and drain the remaining water.
- Remove the regulators from the housing by pulling them towards you.
- If you have a display, disconnect the wiring leading to it.
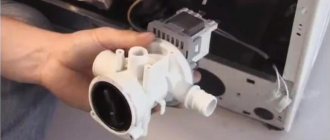
- Now you need to remove the casing. In some models it is fastened with bolts at the top and bottom, in others it “sits” on latches. Pull the facing towards you and up.
A water node will open in front of you. In earlier models it is located separately, vertically. A gas block is installed on top, a water supply is organized on the left, and a heat exchanger on the right.
To dismantle such an element:
- Unscrew the two nuts on the water pipes. Use the key for 24.
- Unscrew the two mounting screws, pull down and remove.
In the latest models, the water unit is placed horizontally. There is a special tap at the bottom through which the remaining water is drained.
- Unscrew the fastening nuts with a 19mm wrench.
- Disconnect the supply sensors.
- Remove the bolts that secure the block to the base.
- Remove the burner.
- Unscrew the fasteners of the water-gas unit with the manifold.
You can start disassembling. In the old Astra and Neva variations, you need to unscrew eight bolts to separate the assembly. In modern models “Neva” 4513, 4511, 4510, “Oasis”, “Vector” only four screws hold it.
If the fasteners are rusty and stuck, spray them with WD-40.
All that remains is to remove the worn membrane and install a new one.
Reassemble in reverse order. Upon completion of work, carry out an inspection. Gradually opening the water supply, inspect all connections for leaks. Then open the tap fully. Everything is fine? Put on the casing, supply fuel - enjoy hot water to your heart's content.
In the video they change the aperture for some models:
How to replace a geyser membrane: reasons + instructions for repairs
Domestic water heaters - gas water heaters are used in old high-rise buildings and private houses to prepare sanitary water. Their parts and components tend to wear out just like any other equipment. Most often, the membrane of the water reducer fails, which you can change yourself.
We will tell you how to replace the membrane of a geyser. The article we have proposed describes in detail the steps to prepare for replacing the membrane and provides recommendations for its selection. Taking into account our advice, you will be able to monitor the operation of the gas heater or restore the functionality of the water heater yourself.
About the reducer and the location of the membrane
A device called a water reducer is part of almost any design of gas heat exchangers.
This part may have different configurations depending on the model of the water heating apparatus, but the principle of operation of such devices remains unchanged.
A water reducer installed on a gas water heater serves to stablely maintain water pressure directly in the water heater heat exchanger system. Due to the uniformity of pressure, a uniform flow is ensured, which means the same uniform heating of the liquid.
A part of the gearbox that facilitates smooth pressure regulation is a rubber membrane. This gear component, made in the form of a gasket, usually based on technical rubber, has the shape of a circle. It is installed inside the gearbox housing.
Due to the long-term operation of water heating equipment, being constantly in motion, the membrane gradually wears out. Wear of technical rubber in some places leads to tears in the material. Accordingly, the function of regulating water pressure stops operating according to the specified algorithm.
In such cases, it becomes inevitable to replace the rubber membrane of the reducer in the gas water heater, because the water heater does not work properly.
The quality of sanitary water heating decreases sharply, and in other cases the column simply cannot be put into operation. Comfort for the user is lost.
Reducer Diaphragm Replacement Steps
If we proceed from the rules for servicing gas equipment and strictly follow these rules, performing any installation, plumbing work, as well as work related to power supply is the prerogative of gas service providers, in particular, the local gas service company.
What do you need to know before starting work?
In other words, owners of gas water heaters are prohibited from carrying out work on gas equipment themselves. And even taking into account that the water reducer is theoretically not related to the gas system, disassembling this structural part and changing the membrane with your own hands is also prohibited.
Sometimes the desire to do everything yourself, without having practical experience in performing this kind of work, can result in disastrous consequences. As evidenced by the numerous accidents associated with household gas equipment.
However, premature wear of the membrane and other components of the water heater under pressure can be prevented by promptly cleaning the equipment with your own hands or by a gas service representative.
There are often craftsmen who are ready to independently change the gearbox membrane on a gas water heater. Moreover, it is, in fact, not at all difficult to perform such an operation if you have plumbing skills.
Do this easy job as follows:
- Using documentation or by opening the column housing and examining the internal contents, determine the brand (model) of the installed gearbox.
- Based on the technical information obtained, they purchase a new membrane on the market.
- If the equipment is imported, you may have to purchase the membrane only to order.
- If there is a membrane, shut off the gas supply to the equipment and close the cold water supply tap from the central heating system.
- Drain the contents of the gas heater heat exchanger using the service drain valve, the location of which is determined according to the documentation.
After these operations, you can begin dismantling the gearbox. However, there is no need to rush here. You need to work carefully and carefully so as not to damage other nearby parts of the gas water heater.
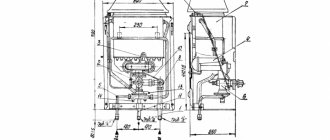
Gearbox removal and disassembly
The water pressure reducer has inlet and outlet pipes. Actually, thanks to threaded union connections, the device is mounted inside the gas system, directly on the water flow line.
Therefore, in order to dismantle the device, it is necessary to unscrew the two union brass nuts securing it to the pipeline. But before doing this work, it is recommended to unscrew one or both plugs on the gearbox drain outlets, which are located under the disc housing.
The nuts should be unscrewed smoothly, while simultaneously holding the device from possible rotation. The mechanism of the device has a regulator rod that is in contact with another part of the gas water heater. On some models, the rod head is secured with a screw. This point should be taken into account and, if necessary, loosen this screw.
Dismantling may be accompanied by residual water leakage. It is recommended to stock up on convenient, capacious containers for collection.
Brief instructions on replacing the membrane
The removed pressure regulator will need to be disassembled to get to the rubber (silicone) membrane. The disassembled part looks roughly like a plate.
- Unscrew the fastening screws on the top of the plate;
- carefully use a flat-head screwdriver to bifurcate the plate;
- remove the defective membrane;
- install a new one;
- articulate the halves of the plate;
- secure the joint with screws in a circle.
The correct location of the membrane on the gear plate is determined by a special “key” recess or pin, which, in turn, is located on the radial edge in the same row as the holes for the mounting bolts.
You need to align the membrane “key” with this notch before connecting the plate halves and screwing in the screws.
The moment of screwing in the mounting screws is a traditional action. However, you should keep in mind the uniformity of tightening of the gearbox parts. Technically competent tightening is performed using the “crosswise” method. That is, first, four screws located one opposite the other are tightened sequentially, and only then all the others are tightened.
The assembled gearbox, equipped with a new membrane, is installed in place in the reverse order. Carefully insert the rod inside the tube of the control device, align the device to the level of the water pipes. The nuts are then manually screwed onto adjacent sections of the pipe.
As a rule, pipe connections require the presence of sealing gaskets and their correct installation. This point must be taken into account when installing the gearbox at the installation site. Next, all that remains is to tighten the fastening nuts, applying a little force and do not forget to tighten the drain plugs under the plate.
Membrane shapes and materials
The design of geysers is varied. Accordingly, a change in the design of the pressure reducer cannot be ruled out. Therefore, the existence of reducing membranes of various shapes also seems to be an obvious phenomenon.
If a round-shaped product, which can often be found when disassembling the valves of domestic geysers, is considered standard, imported devices are often equipped with “exotic” ones.
One such example is the geysers of a well-known foreign company that produces household appliances under the Electrolux brand. Many models of equipment from this brand are equipped with figured membranes in the form of a “figure eight”.
The devices of the foreign company Vaillant are somewhat less popular compared to Electrolux, but they also stand out from the entire range of household geysers due to the non-standard production of gear membranes. When disassembling their valve, there is a chance of colliding with the flag membrane.
For the sake of objectivity, it should be noted: products of non-standard shape show finer regulation of flow pressure, however, in terms of long-term performance, they are often inferior to standard ones. Often the degree of durability is determined by the quality of the material.
In practice, it has been noted that silicone membranes last longer than rubber ones. However, for silicone, an important criterion is careful filtration of network water. Even a small amount of sand or rust that gets into the area where a silicone product is located will dramatically reduce the service life of the material.
Technical rubber is less sensitive to the effects of suspended particles, but for the most part “suffers” from insufficient chemical resistance. That is, if the composition of the water has an aggressive component to some extent, under these conditions, products made from technical rubber usually do not last long.
Repair of geyser membranes
The desire to save on everything forces some users to resort to such a virtual replacement technique as repairing a defective membrane with their own hands.
It should be noted right away: this activity may be interesting for a home handyman, but, from a service point of view, it is absolutely irrational and pointless.
They try to repair geyser membranes in different ways:
- by puttingty with silicone sealant;
- using various types of adhesives;
- application of pentelast;
- installation of miniature patches;
- and even masking tape.
The activity of such a “repaired” part lasts, as a rule, no more than 1-2 days. After which the problems begin again, and often worsen.
Repairing membrane plates of geysers, especially with your own hands, ends in failure in any case. Tested in practice more than once. So, it is not recommended to change the “awl for soap”, unless there is a purely research interest in this matter.
If it is not possible to restore the functionality of the wall-mounted water heater, you will have to buy a new gas water heater. The following article, which examines this current topic in detail, will introduce you to guidelines for choosing equipment.
Conclusions and useful video on the topic
The video demonstrates the personal experience of one of the heater owners - that is, do-it-yourself repair of the water pressure regulator. In particular, all repairs come down to replacing the membrane. We remind viewers once again: independent repair of gas systems is unacceptable!
It’s easier to find and buy a new membrane for a geyser, replace this accessory according to the instructions described above and sleep peacefully. Moreover, replacement, in most cases, does not require significant financial costs. On average, 200-300 rubles are enough to purchase a complete accessory.
Please leave comments, post photos related to the topic of the article and ask questions in the block below. Tell us about how you selected and changed the membrane in a gas water heater. Share useful information and technological nuances that will be useful to site visitors.
How to replace the membrane in a geyser with your own hands
- Content:
- How does a membrane in a column work? What is it responsible for? Types of membranes for columns
- Signs of a membrane failure in the column - how to check
Replacing the membrane in a gas water heater yourself will be easier if you understand how the water regulator works and what purpose it serves. There are general signs that indicate that the rubber diaphragm has failed and the assembly needs to be repaired.
How does a membrane in a column work? What is it responsible for?
The principle of operation of the membrane in a gas column is as follows:
The water regulator is a metal assembly with an empty cavity divided into two parts by a diaphragm.- The first compartment is necessary for filling with water. After opening the hot water tap, liquid flows into the connected part of the regulator. Pressure is created inside the assembly, bending the gasket.
- The membrane in the gas column presses on the rod located in the adjacent section of the regulator. A metal rod opens the gas valve and at the same time gives a signal to electrically ignite the burner (in automatic dispensers).
- After closing the hot water tap, the pressure drops. There is a spring on the metal rod that returns it to its original position. The gas supply is interrupted. The burner goes out.
The design of the membrane on the gas water heater may vary depending on the model of the water heater, but the basic principle of operation remains unchanged. Over time, the diaphragm wears out, becomes insufficiently elastic or breaks, which leads to failure of the heat generator.
Types of membranes for columns
The gas water heater diaphragm is a round gasket made of black rubber or silicone. Depending on the speaker manufacturer, the membrane may contain hard plastic or metal elements. Some diaphragms are reshaped.
Gas water heaters made by European manufacturers use diaphragms that are difficult to counterfeit. For example, the Ariston Fast GIWH has a so-called “figure eight”, while the Electrolux GWH or Vaillant MAG has a diaphragm with a special eye. You can only purchase such a gasket at an official service center. A frog membrane for a European water heater costs from 200-500 rubles. For comparison, a repair kit for the domestic NEVA Lux 5013 (5016), together with plastic parts, costs only 150-200 rubles.
If we talk about the material from which diaphragms are made, there are several types:
- The black rubber membrane is a classic look. Most manufacturers prefer to make gaskets from black rubber. Such a diaphragm will last 7-8 years, provided that there are no defects.
- Silicone membrane - guaranteed to work for 10-12 years. On the market you can find gaskets for domestic and Chinese equipment. Owners of European water heaters will have to make do with black rubber diaphragms.
- Red membranes - low quality material is used. The rubber breaks after turning on the speaker several times. Suitable as a temporary measure. It happens that the necessary gasket has to be ordered directly from the manufacturer. Having installed the red membrane, you can continue to use hot water while awaiting delivery of the original part.
You can fully find out which diaphragm is used in the technical documentation supplied with the instantaneous water heater or after disassembling the water regulator.
Signs of a membrane failure in the column - how to check
- The water regulator is leaking - in normal condition, the gasket completely covers the part of the unit in which water circulates. It only starts to drip if the membrane is torn.
- It takes a long time from opening the hot water tap to turning it on - if the unit is working properly, the burner lights up after 1-2 seconds. There are several reasons for the long response time:
- The membrane is leaking - provided that the leaking small column will work for some time. Over time, water will begin to drip from the regulator.
The membrane has stretched - in this case, the pressure on the rod will not be enough to open the gas supply. The same problem occurs when the gasket becomes rough due to hard water.
- The microswitch rod of the electronic unit does not turn on - another characteristic sign that the diaphragm has become unusable. The column shows no signs of life.
The membrane on the column fails due to poor water quality. The surface becomes rough and loses elasticity. Over time, microcracks form that allow water to pass through.
Is it possible to make a membrane yourself and from what?
Before starting repair work, you should make sure that the poor operation of the burner device is due to a failed diaphragm. The cause of a malfunction of the water heater can be dead batteries and malfunctions in the igniter. Only after all other breakdowns have been ruled out do we proceed to repair the water regulator.
Diaphragm problems often arise unexpectedly. It takes several days for a suitable pad to arrive. To use hot water all this time, you can restore the membrane yourself or make it yourself.
For temporary laying, rubber with a thickness of 1.5-2 mm is suitable. Some people use an old car inner tube or thick household gloves as a blank. The holes for the bolts and the bypass channel are made with a punch, which is easy to make yourself from a metal tube.
A new diaphragm is cut out using the old one as a template. As a temporary measure, you can seal the membrane by applying a patch. After repair work is completed, the column will be able to work for some time, sufficient to purchase a factory diaphragm.
How to properly install a membrane on a gas water heater
The gasket is located inside the water regulator (frog). Replacing the diaphragm is not difficult. Before starting work, turn off the gas and water supplies. The liquid is drained. To do this, open the DHW tap located below the lower level of the column. Repair work is carried out in the following sequence:
- Remove the speaker casing - in most modern devices the casing simply hangs on hooks. To remove the cover, simply lift it up.
- Dismantle the water regulator - to do this, disconnect the cold water supply and unscrew the gas reducer.
To change the diaphragm on a gas water heater, the “frog” is disassembled. Typically, you will need to remove a few brass bolts. They should be unscrewed carefully so as not to damage the folds. This will give you access to the gasket. After replacing the diaphragm, the water regulator is reassembled in the reverse order. Turn on the gas and let in the water. Do a test run of the water heater.
If any of the above is difficult, it is better to call the gas service experts. Replacing the membrane will cost 900 rubles, plus the cost of the material.
Signs of malfunction and wear of the geyser membrane
- Insufficient water heating . (Loss of power with the onset of cold weather).
- Hot water in the first seconds of operation . (Loses temperature in the process).
- We reduce the pressure by closing the water tap . water is heated.
- When you open the water tap, the column does not turn on . (The wick continues to burn.)
Membrane replacement tool:
- Phillips screwdriver (+);
- Flat-head screwdriver (-);
- Adjustable wrench.
How to replace the membrane in a gas water heater yourself
Most water heaters, from the oldest to new generation devices with built-in smart equipment, have a special membrane for the gas water heater. It is necessary to separate the internal space of the fluid regulator. This part is classified as consumable and wears out over time. In this regard, owners of geysers often have the question of how to replace the membrane, and do they need to call a specialist for this?
What you need to know
Over time, even the most reliable membrane becomes unusable - this is one of the most common problems for geysers. It is quite possible to replace a worn-out element with your own hands. If you strictly follow the instructions in the instructions, even an ordinary person can easily cope with this.
However, it should be remembered that repairing gas equipment involves a certain risk. Mistakes may not only result in equipment failure, but can also lead to injury, gas leaks, or fire.
Part wear usually occurs over time as a result of intense use, but it can also happen suddenly. Be that as it may, a microcrack appears in the barrier, through which water begins to leak from the adjacent cavity of the water regulator. The flow of water causes a drop in pressure levels, and the column cannot function normally. Over time, the gap increases, further reducing the pressure. As a result, the system shuts down completely.
Membrane for geyser Beretta Aqua
How to determine membrane failure
The reason that the geyser does not work correctly is most often a torn membrane. First of all, check the water and gas pressure levels. Normal operation of a household appliance is impossible if it is unstable or does not reach the standard. Count the amount of hot water consumed through the tap. Its volume should be between two and three liters per minute. The level of gas pressure can be estimated by eye, focusing on the shape of the fire in the burners of the gas stove. There are different methods for different types of speakers.
Wick ignition
When dealing with devices of this type, pay attention to the location of the pilot light and its size. Ideally, the tongue should reach three to five centimeters in height and be located directly under the edge of the main burner.
If the signs do not match, this may indicate a problem, for example, a clogged jet. Try cleaning it and inspecting it again. If the procedure does not help and the column stops lighting up, then the problem is definitely in the membrane.
Battery ignition
If the column is ignited with a button, you should periodically monitor for attempts at ignition. When turned on, the owner should hear a certain sound, similar to a click. This means that the rubber membrane is working properly, and the source of the problem must be sought in the gas part or the ignition electrode. If clicks were not heard, there is a high probability of membrane rupture. However, this phenomenon is caused by several reasons; you can find out what’s wrong only by disassembling the assembly.
Other cases
There are models of water heaters in which the performance of the membrane is determined by the movement of the rod, which regulates the operation of the electronic unit using a microswitch. The easiest way to notice this is to remove the protective casing. A static part when the hot water supply tap is open becomes clear evidence of a failed membrane. In this case, replacement of the rod is not required.
How to choose a replacement membrane
Having identified the cause of the problem, you can begin to select a replacement part. At this stage, the owner may encounter difficulties, because for some models, especially those produced abroad, there are simply no spare parts. Purchasing a membrane becomes a real problem: you can only get it from an official dealer of the manufacturer, which significantly inflates the cost. There are two ways out of this situation: purchase a new speaker or try to pick up a part from another model.
With more popular geysers such problems will not arise. Spare parts for them can be purchased in specialized stores or ordered online. Even a technician called to your home can install them for you for an additional fee. The cost of the membrane will increase depending on its type and the material used in its manufacture. The brand of a household appliance can also affect the price, because servicing advertised speakers is more expensive.
Types of membranes
There are membranes of a special shape, the principle of operation of which is different from the standard scheme. A striking example of such a part can be the consumables for the Ariston Fast GIWH water heater. It is called "eight".
It is cast in a special mold using dense black rubber. The average market price can range from three hundred to five hundred rubles, depending on the place of purchase.
The partition of a household appliance from Electrolux or Vaillant is much simpler. Created on the same principle as the “eight”, it costs only two hundred to two hundred and fifty rubles.
There is an even simpler type, for example, a membrane for a geyser from the company Neva or Astra. Despite its external unpretentiousness, the part copes with its functions perfectly. An additional advantage of this form is the ease of replacement.
There is a type of membrane suitable for all models of geysers - a kind of universal spare part. However, you need to remember that it can be used as a temporary replacement, because it is very difficult to achieve precise equipment settings without factory parts.
Replacing a failed part
The procedure for replacing a used membrane is not difficult.
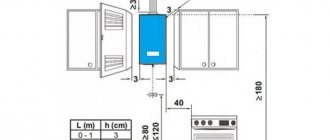
First of all, you should turn off the household appliance and block access to cold water and gas. In addition, do not forget to reduce the pressure in the pipeline. To do this, open one of the hot water taps and wait a while. The pressure release procedure has its own nuances. It is best to open the tap located at the bottom of the column, usually a faucet located in the bathroom. This will allow the water accumulated in the heat exchanger and pipes to drain freely due to the siphon effect. Of course, you can open the kitchen faucet, but it may be fixed at a higher level than the liquid regulator. In this case, you need to be prepared for the fact that when disassembling the column, some of the water, namely three to five liters, will spill onto the floor. Prepare a suitable container in advance and be vigilant.
Mounting screws for removing the protective cover
Having finished with the pressure, you can begin to dismantle the protective casing of the water heater. The mounting bolts, depending on the model, may be located in different places, but usually they are not difficult to find. In some cases, they may be hidden by decorative elements or panels, as well as under device control toggle switches. New generation units can do without mounting bolts altogether - their casing is held in place by special hooks and can be removed with a little pressure. By removing the barrier, you will gain access to the interior of the device and will be able to replace the partition without interference.
Old speakers
The gas water heater of the previous generation has a special structure. Its membrane is located in the fluid regulator, which is installed as a separate element. It is quite easy to distinguish it from other parts - this is the first element that is connected to the pipe through which cold water is supplied to the column.
Column fluid regulator
To remove the water regulator you need to:
- unscrew several nuts securing the water pipes;
- then unscrew the three screws that perform the function of fixing the regulator in the gas section;
- Carefully remove the regulator from the groove by pulling it down.
New generation household devices
Progress does not stand still, and new types of devices are becoming more and more complex every year. Manufacturers integrate automatic ignition and water heating control systems, batteries and touch screens into them. However, to remove the water filter, you will have to follow the procedure described above.
To work with the device, you will need to remove the cover from it. This can be done by unscrewing several nuts and screws with an internal sprocket. By choosing the right screwdriver, you'll get the job done in no time. Having eliminated the obstruction, disassemble the fluid regulator and replace the worn partition with a new one. Carefully monitor the installation of the part, do not place it in the wrong position. After this, reassemble the column in reverse order. This is how the membrane in a conventional gas water heater is replaced.
Sources: https://sovet-ingenera.com/otoplenie/vodonagrevatel/kak-zamenit-membranu-gazovoj-kolonki.html https://avtonomnoeteplo.ru/vodonagrevateli/727-zamena-membrany-gazovoy-kolonki.html https: //tehnika.expert/klimaticheskaya/gazovaya-kolonka/zamena-membrany-v-gazovoj.html
How much does it cost to repair a geyser?
| Name of works | Price, rub |
| Call | 0 rubles |
| Diagnostics | by phone |
| Refusal to repair after diagnosis | 1000,00 |
| Dismantling the geyser | 500,00 |
| Installation of a geyser | 2500,00 |
| Replacing or cleaning the burner | 660,00 |
| Replacing the tap block | 1820,00 |
| Repair of gas block valve | 650,00 |
| Replacing the membrane | 900,00 |
| Repair or replacement of the water part | 1800,00 |
| Cleaning the pilot burner | 560,00 |
| Replacing the heat exchanger | 1400,00 |
| Replacing outlet and inlet tubes | 740,00 |
| Replacing the solenoid valve | 770,00 |
| Replacing the traction sensor | 820,00 |
| Replacing rubber gaskets | 800,00 |
| Replacing the flame ionization sensor | 690,00 |
| Replacing the thermocouple | 690,00 |
| Replacing the handle | at our expense |
| Cleaning the water fitting | 780,00 |
| Cleaning the pilot nozzle | 640,00 |
| Burner nozzle calibration | 600,00 |
| Cleaning the NEVA 3208-10 sensor tube | 510,00 |
| Cleaning the Venturi burner tubes | 980,00 |
| Cleaning the heat exchanger (radiator) from soot | 1830,00 |
| Soldering the heat exchanger tube | 1500,00 |
| Soldering radiator honeycombs (hard-to-reach places) | 1700,00-2500,00 |
Sources
- https://www.o-vannoy.ru/gazovye-kolonki/membrana/
- https://sovet-ingenera.com/otoplenie/vodonagrevatel/membrana-dlya-gazovoy-kolonki.html
- https://zen.yandex.ru/media/id/5cffe3fce6438000aed38474/5d5c0788d11ba200ad7a186b
- https://remont-system.ru/kotly/funkcii-i-zamena-membrany-gazovyh-kolonok
- https://cosmo-frost.ru/gazovye-kolonki-i-kotly/neispravnosti-gazovye-kolonki-i-kotly/kak-pomenyat-membranu-v-gazovoj-kolonke-vybrat-i-ustanovit-samostoyatelno/
- https://gazser.ru/stoimost-remonta-gazovoy-kolonki
Share link:
- Click to share on Twitter (Opens in new window)
- Click here to share content on Facebook. (Opens in a new window)