What you need to have for decoration
First, you need to have an idea. Sticking randomly flowers on, this, you know, is not ice. It will look like transfer stickers in Soviet times. And the effect of transforming the refrigerator with your own hands will be sad.
Therefore, think through the composition inside and out. It should be in harmony with the rest of the furniture and interior items. Moreover, we draw your attention to the fact that you should not combine the design of the refrigerator with curtains, tablecloths, chair covers and other short-lived items. You change them, but the refrigerator will remain...
If you have already come up with everything and are ready to get started, then you need to purchase the following things:
- Napkins for decoupage (four-layer)
- PVA glue
- Scissors
- Fine abrasive “skin”
- Acrylic lacquer
- Craquelure paint (optional)
- Gilding paint (optional)
- Acrylic paints
- Glue brush
- Paint brush
- Foam roller for smoothing
Now you can get down to business.
This work is painstaking and requires patience. The volume is still considerable. Don’t rush, it’s better not to do it in one day, slowly, but in such a way that the guests will simply gasp! See also -
How to defrost a refrigerator correctly: expert advice
Creative refrigerator using decoupage technique
Do you want to create an original, sophisticated interior in the kitchen, keep the room in the same style, add the finishing touch or dilute a boring, boring design? This can be done using one of the modern techniques that are widely available to any Internet user.
Decouping a refrigerator with napkins is almost simple; you just need a little patience and skills in working with glue and paper.
Numerous master classes clearly demonstrate how an ordinary person without any skills can transform his home beyond recognition by updating curtains, placing funny panels on the walls or shelves, or gluing appliques, decorating the refrigerator with his own hands. When decorating a kitchen in Provence or high-tech style, do not forget about decorating furniture and household appliances. Without this, your interior will be boring and dull.
Preparing the surface for decoupage and drawing a picture
The refrigerator must be thoroughly washed and wiped dry. Then, wipe with alcohol the places where you plan to glue the applique. There is no point in degreasing with acetone; there is no need to sand the surface either.
There is no risk that the application will “come off”. And, it will be better for you if you leave yourself the chance of reversing. You never know, it won't work out? Or, after a certain number of years, you will want to sell it, but with decoupage no one will take it, that’s a fact.
After this, cut out your design with scissors without separating the layers of the napkin. After the part is cut out, you can separate the very top part from the bottom.
Then, apply a thin layer of PVA glue on it and attach the design to the surface. After 20 seconds, roll the roller in different directions, carefully expelling the air and smoothing out wrinkles.
We perform decoupage
It is imperative to treat the surface of the refrigerator. To do this, it should be thoroughly degreased using any non-aggressive detergent. If you need to change the color of the surface, then you must first prime it thoroughly with acrylic-based paint, choosing the most suitable shade.
Then you need to separate the top layer from the napkin, which has a pattern on it. When doing the work yourself, be extremely careful, as the napkins may tear. After this, scissors should be used to cut out the largest patterns.
The pictures need to be laid out on a flat table surface, which will help create a finished image. Lubricate each drawing with glue and transfer it to the refrigerator. The napkin may stretch at this point. That is why you should glue very carefully, using a small brush to remove any wrinkles and small bubbles that appear. It is best to start gluing with the drawing, which will be in the center. When all the images have been transferred to a previously prepared surface, you can complete the finer details of the composition with a thin brush.
Only after this the drawing is covered with 2 layers of varnish, which will protect the image made using the decoupage technique from moisture and all kinds of damage.
Applique design styles
There are exactly as many styles as there are styles of interior design. We are not talking about what styles there are. We are sure that you are aware of this without us. I just wanted to remind you that if you have a “Provence” style, then you shouldn’t decorate in the “ethnic” style.
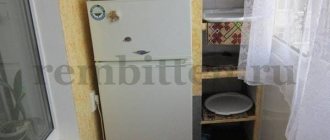
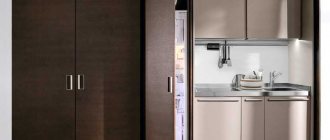
Everything should be in harmony so that the refrigerator looks like a single ensemble with the rest of the furniture. Sometimes it looks very good if the refrigerator is decorated in such a way that it is practically invisible, it takes on the appearance of a cabinet in a given style.
Sometimes it’s the other way around. Your kitchen is white, in high-tech style, for example. And often, a very good solution turns out to be to highlight the refrigerator with a bright spot that contrasts with the rest of the decor.
Let's take a closer look at some of the “powerful” ideas. Perhaps you will take something into account.
Refrigerator decoupage “Phone Booth”
This is a very cool design. The refrigerator looks like a classic red phone booth, of which there are so many on the streets of London. But you can’t do it with napkins alone to implement it. Here you will need paints and a fairly high level of skill.
To begin, draw a drawing on the refrigerator so that you know exactly how and where to glue the parts. The windows in the booth will need to be framed with wooden frames to give the composition volume and a natural look. Some details will need to be drawn, not forgetting about the shadows.
Such refrigerators look good in almost any kitchen, with the exception of the obvious “Country” and the notorious “Provence”. There they will be completely inappropriate, since this is a more strict style.
Refrigerator decoupage “Antique cabinet”
But this is clearly for “Provence” and others like it. You can depict the wardrobe absolutely any way you want; you don’t have to try to make it match the main furniture. Moreover, it is even undesirable, since it will still be different, and the appearance will be rough.
It’s better if you make a completely different cabinet, simply, in a given style. And, yes, this is also not a level for a beginner. And here you will also need paints, craquelure, aging effects, etc., etc....
Decoupage refrigerator “Patchwork”
A very interesting idea. Patchwork is a classic patchwork quilt, as you know. Absolutely anyone can do this design.
There are napkins with a ready-made patchwork pattern, and with the effect of stitching with threads. There are simple plain napkins that you can choose to suit your taste and “sew” the patches yourself. In this case, the divisions will need to be painted over, simulating machine stitching.
But, please note that this is a catchy and bright design. It will “play” if the kitchen itself is not bright. If your walls are painted, or your furniture is of different colors, then it is better to abandon this idea.
Decoupage of refrigerator “Front door”
Also, great solution. By the way, decoupage can be done not only with napkins, but also with photo wallpaper, for example. And, indeed, there are a lot of motives for such a plan.
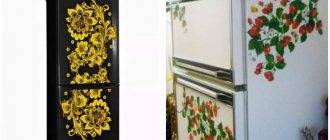
Refrigerator decoupage “Flowers” and “Grapes”
In this case, everything is quite simple. Find good options for flowers or grapes and glue them on. But, do not forget that you need to paint the branches. If you don’t do this, the look will look rather sparse.
Decoupage of the refrigerator “Peas”
A funny design, but at the same time a rather bold decision. The refrigerator looks like a piece of cotton fabric. Unpretentious and very cute.
You can choose absolutely any colors, but the polka dots should be monochromatic and not very large, otherwise the fabric effect will not work.
How to make beautiful decoupage of a refrigerator with your own hands with a photo
To work, you must first decide on the idea and location of the future image. It doesn’t matter whether these are small elements or you plan to decorate the entire surface of the refrigerator, it is important to clearly understand where and what will be located, so as not to get confused during the work process.
You can decorate the surface with paper napkins with a suitable pattern; the main thing is to understand how many napkins you will need and how they will look when finished. Also, when decorating a refrigerator, you can use wallpaper, thanks to the size of which it is possible to cover a large surface with one solid canvas, fabric or special decoupage cards.
In addition to the main material, you will need acrylic paints, PVA glue, a sponge and brushes of different sizes, any alcohol-containing degreasing liquid, scissors, acrylic varnish and, if necessary, decorative elements and means for creating scuffs, decorative cracks and stains, texture and other effects.
We prepare the surface.
First of all, thoroughly wash the refrigerator, remove greasy stains, stains, dust and dirt from the entire decorating surface.
If you are satisfied with the main color of the refrigerator, then you can use it as a background; if not, then prime the surface with acrylic paint of the desired shade. It is better to paint the refrigerator in several stages, allowing each layer to dry separately. Let's start decoupaging the refrigerator.
Separate the top layer with the pattern from the napkin. We cut out the necessary motifs; in order to obtain less noticeable borders of the finished design, you can use your hands instead of scissors, tearing off the necessary elements.
If you use wallpaper or fabric in your work, then the borders of the pattern will have to be masked with fine-grained sandpaper, but this must be done very carefully and carefully so as not to damage the coating of the refrigerator.
Apply glue to the place where the design will be located and carefully glue it with a sponge. Be sure to get rid of the formed air bubbles, creases and folds, smoothing them with a dry sponge or soft cloth.
In the same way, we collect the entire composition and leave it until completely dry. Next, we go through fine-grained sandpaper, carefully blurring the boundaries of the images. We complement the drawing using acrylic paints, add missing elements, shadows, add texture, glitter and other decorations, if provided. At this stage, you can give free rein to your imagination and creative nature.
We cover the finished image with acrylic varnish; for a high-quality coating and reliable protection of the picture, at least three of them will be needed. Dry each layer of varnish separately and you can admire the result.
Decorating items using decoupage is especially applicable in Provence, shabby chic, and country styles, but any other stylistic direction in interior design gives you the opportunity to perform decoupage in accordance with its canons.
Don’t be afraid to try and create, to bring the most incredible creative ideas to life. And the decoupage technique allows you to express yourself even if you do not have any special artistic skills. Decoupage is easy to perform, does not require complex knowledge and extensive experience, the main thing in the work is patience and accuracy. And the result of your own creation will undoubtedly delight you with its beauty and uniqueness.