Kitchen equipment is now in every home, some people only use a mixer and a toaster, but most housewives have modern food processors that perform all functions at once. They are able to speed up a number of complex and labor-intensive processes, perform a variety of cutting and grinding, and easily mix a cocktail or knead dough.
Thanks to such food processors, there is no need to buy a dozen different devices in order to completely cover all your cooking needs. But one device has one motor, although some Bosch models have two. This means that the breakdown of this part can lead to complete paralysis of all work in the kitchen.
Bosch food processor repair - we identify possible problems and fix them
Causes of food processor malfunctions
This type of equipment has a lot of components and it is quite difficult to determine exactly what is broken. First of all, if the unit is under warranty, under no circumstances should you disassemble it yourself, so as not to violate the terms of the service agreement (see also the article Professional kitchen equipment - a fantasy that is always with us).
It’s worth washing it thoroughly, collecting all the documents that came with it and taking it to the nearest branded service center.
Advice: if the owner does not know where to take the broken unit, it is worth carefully studying the warranty card. It must have the phone number and address of the repair center.
However, there are cases when the combine breaks down after the end of the warranty period; in such a situation there are two logical solutions:
- take it to a repair shop;
- try to eliminate the causes of the malfunction yourself.
Parts for Bosch
Frequent problems with Bosch equipment
To find out the cause of equipment failure, you need to carefully disassemble the case and inspect all internal parts. Perhaps the problem is in one of the plastic parts, which is easy to change with your own hands.
You can purchase individual spare parts in a specialized store or in repair shops where used combine harvesters are dismantled. The main advantage of self-replacement is the low cost of repairs.
The most common breakdowns include:
- burnt out engine - the device will not work at all;
- problems with engine parts or a special control board - the combine makes unusual noise, smells of burnt wiring, or turns off from time to time;
- Some attachment or lid lock may break.
After disassembling the case, you need to set aside all the parts that look faulty. Burnt and broken elements must be replaced with new, original or similar ones.
If the fault relates to the electronics section, for example, the control board is not functioning, it also needs to be changed. But without special equipment and knowledge, this will be quite difficult to implement.
Harvester disassembly diagram
- Disconnect the device from the network. If the detailed instructions are not lost, we check the list of parts and check them sequentially.
- We check the drive shaft, gearbox and electric drive.
- Then comes the turn of the juicer, the main mixer disc and all the attachments.
- We check the remaining parts - gears, containers, switches and brushes.
It is possible to repair a Bosch food processor yourself
DIY control board for Bosch food processor
Once again they brought a board from a Bosch MUM 57830 combine, which cannot always be repaired in a simple way and sometimes the microcontroller needs to be replaced. I had thoughts of writing my own program, but then I decided to take the simple route. This is how the analog combine control module appeared:
Despite its simplicity, the scheme simultaneously implements a smooth start, adjustment and stabilization of the speed of the standard food processor engine. When mains voltage is applied to the circuit, capacitor C1 begins charging through resistor R3. The smoothly increasing voltage on capacitor C1 through resistors R1, R2 gradually opens transistor VT1, which shunts the MB6S diode bridge standing in the phase-shifting circuit of dinistor VD2. At the same time, the power thyristor begins to open and the motor in this circuit gains momentum. Simultaneously with this process, pulses are received from the speed sensor through a regulating resistor to the base of transistor VT5. The transistor is opened by its PC817 optocoupler transition. The optocoupler with its transistor shunts the base voltage of transistor VT1. Thereby stabilizing the speed at a certain level, which is set by resistor R5. Capacitors C2, C4 smooth out short voltage surges. An inductive sensor located on the standard module of the combine is used as a speed sensor. The power thyristor and its circuits are also used as standard ones (we disconnect only the control leg from the standard circuit). The speed control resistor is the same standard one, of a stepped type; it must be decoupled from the general circuit. By replacing resistors in the regulator stages, it is convenient to adjust the speed of each stage. We also take +5 volts from the standard circuit. One end of the speed sensor is already sitting on ground, the other end of the sensor is connected to our control circuit. I connected the blocking limit switches connected in series to the control circuit of the standard relay, which supplies power to the thyristor of the harvester’s native board. The board for this circuit is small, 33x30mm, and is placed in the motor compartment, near the main module:
Resistors R4 are made of two 10 com. R3 is also composite, say 800 and 200 kOhm. By selecting the lower value of them, we adjust the soft start time. The blue contact pads are the wire output for connecting to the standard module. This circuit can control any commutator motor equipped with a pulse speed sensor. You only need to select the values of resistors R5, R6
control food processor.lay.zip
If the problem is in the brush
Replacing the entire motor at once can be very expensive, the price for such a service is quite high, and it can be difficult to purchase the part itself in small towns. On the other hand, if during disassembly it turns out that it is not the winding or control board that is faulty, but an ordinary brush, the cost of such repairs will be a pittance.
Most often, a malfunction of the brush is expressed in abrasion, after which it no longer presses tightly against the rotor winding, which is why the plastic can become very hot and can smell burnt when starting the combine.
Attention: the brush is a part made of graphite and transmits current to a rotating shaft located in the rotor. Since graphite is quite soft, it can quickly wear down with regular use of equipment, so it must be replaced periodically.
The dimensions of this part are about 2x1x0.7 cm, they may vary depending on the model.
Motor brushes
How to replace the brush
- In a specialized store, repair shop, or on the market, we purchase a new brush for Bosch. You can go to a car store where you need to buy, for example, an inexpensive Zhiguli brush. It has a pressed-in conductor made of copper and will last much longer than a simple graphite one, but it will have to be “adjusted” using a needle file.
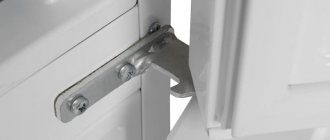
- We insert the modified or branded part into its place: into a special rectangular hole, where the part is clamped with a metal bracket.
- We assemble the housing and check the operation, first at low speeds, and then at full power.
Repair of Bosch food processors: necessary part - auger
The combine does not work - what to do?
Owners of household appliances sooner or later are faced with a situation where, after turning on, the unit either does not work at all or does not work correctly, making various uncharacteristic noises and sometimes even sparkling. This fully applies to food processors.
In this case, the owner of the unit must remember whether the factory warranty is still valid for the device. If the warranty period has not passed, you must immediately contact a service center to repair your equipment.
When disassembling the food processor yourself, be sure to unplug it
If the kitchen assistant is no longer covered by the warranty, then first try to understand the reasons for the breakdown yourself. To do this, you will need to disassemble the unit.
Important! When performing this operation, do not forget that you will then need to reassemble the food processor.
Here are the main stages of dismantling:
- disconnect the device from the network and disconnect the removable elements;
- remove the combine from the base and turn it over to inspect the drive belt and gear;
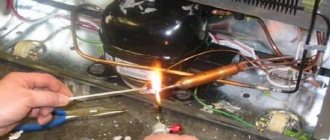
- Having removed the belt and gear, disconnect the engine, open it and inspect it;
- remove the gearbox protective cover and inspect the drive shaft.
If necessary, more detailed advice for each specific model can be easily found on the Internet.
Having figured out this aspect of the problem and identified the malfunction, make a decision to carry out repairs on your own or with the help of a professional.
If the combine still does not work, contact a repairman.
If you understand electrical engineering and feel capable of doing your own repairs, then here are some tips for this case.
- If the transmission belt breaks or becomes loose, it must be replaced by purchasing a food processor belt from a service center.
- If the key fails, then more effort will be required: disassemble the combine by removing the motor; carefully dismantle the part; purchase a new key from the service center and install it in place.
- It will take you 5-10 minutes to replace a blown fuse. It’s not worth wasting time on a trip to the service center for such a small thing.
- The connecting cord is also easy to replace yourself, since you can purchase the missing components at any electrical store.
- If there are problems with the gear, then first you need to thoroughly clean it and carefully inspect it. A small percentage of wear is compensated by lubrication; in more complex cases, replacement will be required.
- When the brush wears out, it is enough to replace the part with a new one.
Important! When purchasing spare parts, purchase only parts from the same manufacturer. Installing cheap parts will lead to complete breakdown of the combine.
Elimination of more serious breakdowns such as a burnt-out motor, failure of a shaft or bearings should be entrusted to a specialist , if only because you do not have the necessary equipment and tools at home.
Other kitchen equipment breakdowns
Almost all breakdowns not related to the operation of the motor can be divided into two groups:
- a plastic part broke: lever, switch, latch;
- the knives became dull.
If replacing plastic elements is extremely clear - bought, installed, started, then sharpening the blades of combine knives with your own hands is a rather labor-intensive and demanding process (see also the article on Japanese kitchen knives).
There are three main methods for this procedure:
- We take the device or just the knives to the nearest service center, where they sharpen them. The result will be guaranteed and quite inexpensive.
- You can use an abrasive stone for turning. But you need to be careful, any wrong angle when pressing can break off a piece of the knife or make it even duller.
- Craftsmen also use regular sandpaper, preferably size 5. But working with sandpaper is even more difficult than working with a sharpening stone. The result will be fast, cheap, but not always of high quality.
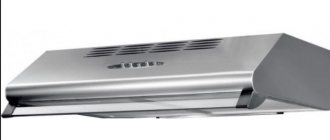
Photo of a working combine
Frequent breakdowns
To identify a breakdown, you should completely disassemble the body of the device, as well as inspect its components.
The most common breakdowns.
- Electric motor burnout . As a rule, this malfunction occurs as a result of prolonged use of the device. At the same time, the multifunctional unit stops working completely.
A complete replacement of the electric motor often helps to restore the functionality of the device.
However, before purchasing a new motor, it is necessary to evaluate the feasibility of its purchase, since the cost of such a mechanism is equivalent to purchasing a new unit.
- Control board failure . If, during operation of the machine, there is an unusual noise effect, a burning smell, or the device switches off spontaneously, most likely the cause of the malfunction is “located” in the internal structure of the combine. Replacing the burnt electronics part will help resolve this problem.
- Broken attachments or lid lock . Such problems often arise as a result of frequent use of the device. Replacing faulty structural elements with new mechanisms will help eliminate this breakdown.
If you need to disassemble kitchen appliances yourself, you should first study the sequential implementation of this procedure. This will help avoid any snags that typically occur when reassembling the unit.
The algorithm for disassembling the combine is as follows:
- — disconnect the device from the power supply;
- — dismantle removable structural elements;
- — unscrew the fastening fittings securing the device body;
- — remove the lower part of the structure;
- — unscrew the bolts securing the electric motor;
- — remove the motor from the housing.
After “opening” the food processor, you should first check the functionality of the drive shaft, gearbox and electric motor. If there are no problems with these mechanisms, it is necessary to inspect the main nozzles, knives, discs, diffusers and meshes. After this, the functionality of the remaining structural elements is checked - switches, brushes, gears of the containers. In this case, the faulty part is removed from the structure body.
As a rule, after disassembling a kitchen appliance, burnt parts are visible to the naked eye. That is why replacing them will not be difficult even for a novice specialist.
Remember, the accumulation of large amounts of dust and debris in the housing can lead to a fire during operation of the device. That is why it is important to clean it immediately after each use.
When disassembling a food processor, you should remember the sequence of dismantling the components. Fulfilling this requirement will ensure correct assembly of the structure in the reverse order.
Kitchen appliance care
To avoid having to urgently shell out a large amount of money to repair your equipment, you should take care of proper care in advance (see also the article on cleaning the kitchen).
There are several simple rules to extend the life of any kitchen appliance:
- After each use, all parts should be washed with warm water, if necessary with detergent, and wiped dry. This will allow the knives not to become dull for a long time, and the plastic parts will shine like new.
- The main compartment of the housing where the motor is located just needs to be wiped with a damp cloth to prevent water from getting inside.
- Once a year, after the end of the warranty period, you need to disassemble the combine and check whether any parts have started to burn or whether the brush has worn out. If you change a “weak” part in advance, it will not cause damage to other elements. How to disassemble this or that model of combine can be seen in numerous videos on the Internet.