Features of operation and main parts of the refrigerator
The side walls of the refrigerator and the body (back panel) are made of metal, and the internal surfaces are made of durable polystyrene; the gap between them is filled with insulating material. The trouble-free operation of the refrigerator is ensured by the absolute sealing of the refrigerator wall and internal compartments.
Due to incorrect operation, the rear wall of the refrigerator is exposed to water and ice, resulting in the formation of condensation. This leads to malfunctions. Destruction of the metal case and parts installed on the back wall of the refrigerator.
The warranty on the refrigerator body is 5 years, subject to proper use. Typically, users provide complaints that the back wall of the refrigerator inside the chamber quickly becomes covered with ice. The reason for this phenomenon is a violation of the defrosting technology and use.
Failure to comply with the requirements for use leads to various damage to the rear wall of the refrigerator.
Step-by-step instructions for repairing refrigerator components and systems
Once you have determined the cause of the problem, you can begin to eliminate it. Consider the most common options.
Troubleshooting the thermostat
Depending on the specific model, the thermostat can be located both inside the refrigerator and outside. With an internal location, it is enough to remove the temperature control knob and remove the thermostat housing.
In refrigerators from Samsung, LG and other foreign brands, you can also check the thermostat under the panel for decreasing and increasing the cooling temperature. But it is located on the outside of the chamber. To determine functionality you will need:
- Disconnect from the network;
- Defrost completely;
- Turn on the refrigerator for maximum freezing, placing a thermometer inside and wait a couple of hours; if the device does not show 5 - 7 ° C, then replacement is inevitable.
To repair a refrigerator, you just need to purchase a spare part and install a new one to replace the faulty part.
Finding leaks and replacing refrigerant
Leaks can be detected using several methods:
- Soapy solution - available in case of a slight leak and the presence of liquid refrigerant pressure in the system. This provides access to all tubes - the protective housing cover is removed and the evaporator is defrosted. Where the gas escapes, the soap solution will foam.
- Dye - used where the pressure in the circuit does not allow the use of a soap solution. A dye is added to liquid freon and released into the system, after which a characteristic color appears at the leak site.
Before pumping new gas from the system, the residues are first removed by a vacuum pump; if blockages are detected, additional cleaning is carried out. After which refueling is carried out. Experts recommend performing this procedure without leakage every 3 to 5 years.
Thermal protection relay failure
If the normal operation of the temperature fuse is disrupted, the refrigerator may shut down prematurely, which poses a risk of engine overheating. To repair, you will need to remove the relay and disassemble its body; if the reason is a jammed rod, you can solve the issue yourself; if the winding is damaged, you will have to change the entire part.
Replacing a faulty compressor
In this case, for repair it is necessary:
- Unplug the refrigerator;
- Tilt the compressor and run the compressor for a couple of minutes;
- The piercing valve is attached to the filter drier, connect the cylinder to the valve and tighten the piercing valve and open it for half a minute;
- Instead of a filling tube, solder a copper tube;
- Make a cut on the capillary tube;
- Remove the old compressor and install plugs in the suction and discharge outlets;
- Install the new compressor and solder it, carefully inspect the quality of the soldering.
Compressor repair
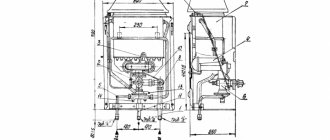
Eliminating rattling compressor sounds
The noise of the compressor can be caused by a loose fit of metal elements or, conversely, excessive proximity of certain elements, which causes collision and rattling.
For repairs, it is necessary to secure the casing tightly; in case of loose fasteners, use washers for a tight fit and tightening.
Figure 4. Adjusting the compressor mounting (shown by arrows)
In case of approaching other elements, it is necessary to adjust the device itself in the opposite direction or carefully bend the tubes if it is impossible to move the compressor.
Replacing lighting bulbs
To avoid electrical injury, unplug the refrigerator. Then open the door and check the condition of the lighting device, for example, in Indesit refrigerators, the light bulb can get very hot, so you should wait until it cools down completely.
To do this, it is not necessary to use the same lamp, but you can find an alternative replacement, but according to the type: incandescent or halogen. The lamp power should not exceed 30 W. But before replacing, it is worth checking the voltage in the socket, because the reason may not be in the lamp at all.
Solving problems with temperature sensors
This part is designed to regulate the speed of operation of the compressor unit. If they fail, the refrigerator will not be able to maintain the desired temperature. Quite often such a malfunction occurs in Nord refrigerators; they contain several such elements at once.
But you won’t be able to disassemble and repair them yourself at home, so after removing the sensor, it will need to be completely replaced.
Cleaning the drainage system
There are two options for placing the tube - outside the body and under it. In the first case, cleaning is quite simple: remove the tube and rinse it in hot water, loosening any accumulated clogs if possible.
If it is impossible to remove the tube, you should try to clean it with the brush included in the kit. If it fails, metal wire, previously sanded, is used for repairs. After cleaning the tube, it must be rinsed with water.
Repair of drainage tube
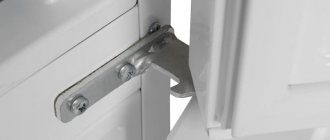
Door alignment
To adjust the position, you need to get to the fastening point, for example, in LG refrigerators you will need to remove the protective strip; in other models, the bolts may be in the public domain. After unscrewing, remove the door, place washers in the required nodes and install the door in place. If any, assemble the decorative structures in the reverse order.
Control board failure
It is characterized by complete silence of the refrigerator, despite the fact that the power circuit is fully operational. The control board is one of the most complex devices and one of the most expensive. Replacing it at a service center will cost three times as much, so it’s better to do the repairs yourself. For this:
- Unplug it from the outlet and unfold it; in Stinol refrigerators and many other brands the board is located in the lower left side.
This is how the control board is removed - Unscrew the fastening screws A and remove the clamp B;
- After this, you can see the board itself in the case; carefully disconnect terminals C.
Control board
Most often, capacitors deteriorate due to constant voltage surges, so to prevent such repairs in the future, it is better to connect the refrigerator through a stabilizer. The installation location may differ from company to company, so first you will have to study the refrigerator diagram.
Evaporator defect
It manifests itself in weak freezing, the appearance of a snow coat or rapid spoilage of food. Occurs due to damage or destruction of the walls of the evaporator, both from natural processes and from exposure to sharp objects.
In addition to replacing the condenser and evaporator at home, you can install an additional one so as not to risk breaking the seal of the freezer. In addition, you can try to repair the existing evaporator if this seems appropriate to you. In any of the repair options, the refrigerant is drained from the cooling system, and during replacement the evaporator sensor is turned off so as not to damage it during operation.
Changing or straightening the rubber seal
A poor seal fit can cause poor freezing, constant compressor operation and other problems. To replace, take a screwdriver and separate the old rubber from the plastic surface. Its place should be thoroughly washed and cleaned of any remaining glue and old sealant. To replace the seal, you need to take a new strip and insert it into the corresponding groove on the door.
Additional fixation is provided by silicone or polyurethane foam; using glue for this purpose is completely impractical.
Replacing a blown temperature fuse
In most cases, burnout occurs due to overheating of the evaporator defrosting element. It is located in the freezer compartment; to check its serviceability, just use a tester. If an open circuit is detected, the temperature fuse is replaced with a new one. But in addition to this, you should find out the reason for the overheating of the heating element, otherwise the breakdown will soon happen again.
Solving problems with fuser, timer and fan in NoFrost refrigerators
The dry freezing system provides a number of advantages over drip freezing, but they are due to additional elements.
To gain access to the contacts and fan power filter, you need to unfold the refrigerator. The electrical circuit of the refrigerator that powers the fan is called, and the movement of the blades is tested.
If no faults are found, remove the fuser from the connectors and test it with a tester. Provided that the resistance is close to zero, we can assume that the fuser is working, otherwise it must be replaced.
If both checks do not reveal any malfunctions, the reason is the electronic timer. It is impractical to repair at home - it is completely replaced.
Start relay repair
The relay is either snap-on or bolt-on. After it has been removed, it is necessary to check the stroke of the rod, as it may stick and interfere with normal movement. The condition of the coil is checked by a tester - if an open circuit is detected, you will have to change all the relays. Replacement is carried out in reverse order. The main criterion, both for a new part and for a repaired one, is the tightness of the contacts.
Very interesting to read in addition:
When is a master needed?
If you notice in the refrigerator:
- Ice freezing inside the back wall of the refrigerator;
- swelling of the outer surface of the body;
- you have to defrost the refrigerator too often;
- if, when removing accumulated ice, the evaporator housing was damaged;
- insufficient cooling of products.
Then the rear wall of the refrigerator needs to be repaired. Restoring the back wall of a refrigerator is one of the inexpensive types of repair, but in most cases it requires delivery of the equipment to a workshop.
Why does the back wall of the refrigerator freeze?
The main reason is the destruction of the thermal insulation material of the inner wall of the refrigerator. Ice begins to freeze around the defect, destroying the insulation even further, reaching the side walls of the refrigerator.
Over time, moisture gets inside the material, which leads to the destruction of its insulating properties. Because of this, the back wall of the refrigerator requires immediate repair.
The formation of ice deposits on the rear wall can be affected by the loss of freon, and as a result, the appearance of frost on the side walls and tubes where it should not be.
Violation of the temperature regime leads to a layer of snow falling on the back wall. Quite often, the cause of ice deposits is abrasion of the rubber door seals. The appearance of snow on the back wall and in the freezer occurs non-stop.
How to level a surface by exposure to temperature
Minor damage can be repaired using thermal expansion. To do this, the problem area should be treated with a cleaning agent and degreased. Then the damaged area must be heated with a construction power tool designed to supply heated air, or with a regular hair dryer for 30-60 seconds.
The temperature should be kept in the average range to prevent damage to the seal located between the walls of the refrigerator. After this, you need to spray cold water onto the heated surface.
Heating and cooling manipulations are allowed to be carried out several times. If re-treatment does not straighten the depression, another restoration method should be tried.