Device and brief description
The steamer (a well-established tracing paper from the English language) or steamer was invented back in the 40s of the last century. However, for a long time it was used mainly for highly specialized tasks before manufacturers saw the opportunity to use it in everyday life.
Steamer was invented back in the 40s of the last century.
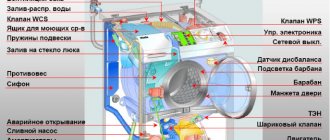
Today this device has a fairly simple design, which ensures high reliability. A typical household steamer consists of:
- Water storage containers.
- Heating element.
- Evaporator for supplying steam: remote or rigidly built into the housing.
- Hose (for stationary devices).
- Attachments for various types of fabrics and ironing modes.
Typically, a steamer has several attachments for different types of fabrics.
Some types of devices can be equipped with a clothes hanger, a lint brush and a protective mitten.
Note! Recently, the opinion has spread that a device such as a clothes steamer can be made with your own hands, for example, from a plug-in steam generator with an iron. Nevertheless, such an imitation is still not a complete replacement for a steamer.
It is not always possible to replace a steamer with an iron.
Principle of operation
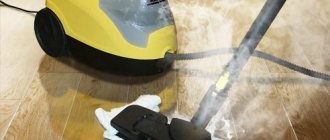
The operation of any steamer is based on the principle of heating water to a boiling state and supplying the resulting steam outside using small nozzles located on the plane of the evaporator. Steam can be supplied by gravity, as a result of the formation of excess pressure, or using a special pump. In the latter case, the device's performance increases dramatically.
The device operates on the principle of supplying steam using boiling water.
Straightening of clothes occurs due to physical processes similar to those that occur when ironing with a regular iron. However, the steam effect allows for more uniform heating of fabric fibers, especially in heavily wrinkled or hard-to-reach places. Therefore, with proper understanding of how to steam things, you can quickly tidy up even the most complexly cut clothes.
Thanks to the steam effect, you can straighten even hard-to-reach places.
Types of household steamers
Despite the abundance of models sold and manufacturing companies, there are only two main types of household steamers:
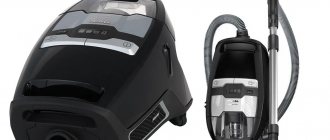
Handheld or portable
Its main advantage is the price. Usually these are small, compact, travel-size devices that allow you to quickly get your clothes in order. Due to their design features, they are unsuitable for long-term use, as they provide low steam intensity. Sometimes they are found in the “electric kettle” version, which really allows you to use the device exclusively for this purpose.
A handheld steamer is a small, compact device.
Stationary or vertical
More powerful and more productive devices. They are distinguished by the presence of a steam supply hose, which makes them suitable for ironing a wide variety of products. Since a floor-mounted steamer can be used for up to half an hour, it is especially effective when ironing large items, such as curtains or suits. Also included in the package is a vertical rack with a hanger, designed for convenient placement of outerwear.
The stationary steamer kit includes a hose and a stand for ironing things.
Additional Information! In pursuit of customers, many manufacturers provide their devices with various specific functions.
Some steamers have additional functions.
For example, Philips is known for its ability to carry out antibacterial treatment, Tefal for its very good ergonomics and quick preparation for work, and devices from Domena allow adding water during operation.
Using Phillips you can carry out antibacterial treatment.
Ironing process
Procedure:
- Fill the reservoir with distilled or filtered water. If you use a regular one, plaque will form on the steam holes over time.
- Select the desired operating mode for the iron, place the device on a stand or place it vertically to heat it up. The instructions for using the iron will help you select the desired temperature conditions if there is no special scale on the device body.
- Place the item on the ironing board, carefully straighten it so that there are no folds or creases.
- Run the iron heated to the desired temperature along the item (if you iron it across, the fabric will stretch or become deformed). Swipe over the entire surface of the product, without staying in one place for long. To remove wrinkles, use the steam setting.
- After one side of the item has been processed, turn the item over and iron it again.
- When finished, hang the clothes on hangers and move on to the next one. While you work, the fabric will dry from the steam, and you can, if necessary, remove the item from the hanger and fold it to put it on the shelf.
- After finishing ironing, turn off the iron. Only after it has completely cooled down, put it in your usual storage location.
What can you “iron” with a steamer?
Despite all the features, benefits and understanding of how to properly steam things, these devices do not do an equally good job of ironing different types of fabrics. However, they can show good efficiency when ironing the following products:
- Delicate things. It is impossible to damage synthetic and thin natural fabrics.
- Clothes with decoration. Lace, frills, rhinestones and other additional elements are not an obstacle to steam, unlike an iron.
- Outerwear: fur coats, jackets, suits with thick lining, jackets.
- Curtains and drapes. You can iron directly on the hanger without removing it!
How to use a handheld clothing steamer
It should be understood that caring for things using such devices requires an understanding of the principle of operation, mastering certain techniques and differs from classic ironing. For example, when processing delicate items, you should not “crawl” the evaporator over the clothes - there should be a small gap between the fabric and the nozzles (1-2 cm, selected experimentally), while outerwear needs deep steaming and it is appropriate to apply it tightly here. evaporator.
Manual steaming has its own rules of use.
Preparation
Before turning on the device, you need to pour water into a special container, hang clothes on hangers or a hanger included in the kit, and turn on the device. After which you need to wait a little, since heating takes some time (usually 40-50 seconds). As soon as steam comes out of the nozzles, you can start ironing.
Preparing for steaming does not take much time.
Steaming
The steaming process itself is relatively simple - you need to install the evaporator over a wrinkled area of fabric and use gentle upward movements to smooth out the wrinkles. Since you need to steam things in a vertical position, in order to smooth out, for example, the bottom of a shirt, you should hold it by the edge with one hand and walk along the stretched surface several times.
Things need to be steamed in a vertical position.
Sometimes you have to support the product from the other side. To do this, you can use a special protective mitten, which is often included in the kit. Or use a regular oven mitt covered with aluminum foil. The sleeves and collar are smoothed using special heat-resistant supports. There is a clamp attachment to straighten the edges.
Sometimes something needs to be held from the back.
Final touches
Upon completion of the work, it is recommended not to touch the items for some time - they need to dry, since the steam, although slightly, still moisturizes the fabric. You can now turn off the device. In this case, you should also wait until the water from the nozzles evaporates and the heater cools down.
After completing the process, the item must be allowed to cool.
Important! Before using it for the first time, it makes sense to test the operation of the device on an old shirt or an unnecessary piece of fabric.
Precautionary measures
If you are using the iron for the first time, you need to read the instructions. You need to make sure that the outlet has the voltage that matches its specifications. If this is neglected, a short circuit or fire may occur.
Afterwards, the device itself is inspected: there should be no noticeable damage on it and on the cord, the sole must be clean, without traces of dirt and soot.
If the iron has the possibility of steam treatment, pour water into a special container, making sure that the liquid does not get inside the device.
It is recommended to iron things on a special board or any flat, hard surface covered with a clean, non-fading cloth. To increase the efficiency of the appliance, place a sheet of foil under the fabric or cover of the ironing board.
When you need to turn an item over or prepare a new one for ironing, the device is placed on a special stand or placed vertically, making sure that there are no flammable objects near it and that nothing touches the sole.
You cannot check the degree of heating of the device with your hands - you can get burned.
How to use a steamer: safety rules
Like any household appliance, it is also necessary to adhere to established safety standards. In addition to the risk of electric shock, if used incorrectly, there is a risk of burns from hot steam. To avoid this, you must follow these simple rules:
- Do not use the appliance if it shows signs of damage to the electrical cord, evaporator or hose.
- When working, make sure that the steam jet is always directed away from you.
- Make sure that the power cable does not come into contact with hot surfaces of the steam generator.
- Do not point the vaporizer at pets!
When using a steamer, you must follow safety precautions.
How to clean the soleplate of an iron
The Teflon sole of the iron is more difficult to clean, but it also gets dirty much less often than its metal counterpart. For maintenance, just buy a pencil for cleaning the iron at a hardware store. As a last resort, you can try wiping the Teflon pad with a soft cloth soaked in a solution of vinegar and water. Ceramic iron surfaces are considered the most efficient and rarely burn. They can only be cleaned with a special pencil.
If the soleplate of the iron is burnt, then physically it can be cleaned with a wooden spatula after high heating. Wood will not scratch the surface. Some housewives use this trick: with a burnt surface, they forcefully iron an unnecessary piece of fabric several times. When heated, the burnt particles roll off and transfer to the rag. After application, caked plastic is removed with nail polish remover. These methods are also suitable for irons with an aluminum surface.
If the sole of the iron is metal and there are rust stains on it, then fine table salt poured into melted paraffin from a candle will help get rid of such deposits. It is enough to iron a hot iron over this mixture several times, after which the rust will transfer from the sole of the iron to the soft surface of the homemade cleaner.
Important! Using coarse salt, like any abrasive substance, can scratch the surface of the iron.
You might be wondering which iron soleplate is best.
When does steaming not give the expected effect?
Despite the widely advertised effectiveness and ease of ironing, the result may not live up to expectations. Even if you fully follow the instructions and understand how to use a handheld clothing steamer. Unfortunately, this is the case unless you consider the following:
- Dense and heavy fabrics may give unsatisfactory results due to the properties of the material itself (you need to try it in each specific case).
- The steamer cannot remove stains.
- Not intended for disinfection.
- Not intended for flat work.
- A stationary device may have height restrictions on its working area.
- Even the most sophisticated steamer is not able to completely replace an iron.
In some cases, steaming may not give the expected effect.
Storage and care
Here you should adhere to the general rules regarding the operation of household appliances: be careful when working, perform operations strictly following the instructions and recommendations of the manufacturer, do not use the device for other purposes.
The device must be used in accordance with certain rules.
Before steaming things, you need to make sure that the water container does not leak, and that the water itself is free of impurities and does not contain mechanical particles. After use, it is recommended to dry the container every time, and also descale it once or twice a year (depending on the quality of the water). This is usually done with a solution of citric acid.
The device requires some care.
Preparing laundry
Make sure your laundry is clean. Under the influence of high temperatures, dirt can only penetrate deeper into the fabric, and it will be much more difficult to get rid of stains.
Sort things into separate piles by looking at the labels. Selection principle: recommended fabric processing temperature. Start with clothes that need to be ironed with a low-heat iron, and then increase the temperature to the next batch. This way the process will go faster, and the risk of spoiling things will be eliminated.
Iron vs steamer: main differences
Each of these devices has its own strengths and weaknesses. Even though each of them is designed to perform the same task, their applications still differ. The main advantages of the iron include:
- Ability to make arrows (the steamer can only point existing ones).
- Ability to work in a horizontal position.
- Due to the physical properties of some fabrics, the use of an iron is more effective, since the heating temperature of the sole is much higher.
Sometimes a steamer cannot completely replace an iron.
Thus, it becomes clear that an ordinary household steamer (albeit a multifunctional one) is an exclusively niche device designed to perform a specific number of tasks. This in no way reduces its effectiveness, since using a steamer is much easier than using an iron, especially when ironing items with a large surface.
A steamer has an advantage when you need to iron a product with a large surface.
However, you can expect maximum returns only if you use both devices correctly. Only under this condition can you really forget about the problem of ironing forever.
How to descale a steamer?
Using tap water risks the formation of limescale. Small fragments of it will spread through the steam channels and clog the steam outlets. To avoid dirty splashes on your clothes, find out in advance how to descale your clothes steamer. A simple device without a pump can be cleaned once a month with a solution of your choice: vinegar (1:1 with water), citric acid (25 g per glass of water), mineral water, household descaling agent.
- Pour 2 cups of solution into the water tank.
- Place it in a horizontal position on the base.
- Let the compound work for 40 minutes.
- Instead of p.p. 2 and 3, you can turn the device on to maximum and release the resulting steam over the sink without any residue.
- Rinse the container with water until the smell of the cleaning product disappears.
A design with a built-in pump requires special care: scale also forms in the pipes and on the pump itself. Acid from home remedies will damage it. Such a device is cleaned in service centers, disassembled into parts. There is another option: modern pump steamers have a built-in self-cleaning function. A steam boost to clean the device under pressure from the inside is an excellent scale prevention.
By purchasing this device, you will not only forget about creases and stains, melted edges and burnt holes. Figure out how to use the steamer in addition to working with textiles. Following the general rules, clean toys, wash windows, carefully care for flowers, or freshen the cracks in radiators. The included attachments will tell you what else you can easily get into perfect shape.