LG washing machine device
The design of the unit consists of several main components:
- Frame. Protects the mechanisms and serves as the installation frame.
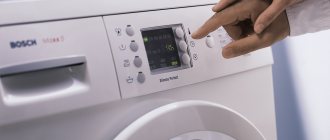
- Display and control panel, program block. Designed to select a mode and monitor execution.
- Tank with drum for laundry.
- Electric motor. Rotates the drum with laundry.
- Electric heater (TEH). Heats water to the specified temperature.
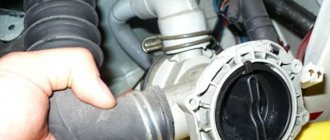
- Water intake and drainage system. Supply and drain hoses, valves, pipes, filters, pumps ensure water circulation during washing.
- Balancing system. Vibration accelerates wear of parts. To reduce vibrations, counterweights, shock absorbers and springs are used.
LG washing machine with direct drive
The drive is the main design element of any washing machine. The classic version of work is carried out using a belt. That is, at the bottom of the washing unit there is a motor that drives the drum of the device through a pulley using a belt.
Important! A similar belt drive is used in cars.
In the 90s of the last century, LG released the first direct drive washing machine. The technology was called "Direct Drive". An excellent PR company came out of this event, which further established the brand in the global home appliance market.
Follow the link to learn about the features of LG washing machines.
This device is a technology that eliminates the use of a belt to drive the drum. The design of the engine allows forces to be transmitted to the rotor through an air gap. The motor is connected directly to the drum, thereby eliminating the presence of intermediate links and the possibility of wear of moving elements.
Important! An electric motor with a direct drum operating system is considered the most reliable. To confirm this, LG has given a 10-year engine warranty to its washing machines with this technology.
On our portal of useful tips in a separate review you will find detailed information about the LG Direct Drive 6 kg washing machine.
Types of faults
Let's look at the main defects of LG washing machines that can cause them to not work correctly.
Rattling and knocking
The appearance of such sounds indicates the following malfunctions:
- Foreign objects (coins, keys, buttons, etc.) between the drum and the tank.
- Damage or wear of the drum bearings.
- Destruction of the counterweight or imbalance.
- Shock absorbers defect.
Water leak
It manifests itself in the formation of smudges on the back wall of the drum, under the loading hatch, under the bottom. Leakage is caused by:
- Damage to the inlet or drain hoses.
- Distortion of the drain filter.
- Leaking valves or hoses in the powder receptacle.
- Worn drain pipe.
- Deformation of the central bearing seal.
- Damage to the tank.
- Pump failure.
Water does not drain
The automatic machine works in accordance with the program, but at a certain stage it stops and the water does not drain. Possible reasons:
- The pump pipe or drain hose is clogged.
- A small object has fallen into the pump.
- Pump failure.
- Level sensor problem.
- Incorrect operation of the electronic module
No water heating
Problems in which the water does not heat up:
- Incorrect operation of the pressure switch - there is no signal about a sufficient water level, the command not to turn on the heater is not issued.
- Damage to the electrical circuit of the heating element.
- Broken heating element.
- Temperature sensor problem.
- Control module malfunction.
The drum does not spin
The drum stops:
- Problems in the control module.
- Engine failure.
- Hall sensor malfunction.
- Drive belt rupture.
- Destruction of tank bearings.
Sunroof won't open
The reasons why the door does not open after the end of the program are:
- Malfunction of the drainage system - water in the tank, the door is blocked.
- Water level sensor failure.
- Damage to the door handle.
- Malfunction of the UBL (hatch locking device).
- Control module defective.
Blockages
The water drains slowly or does not drain at all. Causes:
- The drain filter or drain hose is clogged.
- The pipe is blocked by foreign objects or lime deposits.
- Damage to the pump impeller.
Mechanical wear
The moving parts of the device are subject to severe mechanical wear. The following nodes are critical in this regard:
- Bearings. Signs: extraneous sounds during operation (hum, creaking, grinding, whistling, etc.).
- Drive belt. Signs of stretching: slight rotation of the drum, weak belt tension on the pulley.
- Pump impeller. Signs of depletion: extraneous sounds when draining water, slow pumping.
- Balancing and damping mechanisms. Signs of wear: significant increase in vibration, extraneous sounds, loose drum.
Electronics failures
The electronics in LG washing equipment are convenient and reliable. However, failures in management do occur. The reasons are voltage fluctuations in the network, pressing buttons while executing a program, etc. Signs:
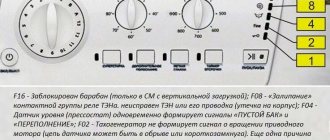
- The machine does not start washing, the hatch does not lock, the drum does not spin, error code is LE, EE, E3.
- Stop washing, sound and light alarm, error code AE.
To fix this, just unplug the machine for a few minutes and restart the washing program.
Breakdown of the pressure switch
Measures the water level in the tank to automatically fill or drain water. Signs of malfunction:
- Washing in an empty tank.
- Endless repetition of the rinse cycle.
- The machine spins the laundry, but the water does not drain.
Problems with the module
In LG machines, the module is placed in a plastic box and filled with a compound to protect it from water. When a module fails, it is determined by the following signs:
- Maximum rotation of the drum at the beginning of the wash, an endless cycle of filling and draining water.
- The module freezes, the indicators do not light up, and the error codes change chaotically on the display.
- The wash doesn't stop.
- Incorrect operation of the heater.
DIY repair
Knowing the typical breakdowns and having the skills of plumbing and electrical installation work, you can carry out quite complex repairs of LG washing machines with your own hands.
Before starting work, the device must be de-energized and disconnected from the water supply.
Replacing bearings
Repair using the example of a 6 kg model of laundry from the WD series with direct drive:
- Remove the top and rear covers, indicator panel, sealing collar, front panel.
- Disconnect pipes, wires, shock absorbers, counterweights.
- Disconnect the Hall sensor, remove the motor rotor and stator.
- Remove the tank and drum.
- Unscrew the screws from the mounting sockets at the joint of the tank and separate the halves.
- Remove the drum.
- Remove the oil seal and knock out the bearings.
- Install new ones, lubricate, install oil seal.
- Place the drum.
- Apply sealant to the joint, connect the halves, and tighten with self-tapping screws.
- Reassemble the machine in reverse order.
Replacing the heating element
The heater changes when it burns out, which is determined with an ohmmeter. To replace you need:
- Remove the back cover.
- Remove the wires from the heater and temperature sensor
- Unscrew the fastening nut.
- Remove the heating element by carefully prying it with a screwdriver and pulling it towards you.
- Insert the new heater into the socket. The part should fit along the guides with little effort.
- Tighten the fastening nut, connect the wires
Pump replacement
Procedure for replacing the drain pump:
- Remove the top cover, door seal, indicator, front and bottom decorative panels, counterweight and power control unit.
- Unscrew the drain filter.
- Loosen the clamps, disconnect the drain hose and pipe from the pump.
- Unscrew the pump mounting bolts.
- Remove the pump.
- Install and secure the new pump.
- Reassemble the car in reverse order.
Electronic module repair
The difficulty of repair is that the board is installed in a non-separable plastic box filled with silicone compound. To troubleshoot the problem you will need:
- Remove the module.
- On the reverse side, mark the projection of the faulty part on the plastic bottom.
- Use a soldering iron to burn a rectangle around the projection.
- Remove a section of plastic, opening access to the board.
- Using a screwdriver, carefully remove the layer of compound at the soldering site of the faulty part.
- Unsolder the part, replace it with a working one, solder it.
- Put the removed section of plastic back in place and glue it.
Replacing the pump
Repair work includes (using the example of the WD-80150HUP model with a load of 5 kg of laundry):
- Place the machine on its side, allowing access to the pump from below.
- Disconnect the pipe, drain hose, wires, unscrew the bolts, and remove the pump.
- Install a new one (the same or with the same characteristics).
- Fasten, put on the pipe, hose, connect to the electrical circuit.
Direct Drive Repair
Problems with direct drive are manifested by a loud hum, jerky rotation of the drum, and vibration. Repair work:
- Open the rear hatch.
- Unscrew the mounting bolts and remove the rotor and stator.
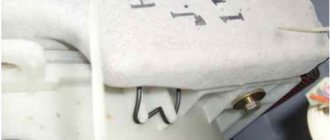
- On the stator, use a sharp tool to carefully remove the compound from the Hall sensor board.
- Find 4 resistors 681 on the board (labeled R01S, R02S, R03S, R04S in the diagram).
- Unsolder, solder in working ones.
- Fill the board with silicone sealant. Let dry.
- Install the stator and rotor, turn on the Hall sensor and power wires.
Hall sensor repair
A malfunction of the Hall sensor leads to uneven rotation of the drum, vibration, and hum. Repair:
- Carefully remove the silicone fill on the sensor board.
- Ring resistors R01S, R02S, R03S, R04S.
- If faulty ones are found, replace them with the same ones or select similar ones.
- Check the resistance between the sensor terminals: between 5 and 1, 5 and 2 there should be 10 kOhm.
- Fill the board with silicone and let dry.
Handle repair
The door handle is a plastic part that breaks easily. It can be repaired in this way:
- Apply superglue to the crack, forcefully connect the broken parts of the part, wait a few seconds.
- Apply superglue to an area 1-2 cm on both sides of the crack and sprinkle evenly with baking soda.
- Do the same on the back side of the part.
- Reinstall the handle.
The gluing area is reinforced with soda and acquires the necessary rigidity.
Drum rib repair
Plastic ribs in the drum make it easier to turn the laundry. Over time, they become loose and play appears. Defect fix:
- Heat the rib with a heat gun, remove it from the clamp, and remove it from the drum.
- At a distance of 1 cm from the bottom cut of the rib and 5 cm from each edge, make two holes, 0.5 - 1 cm long on each side.
- Slide two plastic clamps, teeth up, through the holes on one side of the rib.
- Pass the free ends of the clamps through the drum at the rib attachment points and pass through the holes on the other side of the rib.
- Warm it up with a hairdryer, fix the rib in the mount, tighten the clamp. Trim the ends.
- Do the same with other ribs.
Engine repair
A direct drive motor does not rotate in the opposite direction. Repair:
- Remove the stator.
- Remove the silicone from the Hall sensor board and ring the resistors.
- Unsolder the damaged one, and instead solder a working resistor with a resistance of 331 Ohms.
- Ring the terminals: on pairs 1 and 5, 2 and 5, the resistance should be 10 kOhm.
- Fill the board with silicone.
- Assemble the engine.
Replacing the cuff
A worn or damaged cuff is replaced in the following order:
- Remove the powder receptacle and top cover.
- Separate the indicator panel.
- Use a screwdriver to pry up the clamp securing the cuff and remove it.
- Remove the front panel.
- Unscrew the counterweights.
- Remove the cuff from the drum.
- Install a new one, paying attention to the alignment of the holes for the sensors.
- Assemble the car.
Features of LG washing machine repair
The LG washing machine range includes devices with direct drive and belt drive. The repair of both types is similar, since the designs are largely the same. However, there are differences that need to be taken into account when starting troubleshooting.
Direct drive
- Installing the motor on the drum axis leads to heavy loads on the bearings and reduces their service life. Therefore, repairs to the bearing assembly of an LG direct drive washing machine are done more often than in belt driven machines.
- When the central oil seal leaks, water enters the motor stator and damages it. A complete replacement is required. On the positive side, it is easier to get to the engine than in units with a transmission belt.
- The devices are sensitive to voltage surges, which damage the Hall sensor. Radio installation skills are required for repairs.
Belt driven
- The use of a belt and pulley reduces the mechanical load on the bearing assembly - replacement is required less frequently.
- Belt-driven units generate significant vibration, so repairs to balancing and shock-absorbing systems are carried out more often than for direct-drive machines.
- Regular replacement of the motor commutator brushes is required.
- Regular checking of belt tension, inspection and timely replacement are necessary.
Features of repairing LG direct drive machines
Replacing oil seals and bearings is a common reason why owners of such equipment contact service centers. If you have some knowledge in setting up washing machines, you can try to change these parts yourself.
You can diagnose the need to replace bearings by uncharacteristic sounds when the drum rotates, such as creaking, humming, grinding.
In order to get to both the oil seal and the bearings in direct drive models, the motor must be removed. The easiest way to remove the back panel is to unscrew the bolts around its perimeter. The engine will be immediately visible. It is separated from all the components connecting it to the machine structure (the clamps are cut, the Hall sensor is disconnected, and so on). The counterweights must be removed.
The mechanism has two bearings and an oil seal. Used parts are removed and new ones are installed in their place. It is necessary to recess the oil seal well.