When it is necessary
In modern dishwashers, the movement of the door is controlled by a special mechanism that contains springs. This is done, for example, in Siemens dishwashers. It ensures not only its smooth movement and fixation, but also allows it to be stopped in an intermediate position. If the door malfunctions, if you open it slightly, it may close on its own, creating discomfort when loading the dishwasher.
Various breakdowns of this kind more often occur in built-in dishwasher models, for example, from Bosch.
Preparing for the adjustment procedure
Before starting work, it is necessary to carry out the appropriate preparation:
- It must be remembered that when making adjustments, you must turn off the dishwasher and also disconnect the power cord from the outlet.
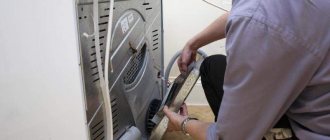
- If we are talking about a built-in dishwasher, such as Electrolux or another similar one, the unit must be removed from the niche.
- Disconnect the hoses that supply water, as well as the drain hoses.
- Before starting work, you will need to prepare the tools that will be used.
- Before carrying out adjustment work, it is useful to familiarize yourself with the instructions for carrying it out.
When disconnecting from communications, it is important to remember the following:
- You need to unplug the dishwasher from the outlet. The wire must be rolled up and hung on a special holder, which is provided in the dishwasher for this purpose.
- It is necessary to close the valve, which will turn off the flow of water from the water supply network to the dishwasher.
- The water intake hose must be completely disconnected from the dishwasher.
- Next, the drain hose is disconnected. After this you need to install a plug.
If a built-in dishwasher model is used, then it is removed from the kitchen furniture set as follows:
- First of all, you need to find the fasteners that hold the dishwasher.
- Using a Phillips screwdriver, you need to remove the screws that hold the car in the niche.
- Next, you need to carefully pull out the car. Typically, the weight of built-in units AEG or others of the same kind does not exceed 50 kg - this makes it possible to move it yourself. In this case, it is necessary to act as carefully as possible.
- Before placing the machine on the floor, you need to prepare a place for this and cover the floor so as not to damage it when moving. The dishwasher should be placed in such a way that it is easily accessible from all sides.
To prepare for door adjustment, you will need the following tools:
- crosshead screwdriver;
- pliers;
- hexagon;
- you need to prepare a metal cable one and a half millimeters thick.
Sewerage
The work of discharging wastewater into the sewer system will not cause any serious difficulties. However, the process should be taken seriously, because if minor mistakes are made, an unpleasant odor may form in the kitchen or dirty water may accumulate in the machine itself.
- The distance of the outlet pipe from the floor should not exceed 15 cm.
- We recommend installing a check valve in the wiring, which will prevent wastewater from flowing back into the PMM.
Through siphon
The simplest method involves connecting the outlet to the kitchen sink drain siphon. But there are certain inconveniences with this method: there is a high risk of waste water returning to the dishwasher. If there are no alternatives, you will have to install a check valve or make a water seal yourself. In addition, blockages in the siphon are possible, which can lead to an unpleasant odor during operation of kitchen equipment. But this can be solved by simply cleaning the siphon once every 6 months.
Therefore, it is better to use a special adapter sold in hardware stores. To do this, you need to disconnect the siphon from the sewer, install a tee-adapter in the same place, then replace both the siphon and the inlet from the dishwasher, not forgetting about the rubber seals and sealing all the nodes with acrylic or silicone after installation.
Pipe tapping
Tapping into a sewer pipe requires care, since it is not easy to replace a damaged pipe in a riser. Otherwise, the process is simple and similar to the method described above for connecting to a plastic pipe with cold water. You will need an adapter of the appropriate diameter, rubber seals and sealant.
An important point will be to find the insertion point below the level of the machine itself to ensure that liquid flows into the sewer under its own weight. The hose must run at a slope and without strong sagging (maximum 5-7 cm) to avoid the formation of stagnant water, which will cause an unpleasant odor to spread.
Carrying out work
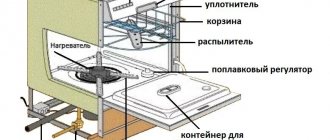
After the preparatory stage, you can begin making adjustments. Unfortunately, this procedure cannot be completed in a few minutes. In order to do the job efficiently, you will need, in particular, to disassemble the machine and check the condition of the springs.
- You need to unscrew the fasteners that hold the right side wall of the car. After this, it must be removed and set aside.
- Then you need to detach the top cover. To do this, simply unscrew the screws that hold it in place.
- Under the cover you will notice two fasteners from which cables extend. They run down along the right and left sides of the body. The ends of the cables are connected to springs.
- There are screws that regulate the tension of the cables. If you twist them in the right way, the opening will become tighter or, on the contrary, more free. The door spring stiffness must be adjusted.
- It is possible that one of the cables has broken. In fact, this leads to the fact that the remaining person takes on double the load. In this case, the damaged element, including the spring, will need to be replaced.
In order to carry out the replacement correctly, it will be necessary to perform the following operations:
- the screw on which the damaged cable is attached must be loosened slightly;
- Using pliers, the fastener must be carefully removed from this screw;
- now you need to disconnect the spring from it;
- in order to carry out this operation, such an element must be purchased in advance;
- then a new, serviceable cable is placed on the spring;
- its other end is placed onto the screw using pliers;
- after this element is assembled, it is necessary to adjust the tension so that it is optimal;
- Now we need to install this cord in its place.
It is possible that the steps performed were able to adjust the door. However, in some cases they may not lead to the desired result. In this situation, repairs continue. Now the following actions are performed:
- You have to open the door all the way. Now, holding it with your knee, unscrew the screws that are located around the perimeter of the end.
- Now we have to disassemble the door. It should be taken into account that it is made according to the sandwich principle. There are internal and external parts, between which there is a mechanism for opening and closing the door. To see it, remove the inner cover.
- During operation, it is necessary to weaken the spring so that the door cannot slam shut.
- You need to remove the cover from the cable.
- After this, you need to install a new locking mechanism instead of the old faulty one.
It is important to remember that it is not recommended to immediately assemble the door. The point is that you need to ensure the quality of the work. This rule applies to any dishwasher: Beko or other brands.
In order to carry out such a check, you need to hold the cable and spring and see how easy it is to open or close the door. It is also important to make sure that the door is held steady in the middle position. If the door spring adjustments have been made correctly, the door can be reassembled.
Dishwasher Installation
The dishwasher installation looks like this:
- Carefully study the instructions from the dishwasher in order to correctly understand which water supply to connect it to. The whole point is that some brands work with the supply of hot water and cold water, while others are connected to one water supply.
- Mounting a tee onto a water pipe in order to provide a branch through which the dishwasher will be connected. As a rule, the remaining necessary spare parts are included in the equipment delivery package. However, sometimes their length is not enough. For example, the manufacturer Bosch allows hoses to be extended up to 3.5 m (for models with a width of 45 cm) or up to 3.6 m (for models with a width of 60 cm). The point here is this: some models do not stop the water themselves and therefore require a special valve. Although the previously mentioned manufacturer Bosch (Bosch) and the fairly well-known manufacturer Siemens have equipped all modern models with this function. Important! Regardless of what brand your equipment is (Bosch, Siemens or something else), connection is only possible when the length of the hose through which water will be supplied does not exceed 5 meters.
- The stage of connecting the unit to the drain (direct installation of everything necessary for water supply).
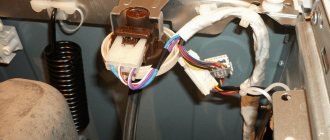
- Connecting the dishwasher to the electrical network. Important! Grounding is required.
- Adjusting the dishwasher. The importance of this stage should not be neglected. It is thanks to the correct adjustment that you can ensure long and productive use of the equipment.
Other faults
The most common situations were discussed earlier. However, other damage may occur:
- The door leaf falls when opened. This suggests that the most likely cause is a broken cord or a broken spring. In this case, appropriate replacement is carried out.
- Sometimes the door does not lock when closed. As a result, the dishwasher does not start working. In such a situation, the dishwasher will show an error code on the display. In this case, it is necessary to take the actions indicated in the instructions for this situation.
- If the machine is leaking, one possible reason could be broken cables or a broken spring. When carrying out repairs it is necessary to check them.
- If you hear a strong creaking sound when opening or closing the door, this indicates that the hinges need to be lubricated. It may also turn out that they have become faulty. In this case, they need to be replaced.
Although in the situations under consideration, adjusting the door tension can be done independently, but if the dishwasher is under warranty, it is better to contact a service center.
Dishwasher Installation
The dishwasher installation looks like this:
- Carefully study the instructions from the dishwasher in order to correctly understand which water supply to connect it to. The whole point is that some brands work with the supply of hot water and cold water, while others are connected to one water supply.
- Mounting a tee onto a water pipe in order to provide a branch through which the dishwasher will be connected. As a rule, the remaining necessary spare parts are included in the equipment delivery package. However, sometimes their length is not enough. For example, the manufacturer Bosch allows hoses to be extended up to 3.5 m (for models with a width of 45 cm) or up to 3.6 m (for models with a width of 60 cm). The point here is this: some models do not stop the water themselves and therefore require a special valve. Although the previously mentioned manufacturer Bosch (Bosch) and the fairly well-known manufacturer Siemens have equipped all modern models with this function. Important! Regardless of what brand your equipment is (Bosch, Siemens or something else), connection is only possible when the length of the hose through which water will be supplied does not exceed 5 meters.
- The stage of connecting the unit to the drain (direct installation of everything necessary for water supply).
- Connecting the dishwasher to the electrical network. Important! Grounding is required.
- Adjusting the dishwasher. The importance of this stage should not be neglected. It is thanks to the correct adjustment that you can ensure long and productive use of the equipment.