Working on a sewing machine begins with threading the upper and lower threads. If there is the slightest inaccuracy in carrying out such a procedure, it will never be possible to achieve an even and beautiful stitch. The machine will either not sew at all, or it will tear the thread and form a seam with gaps and loops protruding above the fabric.
We will talk about the importance of choosing the right bobbin, how to wind thread on it, and what nuances you should pay attention to when threading. From our article you will also learn about what defects and malfunctions in the operation of the machine can arise due to incorrect installation of the bobbin, and how to eliminate them.
Purpose of bobbins and their types
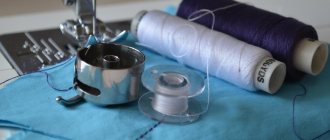
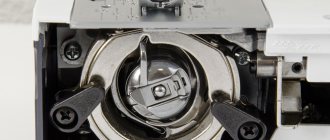
The bobbin is a small spool for winding the lower thread. The bobbin is inserted into a bobbin case, which is placed in a shuttle device located under the needle.
When sewing fabrics, a seam is formed by weaving the top and bottom threads through the material. The upper thread is threaded into the needle, which, when lowered down, plunges into the bobbin case, capturing the lower thread. The bobbin is needed to smoothly feed the lower thread and ensure its normal tension when sewing.
The state of the line is affected by:
- Thread quality and thickness;
- Correctly threading the upper and lower threads, as well as fixing the bobbin case in the hook;
- Accuracy of thread tension adjustment.
Expert opinion
Irina Vasilyeva
Designs clothes, teaches at her own school and advises beginning seamstresses
It is desirable that the thickness of the lower thread be one number less than the upper one. This will allow you to get a neater seam and reduce the likelihood of the top thread breaking while sewing fabrics. If strong standard threads are used, their thickness can be the same.
How to thread a shuttle into a sewing machine
Before working on a sewing machine, you need to correctly thread the upper and lower threads, and also adjust their tension. It is important to determine the stitch pitch size and its type. Without refueling the shuttle, you can’t do it either.
Bobbin case
For example, take the common vertical shuttle. It is used on large factory machines and inexpensive home machines. The instructions look like this:
- Wind the thread onto the bobbin. To do this, it is passed through a special mechanism and attached to a reel. All that remains is to perform a couple of manual winding cycles and switch the device to automatic winding mode.
- When there is enough thread, the process is stopped, and the bobbin is inserted into the bobbin case so that the thread runs clockwise through it.
- Pull the thread through the hole in the cap and pass it under the leaf spring. As a result, it should come out into the ear to a length of about 10 centimeters.
You might be interested in this: The procedure for sewing Aladdin pants for men and women
The old Singer machine also needs proper threading
- If necessary, increase or decrease the thread tension by tightening a special screw on the cap.
- Insert the shuttle into the vertical shuttle device with the tail up so that it fits well into the grooves.
- Turn the handwheel so that the upper thread catches the thread from the shuttle.
- Pull both threads towards the machine foot.
Sewing machine Singer Studio 15
Important! The thread tension needs to be adjusted most carefully. There should be no situations where the thread dangles freely or is pulled too tight. In the first case, this will lead to a crooked stitch, and in the second, to a thread break.
Sewing machine VLK Napoli 2600
Numbers of threads and sewing needles for various materials
| Material type | Needle numbers | Thread numbers |
| Cotton / Silk | ||
| Batiste, silk | 70 | 80/65 |
| Satin, chintz, calico | 80 | 80/65 |
| Calico, flannel, thick silk, heavy cotton or wool fabric | 90 | 50-60/ — |
| Teak, suit wool | 100 | 40/ — |
| Cloth, drape | 110-120 | 30/ — |
Sewing machines are equipped with special devices for quickly and evenly winding thread onto the bobbin. When hand-winding, the thread tension is weaker, so the quality of the stitching is worse.
Machines of various models are equipped with shuttle mechanisms and bobbin cases of several modifications. Accordingly, bobbins of different heights and shapes are used.
For industrial sewing machines, narrow metal bobbins are used, and for household machines, wider ones are used.
The advantages of metal bobbins are strength and durability. They do not form nicks that interfere with the free movement of the thread.
The advantage of plastic bobbins is the ease of sliding along the walls of the bobbin case. It is possible to monitor the thread consumption through the transparent plastic base. When sewing on machines with a horizontal shuttle, such control plays an important role.
The disadvantages of plastic bobbins include low strength. A fast-moving needle can easily scratch the surface of the bobbin and leave nicks on it, which can cause the thread to break and become tangled in the hook.
Important! Bobbins vary in size for different machines, so these products are not universal.
Locations for measuring bobbin sizes for various machines (see table below)
Methods for threading children's sewing machines
Each model differs from others due to certain parameters. However, the principle of refueling is similar for many . Let's look at the most common option. Below we present a certain sequence that will certainly help you achieve what you want and thread the children’s sewing machine without any problems.
Algorithm of actions
- The first step is to install the spool with the selected threads on the bobbin holder.
- Thread one end of the thread from right to left.
ADVICE! Perform the action through the edge of the tension adjuster.
- Next, you should transfer the fiber directly through the thread take-up and also from right to left.
- The next step is to transfer the thread to the guide.
- Finally, you should thread it through the needle on the left side. To summarize, we can say that inserting thread into a children's model is not difficult. The method is as similar as possible to the present one. This is explained by the fact that manufacturers are trying to make it realistic for children to use the machine.
Did you like it?
Loading…
Found a mistake? Select it and press Ctrl + Enter. We'll fix everything!
Bobbin sizes for some sewing machines
| Bobbin dimensions, mm | ||||
| Measurement location | "Kharkiv" | "Tula" | "Gull" | "Podolsk" |
| 1 | 9.3 | 8.8 | 12 | 12 |
| 2 | 8.4 | 8.0 | 11.5 | 11.5 |
| 3 | 6.6 | 7.7 | 10 | 10 |
| 4 | 21.3 | 19.7 | 20.4 | 20.4 |
| 5 | 9.0 | 10 | 9.5 | 9.5 8.5 6.2 |
| 6 | 8.7 | 7.5 | 8.5 | 8.5 |
| 7 | 6.2 | 6.1 | 6.2 | 6.2 |
How to choose the right bobbin
When choosing a bobbin, it is important to remember that:
- It must fit the hook of the sewing machine you are using;
- There should be no nicks, scratches or chips on it. The ideal option is a bobbin with a smooth glossy surface;
- The reel must have a normal shape, otherwise it will get stuck in the shuttle.
A good bobbin fits easily into the bobbin case. If you install it in the shuttle device and then slowly pull the thread, it will come out smoothly, without jerking.
If you use a spool that has defects and clings to the walls of the cap, loops will appear in the stitching due to a violation of the tension of the lower thread. Possible permanent damage to the bobbin and jamming of the mechanism.
When choosing a new bobbin, it is advisable to have a proven sample with you. This also applies to the bobbin case.
For home sewing, you can purchase plastic bobbins. They are cheaper, and having a whole set of such spools with threads of different colors and thicknesses, you can save time on preparing the machine for work. For professional sewing, it is better to buy more durable metal bobbins.
Winding thread onto a bobbin
Modern sewing machines are equipped with a device for winding thread onto a bobbin. It is located at the top of the body. Only the holder for placing the bobbin and the fixing device are brought out.
Winding is done in the following order:
- A spool of thread of the required size is placed on a rod located in the upper part of the body. In this case, the thread should leave it counterclockwise;
- The thread from the spool is pulled through a tension device located next to the rod. Then it is brought to the bobbin, threaded through a hole on one of its bases and wound around the leg several times to secure it;
- The bobbin is put on the holder so that the spring located in its upper part fits into the groove on the inner surface of the bobbin. When you press it, you should hear a click. It is important to direct the thread so that it winds clockwise;
- The holder together with the bobbin moves towards the latch to the limit (a click is heard again);
- In order for the needle to remain motionless while winding the lower thread, the rotation mechanism of the working shaft is turned off. Various types of machines provide for stopping the flywheel by pulling or loosening the screw that holds it;
- The machine is connected to the network, and the winding device is operated using a foot pedal. Once the bobbin is full, the latch moves away from it and winding stops. Approximately 40 m of thread is wound onto the bobbin;
- The working position of the flywheel is restored.
Threading and adjusting thread tension
To thread the upper thread, the spool is placed on the holder rod so that it unwinds clockwise. Pass the thread through the holes of the guide and the disk tension regulator, pass it through the retaining hooks and bring it through the second thread guide to the needle. The length of the free tail is approximately 12 cm.
Threading the bobbin thread in machines with a vertical shuttle
The vertical shuttle is installed in such machine models as
Chaika 143A
Veritas 8014-35
Jaguar EL 223
When threading the lower thread, perform the following steps:
- Remove the shuttle cover. Hold the bobbin case in your hand and insert the bobbin into it. Pass the thread under the spring and insert it into the slot at its end;
- Insert the threaded bobbin case into the hook device by pulling the latch. Make sure the lever fits into the groove of the shuttle. The cap is pressed so that it is securely fixed;
- The end of a thread 10-12 cm long is left outside. The thread should unwind freely;
- Close the lid over the shuttle;
- Holding the end of the upper thread, smoothly manually turn the handwheel towards you so that the needle plunges into the shuttle device, and the upper thread hooks and pulls out the lower one;
- Both ends of the threads are pulled behind the foot with the needle.
Threading the lower thread in machines with a horizontal shuttle
Many modern machines (for example, Brother, Innov-is, Janome, Lady models) have a horizontal mechanism in which there is no bobbin case, and the bobbin is inserted directly into the shuttle. Refilling is greatly simplified. Removing the lower thread is done in the same way as in machines with a vertical shuttle. The bobbin is covered with a transparent cover through which you can monitor the thread consumption.
In order to check that the threads are threaded correctly, test pieces of fabric are sewn together. A normal stitch should look neat on both sides.
If the bobbin thread is not threaded correctly, the threads will not intertwine. Only the top thread remains on the surface of the fabric, there are no stitches at all, or a stitch with large gaps is obtained.
Setting the thread tension
You can adjust the bobbin thread tension by loosening or tightening the screw that secures the bobbin case spring. As a rule, the factory setting is correct. Craftsmen do not recommend making adjustments yourself, since it requires skill.
The quality of the stitching is most often improved by changing the tension of the upper thread using a dial adjuster. If loops are visible on the wrong side of the seam, increase the tension of the upper thread by setting a number on the regulator that is higher than the previous one.
If the stitching on the front side “loops”, the tension is slightly weakened, setting a lower value.
How to insert a bobbin into a sewing machine: Singer, Brother, Janome
Before directly installing the part, you must check whether the width of the coil matches the width of the cap. The bobbin should fit “comfortably” inside the cap. Nothing should prevent it from rotating. At the same time, its width should not extend beyond the edge. If chips, cracks and nicks appear on the surface of the part, this will sooner or later lead to snags and thread breakage while sewing. Even if the thread does not break, this can have an extremely negative impact on the quality of the work.
Threading the bobbin thread
In addition to insertion, a number of additional operations should be performed to wind the thread. If the process is unfamiliar, then you should use step-by-step instructions:
- Install the spool on a special pin, which is located on the top of the sewing machine body.
- Unwind a little thread and wind it onto the bobbin by hand. If the part is made of plastic, then it usually has a special hole for inserting thread and subsequent winding.
- Place a small reel on the winder and secure it well.
- Press the pedal of a manual or automatic machine to begin the winding process.
Top threading
Important! All that remains is to wait for the automatic completion of the winding process. If necessary, you can stop the machine after filling the bobbin with thread, when the wound amount is sufficient.
You may be interested in: Cutting and sewing a straight dress without patterns
Next, the installation itself is carried out, but before it it is also important to check what type of shuttle mechanism is used in the sewing machine. With a horizontal shuttle, the procedure is as follows:
- Remove the cover. It all depends on the model. It disconnects differently in different machines. You should read the operating instructions.
- Take the tucked part and unwind approximately 10-20 centimeters of thread. This action is necessary to bring it out through a needle, single, double-thread or upper thread.
- Insert the threaded bobbin into the cap.
- Return the lid to its place.
- Bring the bottom thread out.
Adjusting the thread tension
If the shuttle of the machine is directed vertically, then the step-by-step process of threading it is as follows:
- Remove the cover. To do this, as in the previous case, it is best to read the instructions for using the device.
- Unwind 15-20 centimeters of thread from the spool and place the part in the holder (cap).
- Pull the end of the thread through the tension regulator. It is important that the direction of the thread matches the position of the spring.
- Insert the cap into the shuttle, holding it by the dedicated tab or latch.
- Install the cap and press the latch until a click appears, indicating that the part is in place.
- Check the correctness of actions. The tail of the cap should be in a special groove in the shuttle device.
- Close the lid as usual.
- Bring the bottom thread out.
Refilling the sewing machine