An automatic washing machine has long become a common thing in almost every apartment. The device can be connected by technicians from the store where it was purchased, or by invited specialists. But many people prefer to install the washing machine themselves, especially since the process is not so complicated. If you got this household appliance from relatives or friends, or you simply don’t want to spend money on the services of specialists, then you can do all the work yourself. So how to install a washing machine correctly? For the normal functioning of the machine, you need to comply with all the requirements for its installation, correctly connect to the necessary communications, and also figure out how to ground the washing machine and why it is needed.
Bathroom
The simplest solution is to install an automatic washing machine in the bathroom. Very often washing machines are placed in it. The advantages are obvious: all communications are close, the drain hose can simply be directed to the bathroom. But there are also plenty of disadvantages to such placement.
- Due to high humidity, a regular outlet cannot be installed in the bathroom; it must only be moisture-proof.
- All parts and assemblies of the automatic machine will have to work in conditions of excess humidity, which will not extend their service life.
- Most bathrooms in apartment buildings have more than modest dimensions. You will have to sacrifice something to put a washing machine there. Sometimes in such cases the sink is removed, which does not add convenience.
Connection to sewerage
The next step should be connecting the washing machine to the sewer. When installing the device, some differences from the standards may occur. For example, if the washing machine does not have a check valve and the water moves only in one direction, then the connection is made strictly according to the instructions with the specified level (its minimum and maximum value should be indicated) for the placement of the pipe. If the minimum level is specified as 50 cm, then the pipe should not be placed below this value. This is demonstrated more clearly by the diagram below.
Scheme No. 1
Your next action should be to connect the outlet pipe of the machine to the sewer pipe. To do this, you must first purchase a siphon, and then install it. The siphon will provide the most reliable fastening and protect against any leaks. Some users attach the drain hose to the edge of the bathtub or sink. But it is clear that this option is not very reliable due to the possibility of accidentally touching the hose, falling and pouring water onto the floor. After connecting, check that the hose is straight and has no kinks. Installation of drain hoses to the machine is done using clamps and adapters.
Kitchen
Here communications are also nearby, and there is more free space. In this case, the automatic machine is installed under the countertop, and for this it is not even necessary to select a built-in model. Please note that a washing machine installed under a countertop must be placed on the floor, and not on the base of the furniture, and the back of the box in which it will be located must be absent.
Connection to water supply
The next important step will be connecting the washing machine to the water supply. This is done using 3/4 inch diameter hoses. You may need to lengthen them. Then this needs to be done using rubberized cuffs. Then you need to cut a thread in a certain part of the water supply system, as accessible as possible, and install a valve there, with the help of which water is supplied when washing begins.
This is interesting! Mold in the washing machine: how to get rid of it and how to prevent its occurrence
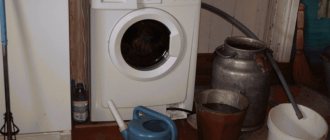
Corridor or storage room
If the width is sufficient, you can install the washing machine in the hallway. But it’s better if there is a small storage room next to the bathroom. It is ideal: it is easy to make a hole in the partition for laying communications, and comfortable conditions will ensure a long service life for all units and mechanisms.
USEFUL INFORMATION: Advantages of a touch-sensitive water tap: choosing an electronic mixer
During operation, the washing machine is subject to strong vibrations, so it is advisable to install it on a rigid base - concrete or ceramic tiles. How to install a washing machine on a wooden floor, which increases vibration? You can use special rubber stands that dampen not only vibrations, but also noise. You can buy them at the same store that sells washing machines.
Preparing the washing machine for installation
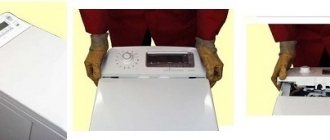
How to install a washing machine so that it does not jump or shake? If the car is new and just delivered from the store, then the first step is to rid it of the box and fasteners that protect the product during transportation. These can be bars and staples.
When transporting the washing machine, the rotating parts are firmly fixed with bolts. They should be unscrewed and the holes should be closed with the plastic plugs supplied. The drum should hang on the springs. Once you turn on a machine that has not had these bolts removed first, it will likely result in costly repairs.
When delivering from a store, all these manipulations should be completed before signing the receipt documents. It is necessary to carefully check the washing machine for external damage and scratches. If you shake it a little, there should be no knocks or other extraneous sounds. Without such a check, it is quite possible to receive a unit with a defect, and it will be almost impossible to prove that the device was not damaged by you.
The washing machine is installed on a pedestal and leveled using a level. Twist-out feet are used for adjustment. The slightest misalignment is fraught with increased vibration and noise during washing.
Connection to water supply and sewerage
The machine is connected to the cold water supply network through the inlet hose, and only then through the drain hose to the sewer. Water is used automatically, so the connection to a stationary water supply must be strong.
The delivery set includes a standard length hose, which is connected to the rear panel using a plastic gateway. In order to secure the drain hose to the sink, the kit includes a hook with which it is secured to the edge of the bathtub or sink.
Washing machine drain installation
The drain hose must be located within a standard sink, sink or bathtub, that is, at a height of 40 to 90 cm!
In order to lead the drain hose directly into the sewer, the drain hose is connected to the sewer pipe. The water pressure is quite strong, so we additionally install a shut-off valve, which reduces the likelihood of water spillage if the water hose is damaged, the equipment is not used for a long time, and for the convenience of its dismantling.
Correct connection of the washing machine Connecting to the water supply Connecting the drainage
Various options for connecting the drain to the sewer.
We connect the washing machine and turn on the water. We check whether water flows where there are connections. The machine is ready for use.
Connecting the washing machine to the water supply
The process of supplying water to the washing machine is simple. We will tell you how to install and connect the washing machine. Connection diagrams may be different, but the general requirements must always be met:
- The pipeline branch supplying water to the washing machine must be equipped with shut-off valves. It is recommended to use ball valves. Then, if a leak occurs, you can quickly shut off the water supply to the machine.
- The pressure in the pipes should not be less than one atmosphere. If the pressure is insufficient, you will have to install a special pump.
- Clogged water can quickly damage the washing machine mechanism. As a rule, most of their models are equipped with standard mechanical cleaning filters. If water of increased hardness enters the apartment, it is recommended to additionally install a polyphosphate filter. It is a flask filled with an active substance that prevents the appearance of scale. The filter media can be easily changed as you use it.
USEFUL INFORMATION: How to lay tiles yourself
It is important to remember that water passed through a polyphosphate cartridge is only suitable for technical needs and cannot be used for food purposes.
To connect the washing machine, flexible hoses with a diameter of ¾ inches are usually used. The hot water supply is used very rarely, so one hose for supplying cold water is sufficient.
- If the apartment has metal pipes, then the easiest way is to make the connection yourself using a crimp coupling. Its two halves are bolted to the pipe, securely fixing the sealing gasket. After this, a hole in a pipe with a diameter of 10 mm is drilled directly through the threaded outlet for the tap. A ball valve is installed, and a flexible hose leading to the machine is connected to it. The joints are sealed with rubber cuffs.
- A tee is installed on metal-plastic pipes. After the tap is made in the right place and the fitting is installed, the tap and flexible hose are installed. You can connect the washing machine to the water supply.
- Sometimes a method is used to supply water to the machine through a tee on the outlet of the water supply for the mixer or flush tank. But before each wash, you will have to unscrew the flexible hose leading to the mixer. Therefore, this method can only be considered as a temporary option.
Water connection
Let's begin to figure out how to properly connect a washing machine to the water supply. To begin with, let's say that it is connected only to the cold water supply pipeline. Afterwards, if necessary, it is heated by heating elements. However, some owners make connections to hot water. In this way, certain energy savings are achieved. But this is very doubtful, because... a larger volume of hot water will be used, which, if there is a domestic hot water meter, will be very noticeable for the budget. In addition, if you connect the machine to hot water, you risk ruining some types of laundry.
Let's move directly to the connection. The delivery set includes a rubber hose that is used to connect to the water supply. It is usually up to 80 cm long and is often missing. If necessary, you can buy a longer one. The flexible hose is ¾ inch in diameter.
To connect the washing machine to the water supply with your own hands, you must perform the following operations. Here we will consider a situation using one separate valve.
Recommendation! It is advisable to make the connection using shut-off elements (ball valves). They will help, if necessary, exclude a consumer from the network.
- A thread is cut at the required point in the water supply system and a valve is installed using appropriate fasteners. It will be needed to shut off the water after each wash.
- It is recommended to install a filter mesh in the line, which will prevent small particles from entering the machine. It needs to be cleaned from time to time.
- The flexible hose is connected either to ready-made outlets from the flush cistern of a toilet or faucet, using tees for connection, or new connection points are created.
- We connect everything using a relatively long hose so that it is sufficient for connection, but there are no kinks.
Connecting the washing machine to the sewer
In addition to supplying water to the washing machine, it is also necessary to resolve the issue of draining waste liquid. Simply put, you need to connect the household appliance to the sewer. The easiest way is to attach the drain pipe to the hook that comes with each machine, on the edge of the bathtub or sink. But this method is also the most unreliable: you cannot use a bathtub or sink at the same time, in addition, the drain hose can simply be accidentally touched, which will lead to flooding of your neighbors. Therefore, it is safer to make a permanent connection to the washing machine.
There may be several options:
- Through the sewer lines of the sink, for which you need to purchase a special siphon with a drain for washing machines. It should be located above the siphon knee. In this case, the unit must be installed nearby, since the drain hose cannot be extended.
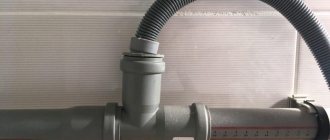
- Insert the machine hose into the plastic sewer pipe. It is easy to make a hole in it with a hacksaw, after which a tee and a section with a pipe are inserted into it. All connections are reliably sealed, and the drain hose is inserted into a separate siphon.
Often, the drain design of many washing machines has a check valve that prevents water from being sucked in from the sewer. If it is not there, then the drain hose must have an S-shaped bend and be positioned as written in the instructions. That is, the connection to the sewer must be below the level of the washing machine tank.
Level installation of the washing machine is important
Depending on the brand, the SMA has 2 or 4 adjustable legs. To install the washing machine, you must select a location that fully meets the installation requirements. Do not place the unit close to walls or furniture. The surface on which the SMA will be placed must be flat, without depressions or protrusions. It is good if the base is tiled. A rigid base will allow the unit to be leveled without additional shock-absorbing cups, which will simplify the process.
If the SMA will be located in a room with a wooden floor, it is necessary to prepare a sheet of plywood 8-10 mm thick or OSB boards. Due to the fact that the floorboards have different densities and are not rigidly fixed along their entire length, vibration of the base will occur during operation of the unit. This will negatively affect the washing process, especially in the spin mode. An additional platform will allow you to evenly distribute the load over the floor surface.
The concrete base must be smooth and not crumble. If pieces break off when you tap the material, it is better to cover it with tiles or install another rigid stand. A poorly adjusted machine will vibrate and shift during operation, which can lead to the protection tripping or rapid bearing wear and failure.
At high rotation speeds, the drum may touch the surface of the tank and, if the latter is plastic, damage the walls.
A correctly aligned unit will ensure safe and correct operation throughout the entire period of operation.
How to properly connect a washing machine to power?
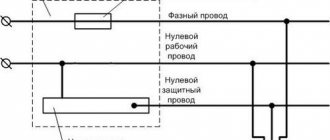
Modern models of washing machines have quite a solid power, which averages about 2.5 kW. Despite the presence of double insulation, these devices are sources of increased danger. Therefore, their connection must be made through a separate circuit breaker with an RCD (residual current device), and grounding is required.
It is important to note that many companies do not install washing machines if there is no grounded outlet. The warranty for these expensive household appliances is not valid if it turns out that they were operated without grounding.
In old houses, where sockets do not have a grounding wire, grounding is organized through a panel from which electricity goes to the apartment. If you do the grounding yourself, then remember that you should not connect the washing machine body to pipes or heating radiators. This can lead to damage to expensive equipment, and the possibility of electric shock to people in neighboring rooms cannot be ruled out.
USEFUL INFORMATION: Sliding glass bathroom screen
The difavtomat will allow you to save your expensive car from power surges; it will break the circuit if water gets in or a person touches a bare wire. Modern automatic machines combine the useful qualities of conventional automatic machines and RCDs, so it is better to give preference to them. If you are not a qualified electrician, it is better to contact a specialist. They will select the appropriate automatic device according to the parameters and provide high-quality protection from electricity.
To avoid a situation where, when you turn on the washing machine, the automatic circuit breaker (RCD) knocks out, you need to:
- lay high-quality wiring, replace old ones;
- install a circuit breaker or RCD that is suitable for the network parameters and do it correctly;
- monitor the condition of the machine.