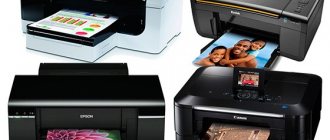
Many owners of portable equipment are often interested in how to connect a printer to a laptop via WiFi connection or USB cable. Some inexperienced users don’t even really know whether this can be done at all. If you are using one of the current versions of Windows 7, 8 or 10, then you can connect according to the instructions in this article.
First, let's connect the printer and laptop together physically, wirelessly, or over the network. Let's take a closer look at technology such as WPS (Wi-Fi Protected Setup), consider manual setup, installing drivers with and without an installation disk. We will give recommendations on how to set up printing from a laptop to any model of printer or MFP from HP, Canon, Epson, Samsung and others.
How to connect a printer to a laptop
Via USB
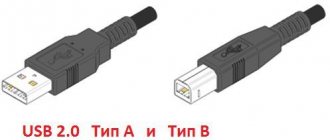
A laptop, like any other personal computer, can be connected to a printer using a regular USB cable. This type of connection is supported by all models of printing equipment without exception. And the input itself is definitely present on the portable “device”. The main thing is that the versions of the interfaces used match. If USB 1.0 is no longer available, then 2.0 and 3.0 are at the peak of popularity.
When the connection is established, you need to wait a little until you hear a beep. After some time, the software will be automatically installed by the Windows operating system itself and you can proceed to the section on setting up printing. If this does not happen, then the drivers will have to be installed manually. There is nothing complicated about this and is easy to do even without an installation disk.
Via Wi-Fi
WPS
WPS stands for Wi-Fi Protected Setup, which means “protected Wi-Fi installation.” To use this technology, it must be supported by the router and the printer itself. The presence of Wi-Fi on a laptop is not questioned, since models without it do not exist in nature.
We make the connection according to the following scheme:
- We are looking for the WPS button on the router body. As a rule, it is placed on the reverse side in most cases.
- Within two minutes we activate a similar button on the printing device.
- We are waiting for the connection between devices to be completed.
- If the laptop is on the same Wi-Fi network, then there should be no problems with printing.
- We connect to the printer as if it were a network one.
If the WPS buttons are not found on the modem case or it is impossible to turn it on, then we will try to do this through the web interface for managing the router. In most cases, to access its settings, you need to enter the address in the IP format 192.168.0.1 in any browser, or try 192.168.1.1. Enter the login “admin” and the same password if it has not been changed. In the settings, find the “Wireless” section, and in its subsections, disable MAC filtering and enable the WPS function.
Learn more about connecting via WiFi. More detailed instructions with screenshots and explanation of each step.
Manual setting
If the automatic connection setup described in the subsection above is not possible on your equipment models, then the Wi-Fi connection can be made manually. All that is required for setup is to know the name of the network and its access code. This information may be listed on the modem's cover or in documents from your Internet service provider.
Manual setup procedure:
- On the printer screen, go to the menu.
- We enter the network settings.
- Select the WiFi section.
- Specify the network name and SSID password.
- After some time, the printer will be online and you can connect to it as if it were a network connection.
How to connect a canon printer to a laptop
Many people have problems and questions when, after purchasing, they bring an MFP home, namely, how to connect a canon printer to a laptop. There are several connection methods, choose which one to use, each has certain advantages and disadvantages. In general, how to connect a Canon printer to a laptop is a fairly common problem, because users believe that there is a significant difference between a PC and a laptop. But in fact, there is practically none; now we cover all the most popular methods, as well as the features of working with an operating system such as MacOS.
The essence of the first method is to use a connection using a USB cable. The answer to the question: how to connect a canon printer to a laptop using USB is the following instructions:
- Install the MFP next to your laptop; it is important that the cable easily reaches the corresponding port.
- Connect the power cable to the printer, then press the power button. Most models from this manufacturer are detected automatically; just wait a certain period of time for the operating system to deal with the peripheral device.
- After that, click on the logo to go to the start menu. Select the Options tab.
- In the window that opens, there will be a “Devices” item; when you click on it, a list of connected devices will appear, among which will be “Printers and Scanners.”
- Click on the “Add Printer” button next to the appropriate device. Next, simply agree with all the questions that the system asks you, so that ultimately you can complete the procedure of how to connect a canon printer to a laptop .
How to connect a canon printer to a laptop running Mac OS
using cable?
First of all, you need to have the latest and most current version of the system, so check for updates, as well as search for new versions of drivers. Once the system is in optimal condition, you can begin making connections: Connect to your laptop using a USB type C cable. Next, turn on your printer and wait for notifications to appear on the laptop. After a certain period of time, a notification will appear in front of you: “Install”.
Network connection
Regardless of whether the printer was connected to the network via Wi-Fi, as described above, through another PC, or directly with a patch cord into an Ethernet socket, now you need to connect to it and install special software (drivers) for proper operation. There are several ways to establish a connection.
- Find a printing device over the network. To do this, open “My Computer” and find the “Network” shortcut at the bottom left. If the printer is connected directly to the network (via WiFi or patch cord), then click on the shortcut, and if through another network PC, then use a triangle to open the list. Using the right key and the context menu, we make a connection and agree to install the drivers.
- Use the installation wizard built into Windows. Through the “Start” button and “Control Panel” we go to the “Devices and Printers” section. In the menu under the address bar, click the “Install a printer” button, and in the next window, select the second option with adding a network printing device. We wait until all available devices are displayed in the list and select the model we need. Next, follow the instructions of the installation wizard.
Possible problems:
- Windows can't connect to the device.
- 0x00000002: During a connect operation.
- Error 0x000006d9 "Unable to save printer settings."
- 0x00000057: The specified port does not exist.
- 0x00000709: Check the name.
- Failed to open Add Wizard.
Detailed information on connecting a network printer Use our separate article if you experience problems connecting.
How to connect a canon printer to a laptop
It is worth noting that not all portable devices that are based on the Apple operating system can be connected in this way. If the notification does not appear, then most likely the device is simply not compatible. After downloading the updates, you will be completely ready to go.
How to connect a canon printer to a laptop without using wires? Many modern models of multifunctional devices can be connected without using wires, using an Internet connection via Wi-Fi. You can often find out about the presence of such a module by the markings on the box, or by reading the technical characteristics of the device.
It is worth noting that for laptops, this connection method is the most practical, since you do not lose mobility and ease of use. The only limitation is the coverage area of your router, but in general this is not a significant problem. To know: how to connect a canon printer to a laptop , you just need to follow the steps below:
Install the printer and laptop in the signal coverage area. Turn on the device for printing using the special button on the case. To connect your device to a wireless Internet network, you will have to open the manual that came with it, because each model has its own connection algorithm. If you have lost the instructions, then go to the manufacturer’s official website, where there are tips and digital copies of such manuals. After the printer connects to your access point, you need to perform the same manipulations as with a wired connection. Now you can use the device without being limited by wires.
How to connect a canon printer to a laptop that is based on the MACOS operating system? The only difference is that with a wireless connection, you will have to go to system settings to change some connection settings: In the menu that opens, select Printers and Scanners, then click on the plus icon to detect and connect a new device.
Click on your MFP name when the system finds it. The process may take a certain amount of time, but if your printer was not found, check whether you are connected to the same access point, and then try connecting to the Wifi network again.
Installing drivers
Windows operating systems independently install drivers from their built-in database without user participation in this process. If this does not happen, then you will have to install the software manually. There are several ways to do this.
- We use the installation disk. This disc is included with any printing equipment, regardless of its manufacturer. Insert such a disk into the “SD-rom” and wait for the installation program to start. Next, follow the instructions of the installation wizard. If the printer is old or you simply cannot find the disk, then use one of the following methods.
- Download the package of necessary files from the device manufacturer’s website. On the official portal of your printer brand, go to the drivers or downloads section. Find your model by name and download the necessary files for the version and “bit” of your OS.
- We search in the Windows database. Open Devices and Printers through Control Panel. In the top menu, click the “Add a printer” button.
In the second step, select local (if connected via USB) or network (if using Wi-Fi) connection option. Follow the instructions of the installation wizard. After a few steps you will see the driver installation window. In it, select the manufacturer of your device on the left, and the model on the right. - We use Windows Update. To update the driver database for devices, you need to click the “Windows Update” button under the list of models in the screenshot above. After downloading all new versions of the software and rebooting the laptop itself, you will be able to see your printer in the list of models.
Installing a printer without a disk. Use these instructions if you were unable to install the driver.
Installing printer drivers on a laptop
The final stage of connecting the printer to the laptop is installing the drivers. Unlike many other peripheral devices, installing printer drivers is a mandatory step. Because printers almost never work without installing drivers.
As a rule, a driver disk is included with the printer. Insert this disk into your laptop and start the driver installation. To do this, you need to open the disk and run the installation file (usually called setup.exe or install.exe).
If you do not have a driver disk or your laptop is not equipped with an optical disc drive, then you can download the drivers from the official website of the printer manufacturer. To do this, enter the name of the printer into any search engine (for example, Google) and go to the manufacturer’s website. On the manufacturer's website you need to indicate the version of the operating system, after which you can download the driver installation file. We recommend downloading drivers from the manufacturer’s website; this is the only way to be sure that the installation file will not be infected with malware.
The driver installation process is also very simple and is no different from installing any other program. All you need to do is run the installation file and follow the instructions that will appear on the screen. The only caveat is that the installer may require you to disconnect and reconnect the printer. In this case, simply disconnect the USB cable from the laptop for a few seconds and plug it back in.
After this, the process of connecting the printer to the laptop can be considered complete. In most cases, the printer starts working immediately after installing the drivers.
Printing settings
After connecting the laptop to the printer and installing the drivers, you should make some settings on the device itself. You can select it as the default main one and open network access to it. To do this, go to the control panel, and then to the “Devices and Printers” section. There, find your model and perform the actions as indicated in the pictures below.
You only need to go into properties to “share” the printing machine for other network clients.
To print from any program that supports this function, just press the key combination “CTRL+P”. You can also first make some personal settings in the interface, if it allows you to do so. For example, in a program from the office package - “Word”.
Here we can configure:
- Select the desired printer to complete the task.
- Specify which pages to print and which not.
- Select the desired part of the document to print on paper.
- Mark even or odd pages of the document.
- Working with copies.
- Select the number of document pages to output per sheet of paper.
- Setting additional properties: duplex printing, quality, layout.
- Options.
Printer printing settings in Windows 7, 8, 10. More detailed instructions with explanations of actions for inexperienced users.
Installing and setting up a scanner in a printer on a PC. Recommendations, nuances, possible problems.
Possible printer connection problems
If the printer does not work, we recommend performing the following checks:
- Make sure the connected printer is set as the default device. To do this, open the “Control Panel” and go to the “Hardware and Sound - Devices and Printers” section. There should be a green mark next to your printer here. If it is not there, then right-click on the printer and select “Set as default” in the menu that opens.
- Check the power cable, USB cable, and printer power button. Perhaps some of this is disabled.
- Check for paper, print cartridge, toner, and ink.
- Restart your laptop. Perhaps the driver cannot start working without a reboot.
How to connect a printer to a laptop
Nuances
When connecting a printer to a laptop, things may not always go smoothly and simply. Situations are different, and sometimes quite difficult, and you should be prepared for them. Let's look at some of them in detail.
- The device does not print. Check whether the default machine is correctly selected for printing from a laptop, whether it is offline, or whether there are documents stuck in the queue.
- The device is not detected. Try replacing the power cords, USB, and Ethernet patch cord (if used). Double-check the quality of the connection, restart the laptop, turn off the printer and turn it on again after a while.
- Drivers are not installed. Clean the Windows operating system from old versions or software from other printing devices.
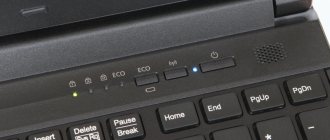
- The printer does not connect to the laptop. Typical for Windows 10, and less often in Windows 7. Check if you have correctly understood the USB interface versions. It is important that this is a cord of at least 2.0 and connected to the appropriate input. Remember that blue indicates USB 3. Don’t get confused, which could very well have already happened.
All possible errors and problems with the printer. Instructions for solving other equipment problems.