Quite often, the size of a stationary freezer does not make it possible to accommodate all the necessary products that require low temperatures for storage. To solve this problem, the easiest way is to buy a ready-made freezer, but you need to remember that the price of such a product will be quite high.
The best way out of this situation would be to make your own freezer. All you need is an old refrigerator, effort and a little time.
What does the equipment consist of?
To understand how to make a cooling chamber yourself, it is important to first understand what such equipment consists of. This will make it possible to meaningfully approach the solution of the task, not waste your time and avoid making mistakes. Also, understanding the structure of such an installation will make it possible to further improve it.
The cooling chamber includes the following elements:
- Capacitor.
- A tube.
- Directly the refrigerator itself.
- Evaporator.
- A compressor that moves refrigerant through the pipes.
- Thermostat. It maintains the required temperature level inside the equipment. It is also the thermoregulatory system that periodically turns the compressor off and on.
Moreover, new refrigerators may be equipped with filters, dehumidifiers and devices for automatic temperature control and regulation. This allows you to maintain stable operation of the device and avoid problems.
Worth knowing! You can store a ready-made homemade freezer in different rooms, but it is best to place it in a dry basement with electricity.
Freezing equipment design
Before considering various options for creating a freezing installation and proceeding with their implementation, it is necessary to become familiar with the operating principle of the equipment and its design. This will allow you to meaningfully approach the solution to the problem posed, and in the future independently modernize (improve) the created unit.
The cooling unit consists of the following main parts:
- compressor (providing movement of refrigerant through the pipes);
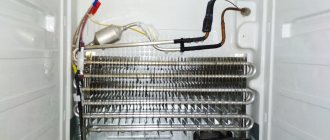
- evaporator (here the coolant evaporates, turning into steam);
- refrigeration chamber;
- thermostat (maintains a given temperature level inside the equipment, periodically turning the compressor on and off);
- condenser (in the heat exchanger the steam is converted back into a liquid state);
- tubes.
Modern units also contain automatic control and regulation devices, filters, and dryers.
How the design works
All of the above-described elements of the freezer are connected to each other by tubes and form a kind of closed system. It is through this that a substance circulates during operation of the device, which freezes at sub-zero temperatures.
A fairly large role in such a process is played by the refrigerant pressure inside the cavity of the tubes. Thus, the lower the pressure, the lower the “boiling” temperature will be.
When the freezer is constantly running, steam from the evaporator enters the condenser. There it is cooled by air and converted back into liquid. Large freezers also use fans that greatly reduce the overall temperature of the device's radiator.
Today, modern automation systems make it possible to carry out the process of freezing and defrosting products without human intervention. It is quite easy to achieve this level even with a homemade unit. To do this, you just need to strictly follow the instructions presented below.
Remember! When purchasing new refrigerator parts, it is better to make a list in advance. If a person does not know much about what exactly he needs to purchase, it is better to additionally consult with a specialist so as not to buy too much.
Operating principle
In order for freezing equipment to work, you need to purchase a special substance - freon. This liquid can boil at subzero temperatures. It is the freon that will circulate through the system while the unit is operating.
The lower the refrigerant pressure in the connecting pipes, the lower the boiling point. All of the above elements, with the exception of the camera, are connected to each other using tubes.
When the liquid boils, the refrigerator compartment begins to work, and the temperature inside it drops. Next, the steam from the evaporator is sent to the condenser and there it turns into liquid again.
If the installation is powerful, then you need to use a fan to help cool the radiator.
The principle of operation of the freezer is the transformation of a substance that circulates through the tubes into steam and back.
What can a freezing unit be made from?
Experts identify the following simplest and at the same time effective ways to create a freezer yourself:
- from the basement or cellar;
- from premises, empty containers;
- from an unwanted old refrigerator.
To implement such projects, you will certainly need different materials and tools. According to reviews, it is easiest and most profitable to convert an old refrigerator into a freezer, since other product options will require the additional purchase of new cooling systems.
The duration of such work will largely depend on how well the person understands the structure of refrigerators. Thus, some may need two weeks or more to make a camera, while others will be able to cope with this task in just a couple of days.
The performance of the finished device will depend on the following factors:
- strict adherence to instructions (step-by-step execution of tasks);
- the original condition of the old refrigerator and its cooling system;
- the quality of new built-in elements and their correct installation (following the required algorithm of actions, features of the new cooling system).
Options for creating a freezing installation
There are various options on how to make a freezer yourself. They differ from each other in financial costs and dimensions of the installations created. To implement projects, you will need to use different materials and tools. Depending on the chosen method of creating a freezing unit, the work takes different times.
You can create a freezer with your own hands:
- from an old refrigerator;
- from an empty container, chest, room;
- from the basement, cellar.
From an old refrigeration unit
The simplest, most affordable way is to create a freezing machine from a refrigerator. The general conversion scheme is carried out as follows:
- dismantle the freezer compartment;
- dismantle and unfold the evaporator;
- secure it to the back wall with bolts;
- install the sensor back;
- check functionality.
All models are handled differently. If the equipment was operational before conversion, then during conversion it is necessary to handle the tubes very carefully, avoiding kinks. But it is better to release the refrigerant, and after reworking the system, solder it again and fill it with it. This complicates the process and requires special equipment.
A non-working refrigerator requires a preliminary search for the cause of the breakdown. It may turn out that its repair and further alteration does not make sense. The repaired model is converted according to the above scheme. It is necessary to take into account that homemade designs based on an old refrigerator will consume more electricity than store-bought counterparts - they have lower efficiency.
From an empty room
An existing empty space can be converted into a freezer compartment. All actions are performed in the following sequence:
- create a sheathing around the perimeter of the room from wooden beams, setting the guides according to the level;
- adjust the reflective film;
- the resulting cells are filled with insulation (its thickness is about 10 cm, depending on the material);
- the joints are sealed with tape in aluminum foil;
- sheathe the room with metal sheets (galvanized);
- all existing seams are sealed with sealant;
- install shelving;
- install a ready-made monoblock or split system, set up sensors, adjust the automation;
- install an insulated door so that there are no gaps left when closing;
- check functionality.
In a similar way, you can create a freezing installation from boxes of various sizes (consisting of different materials), boxes, containers. The scheme of work is as follows:
- a frame (if there is none) and a heat insulator are mounted;
- the chest is lined from the inside, seams and holes are sealed with sealant;
- shelves are made as needed;
- a cooling unit, sensors, doors are installed;
- the system is adjusted until the required operating mode is achieved.
In the cellar (basement), it is enough to seal the cracks, seal the door and install a split system. You just need to bring it to the surface and arrange an external block there.
The following video shows the process of creating a freezer from a room.
How to disassemble a refrigerator
The first thing you need to take care of when disassembling an old refrigerator is safety. For this reason, before starting work, you should disconnect the device from the electrical supply and only then get down to business.
The general scheme for remodeling the camera includes the following steps:
- Dismantling an old refrigerator. No details need to be thrown away just yet, even if at first glance they seem unnecessary. Most likely, these are the elements you will need when assembling a new camera.
- Removing the evaporator.
- Fixing the evaporator.
- Installing a new temperature sensor.
- Functionality check.
Remember! You need to check how well the converted camera works gradually.
It would be unwise to immediately load the device to the top with products, because it may not work properly, as a result of which everything that was frozen will spoil. In such a case, it is recommended to place only a couple of foods or just bottled water in the chamber. By the level of its freezing, you can determine how well the freezer is working.
You should also know that all refrigerator models are disassembled differently. This is due to the structural features of the devices, as well as the types of installed cooling systems.
If the equipment being converted is inoperable, then when working with it you should handle the tubes very carefully, avoiding their kinks. It is better to release the refrigerant altogether and refill it after reinstalling the system. Of course, this will complicate the process somewhat, but getting a new camera to work is often the only way to do it.
In some cases, a non-working camera requires a preliminary search for the cause of the malfunction. It may also happen that repairing and further reworking the device will simply be pointless.
Important! It should be understood that homemade designs that were made from old refrigerators will require more energy than their new store-bought counterparts. This is justified by the fact that they have lower efficiency.
How to make a freezer out of an old refrigerator
@rem.ninja
It happens that after updating the refrigerator, the old one is still ready for use and stands somewhere in the far corner or in the country. It is easy to convert it and get additional space for storing frozen food.
The first step is to check that the equipment is in working condition.
If the refrigerator has been stored horizontally for some time, you should place it vertically and wait until all liquids from the cooling system can return to their previous location. And then proceed to re-equipment.
- We disassemble the freezer compartment and dismantle the evaporator.
- The evaporator should later be moved and deployed.
- The evaporator is firmly attached to the back wall.
- Next, you should insulate the inside of the refrigerator where you plan to place the new freezer compartment.
- A new temperature sensor is being installed.
- Now you should make sure that the chamber is tight and top up the refrigerant if necessary.
- We check whether the new unit is ready for operation.
It must be taken into account that each refrigerator model is disassembled differently, since each has its own mechanism. Therefore, you should be careful not to break the equipment.
Step-by-step instruction
If you have an old refrigerator at home that leaks all the time, then this is not a reason to throw it away. It would make a great freezer. To do this, do the following (analysis of the chamber using the example of the Nord refrigerator):
- Remove the device cover.
- Remove the thermostat.
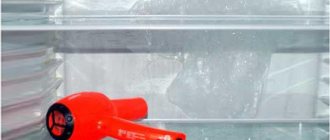
- Release the refrigerant (if it is still there) through the tube.
- Using a grinder, cut the freezer 5 cm higher from the refrigerator compartment. If the evaporator of the device is in working condition, then it can be safely used. To do this, one side should be mounted with a capillary tube under a pressure of 15 atm. Connect the other side to a copper tube with a length of 1.5 m and a diameter of 6 mm.
- Make two holes in the freezer. The first with a diameter of 8 mm for the suction tube. The second is for a thermostat tube with a diameter of 3 mm.
- Install the evaporator into the chamber and thread the suction tube into the hole.
- Mount the thermostat behind the device and insert its tube into the hole. Secure to the evaporator from below using two clamps.
- Secure the evaporator itself with stainless steel screws. In this case, you need to be careful not to get the screw into the tube, otherwise it will be damaged.
- Bend the suction tube down towards the compressor and put insulation on it with a diameter of 10 mm.
- Fill the finished holes with silicone.
- Attach a capacitor behind the device.
- Install the entire refrigeration system and charge it with refrigerant.
- Install the electrical wiring (one wire for powering the network on the start-up protection field, and the second on the start-up protection relay).
- Place the cover on the camera.
- Insert standard shelves.
In the finished device, the temperature should normally be minus 18–25 degrees.
Another popular refrigerator for its transformation into a freezer is the Snige. It has a simple design, so it does not cause problems for craftsmen. The scheme for converting it into a chamber is the same as that of the Nord refrigerator.
Interesting! Many people ask what else can be made from an old refrigerator. In fact, you can use it to build a mini-cellar for storing fruit, a smokehouse, or a cabinet for storing small items. That is why, before throwing away your old refrigerator, you should think about whether it will be useful for any other purposes. The flight of imagination is unlimited.
How to make a usb refrigerator
When working with a computer, especially in the heat, you want to have chilled drinks on hand. A USB refrigerator can solve the problem. It is usually small in size, no more than a couple of cans of beer or drinks can be placed in it.
Popular articles Professional darning of jeans
To become the owner of such a useful gadget, you need to purchase:
- Thermoelectric converter: this usually means a Peltier element; When a device is supplied with direct current, one of the sides gives off temperature, and the other, on the contrary, heats up; buy in a computer salon, on the radio market;
- Two radiators;
- Thermal paste.
There is a Peltier element in the computer - it is used to cool the processor. Between it and the cooler you can find it in an old computer. The element for the refrigerator is suitable, you just need to clean off the old thermal paste from it. If there is an unnecessary amplifier, then you can remove the radiators from it.
Next, the Peltier element is placed between the radiators. The merger is done using thermal paste. After connecting the USB cable wires to the element, the operation of the resulting device is checked. It is connected to the USB port of the computer - one side should be cooled, the other should be heated.
In order for the device to be converted into a refrigerator, it is placed in the lower part of the case, using it as a base. The body is made of a material that has good thermal insulation. You can use porous plastic; dense foam will do.
The sides, back wall, and top base are cut according to the size of the device and the container in which the drinks are located. Glue them together with superglue. The door can be made transparent - from plexiglass, recessed in a frame made of plastic or foam. Any loops will do. To ensure that the doors close securely, they are equipped with a magnetic clasp.
The refrigerator is ready and can be used to cool a bottle of drink. Some people modd the resulting unit. To do this, print your favorite pictures and web pages on transparent sheets and stick them on the outside of the door on plexiglass. A further improvement of the refrigerator could be the installation of LED lighting inside the chamber.
Some craftsmen place radiators in the upper base, explaining this by the fact that the cold will fall from top to bottom and will cool the drink faster. In addition, the inside of the housing is covered with an additional three layers of aluminum foil, increasing its thermal insulation.
Recommendations for using and setting up the camera
In order for a homemade freezer to work smoothly and not cause trouble, it is important to adhere to the following recommendations from specialists for using this device:
- Set the modes correctly. According to the standard, the chambers have a freezing mode and a storage mode. The first should be used for quick freezing of fresh vegetables, meat, fish, various semi-finished products and vegetables. The second mode must be installed after a day.
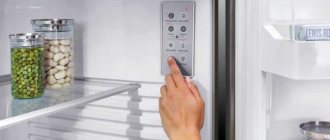
- Regulate the temperature. This can be done using a special regulator (usually they have a scale from 1 to 7). After setting the regulator in the desired position, the temperature in the chamber will be maintained automatically.
- Select the temperature regime based on the required storage conditions of the products. The temperature of the camera is also affected by the location where it is installed and the general temperature in the room.
- Properly arrange food in the freezer. Thus, the upper compartments are intended for primary freezing of products, and the lower ones are for storing already frozen products.
- Do not open the chamber door too often, as this may disrupt the temperature of the device.
- Regularly defrost the freezer and clean out the cabinets. This will keep it clean and prevent unpleasant odors.
- Do not place products in the chamber whose quality or expiration date you are not sure of. It is also important to label the name and date of freezing for each product, especially if it is meat or fish.
- Properly remove odor. Some cameras that are used for a long time may develop a bad odor. To eliminate it, it is best to wash the inside of the camera with a regular baking soda solution. The refrigerator itself must be disconnected from the network.
- Install an audible alarm. It will operate if the door is open for 30 seconds. This will allow you to maintain optimal temperature conditions for storing food.
- The camera should be turned on at least 24 hours before placing food. It should reach the desired temperature. Otherwise, the freezing may be of poor quality, which will negatively affect the shelf life of semi-finished products.
Moreover, it is important to check the power supply in advance. If there are problems with this (insufficient electricity, frequent power outages), then this can cause the camera to be “knocked out” of power and the wires to burn out.
Recommendations for using a homemade camera
To ensure that your home freezer operates without interruption, follow these simple rules:
- Set the modes correctly. Remember that refrigeration is necessary to freeze food, and storage is necessary to maintain temperature.
- Adjust the temperature yourself and make sure that it is maintained at the same level.
- Set the temperature according to the characteristics of the products that you will store in the freezer.
- Arrange foods so that those that need freezing are on the top shelf, and those that need to be frozen are on the lower shelf.
- Do not open the freezer door often or for a long time in order not to disturb the temperature inside it.
- Defrost the chamber regularly and keep it clean.
- Install a sound alarm that will notify you in time if the chamber is depressurized.
- Connect the camera to the network at least 24 hours before placing food in it. This is necessary to ensure that the desired temperature is established inside the chamber.
As you can see, assembling a home freezer is not that difficult. It is enough just to have a good understanding of the technical part of the unit.
Video: calculation of the refrigeration chamber
Lesson 3. Calculation of the refrigeration chamber.
Watch this video on YouTube
Do you want to understand better than others?
- Making a homemade camping refrigerator with your own hands - When going on a picnic, country house, car trip or just fishing, you need to take care of the safety of perishable foods in advance. This problem is especially acute...
- We make a refrigerator with our own hands - We offer an article on how to make a refrigerator with your own hands, having understood the principle of its operation. The method of generating cold directly depends on the dimensions of the future...
- How to make a refrigerator for a moonshine still with your own hands from a copper tube + video - When assembling a moonshine still yourself, you cannot do without using an effective device for condensing alcohol vapor. Refrigerator for moonshine still…
- Air conditioning from a refrigerator: we make it ourselves - The operating principle of household refrigerators and air conditioners is the same. And although the types of compressors, layout, working volumes, “recovery” of heat and condensate are different, it is necessary to do...
- Instructions for making a smokehouse from a refrigerator with your own hands - Old household appliances can be used on the farm in the most unconventional way. For example, a refrigerator that has served its age is an excellent springboard for a home craftsman. One…
What not to do
To avoid damaging the device, do not do the following:
- store glass containers that contain freezing liquids in the chamber;
- place products close to the installed temperature sensor, which is located on the back wall of the chamber;
- use metal objects to remove snow deposits;
- defrost the device without using a special spatula (melt water can cause leakage and lead to breakdown).
How to turn a refrigerator into a freezer
This option is the easiest when creating a freezer with your own hands.
First of all, you need to disassemble the freezer compartment and remove the evaporator. After this, you should insulate the interior space, which will become the new freezer. After this, you need to unfold the evaporator and fix it on the back wall of the freezer. The crucial point is the next step, where you must choose the right location to install the temperature sensor. Depending on the choice, the freezer will maintain the set temperature with varying accuracy.
After installing the sensor, you need to make sure that the resulting chamber is tight, check the refrigerant circuit and, if necessary, top up.
ATTENTION! To diagnose the refrigeration circuit and charge freon, you must use a specialized tool. To avoid circuit integrity, it is necessary to handle the capillary tubes with extreme caution, avoiding excessive kinks.
At the last stage, you should turn on the upgraded unit and test it in operation.
IMPORTANT! The efficiency of a self-converted freezer will be significantly worse than that of one created in an industrial environment, so its energy efficiency will be lower and its electricity consumption will be higher.
Let's make the refrigerator body
Avoid using polyurethane foam: you will need special clothing. Buy a can of insulation (spray foam). There will be no need to look for a respirator. Polyurethane foam expands and gains volume relatively slowly. More airy material means better insulation.
To insulate with polyurethane foam, you will need to make a box with double walls and a similar door (lid). Not an easy task, since you need to fill the bottom with insulator. Decide for yourself how best to proceed; we recommend leaving technological holes in hard-to-reach places. After the polyurethane foam has hardened, cut off excess and patch unnecessary holes. The problem of insulation is being solved. Avoid contact of the polymer with the product.
Popular articles How to sew a soft toy dog
DIY refrigerator
Polyurethane foam will seal the cracks where the Peltier elements enter the chamber. Ideal insulation, which is difficult to achieve in any other way. Peltier elements are expensive. The refrigerator should be smaller, better insulated
We suggest paying attention to Penofol with double-sided foil. Availability of material, check with the manufacturer or dealers for details, take it with double-sided foil, ignoring the complexity of installation
The material can be glued, avoid nailing, it will create heat leakage bridges.
We finish the outside of the box with polyurethane foam, eliminating the slightest cracks. Peltier elements do not fit inside the compartment. They are fenced off with a gasket of food-grade aluminum. It will prevent contact of food with polyurethane foam, as in a factory refrigerator. We recommend using a regular, passive thermostat that measures pressure. You can buy it on the market at the request “refrigerator thermostat”, remove it from old equipment. It looks like a small metal cube with a long thin tube, the end of which must be attached to the cold side of the Peltier element.
Select the position of the sensitive area of the sensor so that the modes are maintained. The advantage is that such a device turns off the power at the right moment and is itself configurable. A purely passive element, as mentioned above, consisting only of a membrane and a contact group. The design is sealed, do not worry too much about the device. The whole story is about how to make a refrigerator with your own hands. It is better to store food on shelves, with the insides lined with food-grade aluminum. Avoid plastic.
Don't forget the grounding; it won't hurt to install thermal fuses in the right places. The story showing how to make a refrigerator with your own hands is over. We hope the text was useful. We believe that every reader will be able to make a refrigerator with their own hands.
Large refrigerator room
The role of a room can be any non-residential premises, for example, a small outbuilding made of brick. In this case, proceed as follows:
- they make a wooden sheathing on which a thick film (oilcloth) is attached;
- the empty space is filled with foam plastic, the joints are sealed with aluminum tape;
- they make a wooden floor if the extension is earthen;
- all surfaces are sheathed with galvanized sheets, all seams are treated with sealant;
- They install shelving and a door, which is pre-insulated and equipped with airtight seals.
To build a cooling system, it is better to take two old refrigerators at once. Having removed the refrigeration systems from the equipment, they are attached to the outer wall of the future refrigeration chamber. Fans are installed underneath them. Freezers installed indoors are connected to the systems using tubes led inside. Both refrigerators are “forced” to work in shifts; this mode of operation protects them from overheating.
Popular articles Page for a children's book in pop-up style
A simpler (but also expensive) way is to purchase a ready-made monoblock with sensors that automatically regulate the temperature. If you are installing a refrigeration chamber in the cellar, then the work is greatly simplified: it consists of sealing the cracks and sealing the door, but in this case it is necessary to install a split system.