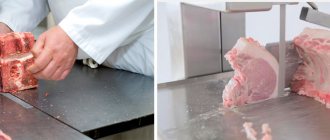
Circulation and drainage: what is it and why is it important?
When cooking, a lot of smoke, drops of fat and odors are released, and walls, dishes and furniture become covered with a coating that is difficult to remove. A hood can solve this problem. There are two main types of hoods:
- Recycling;
- The first type removes air through a filter and discharges it into the ventilated space.
The first type absorbs air, filters it and returns it back to the room. The second simply takes air from the room and discharges it outside through the wall (in a private house) or into a common ventilation duct (in a residential building), so the exhaust operation is considered more efficient - the air is purified by 99%.
Air recirculation mode in the hood - what is it?
In multi-storey buildings, problems with the ventilation duct are far from uncommon. Often the shaft is clogged and cannot function normally. And in private houses of old construction, ventilation is not provided at all. A hood that operates without a ventilation duct is the only option for such situations. You can, of course, take a drastic route by cutting a branch directly in the outer wall or leading it out through a window, but few people dare to do this.
The circulation exhaust system works as follows: a fan, rotating horizontally above the hob, sucks contaminated air into the system socket. Before entering the housing, the air flow passes through an external filter. Thus, the air is cleared of fat. Inside the device, the air passes through one or a series of internal filters, purifying small particles of odors. After complete cleaning, the air flow returns back into the room through special openings at the top of the unit.
Important! After cooking is completed, it is recommended to ventilate the room to restore normal atmosphere in the room.
This measure is necessary to eliminate excess humidity and saturate the air in the kitchen with oxygen, since this is not included in the hood’s capabilities.
Sealed double-glazed windows made of metal-plastic are practically the norm for the vast majority of modern houses and apartments. They keep out the cold and block out street noise. And if in the presence of a wooden window natural ventilation occurs, then with a metal-plastic double-glazed window this does not happen, and the flow of fresh air must be constant in the kitchen.
Design and operation of a hood with an air duct
The exhaust system is designed to get rid of unpleasant odors in the kitchen and protect furniture, walls and ceilings from soot and grease. When turned on, it recirculates the air in the room at least ten times per hour. Traditionally, a hood consists of a housing, a fan, a filter and an air duct.
Designing a system with exhaust air for ventilation is advisable! Typically, exhaust hoods are equipped with durable metal grilles that can be easily removed, washed to remove food particles, and reinstalled. However, there are models equipped with disposable filters - they need to be replaced from time to time.
Principle of operation
The main difference between duct and recirculation hoods is the ease of control:
- When the device is turned on, the electric motor begins to draw contaminated air into the vent;
- A filter installed on the surface retains product residues, preventing it from entering the system;
- A surface-mounted air filter prevents food debris from entering the system; Unpleasant odors are removed through the ventilation system and replaced with fresh, clean air.
The more powerful the motor, the faster and more efficiently the air in the room is purified. At the same time, for high-quality operation of the device, a constant flow of fresh air is required through an open window or window sash.
Advantages and disadvantages
Kitchen hoods with an exhaust fan have the following advantages
- installed filter cartridges do not require replacement - it is enough to periodically clean them from accumulated grease and dirt;
- high efficiency - this technique is able to remove all unpleasant contaminants, regardless of particle size;
- They are easy to use;
- A low-resistance grease filter allows you to clean the air as quickly and thoroughly as possible;
- The units require minimal maintenance during operation;
- A wide selection of equipment will allow you to easily find exactly the device that fits perfectly into the interior of your kitchen.
In general, modern devices have no disadvantages. Particular disadvantages lie in specific models from different manufacturers - this could be:
- Increased noise level when turned on;
- high costs.
Principle of operation
If for certain reasons you cannot install an air duct in your room, you should not look for ways to install it in other areas of the kitchen. It is enough to purchase a hood with recirculation properties, as it will perfectly cope with its main task even in a small isolated space.
The peculiarities of this type of hood are that it processes the air directly inside the exhaust duct.
The recirculation mode in the hood allows the air to be quickly cleaned and returned to the room. Contaminated air enters the hood and passes through one or more filters.
This hood quickly clears the air of contaminants and has sufficient power to clean rooms where a lot of cooking is done frequently.
The quality of air recirculation in the hood largely depends on how many filters are installed in it. Modern hoods use two types of filters. The first - fat - is attached to the outside of the hood: as a rule, it is made of metal and serves to retain fat deposits on the surface. It is enough to clean such filters periodically using detergents.
The second type of filter - carbon - serves directly to clean the air penetrating deep into the air. Filters of this type cannot be cleaned, so they will have to be renewed approximately every 3 months of operation of the hood. On average, one high-quality filter of this type will cost about 200 rubles.
Attention! Despite their high operating efficiency, hoods with recirculation mode also have disadvantages. The main one is the impossibility of completely getting rid of unpleasant odors in the room. Difficulties during operation may also arise with the replacement of filter systems
It will not be difficult to install them yourself, but it is not always possible to predict the need for replacement in time
Difficulties during operation may also arise with the replacement of filter systems. It will not be difficult to install them yourself, but it is not always possible to predict the need for replacement in time.
To ensure that customers do not forget about changing filters, manufacturers equip modern hood models with special sensors that notify them when they are dirty.
As you may have noticed, the main advantages of using a recirculating hood are that you do not need a ventilation shaft. In addition, when equipping an island kitchen, it can be difficult to determine the optimal location of hoods with air venting.
To ensure that this equipment serves you as long as possible, do not forget about timely cleaning and careful care. Since there will be humidity in the room when operating hoods with recirculation, there is a possibility of mold forming in the room. Regular ventilation of the kitchen will solve this problem.
A powerful recirculating hood without an air vent will cost very little, but will cope with the task of cleaning the air in your kitchen. Therefore, experts consider this technology option to be one of the most successful among all economy class hoods.
Standards and requirements for kitchen exhaust systems
Based on the principle of operation, kitchen hoods are divided into two fundamentally different groups. A filter hood purifies the air in the room by forcing it to circulate through a built-in filter system. Thus, by-products are retained in the hood filters, and the purified air is recirculated back into the room. This group of hoods attracts attention with their low price, simplicity, compactness, low noise level and ease of installation - just attach the hood to the wall and plug it into an outlet for it to start working. The disadvantages are low efficiency and additional maintenance efforts, since the filter elements of the device require periodic cleaning and replacement. A hood with a ventilation outlet, as the name suggests, on the contrary, does not allow air to pass through itself, but takes it outside the room. This method allows you to qualitatively increase the level of productivity and efficiency of the device, but requires qualified installation of the air duct system. In this article we will look at the main issues of installing a kitchen hood with air ducts for ventilation.
The rules require compliance with a number of rules and requirements when choosing and installing a kitchen hood:
- The height of the hood installation above the work surface. This is very important for the operation of the device, since if it is installed too low, it will significantly increase contamination of the device with smoke and combustion products. On the other hand, a hood mounted too high will not be able to effectively remove pollutants from the air. For electric hobs and stationary stoves, the installation height is 65-70 cm from the work surface, and for gas stoves - 75-80 cm.
- Compare the power of the device with the volume of the room and the intensity of the work performed in it. Hood performance is the amount of air that the device passes through itself in one hour of operation. In an ordinary apartment or private house, where the kitchen is used for preparing food for the whole family, the volume of the room in cubic meters should be multiplied by k = 10-12 to determine the required power of the canopy.
- Other requirements for device noise and the use of fire-resistant materials must be met by the manufacturer, so when purchasing, make sure that the technical data sheet of the product contains information on compliance with current standards and GOST.
- If you are going to use a vent hood, it should be equipped with a filter screen or grill that will prevent dirt and grease from entering the vent.
Typical ventilation schemes in the kitchen
There are two main kitchen ventilation schemes: natural and forced. In the first case, ventilation is carried out using holes in the walls and open vents on one side and general ventilation ducts on the other.
In the second case, air exchange is carried out mechanically, by installing energy-dependent devices. The third, combined option is considered the most successful, in which there is simultaneously a natural inflow scheme, according to which air enters the room spontaneously, and forced exhaust through kitchen hoods.
According to the method of air purification, all hoods can be divided into 2 types - exhaust (supply) and recirculation. The latter are not connected by pipes and channels with ventilation ducts and operate autonomously
There is also a third type - combined units, which are equipped with double filters and an air duct, and can operate either connected to a ventilation shaft or autonomously.
Natural ventilation has one advantage: ensuring a comfortable microclimate in the kitchen (as in other rooms) does not require additional material costs.
But it has low efficiency. When cooking on an electric or gas stove, slow air exchange quickly dissipates harmful odors.
Forced air units are much more efficient, but the mechanical system requires equipment that depends on the power source.
Hoods and recirculation units do a great job of cleaning dirty air and removing odors, but they don't cover the area below the ceiling, where fumes and grease particles are also trapped.
Taking these features into account, a combination of exhaust systems and natural ventilation systems was used.
Read about typical kitchen ventilation schemes and options in this article, which we advise you to read.
Conclusions and useful video on the topic
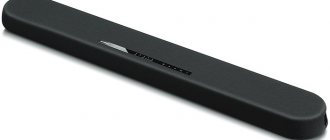
Video about a flat kitchen hood:
About installing a carbon filter in a kitchen hood:
Hoods that operate on air recirculation eliminate the need to connect them to the ventilation shaft. With the help of integrated filters they effectively clean the exhaust air. In this case, it is necessary to replenish the supply of fresh air in the room through the vents.
Perhaps you have experience using recirculating hoods? Tell us what device you use and are you satisfied with its performance? Please leave your comments at the bottom of the article.
There are two modes of operation of the hood: exhaust and recirculation. In exhaust mode, the hood sucks air from the kitchen and discharges it into the ventilation shaft (outside the room). In recirculation mode it works a little differently.
Kinds
There are several types of hoods. Each of them has its own characteristics and purpose.
| Suspended | The simplest and most common type of hood. Suitable for small kitchens as it has only one motor. Barely noticeable, installed above the stove on the wall or under a shelf. |
| Built-in side | As the name suggests, this type of hood is built into furniture, so it will fit into almost any decor. Most often it is made of metal, since the main body is still not visible. It is also suitable for larger kitchens, as you can find models with two fans. |
| Separately | It is suitable for kitchens with an island layout. This hood is mounted to the ceiling above the island. Most often they are made of stainless steel and are suitable only for modern styles. The main problem is finding a place to place the ventilation housing. |
| Fireplace | The most expensive, but also the most powerful version of the hood. To install it, you must contact a professional. The price provides almost any appearance (whether wood or metal), the presence of a variety of lighting and a number of additional functions. It copes well with spacious rooms, but requires a lot of ventilation power, so it must be taken outside. |
| Inclined | The hob is installed at an angle to the hob. It is gaining popularity among housewives of small kitchens; it looks discreet, but loses power. Can be of any size, shape and material. Easy to maintain. |
| Corner | Rarely found because it is not practical at all. Suitable only in cases where a stove is installed in the kitchen corner, which allows you to remove most of the space. Therefore, a good kitchen layout rarely favors this option. Side drains are also available. |
How does a recirculating hood work?
The recirculation type hood operates in a closed cycle. In fact, it can only be called an exhaust device conditionally, since it does not remove air from the room, but only cleans it and returns it back.
Contaminated air enters the device body under the influence of draft created by the fan blades rotating in a plane horizontal to the surface of the kitchen stove.
Moving along a given path, the air mass collides with the coarse filter. Having passed through it, it leaves fatty inclusions, particles of soot and dust on its fine mesh surface.
Next, the air flow, under the influence of pressure, passes through a fine filter, where it gets rid of odors and traces of the smallest particles, then returns to the room.
This filter is an ordinary cartridge filled with granular carbon. The carbon filter is a disposable product, so when it becomes dirty, it must be replaced.
Since this type of hood does not interact with the ventilation system, designers have developed telescopic hoods. During operation, they create a powerful lateral draft, due to which all dirty air masses are sucked in.
As soon as the need for this disappears, the device hides in the countertop. This solution is not only original, but also very convenient.
Technical characteristics overview
When purchasing a new hood or replacing an old one, you need to familiarize yourself with the features of specific models. It is necessary to pay attention both to the design and design, and, first of all, to the technical parameters on which the efficiency of the ventilation equipment depends.
Installation efficiency calculation
In order to correctly navigate the choice of an effective unit, you need to know the exact area of the room. Typically, both the capacity and the desired size of the kitchen are indicated in the technical data sheet of the product.
For example, the productivity of Krona Camilla 600 is 550 m³/h (in recirculation mode - 385 m³/h), so it is recommended to use it to serve a room up to 11 m² (ceiling height 2.5-2.7 m).
If you use a less powerful device for the same area, it simply will not cope with the task, and a more powerful hood will waste energy.
To calculate the performance yourself, multiply the volume of the room by the number of recirculation cycles and include the error factor. In the kitchen, the minimum number of recirculation cycles is 12; KP is 1.3. Therefore, to determine the required volume, you should consider:
11 x 2.5 x 12 x 1.3 = 429 m³/h
It can be concluded that when using the Krona Camilla 600 awning, to ensure sufficient air exchange over an area of 11 m², it is better to use the exhaust mode for ventilation and use recirculation only as an additional function.
When calculating the exhaust performance of a ducted canopy, a factor of 1.3 is typically used, while a slightly higher factor of 1.7 is used for recirculating models.
Is noise level that important?
The second important parameter that you should pay attention to is the noise level. If the owners of an apartment or house spend a lot of time in the kitchen, it is desirable that it be minimal. This point is also important for those who live in one-room apartments where the living room is combined with a kitchen.
Strong and irritating sounds negatively affect a person’s well-being, so increased demands are placed on household appliances equipped with fans and motors.
Modern devices operate quite quietly, as they are equipped with special acoustic noise protection. Sounds in charcoal hoods can come from the fan, motor, and air moving inside the structure.
When using ventilation units, noise often occurs due to improperly connected ventilation ducts.
If you want to create a comfortable atmosphere during and after cooking in the kitchen, give preference to models whose noise level is in the range of 50-55 dB. The quietest devices operate in the range of 35-42 dB.
The high price of a model does not mean that the hood will operate quietly. On the contrary, expensive equipment is more efficient than cheap equipment, so it is often expensive devices that create a lot of background noise - above 60 dB. For example, the Neff D55ML66N0 (36 thousand rubles) has a noise level of 72 dB, and the Elica Hidden HT (51.5 thousand rubles) has a noise level of 62 dB.
Convenient control and adjustment
You will need to use your kitchen hood every day, so you should choose a model that is easy to understand and operate. All controllers can be divided into two main categories: manual and remote.
Manual (or mechanical) can be different:
- Slider (increasingly rare);
- Push-button (most common type);
Expensive models are equipped with electronic controls with touch contact panels for issuing commands.
Models in the mid-price segment are made traditionally: on the front panel there is a row of buttons with which you can set the desired mode (diversion or recirculation), change the speed, and turn on the backlight.
Modern programmable hoods have a number of useful additional functions with delayed action. For example, the interval ventilation mode will continue to purify the air even without your presence at specified intervals.
Remote control models have a remote control that allows you to make almost all settings, but also have buttons or a touch screen on the front to select operating modes. The more convenient the method of operation, the more expensive the equipment.
Important Features and Options
In addition to the basic technical parameters, there are a number of features that can be very useful during operation. But if additional functions are not needed, you can save a lot on the purchase, since electronic filling, various modes, and programming increase the cost several times.
Photo gallerySeveral LED or halogen lamps placed on the lower plate provide effective illumination of the hob. They compensate for the lack of overhead light arising from the upper cabinets. The lion's share of all hoods are universal devices that can operate in both modes. If for some reason there are problems with removing contaminated air for ventilation, use an independent mode with filtration. If the device operates at the same speed all the time, the cleaning intensity will always be the same - both when making coffee and when frying meat. The presence of several speeds is timely for those who cook frequently, a lot and variously. Replaceable consumables include carbon filters that thoroughly clean the air. Thanks to the clogging indicator, you can see when filter cartridges or seals need to be replaced. Thanks to the contamination indicator, you can see when the filter cartridges or gaskets need to be replaced.More expensive models usually have such indicatorsWorking area lightingOperating modes: exhaust and recirculationNumber of exhaust speedsFilter contamination indicator
Competition for hoods in the household appliances market is very fierce, so manufacturers are racing to come up with new features. For example, in some models you can regulate not only the intensity of air intake, but also the degree of illumination of the space, and also set the speed change in automatic mode.
Types of filtration exhaust devices
The variety of recirculating kitchen hoods is as great as that of classic flow-through devices.
See also: Telescopic kitchen hood
Depending on the location and method of installation, the following types of hoods are distinguished:
- Vertical;
- Horizontal, mounted;
- drowned;
- slider;
- island.
Horizontal wall-hung hoods without an air exhaust system are installed in the classic version - open placement above a gas or electric stove. Their big advantage is their small size, which allows them to be placed on the kitchen countertop.
Vertical kitchen hoods with air recirculation can be called an innovation in this segment of household appliances. They are installed behind the hob or in the countertop. If necessary, they can be positioned vertically, at a slight angle, behind or to the side of the cooking zone.
Telescopic hoods (retractable or retractable) have reduced dimensions in the non-working position. When you turn on the device, its working surface doubles thanks to the retractable panel.
Built-in models allow you to preserve the design when placed in a kitchen cabinet. The cabinet itself can be fully used for its intended purpose, since there are no wires in it.
Island models of recirculating hoods amaze with their variety of shapes and sizes. They are installed above the stove and attached to the ceiling. The absence of ventilation ducts allows you to “disguise” the hood without relegating it to a decorative element of the room.
Which is the best hood to choose?
Having decided on the location of the hood, you need to pay attention to the power of the device. The quality of ventilation and air purification depends on this parameter.
Interesting: in the Russian Federation there is a standard for air exchange in the kitchen. According to it, the air must be replaced every 12 hours.
To calculate the power of the hood for your kitchen, you need to multiply its area by the height of the ceiling, and then multiply the resulting number again by 12. Add 30% to the result (losses due to the length of the ventilation duct and bends of the air duct). The final number is the power required for your kitchen.
Where and how to remove the air duct
Most often, the duct from the hood is connected to a vent, which is ventilated naturally (due to draft). This is inaccurate, since with this method most of the grille is tightly closed by the ventilation ducts, and there is insufficient air exchange through the remaining openings.
Most of the ventilation grille is closed, and ventilation in the apartment is insufficient
It is a good idea to connect the duct to a separate ventilation duct. In this case, install the grille as in the picture above.
If there is no separate ventilation duct, but there is an external wall nearby, you can lead the pipe to the street by placing the grille outside. These are two ways to ensure adequate ventilation and ensure that your hood is working properly.
How to take it outside
In order to install the hood and connect the wires to the wall, you need to make a hole in the wall. And this is the only difficulty. Then an air duct is inserted into this hole, sealing it with a solution. From the outside, the hole is closed with a grill to prevent the entry of debris and the settlement of birds and small animals.
One example of a kitchen hood with air outlet through the wall
To prevent outside air from blowing into the room, install a check valve (indicated diagonally in the figure above). By the way, it is best to install it at the junction of the air duct with the ventilation system so that odors from the pipes do not penetrate into the room.
The check or anti-return valve for air ducts looks like this:
A duct check or non-return valve is a lightweight plastic or metal plate. It is movably attached in two places to the pipe - top and bottom, the blade is supported by a light spring. When the hood is not working, the valve blocks the flow of outside air. When the hood is turned on, the air flow pushes the plate forward, pushing the spring back. As soon as the hood is turned off, the plate returns to its place under the action of a spring. If you install a hood without this valve, the kitchen may be too cold in winter; outside air will easily penetrate into the room.
So that the hood does not interfere with natural ventilation in the kitchen
By the way, using a tee and a check valve, you can install the hood so that it does not interfere with natural ventilation in the kitchen. To connect the hood, you need a special ventilation grille, a check valve and a tee. A tee is attached to the ventilation grille, air from the hood is connected to its lower inlet, and a check valve is placed on the free outlet; it is just such that the blades overlap when air passes from the pipe (in the figure below).
Non-return valve for normal natural ventilation in the kitchen
How does such a system work? When the hood is turned off, the petals of the check valve are bent, air from the kitchen enters the ventilation duct through the grille and the open outlet of the tee. When the hood is turned on, the air flow from the hood unfolds the valve plate and air enters the ventilation system. When the hood is removed, the springs again open the air through the tee.
Outwardly, such a system does not look very attractive, and it will have to be disguised in some way. However, this is the only way to connect the hood to the only existing ventilation outlet without compromising air exchange.
Ventilation requirements
The basic requirements and standards that determine how to make ventilation in each room in the house are contained in SNiP. It is necessary to comply with the specified rates of air mass change frequency, temperature and humidity indicators, etc. This is facilitated, first of all, by natural ventilation in the house and apartment. Apartment buildings are initially built with ventilation shafts designed for natural ventilation of living rooms, kitchens and bathrooms. The ventilation system in the kitchen in your home and other rooms is designed in advance.
In a private house, ventilation ducts must be built in the kitchen, bathroom, boiler room and other technical rooms, characterized by a certain percentage of air pollution.
General sanitary and hygienic requirements for ventilation for an apartment, in a house:
- ventilation systems in the bathroom and kitchen are installed independently and should not intersect to prevent air flow from one room to another;
- ventilation systems in the bathroom, toilet and kitchen should not be combined with the general ventilation scheme for living rooms;
- The air removed from the bathroom and kitchen area must be discharged to the street through the roof of a private house. In the apartment - through ventilation shafts;
- The air in the kitchen can be reused only after cleaning with a recirculating hood;
- the kitchen ventilation opening cannot be completely covered with a kitchen hood pipe with an outlet into the ventilation;
- For the ventilation system to operate effectively, it is necessary to ensure a flow of fresh air into the premises.
Installing a hood in the kitchen with your own hands: process and installation steps
To ensure air exchange and get rid of unnecessary odors in the apartment, install an exhaust system. And you can do it yourself, without the help of specialists. This is confirmed by our own experience. Knowing how to install a kitchen hood with your own hands, you will save a round sum in the family budget.
Considering the principle of operation, there are 2 types of hoods:
- flow. The device sucks in contaminated air and discharges it directly into the ventilation chute. This system is the most effective option for air purification.
- Circulation. The device passes air through purifying filters, and then the same air, but already purified, is returned to the kitchen.
When using a circulation system, you do not need a duct, and the installation of the device itself is very simple. But, believe me, this is of little use. Filters constantly become clogged and must be replaced regularly. In addition, they cannot cope with the volume and do not properly clean the incoming air.
Having decided on the location of the hood, you need to pay attention to the power of the device. The quality of ventilation and air purification depends on this parameter.
Interesting: in the Russian Federation there is a standard for air exchange in the kitchen. According to it, the air must be replaced every 12 hours.
To calculate the power of the hood for your kitchen, you need to multiply its area by the height of the ceiling, and then multiply the resulting number again by 12. Add 30% to the result (losses due to the length of the ventilation duct and bends of the air duct). The final number is the power required for your kitchen.
The height of the hood above the electric stove must be at least 70 cm. Above the gas hob, the device can be installed at a distance of at least 80 cm.
Before installing the exhaust system, I had to consult with professionals on this issue. Some of them told me that the distance between the gas stove and the hood should be at least 70 cm. This should be enough for all the fumes to escape.
However, keep in mind that a gas stove produces hotter air than an electric stove, so the power of the device may not be enough to suck in combustion products. In addition, such temperatures can damage filters and other parts of the exhaust system, which affects the efficiency of the device. You decide for yourself whether it is worth the risk while maintaining a minimum distance.
The distance between the hood and the hob also depends on the height of the person who will stand at the hob. The system must be fixed at such a height that a person’s head does not hit the device body.
For installation and installation of the exhaust system you need:
- Venturi - for air outlet into the ventilation duct.
Tip: it is better to choose a chimney made of plastic rather than aluminum. It looks nicer and is quieter
- Hammer drill or impact drill (for concrete walls);
- Clamps (2 pcs.) – for attaching the chimney to the eaves;
- knife;
- Circular saw and emery board (for cutting and finishing the pipe);
- Jigsaw - for making a hole in a cabinet or shelf (if the system is built-in);
- screwdriver (for a wooden wall);
- ventilation grille;
- sealant (silicone) – for sealing gaps and joints between structural elements.
- Level, tape measure, marker - for marking;
- Screwdriver;
Mandatory condition: carry out all work wearing gloves and safety glasses!
If the system operates according to a flow-through design, an air duct with a diameter of at least 120 mm must be laid in the ventilation shaft. It should not be narrowed, bent or stretched in any way, otherwise the capacity will be lost. Round and square diffusers work equally well.
Note: It is better to buy smooth ducts than corrugated ones. This will significantly reduce the noise level when the device operates.
If the hood operates in circulation mode, there is no need to connect it to ventilation. The main component, the filter, will have to be purchased separately.
An important part of the installation is calculating the distance from the hob to the hood so that it complies with regulations and does not interfere with food preparation.
Built-in models are not attached to the wall, but are installed in the kitchen cabinet itself. Once installation is complete, attach a protective cover to the cabinet to hide the wires.
The hood screen should be slightly wider than the hob to ensure that the exhaust gases are completely absorbed by the hood.
Detailed installation steps are given in the table below.
| Step | Step | Description |
| 1 | Preparatory work | Find the right tools and prepare the surface to be treated. |
| 2 | Checking accessories | Remove the casing from the packaging and check that it is complete and that all its components (screws, brackets, clamps, wires) are present. If there is no damage and there are enough components for installation, proceed to the next step. |
| 3 | Marking | Using a spirit level, tape measure, and pencil, draw two lines on the wall. One of them is a vertical line running from the center of the tile to the attachment point. The other line is horizontal and marks the boundary of the working surface of the system. Refer to the installation diagram in the manual and mark where the brackets will be installed. |
| 4 | System fix | If you plan to hang the hood on the wall, drill holes in the wall with a depth of at least 50 mm according to a pre-prepared template. Then insert 10 mm dowels there and screw in the screws, but not all the way, so that there is a small space left for hanging appliances and attaching the hood to them. If the device is a circulation device, simply install the filters inside. If the hood is built-in, remove the bottom shelf of the cabinet and drill 4 holes in the corners and a hole in the middle for the cable (according to its diameter) as marked. Drill similar holes in the center of the other shelves so that the pipe runs through the cabinet and into the vent. Install an adapter onto the pipe to connect it to the vent. Replace the bottom shelf of the cabinet and secure the hood cover. Install filters if the system is circulating. |
| 5 | Ventilation duct installation | Connect one end to the adapter and the other to the ventilation duct. |
| 6 | Connecting to a power source | The system is connected to the mains using a standard socket. If the device is built-in, the outlet should be located under the cabinet. Since the kitchen is a very humid place, purchase an outlet rated IP44 or higher. To avoid electric shock, be sure to ground the unit. |
It is better to use a plastic pipe as an air duct than an aluminum one. It looks more aesthetically pleasing, and the material is durable, easy to install and quiet in operation, since its smooth surface does not interfere with the free flow of air.
Carefully pull the duct through the holes you made so as not to damage the pipe itself. At the junction with the vent, carefully cut off the excess ductwork, leaving a small margin. Cut off a few corners and then bend them inside the vent. When pulling the air duct, do not make bends, and if they cannot be avoided, make an angle of no more than 90°, otherwise the efficiency of air intake will decrease.
Securely fasten the air ducts and secure them with clamps. Don't forget to seal the gaps in the joints with silicone so as not to lose traction.
To ensure that your hood works properly and eliminates the risk of fire, clean it of carbon monoxide at least twice a year. Follow the safety rules for your exhaust system and it will serve you for a long time and safely.
Connecting the hood to electricity
This step is the simplest. It is very good, when you are initially planning a kitchen, to carefully consider the location of all electrical sockets and sockets.
If you don't have a clear exhaust outlet, you'll have to install one. To do this you will need the following materials:
- VVGngls 3 * three-core cable 2.5 mm2
Use a cable of this brand (index Ls) in your home electrical system.
- Standard 16A grounded socket
The hood, unlike other kitchen appliances, is a low energy consumption device. It is not necessary to correctly pull separate wiring underneath it directly from the distribution board.
It turns out that you can connect the device from a common group of sockets with the nearest distribution panel.
Pull the mounting boxes or conduit out to the location of the future outlet and install the outlet box.
This outlet is located at the top, almost under the ceiling, slightly above or to the side of the hood itself. The choice of a specific location depends on the length of the cable and the requirement for the minimum height of the exhaust device above the stove.
This often means cutting a hole in an adjacent kitchen cabinet.
You then remove the insulation from the cable, label the wires, and connect them in a junction box.
All that remains is to connect the outlet correctly.
You have connected a kitchen appliance. Let's go to the channel.
Correct connection of the air duct to the ventilation system
For this you will need:
- plastic hoses
- offset check valve
- tee
As a result, you should end up with a project like this.
How does it all work? When the hood is turned off, the valve will be open and warm air will be able to bypass the duct. As soon as you turn on the hood, the valve closes automatically, cutting off the air supply to the room.
All odors from the hood can escape freely. When you turn off the air duct, the pressure in it is released and the valve automatically opens, connecting the ventilation duct to the apartment.
Advantages of recirculating hoods
After listening to a lot of laudatory odes about the power and efficiency of exhaust hoods, you can decide that a hood with recirculation is the worst option. However, this is not at all true. A lot depends on the type of device, its manufacturer, model, price and other parameters. Recirculating hoods for the kitchen have many advantages, which many do not pay attention to, because they are overshadowed by the main drawback - the lack of an air duct, and therefore the possibility of removing contaminated air outside.
However, if you analyze all aspects of the operation of circulation exhaust devices, this disadvantage may not be as significant as it seems at first glance. For example, even someone who has never dealt with installing air purifiers can install this device, because there is no need to lay out the air duct. Models operating in recirculation mode are lightweight and compact, and therefore take up much less space than diverter models. Many of them are mounted in kitchen cabinets. The air duct pipe will not disturb the interior of the room. They work much quieter and do not cool the air in the room in winter.
After reading the following sections, you will learn everything about the circulation mode in the hood and will be able to draw your own objective conclusions about its real advantages and disadvantages.
Principle of operation
If you look in the dictionary, you can find out that recirculation is the repeated use of the same volume of air in a closed system and its repeated processing. How is this principle implemented in a kitchen hood?
When you turn on the exhaust device during cooking, it, with the help of powerful turbines and fans, begins to suck in the air coming from the stove. It is saturated with water vapor, fat particles, combustion products and other impurities. Before returning to the room again, the air goes through two degrees of purification - coarse and fine. The grease filter installed immediately behind the working panel is responsible for the first. It traps particles of fat and evaporation, preventing them from penetrating inside the mechanism. Unpleasant odors and combustion products are adsorbed by a carbon filter element. After this, the purified air is returned back to the kitchen through special holes in the upper part of the device.
Speaking about the principle of operation of a recirculation hood, one cannot fail to mention its main working elements - filters. Since there is no possibility of air removal, they are responsible for the quality of its cleaning. Grease removal cartridges are available in disposable and reusable versions. Non-woven, padding polyester or paper elements, which can be used only once, are usually installed in budget models. When choosing them, you should keep in mind that filters will have to be replaced approximately once every 2-4 months. Having saved on the purchase of an exhaust device, you will periodically spend money on its maintenance.
Acrylic filters are an intermediate option. They can be washed and used several times, but they wear out quite quickly. The best are reusable filter elements made of aluminum foil or stainless steel. They are not changed, but only cleaned when they become dirty. High-quality filters will last as long as the air purifier itself.
Previously, carbon filters were exclusively disposable. But now elements have begun to appear that can be cleaned and reused. However, it is still difficult to find them on sale, and they are quite expensive. Therefore, you should prepare for the fact that the cartridges will have to be changed every few months. How often to do this depends on several factors: the quality of the element, manufacturer, cost, intensity of work. The service life of carbon filters can range from 3 months to a year.
Installation Tips
Depending on the model, a hood without outlet can be attached to a wall or ceiling, built into a kitchen cabinet or countertop. For the installation of any suspended exhaust devices, there is a single rule - their working surface must be at a safe distance from the hob. If a gas stove is installed in the kitchen, the distance is 75-80 cm, if an electric one is 65-70 cm. The width of the air purifier must correspond to the width of the stove, otherwise the efficiency will be significantly reduced.
The fasteners necessary for installing the exhaust device are included in its package, so for installation you will need a small set of tools: an electric drill (hammer), screwdriver, hammer, screwdriver, level, pencil or marker.
It is necessary to make markings on the wall or ceiling, on which you will then mark with dots the places where the mounting dowels will be driven. Here you need to drill holes. After the air purifier body is suspended on dowels, it is tightly pulled to the wall or ceiling using anchor screws. Then all that remains is to connect the hood to the electrical network and check its operation.
The built-in hood is installed in a special kitchen cabinet. Its body is attached to the top or middle shelf, and in their absence, to the side walls. The air purifier is mounted in such a way that only the operating panel remains visible.
Design of recirculating models
The design of hoods operating in circulation mode is very diverse. You can choose any model to suit your taste: modest built-in, artsy and unusual island, modern and laconic inclined, traditional domed, light and strict T-shaped. Manufacturers produce air purifiers in various styles: modern, high-tech, country, retro, classic, minimalism.
There is nothing to say about the variety of color solutions. Only built-in models, which are almost completely hidden, are modest in this regard. But everyone else can be chosen in almost all colors of the rainbow. But designers don't stop there. The appearance of some hoods is more reminiscent of decorative items or paintings. For decoration, plastic, tempered glass, wood (including rare, expensive species), mosaic, painting, stained glass technology, and crystals are used.
The use of ventilation pipes for kitchen hoods
The key to a beautiful and comfortable kitchen is to keep it spotlessly clean. Regular cleaning and fresh air are important. Conventional ventilation is not enough here, since cooking produces moisture and combustion elements that can settle on walls, ceilings, floors and furniture. A ventilation hood can largely solve this problem. This device requires proper installation, especially when connected to a ventilation duct. The correct choice of air duct for the hood will significantly increase the efficiency of ventilation.
Properly selected and installed air duct will increase the efficiency of the kitchen hood
Every home should be equipped with a kitchen hood. This is necessary not only for comfort, but also for the safety of people, since carbon dioxide and moisture are released during breathing. In addition, cooking produces decomposition products such as soot, grease, gases and moisture.
As a result, moisture settles on furniture and walls, forming mold, soot and smoke contaminate surfaces, and combustion elements such as carbon dioxide lead to fatigue, respiratory irritation, poor health and decreased productivity. Carcinogens produced during frying can cause poisoning. That is why it is so important to install a ventilation hood, the effectiveness of which largely depends on the choice of ventilation ducts.
The evolution and development of air ducts for kitchen hoods
In multi-storey buildings built during Soviet times, apartments had a small area. Ventilation in such rooms removed not only harmful substances from the kitchen and bathroom, but also air from living rooms. The ventilation ducts were then built directly into the walls of the buildings. Single-family houses had no ventilation at all, and residents were saved from the harmful effects of carbon dioxide by a common chimney built into the stove. This is where the products of fuel combustion and decomposition elements go during cooking.
The exhaust duct is usually not enough, so ducted air exhaust is added.
Fresh air in old houses and apartments usually entered through poorly fitted doors and windows, and soot and odors gradually accumulated on the walls and ceilings, so whitewashing was required every year. In some apartments, ventilation ducts were prototypes of kitchen hoods, and the same ventilation was installed in bathrooms and toilets.
In modern homes, in addition to the exhaust fan, an additional ventilation system is installed. This could be an exhaust system or a supply and exhaust system. In energy-efficient houses, a mandatory condition is the installation of a supply and exhaust system with heat recovery.
Kitchen hoods with ventilation outlet
Traditional exhaust devices installed in most cases. They differ in many parameters, so they allow you to choose the optimal option for local forced ventilation. When installing such structures, it is necessary to ensure that connecting the kitchen hood to the ventilation does not disturb the flow of natural ventilation.
Mixed ventilation in the kitchen in typical apartments is common; it is sufficient for a small space. Forced ventilation in the kitchen is not advisable.
Structurally and according to location, hoods are divided into:
- corner;
- built-in;
- wall;
- island.
Wall-mounted devices are the most common, due to the typical layout of city apartments. When installing a ventilation system in a private house with your own hands, various options for the location of exhaust hoods are possible, including island placement above the food preparation area.
The filtration system is simple. A metal grill for collecting grease and dust particles is located on the outside, protecting the fan from clogging. The grill needs to be cleaned once every few months. The frequency depends on the intensity of cooking. Exhaust fans can be of different power, which determines the performance of the hood, often the noise level in operating mode.