Difficulties in disassembly during repairs
People buy top-loading washing machines much less frequently than front-loading ones - that’s a fact.
- The tightness of the machine components creates difficulties during disassembly
- Increased vibration during spin cycle
- On some machines it is not possible to adjust the level of the rear legs
- Corrosion of the top cover from moisture
- Spontaneous opening of the drum flaps due to imbalance
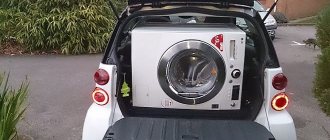
- Narrow and deep, perfect for tight bath spaces, closets or kitchens
- No need to bend over to fold laundry
- Possibility to interrupt the program and add laundry
- Child safety. Control panel location.
Features and nuances for self-repair of verticals:
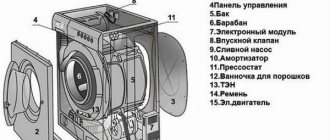
The device contains the same elements (pressure switch, water intake valve, drum, tank, control board, pump, and so on). The drum axis is structurally made on two bearings; a self-positioning sensor is sometimes located on the tank (the drum is fixed with the flaps up).
We will show the dismantling of components using the example of Electrolux:
1. Using a screwdriver, release the control panel from the sides 2. Pull the plastic panel up and slide it towards you 3. Tilt it at a slight angle towards you to remove the wires from the board connectors 4. Remove the panel
To remove the electronic control module, disconnect the remaining wires and unscrew the screws shown in the figure. For quick and correct assembly, take photographs of the connection points of the wire loops. To remove the water fill valve, disconnect the rubber hoses from the clamps and dismantle them. Unplug the wires and press on the holes from the outside to press out the valve.
To remove the side panels, unscrew several screws; do not forget to save the washers for grounding the case. Bend the wall from below with your hand and slide it down.
After removing the two sides, access to the screws for removing the front panel appeared. Unscrew them.
To remove the NTC sensors and position the DSP drum itself, it is enough to remove the right wall and dismantle them.
- Frequent malfunction - there is no way to change the program:
Example - Hotpoint Ariston ARTL 1047.
Many “craftsmen” sin that the control module is to blame for everything. But no!
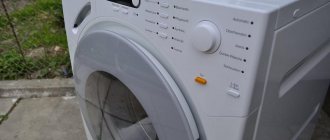
It is enough to unscrew two bolts from the back and remove the control panel.
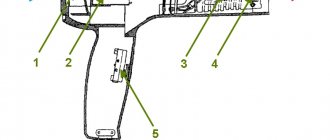
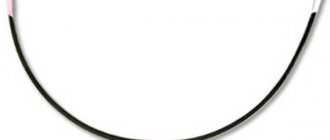
This very cracked handle is the culprit. Use a metal ring (antenna plug for example).
By squeezing the plastic handle, the ring will prevent programs from skipping.
- Exploded top of the Indesit, Ariston vertical:
001 - control knob 002 – white on/off/reset buttons 003 - white control panel 004 – bitron switch 005 – function keys 007 – display 008 – cover handle 010 – dispenser release lever 011 – dispenser hook spring 012 – dispenser release button 016 – cover support 018 – partition with shock absorber 021 – door locking device 022 – white dispenser 023 – siphon cover 026 – control panel wiring 027 – 8-pos.
potentiometer There is an opinion that two drum supports instead of one are good.
This is not so, and in the case of the “vertical” it is simply a forced engineering decision. The service life of the drum bearings does not increase even by a minute.
If the screws are difficult to unscrew, heat them with a blowtorch.
Use special lubricant for oil seals - Litol-24, CIATIM-221, CV joints-4M, etc.
On the Kandy, in order to change the bearings, you need to disassemble the entire machine down to the screw! And what about the wild cramped conditions in the depths of the “verticals”. Sometimes you have to do everything literally by touch.
How to disassemble a Hotpoint-Ariston washing machine?
Like any complex technical device, Ariston brand washing machines also tend to break down. Certain types of faults can be eliminated solely by almost completely disassembling the unit into its component parts. Since the majority of such malfunctions of the Hotpoint-Ariston washing machine can be completely corrected on your own, the independent disassembly procedure should not be confusing. We will look at how to put this into practice in this publication.
Preparation
First of all, you need to disconnect the washing machine from all communications:
- disconnect from the power supply;
- unscrew the inlet hose;
- We disconnect the drain hose from the sewer (if it is permanently connected).
It is advisable to drain the remaining water from the tank in advance using a drain filter or a tube near it. Next, you should prepare free space for the location of the washing unit itself and the components and components removed from it.
We prepare the required tools. To disassemble the Ariston washing machine we will need:
- screwdrivers (phillips, flat, hex) or screwdriver with a set of bits of various types;
- open-end wrenches 8 mm and 10 mm;
- knob with heads 7, 8, 12, 14 mm;
- pliers;
- wire cutters;
- hammer and block of wood;
- A puller for bearings will not be superfluous (when disassembling the washing machine is carried out in order to replace them);
- hacksaw with blade for metal.
Step-by-step instruction
Having completed the preparatory work, we proceed to disassemble the Hotpoint-Ariston washing machine.
Washing machine top cover
Without dismantling the top, there is no way to remove the other walls of the unit. Therefore, unscrew the fastening screws from the back, move the cover back and remove it from its place.
On top there is a large block that equalizes the position of the washing machine (counterweight, balancer), which blocks access to the tank, drum and certain sensors, however, it is quite possible to get to the noise filter and control panel. Remove its bolts and move the balancer to the side.
Rear and front panels
From the rear wall, use a Phillips screwdriver to unscrew several screws holding the back wall. By removing the back panel, many components and parts become available to us: a drum pulley, a drive belt, a motor, a thermoelectric heater (TEH) and a temperature sensor.
Carefully place the washing machine on its left side. If your modification has a bottom, then remove it; if there is no bottom, then this makes the task easier. Through the bottom we can get to the drain pipe, filter, pump, electric motor and dampers.
Now we dismantle the front panel. We unscrew the 2 screws located under the top cover of the machine body in the front right and front left corners. We unscrew the screws located under the tray of the washing unit, and after that we take hold of the control panel and drag it upward - the panel will come off freely.
Moving elements
A pulley with a belt is fixed to the back of the tank. Carefully remove the belt from the motor pulley first, and then from the large pulley.
Instructions for removing the top cover from the Ariston washing machine
When starting the stage of detaching the top cover, you need to consider how the laundry is loaded into the washing machine. This means frontal (horizontal) or vertical loading. Accordingly, the methods of fastening for such modifications also differ. This is due to the design of washing machines, including Ariston. And also the impossibility of securing the top cover in models with vertical loading, similar to models with horizontal loading.
Step-by-step instructions for removing the top cover of front-loading Ariston machines
First, let's look at how to remove the top cover of an Ariston machine with horizontal loading:
- on the reverse side, in its upper part, all existing screws are unscrewed. Their number may vary, depending on the specific model of Ariston machines, usually there are two. It is very important not to lose them during the work process. Therefore, first prepare a place for storing them until the cover is installed back;
- It is necessary for the fasteners to come out of the grooves, so the top cover moves slightly towards the rear wall and rises upward.
So, the cover is removed, and you can begin further repairs.
The scheme for removing the cover of a Russian-assembled Ariston washing machine - arsl 100 - is no different from the sequence of actions for other modifications made in Europe.
Step-by-step instructions for detaching the top cover of Ariston top-loading machines
If we are dealing with machines that have vertical loading, you need to follow several steps that differ from the previous instructions:
- in order to get to the fastenings of the lid, which in this case is hinged to remove laundry from the drum, you need to remove the control panel. Using a Phillips screwdriver, unscrew the two self-tapping screws located on the back wall of the machine.
- after which, using a flat screwdriver, the panel is carefully lifted out of the special grooves and removed to the side. This must be done very carefully, trying not to damage the hanging wires;
- After the panel is removed, you need to unscrew the four screws on the body of the washing machine, with which the top cover is attached to the body. They are located on opposite sides from each other. They need to be taken out, not forgetting to put them in a safe place so as not to be lost;
- Finally, carefully remove the cover without damaging the latches with which it is inserted into the body of the machine.
In conclusion, we can say that it is quite possible to fix some minor breakdowns on your own. And in order to remove the top cover of any Ariston washing machine, whether with vertical or horizontal loading, no additional skills or the use of complex tools are required. In addition, this will help save money on calling a specialist.
Do-it-yourself bearing replacement in an Ariston washing machine
Today, bearings are used in almost all mechanical devices, including automatic washing machines (hereinafter also referred to as SM, ASM). The main task of the bearing is to minimize friction between the surfaces of the shaft and sleeve moving relative to each other during rotation. According to their design, modern bearings are divided into several varieties. In modern SM drums rotate on ball bearings, as well as on their roller “counterparts”. We will tell you about replacing the bearing in an Ariston washing machine in our article.
Causes and symptoms of bearing wear in washing machines
Ball bearings are designed for a long service life, on average up to 10 years. In order for the devices to work for a long time, their parts are well adjusted and generously lubricated with special substances. To prevent water from entering the mechanisms, the bearings are hermetically sealed with seals made of special types of rubber or caoutchouc.
During washing and spinning, the drum rotates inside the tank on ball bearings mounted on the shaft. Replacing bearings in an Ariston washing machine, as well as other well-known brands, is inevitable after water gets into mechanical parts. This occurs due to damage to the seals, which lose their elasticity over time. The reason is exposure to an external aggressive environment: water and detergents. Water accelerates wear of parts by washing away lubricant.
Accelerated wear is caused not only by damage to the seals, but also by improper operation of washing machines. If you often load a large amount of laundry into the AFM and spin it at maximum drum speed, high loads lead to the following symptoms:
- strong vibrations and hum while spinning clothes;
- play of the drum when it rocks, which can be felt with your hands;
- slow rotation or jamming of the drum during washing and spinning.
If signs of a defect are evident, replacing the bearings yourself requires preliminary preparation.
Preparing to replace the bearing
To get started, you need to have a set of tools for disassembling the unit:
- pliers and platypuses;
- a set of slotted and Phillips screwdrivers;
- adjustable wrench and set of open-end wrenches;
- metal rod;
- removable device for bearings (preferably, but not required);
- sealant and WD-40 fluid;
- hammer.
It should be noted that bearings are quite easy to change in models of the Margarita 2000 series - such as AVSL 109 and others, with metal and plastic tanks that can be disassembled. But there are other models of machines with a non-removable tank made of plastic. In these cases, you will have to purchase and replace the entire expensive unit.
Some craftsmen manage to cut a non-separable plastic tank, change the bearings and oil seal, and then glue it together with sealant and fasten it with self-tapping screws. But the consequences of such repairs are unpredictable - the tank can leak at any time, as it experiences heavy loads during spinning.
Before you change the bearings on your Hotpoint Ariston washing machine, you need to purchase the same new ones. The markings can be found in online stores that sell spare parts for ACM. New seals for ball bearings also need to be purchased. In the place where the repairs will be carried out, you need to free up a free space of at least 3–4 m2. A free perimeter around the machine is necessary for access to all its components.
Warranty for connecting washing machines!
We employ only experienced plumbers who regularly connect Ariston washing machines to sewerage and water supply in apartments in Moscow and the surrounding Moscow region. Installation is provided with a written guarantee for a period of one year. This means complete safety for our customers, as well as the absence of any problems with water leaks and sewer odors. Each master always has with him all the necessary tools. To call a plumber to your home, call or leave a request on the website. We will connect the washing machine in accordance with the manufacturer's requirements!