During the operation of the washing machine, various technical problems may occur. Among the malfunctions of the home assistant, one can note the appearance of a hum during washing and strong vibration. The cause of serious malfunctions in the operation of a household appliance is defects in the drum. It is possible that it jams and does not spin if foreign objects get into the device components. Replacement of worn-out parts and structural elements is impossible without disassembling the device. To troubleshoot problems, you can use the services of professional technicians and try to solve the problem yourself. Let's look at how to disassemble a washing machine drum yourself and what you will need for this.
Causes of breakdowns
The situation when, after starting the washing machine, after some time it stopped rotating and the drum jammed, is familiar to many owners of household appliances. The reasons for the failure of a household unit may be related to mechanical damage, wear of parts, structural components, malfunctions of electronics, and problems with wiring. To eliminate the malfunction, it is very important to establish the root cause of what exactly caused the malfunction of the household device, and for this the device will have to be disassembled.
Reasons that led to drum failure:
- ingress of foreign objects into components, structural parts, drums - buttons, coins, underwires from women's bras. The drum is jammed, does not spin, and turns with difficulty. To establish the causes of malfunctions, it is necessary to dismantle the heating element, after which third-party objects can be removed;
- jamming, wear of bearings, flanges, seals. The problem arises with frequent use of household cleaning products. The cuff wears out over time and water leaks into the bearings. The bearings fall apart, the drum shaft jams, and the drum does not spin. It is best to entrust replacement to washing machine service specialists;
- broken drive belt, which is equipped with machines with commutator motors. The problem occurs when automatic washing machines are idle for a long time. The belt material loses its properties, cracks appear on its surface, which lead to rupture during operation of the machine. In this case, the most vulnerable spot is the electric motor pulley. Before replacing the belt, remove the back cover of the unit and examine the markings on its outer surface;
- The drum drive motor is not functioning. During operation, the operation of the motor wears off the material of the brushes, and an unpleasant specific smell appears when the washing machine operates. If the brush life is exhausted, the drum stops rotating. Before installing new brushes of the appropriate size, the commutator is cleaned;
- malfunction of the electronic programmer module, which, depending on the model modification, is responsible for the water supply valve, operation of the drain pump, collector motor, thermistor, timer. In fact, the electronic module is responsible for the performance of the main parts and engine components of washing machines.
The drum may jam and not spin if the tachometer fails, the electrical wiring is damaged, or the capacitor burns out. In this case, it is necessary to carry out serious diagnostics. The reason why the drum does not spin may be overload with laundry or clogged filter. All of the above reasons require troubleshooting, so you cannot do without disassembling the washing machine and removing the drum.
Inoperative state of the electronic module
Foreign object in drum
Belt break
Bearing wear
Drum motor malfunction
Removing the Drum
Before you can begin to actually disassemble the drum, it must be removed; the operation algorithm largely depends on the type of machine, the specific model and its manufacturer.
Front loading machine
This type of machine is the most common. The process of removing a drum from such a machine is a rather complicated procedure, but with persistence, attention and accuracy, any job can be completed.
Before starting disassembly, it is important not to forget to disconnect the machine from communications, turn it off and remove the plug from the socket.
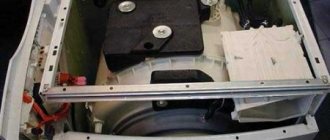
- After unscrewing several bolts holding the top panel, it is moved back and removed. Access to the insides of the device is provided.
- Unscrew the bolts securing the rear wall. They take it off.
- By turning the pulley, remove the drive belt.
- Disconnect all wiring going to the drum.
- Unscrew the bolts securing the electric motor.
- If the model has an upper counterweight, remove it.
- Remove the detergent tray. In most models from LG, Samsung, Indesit and a number of other manufacturers, it is held in place by a plastic latch.
- Disconnect the supply pipe.
- Unscrew the bolts holding the control panel.
- Carefully remove the panel.
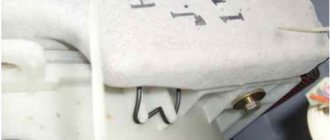
- Loosen the clamp securing the cuff of the loading hatch and tuck it inside the drum. It is important not to forget that the cuff is made of soft material and is very easy to damage.
This will open access to the drum, hanging freely on springs and shock absorbers. You can remove it. In some models of washing machines, in particular those manufactured by Samsung, it will be easier to work if you first remove the front panel and unscrew the lower shock absorbers.
Top loading machine
These devices are distinguished by excellent functionality with very modest dimensions. A top-loading washing machine has a hatch at the top. The drum is fixed in it with bolts. Due to significant differences in design, disassembling the device looks slightly different.
- They turn the car around.
- Unscrew the back wall by unscrewing several screws.
- Move the side walls aside and dismantle them.
- Remove all interfering electrical wiring.
- Unscrew the bolts securing the plastic cover.
- Release the shaft and remove the drum.
Regardless of the type of machine, it would be useful to take step-by-step photographs during the work. Having your own instructions with a photo will make subsequent assembly much easier and will protect you from the appearance of “extra” spare parts.
Collapsible drum
Most models of modern washing machines, this is true for models from famous manufacturers: LG, Samsung, Ariston and others, have a collapsible drum, which significantly simplifies any repair work associated with it. Structurally, it consists of two halves, which are bolted together. Along the joint line there is a gasket or a layer of sealant, which ensures ease of disassembly and tightness of the drum.
Most often, disassembly is not particularly difficult, you just need to perform a number of actions in the following sequence:
- place the drum on a flat surface with the hatch down;
- jam the pulley using a small wooden block;
- Use a socket wrench or a socket with a ratchet to unscrew the bolt securing the pulley;
- after the pulley is removed, use a wrench of a suitable size to unscrew the connecting bolts;
- The halves are easy to separate; you may need to apply several light blows to the shaft with a mallet or a regular hammer through a wooden block.
When planning to unscrew a pulley, you must be prepared for the fact that the bolt will resist. If this is the case, you should not try to unscrew it “forcibly”; it is easy to tear off the edges, or even break the rod, as a result of which the repair will take a long time. Before unscrewing any bolts inside the washing machine, you should use WD-40, this will make the work easier and ensure the safety of the original fasteners.
After the drum is disassembled, you can proceed directly to replacing the bearings or removing foreign objects that have jammed the machine. If the task is to remove old bearings, it is better to use a screw-type puller. You can preheat the bearing, but you must use a torch or blowtorch with extreme caution so as not to damage the drum itself.
When changing bearings, it is important to pay attention to the condition of the sealing seals. If they have lost elasticity, there is a lot of wear or mechanical damage, the seals are replaced along with the bearings. Afterwards all that remains is to assemble the car; this is done in the reverse order. Of course, before assembling the drum, a layer of sealant must be applied to the parts being connected.
Tools for work
Before carrying out work, having established the cause of the malfunction, you need to prepare the necessary equipment, tools, and purchase failed elements and parts.
To repair a washing machine you will need:
- screwdriver;
- set of hexagons;
- screwdrivers with a cross-shaped, slotted nozzle;
- open-end wrenches;
- set of sockets, ratchet;
- hammer, pliers.
What may be required for work
In order not to be distracted from the work process, it is worth preparing the necessary tools and purchasing replacement parts in advance. The complexity of disassembly depends on the design of the washing machine model.
Before carrying out repairs, read the operating instructions, familiarize yourself with the technical characteristics, disassembly diagram of the model, watch training videos on disassembling the tank.
Disassembling the drum of different types of washing machines
Each type of washing machine has its own specific disassembly and repair work.
Front loading type
Disassembling the drum in washing machines depends on the type of load. Before carrying out any work, be sure to disconnect the unit from the power supply, remove the water supply hoses and drain pipe.
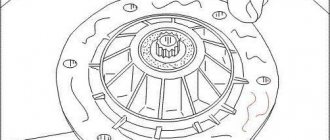
General diagram of the design of front-type washing machines
The work is carried out following the established sequence:
- Use a screwdriver to unscrew the screws securing the rear panel of the unit. Having unscrewed the fasteners, remove the top cover, the front panel along with the hatch for loading laundry;
- dismantle the powder loading container. Use a screwdriver with a slotted head to disconnect the control panel so that it does not interfere with the disassembly of the drum in the future;
- remove the hatch cuff by carefully pulling the clamp spring. Disconnect the bottom panel by unscrewing all the screws located on it;
- shock absorbers, electronics, pipes, and other elements are disconnected from the loading tank. Turn off the motor located behind the drum.
After replacing faulty components, the elements of the washing machine are assembled in the reverse order.
Removing the washing machine cuff
Removing the panel
The front panel can be carefully removed
How to remove the pressure switch Unscrewing the washing machine pulley bolt
Remove shock absorbers and bolts
Remove the tank from the springs
Top loading
The top-loading device is functional, has compact dimensions, and an ergonomic design. Such models are ideal for small bathrooms and kitchens. A design feature of such devices is the location of the hatch in the upper part of the unit, the drum is secured with screws.
Sequence of disassembly work:
- unscrew the screws securing the back cover, the lower front part;
- moving the side panel to the side, remove it from the washing machine;
- remove the electrical wiring, disconnecting the wires, unscrew the bolts around the plastic cover;
- Unscrew the screws securing the shaft and remove the loading tank.
The assembly of the structure is carried out in the reverse order. To avoid mistakes, it is recommended to photograph the most difficult moments during disassembly.
Removing the drum
Steps for a front-loading machine
Depending on the washing machine model and manufacturer, the disassembly process may vary slightly.
For example, you have an Indesit washing machine or any other, and you don’t know how to remove the drum.
Let's figure it out. To solve the problem yourself, you will have to:
- – unscrew all the screws on the back wall, remove it together with the control panel and the detergent compartment;
- – no need to disassemble the control panel, just put it aside;
- –
remove the cuff: unscrew all the screws, remove the panel at the bottom, find the clamp spring and pull it; - – remove the front panel, now the tank is open and accessible;
- – remove all the wires and generally remove everything that can be removed (pipes, wiring);
- – remove the head screw (it holds the tank at the back);
- – pull out the tank, if possible, halve the tank and remove the drum. Replace it with a new one;
- – reassemble in reverse order.
Steps for a top-loading machine
The drum in a top-loading machine is more durable because it is attached on both sides, unlike a front-loading machine.
What steps are needed to get it?
Unscrew all the screws from the bottom of the machine, both on the front and back walls.- The side panel is unscrewed and removed.
- All wires are removed and unscrewed screws are removed.
- Similar to the first, the second side panel is removed.
- The shaft is secured with a screw, which can also be unscrewed.
- All that remains is to remove the drum of the washing machine Ardo, or Bosch, or Candy, etc.
Drum repair
If the drum does not spin, it must be disassembled. Remove the back cover by unscrewing the screws on the rear panel, disconnect the wiring, pressure switch hoses, the hose from the powder receiver, and the drain pipe. To disconnect the wires, unscrew the clamps.
If the tank is collapsible, simply unclench the brackets connecting the two halves of the tank
Disconnect the heating element
Disconnect the wires from the heating elements. If electrical wiring is connected to the tank, it is recommended to disconnect and remove it so that it does not interfere with the process of disassembling the drum. There are counterweights installed at the bottom and top of the tank, so to make the structure lighter, they are also removed. Remove the drum from the springs by unscrewing the fixing shock absorbers with a wrench. Since the tank is removed along with the engine, it must be disconnected by removing the belt. Now you can begin to disassemble the washing machine drum and replace the failed elements.
Washing machine pulley bolt
The design of the loading tank consists of two parts (halves) screwed together with bolts. In some models, manufacturers install soldered drums. To dismantle the forecastles, unscrew the connecting hardware. When removing, evaluate the condition of the seals and bearings. Wipe the drum bushing from water and old lubricant.
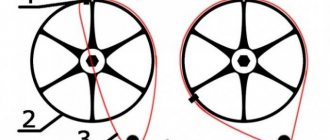
Disassembly begins with removing the pulley secured to the drum shaft of the machine with a bolt. Fixing the pulley with a wooden block, unscrew the bolt. If the bolt is difficult to unscrew, you can heat it a little with a gas heating pad. Carefully pull off the pulley, unscrewing it in different directions.
We knock out the shaft with a wooden block so that it is flush with the bearing. The drum should rest against the front of the tank. We unscrew the tank in a circle, removing the bolts, latches, and clamping brackets. Divide it into halves. Remove the tub from the washing machine.
Use a wooden block to jam the drum pulley
Having pryed the oil seal, remove it with pliers and a flat screwdriver. If necessary, replace it with a new one. Using a hammer, a punch, the cross-sectional diameter of which must match the size of the bearing, carefully knock out the bearings, trying not to damage the edges or walls of the hole. The new bearing is pressed into place using a punch and screw press. If the crosspiece is damaged or worn out, replace it with a new part.
The washing machine tank consists of two parts
How to get to the drum?
To get to the drum of the Indesit washing machine, you need to carry out a series of sequential actions:
Remove the top housing cover. To do this, unscrew the fixing bolts located on the rear wall of the washing machine body. The cover is slightly moved back, lifted up and removed from the body.- Unscrew all the bolts securing the panel on the back wall of the washing machine. Carefully turning the pulley, remove the drive belt (the parts are located behind the back panel of the washing machine).
- Disconnect the wiring cables that are attached directly to the drum. The work is carried out extremely carefully, since the cables are often clamped with plastic clamps, which are very easy to damage.
- Remove the heating element. The heating elements are located under the tank. First of all, disconnect the wiring, then loosen the central nut, push the bolt inward, pry up the heating element with a screwdriver and remove it from the socket. When reassembling, the rubber seal on the heating element must be replaced. Otherwise, there is a high risk of leakage.
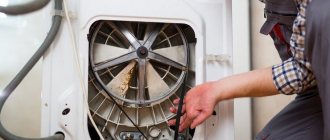
- Remove the engine. To do this, disconnect the wiring step by step, unscrew the mounting bolts, gently rock the motor, and remove it from the housing.
- Remove the counterweight (located in the upper part of the washing machine body). For this work, a hexagon is used to unscrew the fixing bolts. During dismantling, the counterweight must be supported by hand. An insufficiently secured, heavy part may break off and damage other elements of the washing machine.
- Disconnect the wires and hoses from the water level sensor (the element is located on the side panel and looks like a tablet).
- Loosen the clamp holding the cuff, pull it back and push it inside.
- Remove the powder receptacle from the housing.
- Carefully lay the washing machine on its side and remove the AquaStop sensor. To do this, unscrew the drain filter fasteners, disconnect the pump wires, unclench the clamps and remove the drain hose pipe. The pump is removed along with the cochlea. At the same time, unscrew the shock absorber bolts.
- Remove the UBL (hatch locking system). To do this, having installed the washing machine in its original position, unscrew the two UBL bolts and disconnect the wiring. Additionally, the control module is dismantled. To do this, unscrew the fastening bolts and press the locking latch. The control module is not removed from the wires, but is carefully placed on the outside of the housing.
During the process of disassembling the washing machine, it would be a good idea to take video or photographs. This will help to avoid errors in reassembling the household appliance.
The video will show you how to disassemble the Indesit machine:
Dismantling a welded tank
Some manufacturers, in order to reduce the cost of the model, install a soldered tank. If the drum does not spin, it is jammed, in case of malfunctions of its components or parts, a new tank will need to be installed.
The disassembly process is as follows:
- remove the tank from the washing machine;
- determine the location of the welded connecting seam. Every four to five centimeters, drill shallow holes with a drill using 3-4 mm drills;
- we cut the drum along the seam with a saw, a hacksaw for cutting metal, or a jigsaw;
- We carefully cut off the front part of the tank, where the drum is located. The rear part remains in the tank;
- turning over the main part of the tank, we find the place of its connection with the drum. Fixation is carried out on the wheel, which is dismantled with a flat screwdriver.
We take out the tank
Finding the seam location
If the tank is not collapsible, you will have to cut it.
As you can see, the technology of disassembling the drum is quite a labor-intensive, painstaking, responsible process that requires technical knowledge and experience. The work must be done in a consistent manner. Without confidence in your abilities, entrust the repair of your washing machine to professional craftsmen and do not try to disassemble the equipment yourself.
To prevent damage to the washing machine, before starting the unit, check your clothing pockets, use special bags for washing small items, do not exceed the amount of detergent, and do not put a lot of laundry in one wash cycle.
If any extraneous noises, creaks, or sounds occur, if you notice that the drum is spinning slowly, or if other faults are detected, call a washing machine repair specialist.