Let's remember physics
From a school physics course we know about the structure of an internal combustion engine. The compressor functions in a similar way. The scheme of its work for Indesit or Atlant is the same. A piston and valve system compresses the freon, sending the heated refrigerant to the condenser. There it turns into a liquid state and enters the capillary expander. The compressor compresses the freon, then cools the gas in the condenser, allowing it to circulate throughout the refrigeration system. The process has a continuous cyclical nature. The compressor is turned off, turning on from time to time to perform the function of compressing the refrigerant.
Internal combustion engine structure
Which refrigerator do you have - the Belarusian Atlant or the Indesit assembled under the Italian patent? They all have the same motor and similar internal circuit design. In Atlanta and Indesit, piston-type compressors are used. The piston compressor is equipped with an electric motor with a vertical shaft. The structure is insulated with a sealed casing. When the engine is turned on, it starts the crankshaft, which rotates and moves the piston. The piston pumps the refrigerant out of the evaporator and pumps it into the condenser.
Piston compressor
Repair
To carry out restoration work on this unit, stock up on the following tools:
- gas-burner;
- freon storage;
- piercing valve.
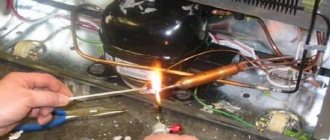
Before starting repairs, disconnect the unit from the network, empty it of products, pull out the compressor and, slightly lifting it, break the freon filling pipe. Turn on the refrigerator for about 5 minutes to allow the gas to move into the condenser. Connect the piercing valve with the cylinder hose attached to it. Open the valve for 30 seconds, the gas will collect in the accumulator. Copper solder is made in place of the filling pipe; a torch is useful for this; a soldering iron is also suitable. The filter must be unsoldered from the condenser by breaking the tube on the capillary expander. The compressor is disconnected from the pipes by soldering. Then the old unit is replaced with a new one. In this case, all actions are repeated in reverse order.
A vacuum compressor for refrigerator repair is necessary when repairing a refrigeration unit. It is used to remove air and moisture from the refrigerator piping. A vacuum compressor made in the form of a pump evacuates refrigeration systems, removing water from the circuit.
You can repair the Atlant refrigerator compressor yourself by carefully familiarizing yourself with the device diagrams in the photo and video. It should be borne in mind that components and assemblies must be replaced only with original spare parts.
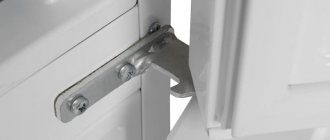
Installation of the device
The most likely causes of refrigerator failure:
- Poor fit of the seal;
- Cracks on the door during transportation;
- Clogged capillary tube, refrigerant leak;
- Failure of the sensor-relay used to maintain the temperature;
- The compressor itself is faulty and requires replacement.
Where to start replacing a refrigerator compressor with your own hands
You can repair refrigerators and replace the compressor yourself by identifying the cause of the malfunction. If the compressor heats up after being plugged in, the thermostat relay has most likely failed. Replacing the refrigerator compressor relay can be done even by an amateur. When starting the refrigerator does the motor suddenly turn off for no reason? Replacing a refrigerator compressor motor is best left to the professionals.
Refrigerator compressor repair
But you can try to replace the entire compressor.
Reasons for failure
Quite often, incorrect user actions lead to breakdowns. For example, the “Super Freeze” or “Quick Freeze” functions must be turned off after the time specified by the manufacturer has expired. Otherwise, prolonged operation of the engine at full power leads to its burnout.
The need to repair a refrigerator compressor may be caused by:
- Mechanical damage during transportation and movement;
- Increased or decreased voltage in the electrical network, frequent peak voltage surges;
- Incorrect placement of the unit (close to the wall, close to heating appliances or in direct sunlight);
- Attempts to independently repair other blocks and modules (capacitor, housing, etc.);
- The presence of malfunctions in the temperature sensor, evaporator sensor, relays and other components, which entails increased engine operation.
What you will need
Check out the video and photos of the step-by-step process of replacing a refrigerator compressor with your own hands.
Then prepare the necessary tools:
- oxygen-propane burner;
- two valves: for piercing and removing refrigerant;
- leak detector;
- electronic thermometer;
- small pipe cutter;
- filter drier:
- copper tube 6 mm;
- solder;
- flux;
- pinch pliers;
- Hansen coupling;
- charging cylinder;
- storage container for freon;
- new compressor.
Follow safety precautions. Do not start work while the device is turned on. Repair equipment must be grounded. The work is carried out with gas - the room must be well ventilated. Clear the refrigerator so you can lift and turn it easily.
Disassembling the refrigerator
Work process
When replacing the compressor of an Atlant refrigerator or any other refrigeration device, it is necessary to slightly extend the compressor. Lifting it, break off the freon filling tube, after cutting it with a file.
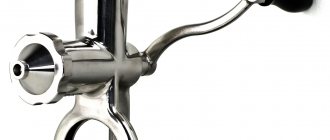
Compressor
Then you need to release the gas. Turn on the refrigerator for no more than 5 minutes. The refrigerant will move to the condenser. Attach the piercing valve with the hose from the cylinder connected to it, unscrew it for 30 seconds. The gas will collect in the container.
Solder a copper one in place of the broken tube. A gas burner is used here; in the absence of a burner, a soldering iron will do. A cut of several centimeters is made on the capillary expander to break off the tube and unsolder the filter from the condenser. The compressor is connected to the refrigeration unit by two tubes (one to build up pressure, the other to remove excess gas).
It needs to be unsoldered from these tubes or cut off with a pipe cutter. The filter drier is cut off at a distance of 15 mm from the condenser. Remove the start-up relay. Dismantle the compressor and remove it from the refrigerator. Before starting soldering on a new compressor, clean the pipeline.
When installing a new compressor, all steps are repeated in reverse order:
- place the compressor in the refrigeration cabinet, securing it to the traverse;
- the plugs on the pipes must be removed;
- it is important to depressurize the unit 5 minutes before starting soldering;
- when removing the plugs, check whether there is excess air pressure in the compressor (this will be indicated by the noise of the escaping air;
- gradually connect the discharge, suction and filling tubes to the compressor pipes, the filling tube should have a diameter of 6 mm and a length of 60 mm;
- start soldering the seams on the tubes, adhering to the following sequence: filling, suction, discharge, make sure that the burner flame is not directed into the compressor nozzle;
- Having removed the plugs from the filter drier, attach it to the condenser, connect the capillary tube to it;
- solder the filter along the seams;
- and put the filling tube on the valve coupling half;
- check the quality of soldering of all seams, they should be smooth, without unsoldered spaces;
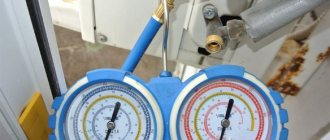
- Refill with freon by connecting a vacuum filling station to the coupling and removing moisture from the system;
- attach the start-protection relay to the compressor by connecting the electrical wires;
- turn on the refrigerator, fill the system with freon, leave for 5 minutes;
- Use a leak detector to check whether the tightness of the seams is broken;
- perform a secondary evacuation of the refrigerator, leave it to work for 20 minutes;
- pinch the filling tube, remove the coupling, and solder the tube.
Step-by-step compressor replacement
If the owner of the equipment was able to get a set of tools, then he can repair the equipment himself. Before replacing the compressor, it is necessary to disconnect the unit from the electrical network and clean the chambers of products. The equipment is moved away from the wall, and a layer of dust is removed from the surface of the pipelines. After removing ice and water, it is necessary to drain the condensate from the bath mounted on the cover of the pumping station.
View » How to find a freon leak in a refrigerator at home: signs of a leak and what to do
To change the compressor, you must:
- Cut the main pipe at a distance of 30 mm from the dryer body; it is possible to cut the metal and then break off the pipeline.
- Using a cutting tool, separate the metal pipes through which the refrigerant is pumped and drained. The incision is made at a distance of 10-15 mm from the point of entry of the tube into the compressor housing.
- Separate the dryer housing from the line.
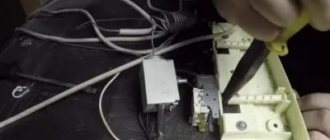
- Open the control relay casing and disconnect the cables going to the refrigerator compressor motor windings. On some equipment models, the switching unit is installed on metal contacts; to remove it, you need to pull the relay towards you.
Removing old
The pump housing is installed in the niche of the refrigerator on a special traverse. The supports are equipped with spring and rubber shock absorbers, the structure is tightened with a bolt and nut. To remove the compressor, you need to unscrew the mounting points. If the threads are covered with rust, then WD40 must be applied to the surface. After removing the worn-out unit, it is necessary to clean the ends of the metal pipeline.
Installing a new
Since the design of the compressor does not provide for repair of the electric motor or piston pump, if parts break down, it is necessary to install a new unit. The unit body is mounted on a traverse, and factory safety plugs are installed on the tubes. It is allowed to remove elements immediately before soldering the pipelines; during dismantling, the excess air pressure in the housing is checked (by the whistle of the escaping gas).
If there was no air under pressure in the compressor, then installing such a unit is not recommended.
Then the lines are sealed; the burner flame should not enter the cavity of the pump unit. After removing the shipping caps from the dryer body, the capillary tube is installed. After checking the quality of the seams, the refrigerant recommended by the refrigeration equipment manufacturer is pumped into the circuit. When refilling, the system is pre-evacuated; if cracks are detected in the freezer or connecting pipes, additional repairs of the refrigerator are performed.