Today, in almost every apartment building you can find a Whirlpool brand washing machine, and more than one. Both assemblies are common in our country: Slovakia and Italy. The latter are bought less frequently and are more expensive, but machines assembled in Slovakia can be found in all household appliance stores.
Perhaps, it was the European assembly standards that helped Whirlpool machines establish themselves as machines of high quality and enviable durability. That is why repairs are rarely required, but if breakdowns do occur, you can often repair Whirlpool washing machines (Whirlpool) yourself.
Typical Whirlpool machine failures
If we thoroughly list all possible breakdowns of SMA, we would be forced to write a whole manual in 10 volumes. Therefore, we will focus only on malfunctions that are typical for this brand.
We've used data from reputable service centers to create valuable instructions for those planning to do their own Whirlpool washing machine repairs.
The most common failures:
- After washing, the water remains in the tank.
- Washing modes freeze, do not start at all, or programs run incorrectly.
- All washing modes are carried out in cold water.
- The SMA leaks in the manhole area.
Important! These seemingly harmless faults may hide serious damage. They need to be eliminated immediately so as not to completely break the SM.
External signs
Whirlpool washing units do an excellent job of self-diagnosis and report detected errors by displaying them on the display. Knowing the error code greatly simplifies troubleshooting and allows you to decide on further actions.
Error codes can be found in the instructions. However, there are also situations when the device simply refuses to turn on, then no codes will tell us about further actions.
First of all, you need to figure out what caused the failure. Analyze the problem and decide whether you can deal with it yourself or whether you should seek help from professionals.
Let's get acquainted with the main malfunctions of Whirlpool washing machines:
- Engine. These problems are quite widespread, and mostly they can be easily fixed with your own hands. Due to the fact that the brushes wear out, the engine power gradually decreases, and sometimes the drum simply stops rotating at the required speed. At the same time, the device turns on and the washing mode starts.
- If the machine does not turn on, the most likely cause is a problem with the control board. In addition, during the washing process, program settings may be lost. This is manifested in the chaotic blinking of indicator lights and the absence of any specific symbols on the display. In such cases, turn off the device as soon as possible. Without the help of a specialist, it will not be possible to confidently identify this problem. In addition, the technician will tell you what parts will be needed and give you an estimate of the cost of repairs.
- After completing the washing cycle, water may be retained in the tank, this is noticeable at the final stage of washing. When you reboot the unit, the problem will reappear. Excess water must be removed from the tank. To do this, use a hose designed for emergency drainage. This malfunction occurs if there is a blockage in the hose, sewer or filter, or if the electric drain pump fails. Completely empty the drum of laundry and water and clean the clogged part.
- If the unit does not start the washing process, this may be due to insufficient heating. Use a hose to run a small amount of water to check its temperature. The heating element should be checked and replaced if necessary.
- Noise, knocking, crackling and vibrations that are unusual for the unit may indicate that a foreign object has entered the drum. You can verify this only by removing the drum.
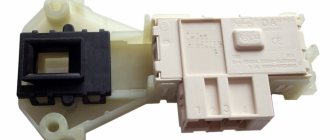
- Sometimes, upon completion of work, a large puddle may form in front of the device. This is usually due to a malfunction of the cuff designed to tightly close the hatch and keep water in the tank. Most often, the cuff becomes unusable due to dirt. It becomes thinner and may tear or burst. If damage occurs, it must be replaced as soon as possible. The device cannot be used in this condition. You can check the integrity of the cuff by pulling its central part.
- With prolonged use of the unit, over time, difficulties with the drum flaps and corrosion of the housing may appear. In this case, it is necessary to update the details. Most often, these difficulties are characteristic of machines with vertical loading rather than front-loading.
The most vulnerable parts of Whirlpool machines
Based on the problems described above, we can identify the most vulnerable areas of Whirlpool washing machines. Many modern models have a self-diagnosis system that, using a fault code, will tell you which part has failed.
But what to do if the machine does not turn on at all, and there is nothing that could help you find out the cause of the breakdown? Listen to the advice of experienced repairmen, they are sure that the most vulnerable parts in a Whirlpool machine are:
- Thermoelectric heater – heating element.
- The engine and its moving elements.
- Hatch cuff, pipes.
- Controller (control module).
Attention! Whirlpool machines, like any other machines, suffer from blockages. Both filters and hoses become clogged. If you carry out cleaning in a timely manner (3-4 times a year), you can avoid breakdowns of the water drain and fill system.
Construction and disassembly of the Whirlpool washing machine with vertical loading
Not only front-facing models are prone to breakdowns. However, repair work is described only for them. We decided to correct this oversight.
Almost all verticals are arranged the same way:
In such machines, bearings and other parts wear out more often, because all components are located close to each other. To repair the problem, you still need to get to it.
How to disassemble the Whirlpool washing machine:
- Disconnect the device from the network and water supply.
- Use a flathead screwdriver to pry the control panel latches. If necessary, remove the wiring chips.
- To remove the top panel, remove the screws from the back. Lift it up, secure it with a ribbon or chain so that the lid does not fall.
- Unfasten the balancing ring latches on the centrifuge. Put it aside.
- Unscrew the screw and remove the centrifuge activator.
- Unscrew the axle washer and remove the drum from the tank.
Assembly is carried out in reverse order. Along the way, you can inspect and replace the necessary elements.
If the structure of your vertical loading machine is different from that described, watch the video on how to change the bearing on a vertical loading machine:
Heading
: Advertising
Publication date
: 31.07.2017 2017-07-31
Article viewed:
1286 times
Bibliographic description:
Do-it-yourself repair of Whirlpool washing machines // Young scientist. - 2021. - No. 10. — URL https://moluch.ru/archive/114/46158/ (access date: 01/02/2020).
Modern Whirlpool washing machines are characterized by a long service life and high quality. It cannot be said that household appliances often break down, but there are cases where elements need to be replaced or complete maintenance is required. It should be noted that repairing a washing machine is a labor-intensive and expensive process, so if necessary, most people prefer to contact specialists. In this article we will try to dwell in detail on each nuance of repairing Whirlpool washing machines and talk about all the details of this process.
If you still require qualified washing machine repair, we recommend contacting EuroBytServis (https://www.evrobytservis-remont.ru/remont-stiralnyh-mashin/). Experienced craftsmen will repair any damage in a short time and give a written guarantee for up to 3 years.
Water does not leave the tank of the Whirlpool machine
You are probably familiar with the situation when you loaded the laundry into the tank, selected a convenient washing mode, went about your business in the kitchen, then came to get the laundry, and there was a disaster. The machine is malfunctioning: it is full of water and foam, the wash has not finished, the laundry is wet.
You restart the program, but everything is in a circle - the washing program is not executed because the water remains in the drum. This problem is caused by one of three factors:
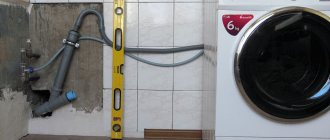
- Debris has accumulated in the water drain pipe or drain filter.
- A clogged drain hose or a blockage in the sewer system.
- Failure of the electric drain pump (pump).
However, before you devote time to finding the causes of the failure, prepare your SMA for this:
- Turn off the power.
- Manually drain any water remaining in the drum. This can be done quickly using the emergency drain hose - it is usually located near the water drain filter.
- Place a container or place a rag on the floor and waste water will flow out there.
Next, remove the waste water filter:
- Place a cloth or container under the hatch behind which the filter is located.
- Unscrew the plug counterclockwise.
- Clean and rinse the unit under the tap.
- Put everything back in place.
- Twist the drain hose, clean and rinse it, and install it in place.
It doesn't hurt to check the drain for blockages.
To carry out all the steps, you do not need to know how to disassemble a Whirlpool washing machine - this is an easy job that any user can do.
If your actions did not help get rid of the problem, the drainage system is clean, there is no blockage in the sewer, and the washing machine still does not drain water from the tank, it will still have to be disassembled. The real cause of the breakdown may be hidden in the pump and drain pipe.
Important! Almost all Whirlpool models are designed in such a way that the pump and pipe can only be reached from the bottom. You'll have to turn the car on its side.
How to find, check and clean the pump and pipe:
- Remove the detergent dispenser.
- Disconnect the machine from all systems: electricity, water supply, sewerage.
- Turn the SMA over, placing it on the side wall.
- Unscrew the bolts and remove the bottom.
- Arm yourself with a tester and measure the resistance of the pump.
- If you find a problem, change the pump.
- If the pump has nothing to do with it, then proceed further.
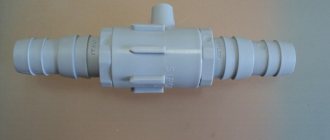
- Loosen the clamps of the water drain pipe.
- Remove the pipe.
- Clean and rinse it.
- Reinstall the pipe.
This breakdown is typical for machines with any type of loading. The design of the top-loading Whirlpool washing machine is somewhat different from that of conventional washing machines, but the problem with it must be solved according to the same scheme.
Types of control
The manufacturer produces models with three types of control. The consumer has the opportunity to choose the most optimal option for himself. The Whirlpool washing machine can be controlled by:
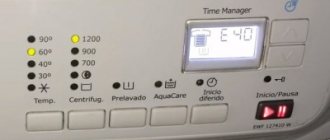
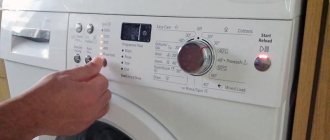
- Electronic. Such models are equipped with a display and buttons located on the control panel. Installation of the program is carried out using buttons. The display shows information about the time and wash cycle, as well as breakdowns. When a malfunction is detected in a top-loading Whirlpool washing machine, a code value will appear on the display panel.
- Mechanical. Such models are equipped with a manual regulator, which allows you to set the required washing program. Also on the control panel there are service indicators that inform not only about the washing cycles being performed, but also about malfunctions.
- Combined. The control panel will contain mechanical adjustment keys and an electronic control system.
Whirlpool machine freezes, cold water when washing
Often, after starting the washing machine, the control panel begins to behave inappropriately: the display blinks, and all the LEDs blink along with it. The program you have chosen may also not work.
If this is your case, then immediately turn off the SM and wait 60 seconds. Then turn it on and, if the problem persists, you should call a technician, since the control module is damaged, and repairing it yourself is almost impossible. You will need not only a diagram of the control module of the Whirlpool washing machine, but also experience in such repairs.
If the washing machine does not want to heat the water and does not wash clothes well, then you can determine the breakdown without the help of special devices and carry out independent repairs.
The most likely reason for this behavior is a breakdown of the thermistor (temperature sensor) , but the heating element could also fail. Be that as it may, it is worth checking both elements together. Next, follow this simple procedure:
- Turn the machine so that the front wall is in front of you - this will make it more convenient to work.
- Unscrew the bolts and remove the back panel.
- Next, remove the bracket by unscrewing the bolts so that it does not interfere with working with the heater.
- You won’t see the entire heating element at once - only its tail is visible under the tank, to which four wires go, two of which are connected to the heater itself, and the rest to the temperature sensor.
- Remove all wires.
- Take a tester and measure the resistance of the temperature sensor contacts. Check the readings at room temperature, and then by heating the sensor in warm water, they should differ significantly if the sensor is working.
- Next, measure the resistance on the heating element itself. Its normal values are: 20-40 Ohms.
With such a problem, the breakdown will most likely be confirmed, so you will have to replace the sensor (which is easier) or the heating element.
Important! If you do not have a tester at hand, immediately remove the heating element from the tank by unscrewing the fasteners. You will quickly determine the malfunction if the heating element is covered with a thick layer of scale, or dark spots appear on it. If there is just a little scale, then the heating element may not have burned out, but if the water stone is 1 cm thick or more, the breakdown is obvious.
You can easily change the heating element with your own hands as follows:
- The contacts and wires have already been removed, so next remove the plastic shield.
- Unscrew the fastener - it is located in the center of the shank.
- By carefully pulling the contacts, shaking the heater in different directions, remove the heating element. The rubber gasket will be an obstacle, so be patient - there is nothing you can do about it.
- Having taken out the heating element, remove the gasket.
Important! Mechanics recommend installing a new gasket along with the new heater, since leaks due to wear of the gasket are detrimental to this important unit.
- There is probably debris and scale in the hole where the heating element was, so carry out a general cleaning; Only after this can you install the gasket.
- Install a new heating element, tighten the fastener.
- Replace the plastic shield.
- Connect the contacts to the heater and sensor.
- Restore the location of the bracket, and finally mount the machine panel back.