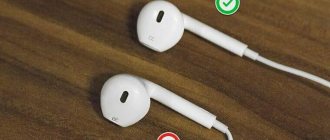
What you need to do first to fix your earphone
If the sound in one of the headphones is not audible or regularly disappears (wheezing), then the first step is to diagnose the cause of the problem. First, you need to determine whether the headphones themselves are to blame, or whether the reason is in the device to which the headphones are connected (phone, computer, set-top box, etc.).
To do this, connect the earbuds to another working device and check the quality of the reproduced sound. If “broken” headphones work normally, this means that the cause of the problem lies not in them, but in the phone, PC and other devices. To be extra sure, connect other headphones to your phone (PC). If there is also no sound in one of them, then it is definitely a problem with the underlying device that needs to be repaired.
If one of the headphones also does not work on another device, then it is necessary to move on to further identification of the problem and its solution.
Broken wire
It is not always possible to immediately determine whether the cable on the left or right is damaged. The gap may be hidden under insulation that is apparently intact. The best way to determine a break is to try to feel the cable along its entire length, from the speaker input to the input plug. In this case, the music must be turned on.
When a problem area is detected, the following effects may occur:
- A sound appears that was previously missing
- The sound that was previously produced normally disappears
- Crackling noises and other side effects are heard
What to do if one earphone does not work due to a break is clear: you need to solder the damaged cable again.
Here are some brief instructions:
- Prepare your tools. You will need a soldering iron with a tip as thin as possible, solder, flux, and a wooden or ceramic stand for work.
- Cut the cable on both sides a few millimeters before the break.
- Carefully strip the wires with a knife. The cable usually contains three wires; if the gap is located above the branching into the right and left channels, there may be two of them. Conscientious manufacturers supply them with insulation of different colors, which makes repairs easier in such cases.
- Tin the stripped ends of the wire with a soldering iron. To do this, place the cleaned end on the work area, apply flux to it with a soldering iron, and after a few seconds make a gesture with the tip of the soldering iron, similar to the movement when removing varnish. As a result, the wire should receive a kind of hard “tip”, which improves conductivity.
- Place a piece of insulating tube (cambric) on each wire. Do the same with the cable as a whole.
- Solder wires whose insulation colors are the same.
- Protect the solder areas by moving the insulating tube over them. Fix the tube with a lighter, slightly melting it. For reliability, the resulting tourniquet can be bent in the shape of the letter Z and tied with thread, which will reduce the likelihood of repeated rupture.
- Do the same for the cable as a whole. For aesthetic reasons, you can choose an insulating tube of the appropriate color.
This method is suitable for any of the above types.
It happens that the wire breaks inside the housing of one of the headphones. To repair in this case, it is necessary to disassemble the body, which is quite simple with overhead models, but difficult with vacuum or liners. Sometimes the disassembly method is obvious. In other cases, you may need advice on forums, where there are likely to be other users of this or a similar model.
To disassemble you may need a scalpel or just a sharp knife. If the body is glued, then you will have to clamp it in a vice so that a crack appears at the place where the glue is glued. After the repair, the seam will have to be glued again.
Basic steps if one earbud doesn't work
When identifying a problem where one of the earbuds stops working, pay attention to the following:
| Things to check: | Explanation: |
| Check the balance of your headphones. | If you're using headphones with a PC, check your speaker side balance settings to make sure the balance isn't set to just right or just left. |
| Check to see if the track you are playing is mono. | Monaural tracks may only use one headphone speaker (right or left), while the other may have no sound at all. |
| Turn off and on the headphones. | And make sure the problem remains or goes away. |
| Disconnect and connect Bluetooth on your phone (PC) if you use wireless devices. | Try playing the audio file to see if the problem persists. |
| Insert the headphone plug all the way into the audio jack. | In some cases, a loose plug may be the reason why sound is not heard in one of the headphones. You can unplug and plug one audio cable into a jack multiple times. This can often solve the problem of a nest becoming clogged with dirt and dust. This repeated switching on and off will allow you to clean the internal contacts of the connector from contamination. |
| Reset your wireless headphones. | This may resolve the issue you are experiencing due to the earbuds not pairing properly with your phone. |
This may be useful: How to properly charge wireless headphones.
Reasons for the lack of sound in one earphone
Any technical device has its own expiration date and headphones are no exception. The headset is often used almost daily and this cannot but affect its service life.
It happens that for some reason only one speaker of the headset works. The sound quality is reduced, but it’s a shame to throw away the headphones. In this case, you can try to repair the device yourself.
Finding a break in wired headphones
If one of your wired headphones does not make sound, then use the following option to find the break point. Connect the headphones to your phone (PC), start playing music on them. And begin to sequentially crumple the wire with your fingers, starting from the plug to the problem earphone. When any sound (crackling) appears in the speaker of a non-working headphone, mark this section of the wire with a marker. Usually this area is problematic, and it is where the wire breaks.
Most often, a break occurs at the cable entry into the plug, at the cable entry into the speakers, and at the branch on the jumper.
There may also be a break in one earphone itself, where one end of the wire has simply become detached from the contact, so it does not work and requires repair.
In some cases, the headphone wire may break from contact
Next, you will need to remove the problem section of the cable and solder the ends of the remaining wire to each other.
Remove the problem section of the headphone cable
Most common causes of problems
If we take into account the different types of ear designs, the most common types of problems with them are as follows:
- Broken wire. The cable leading to one of the speakers can be accidentally interrupted, torn or frayed. This is especially likely if you frequently bend the cord.
- Broken speaker membrane. More often found in over-ear models, where the speakers are larger and less protected by the housing.
- Plug failure. This happens if you bend it carelessly when pulling it out of your player or phone.
- Software problems with the sound source (incorrectly installed driver, incorrect output setting)
Each of these cases is worth considering separately.
Performing soldering when one liner does not work
If the wire breaks right next to the plug and insert, it will be better to cut it off. For example, if the cable breaks near one earphone, it will be necessary to disassemble the earphone. Then unsolder the broken piece of cable from it, and then cut off the damaged part of the cable. The remaining edge of the whole cable must be cleaned, the copper core must be tinned with tin and flux, and soldered to the speaker contacts. This way you can repair the device.
Undamaged parts of the wire will need to be soldered
Perform the same operation with a plug if a break occurs right next to the plug.
In this case, the break occurred right next to the plug
Diagnostics
Life in modern society is not complete without the use of various technologies, and listening to music through your player or smartphone has become a full-fledged part of life, without which it is “much more boring.” Naturally, the breakdown of headphones, when only one of them remains in working order, is always upsetting.
When such a situation arises, most ordinary people do not hesitate to take their audio device to a repair shop. If the repair warranty period is still valid, then no problem, but otherwise you will have to pay extra money for the repair.
However, you can put your headphones in order without qualified technicians - the problem is often not as serious as it might seem. Using the instructions below, you can really restore the high-quality operation of your accessory.
The first step is to diagnose the headphones and determine the cause of the breakdown:
- a broken wire leads to a complete absence of sound, frequent loss, or breakage;
- due to a broken plug, constant changes in sound occur;
- a malfunction in the dynamics is manifested by wheezing, muffled or no sound;
- broken strands in the wire make rustling sounds.
At the diagnostic stage, you should be careful, this will help reduce the time spent on the repair itself.
Recommendations: Making your own simple headphones and a headset with a microphone
How to solder a headphone plug
, DIY headphone repair
How to fix an earphone if the damaged area is in the middle
If the wire breaks somewhere in the middle, the break will need to be cut with a knife. Then remove the top insulation (braiding) and release three wires approximately 3 cm long for easy soldering. Since the wires are coated in different colors, they cannot be mixed up. All cores must be soldered in accordance with their colors, connecting the remaining intact parts of the cable together. The stripped ends are heated with a soldering iron and tinned with flux and tin.
Treat the ends of the cable and solder them
A heat-shrink tube is put on each soldered wire, heated with a hairdryer or other handy tool, and crimped. To avoid breaking the connection, it is reinforced with a thick thread, tying three wires together.
It would be better to wrap the soldered wires with thick thread
It is better to put a heat-shrinkable tube on the resulting bandage in order to give the work an aesthetic appearance.
With a thermal tube it will look aesthetically pleasing
How to repair a broken cord?
To accurately determine the cause of the malfunction and the necessary repairs, the headphones will have to be opened.
Before you start, you need to prepare the necessary tools:
- mounting knife;
- soldering iron;
- tin, rosin;
- insulating tape;
- heat shrink tubes of suitable diameter.
1. Connect the accessory to your smartphone or player and turn on the music. While listening to the problem earphone, carefully feel the wire.
2. At some point, small noises, wheezing, and intermittent sound will appear. This means that the break point has been found. It should be taken into account that most often the break appears in the earphone itself or at the plug.
3. Carefully remove the protective layer of rubber and expose the wire.
4. Having discovered a break, it must be soldered using a heated soldering iron; its tip is covered with rosin and tin.
5. Then you should check the sound: the music should start playing again in the problem earphone. If this happens, then the problem is solved.
6. You can cover the exposed section of the wire by simply wrapping it with electrical tape - this is the most budget option. But to make the wire look more attractive, it is better to cover the section with heat-shrink tubing of the required length.
How to connect broken headphone wires