Replacing bearings for an Ariston washing machine (Ariston)
Using the example discussed below, the bearings of an Ariston washing machine were replaced.
During operation, the rubber seal of the tank begins to let water through, which gets on the bearings, causing corrosion and accelerated wear. The average bearing life is 6–10 years. Before starting repairs, it is necessary to disconnect the washing machine from power and provide access to all its side surfaces. At the first stage, you need to empty the tank and remove it from the machine body. To do this, gain access to the inside by disconnecting the plastic plug located on the back wall of the machine, in the base area. Unscrew the tension screw of the clamp that secures the drain pipe to the tank. Disconnect the pipe from the tank.
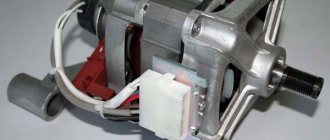
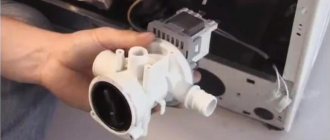
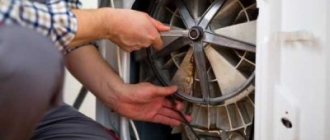
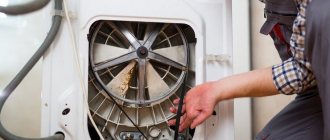
Disconnect the motor power supply contacts. Remove the drive belt. The photo on the right (removing the belt) shows another washing machine, but the principle of removing the motor is also relevant for other models.
Unscrew, not completely, the two bolts securing the electric motor. Alternately, carefully apply pressure on one and the other bolts with the handle of a hammer to move the engine off the skids. After this, finally unscrew both bolts and, holding them, remove the engine.
Right there, at the bottom of the tank, there is a heating element. Disconnect the power contacts from it. Also disconnect all wires from the tank. Go to the top of the Ariston washing machine (Ariston). Unscrew the two screws securing the top cover from the rear wall. Slide the cover back and disconnect it from the body.
Pull out and remove the detergent dispenser. This will allow you to access the two control panel mounting screws that need to be removed.
Unscrew the second pair of mounting screws from the top (right and left). Detach the control panel, first from the dosing hopper, then the lower part.
The rubber cuff of the hatch (seal) is secured to the front wall of the washing machine using a metal wire clamp tightened by a spring. You need to find the tension spring by moving along the perimeter of the cuff edge. Use a flat object to pry the spring, gently pull it and remove it along with the clamp. Disconnect the cuff from the washing machine body. Disconnect the hatch lock by unscrewing the two fastening screws (pictured on the right).
Move to the bottom and detach the plinth panel from the front. We do this with a flat object, prying up the top edge of the panel. Now you have full access to the fastenings of the front wall of the Ariston washing machine. Unscrew two screws from the top (right and left) and several screws from the bottom.
Move it up a little and disconnect the front wall. Access is gained from the front to the inside of the machine. We unscrew the fastening bolts of the front, lower counterweight of the tank (in this example there are three bolts).
Disconnect and set aside the lower counterweight. We move on to the upper counterweight, unscrew the fastening bolts and carefully remove it from the seat of the plastic tank.
Unhook and remove the plastic clamp securing the rubber filler pipe to the tank. After this, it will be possible not to disconnect unnecessary elements, but to move the entire dispenser hopper to the rear wall and temporarily place it there.
Disconnect the level switch (pressostat) tube from the tank. Thus, only the suspension system (shock absorbers and springs) remains to be disconnected. We start with the shock absorbers, which are located at the bottom of the washing machine. The upper end they are attached to the tank, the lower end to the bottom of the machine. You need to disconnect the end of the shock absorber that is attached to the tank.
In this model, both ends of the shock absorber are secured with a plastic pin on the latch. One end of the pin is pointed, the other has a hole. In order to pull out the pin, you can use a self-tapping screw, which must be screwed into the hole of the pin as shown in the photo.
On the other hand, the plastic pin has a latch that prevents it from moving spontaneously while the washing machine is operating. You can tighten the latch using a spanner. Then, holding the key with one hand, with the other, using pliers, carefully pull out the pin, holding the screw.
Disconnect the shock absorber from the tank, moving it towards the side wall. Go to the top part, namely the suspension springs. Using a flat object (in the photo it is a slotted screwdriver), pry and disconnect the retainer for the upper fastening of both springs.
Check again whether all the elements are disconnected from the tank, after which it can be removed from the suspension springs and pulled out of the body of the Ariston washing machine. This must be done carefully so as not to damage the wiring and other elements of the machine that are located around the tank. To remove, the tank must be lifted up until the springs are completely loosened and disconnected. Then, carefully moving it outward, remove the tank and place it with the cuff down on the stands so as not to damage the plastic elements of the tank.
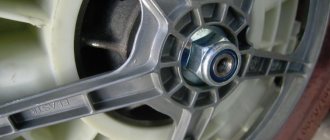
The second stage of repair to replace bearings is disassembling the plastic tank of the Ariston washing machine. You need to start by removing the drum pulley. To do this, you need to unscrew the fastening bolt, locking the pulley using the wooden handle of a hammer or other object. After this, remove the pulley from the shaft.
Sometimes this process is difficult, then you need to be patient and use your hands around the perimeter to pull the pulley toward you until it is completely removed from the shaft. Under the pulley there is a small part of the drum shaft and an outer bearing.
Place a wooden block on the shaft and use a hammer to knock the shaft out of the bearings. After this, you can begin to disconnect the two halves of the tank from each other. To do this, you need to unscrew all the screws securing the two halves around the perimeter of the tank.
After all the mounting screws have been removed, carefully insert a wide slotted screwdriver into the gap between the two halves of the tank and turn it around its axis in several different places. Once the gap between the halves has widened, use your hands to separate both halves.
One of the halves can be easily removed, but the drum needs to be removed from the other. If this cannot be done right away, then you need to once again attach the block to the drum shaft and additionally apply several blows with a hammer to the block until the drum separates from half of the tank.
After the drum is finally released, it is necessary to check the shaft and bushing (most often it is bronze) for damage. If the washing machine was operated for a long time with faulty bearings, they could partially or completely collapse and damage the shaft and bushing. If the shaft or bushing has strong grooves and chips, then the new bearings will not fit tightly on the shaft, and the oil seal will allow water to pass through, which will again lead to wear of the bearings.
Therefore, if the shaft and bushing are in good condition, then you need to thoroughly clean them of rust and deposits. When cleaning the shaft, you can use fine sandpaper. When cleaning the bushing, it is not recommended to use sandpaper; this may damage the oil seal. The bushing is cleaned with the finest abrasive sponge or other means to keep it absolutely smooth.
Also, when inspecting the drum, it is necessary to check the cross with which the shaft is attached to the drum. The silumin material from which the cross is made is sometimes destroyed by the aggressive environment in the tank. Then the rigidity of the shaft-drum attachment is broken, which leads to noise and vibration during spinning, and subsequently to the complete destruction of the washing unit.
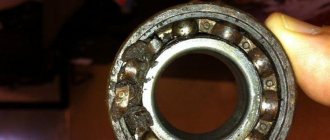
In this example, the drum shaft with the cross is being replaced, since it is damaged (pictured in the center). The photo on the right shows half of the tank, into which the old bearings are pressed.
Old tank bearings must be knocked out using a metal rod (for example, a chisel) and a hammer. It’s more convenient to start with the outer bearing (pictured on the left). The chisel must be positioned as shown in the photo, while being careful not to damage the bearing mounting sockets. When striking, it is necessary to move in a circle so that the bearing does not warp. After removing the outer bearing, turn over half of the tank and knock out the inner one in the same way. The difference between the internal bearing is that the tank seal will also come out with it.
The photo on the right shows the new bearings, tank seal and drum cross with shaft.
Disassembling the Ariston washing machine.
To carry out repairs, you must first remove the top cover. We unscrew the two screws securing it to the case, and also remove the back metal cover of the case by unscrewing the six screws. Now we have access to the internal components of the device. We see the drum drive belt, remove it.
Next, you need to unscrew and remove the washing machine drum pulley.
The pulley is fixed to the shaft with a bolt. The bolt must be unscrewed using a torx wrench. Before you start unscrewing the bolt, be sure to place a copper die on it and hit it thoroughly with a hammer. This must be done because the fixing bolt is screwed in with sealant and is quite difficult to unscrew. To prevent the pulley from spinning, secure it with something.
We remove the upper counterweight, as it prevents us from getting to the crosspiece screws. To do this, unscrew two bolts, look at the photo below.
It's time to remove the cross. Unscrew the screws securing the crosspiece. There are eight of them, four at the top and four at the bottom. Place the Ariston machine on its side and unscrew the bottom screws.
After all the screws are unscrewed, you can pull the cross off the tank and the drum shaft. If there is a bearing puller, then we use it; if not, we do it differently. We remove the plastic plugs from the housing at the places where the transport bolts are attached.
Now carefully hook the ends of the cross with a long flat screwdriver through the holes in the case, as in the photo below, and pull it towards you.
You can also lightly hit the end of the shaft, trying to drown it, but before that, we first screwed the bolt into the shaft, because you can only hit it with a hammer, otherwise you will deform the seat of the shaft pulley, greatly complicating the repair process and your life.
We're filming.
Everything worked out, you can change the oil seal and bearings, but first you need to get the old ones.
How to replace a bearing on an Ariston washing machine
Does your washing machine “jump” around the room during the spin cycle? Do strong vibrations, noise and hum interfere with your normal stay in the apartment? It is worth thinking about checking the equipment and its parts. Most often, the cause of such symptoms is wear and tear on the moving parts of the machine. In the article you will find information on how to replace the bearing on an Ariston washing machine and what disassembly sequence to follow.
How to change a bearing in an Ariston washing machine
Replacing bearings in any washing machine, including Ariston, is quite a difficult physical job that requires certain skills and time. When disassembling the machine for the first time, you can spend about two days to do everything in its “pure form” with your own hands. Therefore, you will have to stock up not only with tools and detailed text and video instructions, but also with patience.
Preparing the tool
Begin any job by preparing what may be required.
For example, you may need a room or a spacious room in which it will be convenient to disassemble the car and store spare parts so that they can be easily found later.
This is often the first problem on the way to repairing the washing machine yourself. Having disconnected the machine from all communications and placing it in a convenient place, we prepare the tool . May require:
- hammer;
- pliers
- flat and Phillips screwdrivers;
- metal rod;
- bearing puller;
- waterproof lubricant WD-40;
- sealant;
- open-end wrenches;
- marker.
In addition, new bearings and seals will be needed. If you know in advance what you need, you can buy them at the store. If not, then disassemble the machine and remove the faulty bearings, look at their markings and buy similar ones.
We disassemble the machine: we take out the tank
As you disassemble the washing machine step by step, you can take photos so that you can use them to put the equipment back together. Although this is not necessary, because in the video on this topic, everything is described in detail and has already been recorded.
So, we present the analysis of the Ariston front-facing machine in the form of the following algorithm:
- Unscrew the plastic cover located on the back wall of the case.
- Unscrew the bolts holding the top cover and remove it.
- We also remove the back wall of the case.
- Loosen the clamp on the pipe attached to the washing machine tank and remove the pipe.
- We take out the chip with wires from the electric motor.
- Remove the drive belt. In an Ariston machine, it is removed, as in many other washing machines; this process is described in detail in the article on how to change the drive belt in a washing machine - video.
- Loosen the 2 bolts holding the engine.
- Gently press on the bolts, holding the engine, then unscrew them completely and remove the engine from the car.
- Next, disconnect the power supply contacts from the heating element located under the tank.
- We check and disconnect all sensors.
- We move on to the front part of the case - take out the powder receptacle.
- Under the powder receiver we find the bolts holding the front panel and unscrew them.
- We unscrew 2 more bolts from the top, they also hold the control panel, and disconnect it.
- Remove the rubber cuff from the drum.
- We remove the bottom panel of the case and unscrew all the bolts that secure the front wall of the machine.
- Remove the front part of the housing.
- Unscrew and remove the counterweights.
- Disconnect the filler pipe from the tank.
- Remove the hose leading from the water level sensor to the tank.
- We remove the niche for the powder receptacle.
- Unscrew the shock absorbers.
- Using a flat-head screwdriver, remove the spring clamps on which the tank hangs.
- We make sure that everything is disconnected from the tank and take it out of the car.
Changing the bearing
Now we have to disassemble the plastic tank of the Ariston washing machine. We start by removing the pulley - this is one of the difficult moments, since the pulley is screwed onto a screw with locking paste. To unscrew it you will have to be patient. You can unscrew it using a hammer and chisel, gently tapping the screw, or you can use a durable T40 size bit and a holder.
https://www.youtube.com/watch?v=oT3PTk3dMRw
The bit is screwed into the axis of the screw, and then, grasping the bit with the holder, you need to rotate the screw counterclockwise. Using a marker, you can mark the correct position of the pulley so that you can put it back on without any problems.
Remove the pulley by pulling it towards you with a rocking motion from side to side. Once you remove it, you will see the outer bearing and the end of the shaft that needs to be knocked out of the tank and drum.
This is done like this: a wooden block is placed on the shaft, which is struck with a hammer.
Next, you need to divide the tank into two parts. In some models of Ariston washing machines, they are fastened together with bolts, which can be unscrewed to disassemble the tank. The part of the tank on the cuff side can be removed from the drum quite easily .
The second part will need to be carefully knocked off the drum so as not to damage the plastic.
Having released the drum from the tank, inspect the wear of the shaft sleeve, to do this, wipe it with a cloth and put on a new bearing; if there is even a small play, the shaft together with the cross will also need to be replaced.
If the tank is not disassembled, but is solid, then it will have to be sawed along the seam; see how to do this in this video recording.
And finally, we take on the bearings. First, the outer bearing is knocked out. This is done using a metal rod and a hammer.
We rest the rod against the bearing rim and apply a small blow with a hammer, then change the position of the rod and strike again. So we knock the bearing in a circle.
After the bearing is removed, turn the tank over and knock out the second bearing from the inside in the same way. Together with it we take out the oil seal.
Having pulled out the bearings, we clean them from dirt and wipe the holes where they were inserted with WD-40 liquid to get rid of rust, and then lubricate them with a special lubricant or Litol-24 lubricant.
Now we install the bearings, starting with the inner one. Gently drive it in using a rod and a hammer, moving the rod crosswise along the outer rim of the bearing. We place a seal on the bearing and coat it with waterproof grease. The outer bearing is driven in in the same way. Next, we assemble the tank, performing the steps in reverse order, using our own photos or videos.
We also assemble the machine step by step, proceeding in reverse order. Take your time, be careful and careful.
In conclusion, we emphasize once again that replacing bearings in any washing machine is considered a rather difficult job. For a better understanding of this work, you can watch the video below. But if, after watching the video, you are even more convinced that you cannot replace this part in the washing machine with your own hands, then feel free to take it to the service center.
Step-by-step replacement instructions
Any equipment can be disassembled with your own hands according to a single scheme:
- The side panel is released, the screws are unscrewed using a screwdriver. Remove the support and release the pulley. Release the belt by removing the side panel.
- The locknut is unscrewed and the pulley is removed.
- The shaft grounding elements are removed.
- To consider the direction of unwinding, parts are cleaned with special paper, similar to sandpaper.
- The oil seal is released using calipers of different threads.
- The seals are treated with a special lubricant included in the kit.
- The new caliper is wrapped, attention is drawn to the arrow indicators. They show the sides of the twist.
- The bearing and oil seal are replaced in a similar way.
Advice from the experts
Experts advise adhering to the following recommendations:
- Independent replacement is possible when the model of the machine is precisely determined and the necessary elements are selected for it. You also need tools for dismantling and replacing spare parts.
- Before disassembling the machine, you need to prepare the room. All unnecessary elements are removed, and space is freed up in the room for storing the removed elements.
- To avoid damaging the hatch, it is disassembled separately. First, disconnect the lock mechanism and its wiring. Then remove the hatch door, having first unscrewed the screws that hold its hinges. Only then do they remove the bolts and dismantle the necessary part of the body.
- It is easier to change flanges and bearings on a top-loading machine than on a horizontal-loading machine. The side panels are removed first, and only then the shaft of the smaller flange.
Replacing a bearing yourself does not seem difficult if you study the progress of the work in advance and thoroughly prepare for the process. Knowing the brand of the washing machine and having prepared the necessary tools for dismantling, you can easily carry out repairs.
Required Tools
Replacing bearings in an Ariston washing machine does not require a large arsenal of tools.
To disassemble the Ariston washing machine we take:
- You need a set of socket heads and the largest one is 13 mm. You will also need a screwdriver to remove the drum pulley.
- Screwdrivers;
- Pliers;
- Hammer;
- Chisel;
- Hacksaw for metal;
- Angle grinder “Bulgarian”;
- Drill with drill d=3 mm. You will need 30-40 bolts of the same diameter with nuts, 20-30 mm long;
- Screwdriver;
- Silicone sealant (note that this will be used at high temperatures).
Preparing the tool
Begin any job by preparing what may be required. For example, you may need a room or a spacious room in which it will be convenient to disassemble the car and store spare parts so that they can be easily found later. This is often the first problem on the way to repairing the washing machine yourself. Having disconnected the machine from all communications and placing it in a convenient place, we prepare the tool . May require:
- hammer;
- pliers
- flat and Phillips screwdrivers;
- metal rod;
- bearing puller;
- waterproof lubricant WD-40;
- sealant;
- open-end wrenches;
- marker.
In addition, new bearings and seals will be needed. If you know in advance what you need, you can buy them at the store. If not, then disassemble the machine and remove the faulty bearings, look at their markings and buy similar ones.
We disassemble the machine: we take out the tank
As you disassemble the washing machine step by step, you can take photos so that you can use them to put the equipment back together. Although this is not necessary, because in the video on this topic, everything is described in detail and has already been recorded.
So, we present the analysis of the Ariston front-facing machine in the form of the following algorithm:
- Unscrew the plastic cover located on the back wall of the case.
- Unscrew the bolts holding the top cover and remove it.
- We also remove the back wall of the case.
- Loosen the clamp on the pipe attached to the washing machine tank and remove the pipe.
- We take out the chip with wires from the electric motor.
- Remove the drive belt. In an Ariston machine, it is removed, as in many other washing machines; this process is described in detail in the article on how to change the drive belt in a washing machine - video.
- Loosen the 2 bolts holding the engine.
- Gently press on the bolts, holding the engine, then unscrew them completely and remove the engine from the car.
- Next, disconnect the power supply contacts from the heating element located under the tank.
- We check and disconnect all sensors.
- We move on to the front part of the case - take out the powder receptacle.
- Under the powder receiver we find the bolts holding the front panel and unscrew them.
- We unscrew 2 more bolts from the top, they also hold the control panel, and disconnect it.
- Remove the rubber cuff from the drum.
- We remove the bottom panel of the case and unscrew all the bolts that secure the front wall of the machine.
- Remove the front part of the housing.
- Unscrew and remove the counterweights.
- Disconnect the filler pipe from the tank.
- Remove the hose leading from the water level sensor to the tank.
- We remove the niche for the powder receptacle.
- Unscrew the shock absorbers.
- Using a flat-head screwdriver, remove the spring clamps on which the tank hangs.
- We make sure that everything is disconnected from the tank and take it out of the car.
Having pulled out the tank of the Ariston washing machine, you need to place it on the stands with the cuff down. Thus, half the way to get to the bearings has been completed. And that's not the hardest part.
How to disassemble an Ariston washing machine
Do-it-yourself disassembly of the Ariston washing machine is carried out in several stages. To get to the bearings, you will have to remove some parts. The sequence is as follows:
- First, disconnect the drum collar. To do this, take a slotted screwdriver, use it to pry up the clamp (spring) and carefully remove it, put it aside, it will be needed at the very end, when all the parts need to be returned to their original position. The cuff must be removed from the contour and its edges tucked inside the drum;
- Using a Phillips screwdriver, remove the 2 bolts that secure the top of the washing machine. The bolts are attached to the rear wall;
- Next, remove the counterweight, which is secured with bolts (in old-style models) or springs (in new-style models). You can unscrew such bolts using a special wrench. It is quite difficult to disconnect the springs with your own hands; for this you will need special keys from the workshop, which can be rented;
- Then remove the container for powder and other products used in washing. Removing it is very easy, almost like removing a drawer from a shelf. It is recommended to fold all parts adjacent to the top cover into the cover itself to make it easier to assemble later;
- Next, we disconnect the bar at the back of the control panel and the panel itself, which is secured with 2 bolts in the dispenser for supplying washing powder;
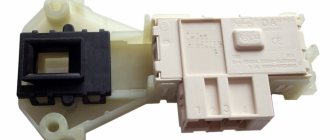
- Then we remove the pressure switch (water level sensor), it is easy to disconnect it, just pry it with a slotted screwdriver at the junction with the body, disconnect the contacts and carefully pull out the hose;
- The next step is to disconnect the dispenser; you don’t need to disassemble it, just unscrew one bolt on the back wall of the washing machine and disconnect the contacts, remembering or photographing their position (when assembling, you can also be guided by the colors of the contacts, there are only two of them: white and blue). We also remove the filling pipe, which is attached to the dispenser from below;
- Next, disconnect the back cover, which is attached to the body with several bolts. Next, it is important to remove the belt from the pins, which are two wheels, and remove the chips from the electric heater of the heating element and the engine. Using a wrench, unscrew the bolts that secure the engine, remove it, and also use pliers to cut through the clamps that secure the wires, and also remove them to the side so that they do not interfere with further work;
- We turn the washing machine on its side to provide access to the parts from the bottom. We take a key for 10, remove the shock absorbers from the bottom of the washing machine. Take pliers and disconnect the pipe. Next, remove the suppression device, having previously disconnected the chips;
- We remove the tank from the body by unhooking the springs and grasping it with both hands from the bottom. It is recommended to place the tank on a rubber tire, then remove the cuff from the drum so as not to stain it. It is also recommended to disconnect the counterweight; to unscrew the bolts you need to use a T-40 sprocket. Then remove the electric heater and drain pipe from the tank;
- Since the tank is solid, it will have to be cut, for this they use a fine-section hacksaw. You should first mark the points for the bolts, two below, one above, one on the left directly next to the filling pipe, the other on the right, mirror-symmetrically. Take a drill and make holes. Next, the tank must be sawed along the seam of this element, starting from the chamber to the top point of one half, sweeping in the other direction also from the chamber to the top point of the tank the other half, so that the entrance seam, the crosshair of the cut, is in the upper part;
- Then remove the pulley using a T-40 sprocket. Lubricate the center with aerosol WD-40 and leave for a few minutes. We place the tank on three bricks, at three points, except for the bottom, damage to which is extremely undesirable. Use a rubber mallet to hit the center several times so that you can remove the drum. Now access to the oil seal and bearings is provided and they can be replaced with new ones.
The approximate duration of disassembling an Ariston brand washing machine can be from half an hour if the work is performed by a professional technician, to a whole day if you decide to make repairs and change the bearings yourself for the first time. Those who are doing this not for the first time disassemble the machine into its component parts with light movements; for beginners, the main thing is to do everything carefully and not rush for speed.