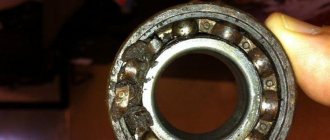
When the bearings come out of alignment, the drum rotates with difficulty, stops, and may even jam. The automatic washing machine practically stops washing, let alone squeezing. In case of such a breakdown, repairs cannot be delayed. If the bearing seat breaks, you will have to replace the drum. A faulty bearing will cause the spider, pulley or motor to fail. You can replace the drum bearing yourself or contact a service center.
Causes of wear
The washing machine drum should rotate freely inside the tub. This rotation is ensured by serviceable bearings.
Causes of wear may result from:
- natural wear of the oil seal, which after 5-7 years of operation begins to harden, deform and, as a result, allow water to pass through, causing corrosion of the bearings,
- prolonged use of the washing machine as a whole and, as a result, wear of all parts,
- improper operation (the washing machine must be operated correctly and periodically treated with special descaling agents).
Replacing a bearing in an Indesit washing machine: detailed instructions
If you have never tried to remove a bearing from the drum of an Indesit washing machine, then this article will help you understand the details. There is no need to pay inflated prices to service organizations for something you can handle yourself.
When replacement is required
Have you started to get bothered by a progressive hum during the spin cycle, which lately has been reminiscent of the sound of an airplane taking off? Perhaps when turning the drum you hear crunching, clicking, or strong vibration?
You'll have to change the bearing. The owners of the Indesit Wisl85 machine gun, a number of other Indesit models, and Ariston should be “congratulated” separately. The tanks of these machines are glued or soldered and are not officially collapsible. Official services will not undertake to repair bearings, and a new tank costs as much as half a washing machine.
Noise and vibration when washing
Rumble and vibration are possible during spinning and washing. Uneven stacking of laundry and overload quickly lead to disastrous consequences. Loosening of the bearing and breakage of its jacket leads to drum beating and vibration.
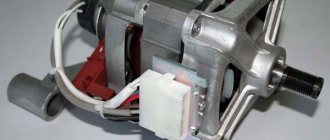
If the humming or crunching noise continues, check whether it is the engine bearings. To do this, you need to remove the belt and twist the drum strongly. If it spins quickly, quietly, and does not jam, the problem is in the engine. In other cases, these are precisely problems with the rotation of the drum drive.
Water is leaking
When the bearing loosens, the seal wears out and water leaks through it, again onto the bearing. Although it is a closed type, the water finds the alkali, washes away the lubricant, and promotes corrosion.
These processes further destroy the already not new node. The flowing water is distinguished by brown stains - traces of it are visible from the back of the machine. Rust can get on your laundry and is difficult to wash off.
A worn bearing contributes to the formation of wear on the shaft and even a new oil seal ceases to hold water.
Which bearings and oil seal are suitable for Indesit washing machines
The drum has a pair of bearings of different diameters. The outer one is slightly larger. Suitable for replacing 62202. The number 6 of the spare part means closed type, and the marking is 202. The bearing is cheap. And, if you remove the drum in time, it remains intact. The main load falls on the internal one. Its marking is 204.
The dimensions of the original oil seal are 22* 40-10/11.5. It's unlikely to be on sale. 22*40-10 will do. The thickness of both is 10 mm. Only the old one has a protective collar, increasing the size to 11.5 mm.
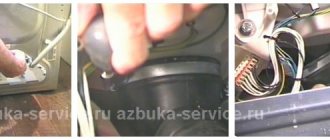
DIY replacement
Since the tank is sealed, access to the bearing is difficult - many are afraid to replace the bearing in the Indesit washing machine themselves. It is better to use two people to remove the tank.
There is no need to disassemble the entire car. Only what gets in the way is removed. It is pulled out mainly through the top, in some cases from the back. The most inconvenient parts are the heavy counterweights.
The top one can be removed immediately, easily, the bottom one can be removed only when the tank is removed.
When working alone, you need to be on the safe side: place something underneath the tank to relieve the springs.
Preparation
For repairs you will need a set of materials and tools:
- self-tapping screw 3.8*20 mm - 20 pcs;
- drill with a diameter of 3.2-3.5 mm;
- a simple pencil;
- Phillips screwdriver;
- metal saw;
- the best waterproof sealant;
- lubricant for the oil seal - Litol or Gydra-2;
- pair of bearings;
- stuffing box.
We mark the place of the initial connection with a pencil. Then, before cutting, we drill a couple of holes and screw in self-tapping screws - they will become guides in the future. We do not tighten the screws into the holes formed until they stop.
Some say that the pulley must be removed before sawing, others after. It’s better - after removing the tank, stock up on normal tools - a ratchet wrench, a T40 bat, a wrench. Before unscrewing, spray with WD-40 and wait 10 minutes. If after this it does not unscrew, place the chisel sideways on the bolt and hit it with a heavy hammer or half-sledgehammer.
Owners of cars with a regular hex bolt will have better luck.
Split tank
To cut the tank, we use a metal file or a fine-toothed hacksaw, which is more convenient. We saw along the existing seam. You should not rush, because if you cut incorrectly, a lot of material will be lost for assembly in the future.
After sawing, remove the cover that covers the drum along with the cuff mounted on it.
Get the drum
The drum is removed using pullers.
To knock out the drum you have to hit the shaft. In order not to spoil it, you need a piece of a pin with a diameter and thread suitable for the size of the shaft. Screw the pin in as deeply as possible, so as not to pull the thread. Slowly we begin to knock it out, tapping gently with a hammer. After knocking it out, unscrew the pin.
There are 2 bearings in the drum - external and external.
If the drum is covered with a layer of scale, you will have to remove it. Scale is difficult to remove. You can soak it in citric acid or remove it with a special drill attachment.
Remove the old oil seal and bearings
After removing the drum, we inspect the presence of wear on the shaft. If it’s not there, that’s already good. Next is the seat for the oil seal. It's not bad if it's still lubricated.
We pry the inner bearing seal with a powerful screwdriver and try to pull it out. It is additionally placed on sealant and often sticks. Now we have access to the bearing. The inner diameter of the bearing is 17 mm, the outer diameter is 18 mm. Preparing the puller:
- take 3 washers with a diameter of 8 mm;
- hairpin 12-20 cm long;
- We grind the washers so that they can press on the inner race of the bearing without any problems.
Now when you tighten the nuts it will come out. It is advisable to manufacture the puller with an impact on the outer diameter of the bearing. It is better to take a normal mandrel than to build it for the task.
To press out the inner bearing, another device is needed. Take a piece of pipe that fits into the base of the hole. Insert the stud with nuts. The principle is this: resting against a piece of pipe, when tightened, the nut, on the other hand, pulls the bearing along with it, pulling it out of the socket.
Before pressing out the bearings, spray with WD-40 penetrating fluid.
Install new oil seal and bearings
Before installing bearings and oil seals, all surfaces are carefully treated to remove stains, rust, and unevenness. It is recommended to buy parts of European quality or, if possible, Soviet-made.
All bearing seats are wiped thoroughly from dirt and lubricated for good passage of the unit.
We make a pressing machine. The essence is similar to a puller - we hold or rest against the opposite end of the hole, push or pull the bearing.
In this case, the nodes move towards each other, so we place the stops directly on them, tighten the nuts until they are installed in the standard sockets.
The nuts must press on the washer, which must press on the outer diameter of the bearing. Avoid applying force to the inner diameter to avoid damaging the holder. We reach all the way, but without excessive zeal.
When driving the part, distortion should be prevented. After pressing:
- We fill it with Litol lubricant. Even though the bearing is closed, the aggressive environment still destroys it. To reduce the speed of the process, lubricate the entire metal surface.
- To clamp the oil seal, place it in a free space and press it evenly with a hammer in a circle.
- We degrease the drum shaft and the oil seal seat.
- Lubricate the oil seal area with Litol.
It is more convenient to install the inner bearing first - this will make it easier to see whether it is seated or not. The outer one should not be in the plane of the bushing, but somewhat deeper.
Reassembly
We prepare the sawn-off cover of the drum compartment for installation in place: we remove the unevenness of the sawing and sand it. We remove everything not only from the lid, but also from the drum capsule - the place where it rotates. We take the lid and place it on the intended marks.
We tighten a couple of screws already present here. Using a drill with a 3.2 mm drill, we begin to drill mounting holes in a circle to fasten the two halves of the case. The distance between the screws is about 10 cm. You can install bolts instead of screws, but you will face the fact that the heads will have to be sharpened.
We stick the drum shaft back. We tighten the pin-tool and pull out the tank to the end.
Now we degrease the bonded plastic surfaces of the drum capsule and lid. We coat the surfaces with moisture-resistant silicone, without missing a single millimeter. We carefully install the top cover according to the marks and twist the parts with self-tapping screws. First we bait it lightly, then we pull it out without tearing off the plastic. Remove excess silicone. Let it dry for at least a day.
Upon completion of assembly, turn on the machine in boiling mode with descaling acid, such as “Adipinka”. It will eat away rust, plaque, and excess silicone.
Replacement features for top-loading models
Replacing a bearing in an Indesit top-loading washing machine is even more labor-intensive. To begin with, you will have to disassemble almost the entire washing machine.
Unlike front-loading, on a “vertical” drum the drum is attached on both sides. The doors and blocking are at the top, and the side walls are at the sides. Washing machines Electrolux, Bosch, Whirlpool are disassembled in approximately the same way.
But Bosch will have to be promoted almost completely.
The peculiarity of a vertically located drum is that two bearing assemblies need to be replaced - top and bottom. Otherwise, an imbalance may occur and all the work will have to be done again.
Changing the bearing on an Indesit washing machine with your own hands is not so difficult. The main thing is not to be afraid, to prepare properly and to have the right tool.
Source: https://tehnovedia.ru/stiralnye/zamena-podshipnika-v-stiralnoy-mashine-indesit/
Diagnosis of failure
Rumble and hum when the drum rotates in the washing mode, breakdown of the spin mode and rapid wear of the drive belt indicate a faulty bearings.
You can verify this by carefully inspecting the washing machine.
To do this, you need to open the door, grab the top of the drum with your fingers, try to swing it and determine whether there is play in the drum mount. And then spin the drum from the inside with your fingers, listen and try to catch extraneous noise.
If there is play, but there is no extraneous noise, this means that these parts have begun to deteriorate, but replacing them can be delayed for several months.
If there is play, and there are also characteristic noises (grinding, hum, rumble), but the drum rotates freely and does not stop, you need to change the bearings as soon as possible.
If the drum moves with a terrible grinding noise and even stops, it is generally dangerous to use this washing machine and requires urgent repairs.
What bearings are in Indesit machines?
For each model, spare parts are selected in accordance with the design features. You can find out which bearing specifically is in a particular washing machine from the Operating Instructions, or by removing old spare parts from a disassembled machine. When replacing parts, you must strictly follow the original size and choose identical parts.
The following bearings are usually installed in Indesit washing machines:
- 203,
- 204,
- 205,
- VA2V 633667.
What types of bearings are there?
There are many types of bearing elements, which are classified according to a variety of criteria. In automatic machines, two types are used, based on the design features:
- Metal. They are used more often because they are relatively inexpensive.
- Plastic dustproof. They are considered the best when compared with metal ones, since they have a two-layer structure (a metal base, which is additionally covered with a protective layer of plastic).
The type of part can be easily recognized by the marking (located on its outer surface): ZZ means metal, 2RS means plastic.
In addition, the bearing elements differ in width, as well as in the diameter of the circle (internal and external). This mandatory condition must be taken into account when selecting a new spare part.
The correspondence of their types and sizes can be seen in the photo below, where d denotes the diameter of the internal hole, D the external hole, and h is the width.
Necessary tools for repair
In order to disassemble the washing machine and change the bearings, you will need:
- large pliers with rubberized handles,
- pliers with a narrow, elongated working part,
- set of wrenches,
- screwdrivers (Phillips and regular flathead),
- a screwdriver with replaceable bits (star bits must be included in the kit),
- round pliers,
- chisel,
- hammers (rubber and regular),
- if the tank is not dismountable, you need a tool for cutting the tank (grinder, hacksaw or jigsaw),
- It is advisable to have specialized pullers that will simplify the process of removing bearings (if they are not available, you can use auto tools or improvised mechanical devices).
Also, for disassembly and further assembly you will need consumables: WD-40, silicone sealant, special waterproof glue and clamps for fastening wires of different diameters.
Main stages of bearing replacement
The initial stage of work involves dismantling the washing machine tank. Important: a certain brand and model of a technical device requires an individual approach. Let's consider the procedure for replacing bearings using the example of a Samsung washing machine. Removing the tank from the body part requires preliminary disassembly of the machine.
Disassembly
To disassemble you will need:
- remove the top cover - the design of the model provides for the removal of the front panel when removing the tank or repairing the heating element. To remove the front panel from a Samsung machine, you need to remove the control panel while simultaneously removing the detergent container. Underneath there are two self-tapping screws that need to be unscrewed; the third self-tapping screw is located at the end of the panel. After this, you need to unclip the panel with the electronic module wiring de-energized;
Removing the dashboard
- unscrewing the screws securing the front panel. First, remove the sealing cuff of the hatch, then you need to snap off the lower plastic panel (on the front side), where the drain system filter is located. There are also lower screws attached to the front side of the panel. Following the operation, the upper ones must be removed;
- removing the front panel - very carefully, having first disconnected the terminal from the hatch lock;
We disassemble the case
- removal of the metal frame where the electronic control panel is installed. This stage is preceded by removing the body part of the container to fill the washing powder. The most acceptable option is simultaneous removal with the valve responsible for regulating the flow of water. The need to remove the housing amplifier is due to the subsequent simplification of the procedure for removing the tank of a Samsung washing machine (without removing the motor). The tank and motor are removed and installed in order to avoid problems with belt tension (location and position are difficult);
- Next, the drainage system pipes are gradually removed from the tank, the shock absorbers are twisted, and the electronics are removed from the heating element and the engine. Separately about shock absorbers: in most models of Samsung washing machines there is no provision for separating the shock absorbers from the body of the machine, and after removing the drum they are divided in half without violating the underlying structure and defining functions;
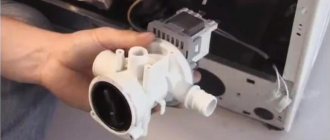
- removing the tank (provided the wiring, pipes, etc. are disconnected). The tank is removed from the springs and carefully placed on a previously prepared surface. The remaining parts that prevent disassembling the tank are unscrewed and removed (motor, drum drive pulley);
Removed tank
- removing the mounting brackets connecting both parts of the tank. First, the places of their initial installation are marked, then the brackets are snapped off, dividing the tank into two halves. Next comes the removal of the drum through the rear cover of the tank. Pullers help remove bearings, or their remains;
- the process of cleaning the installation site of bearings, oil seals, and drum shafts. Here it is necessary to carefully consider the condition of the shaft surface and the recesses for the bearing and oil seal for the presence of force damage. If the shaft is not subject to mechanical stress, there are no irregularities or depressions in the fit, the plastic is not accompanied by cracks, the bearings with the seal can be pressed. The oil seal is filled with grease and the shaft is lubricated. The bearing replacement is completed, the drum returns to its workplace (the rear half of the tank);
All processes must be carried out very carefully
- The rubber seal at the junction of the tank halves is thoroughly cleaned, then the joint is sealed using silicone sealant, which helps prevent water leaks;
- After the operations, the front cover of the tank is installed and the brackets are fixed.
Assembly
The assembly is carried out in reverse order. First, the shock absorbers are attached to the tank, followed by the motor. A pulley is installed on the drum shaft, and the belt tension is adjusted. Thanks to the springs, the tank is suspended and the shock absorbers are fixed. Next, you need to connect the water drain pipes, electrical wiring to the heating element and water temperature sensor. The load and the compartment for washing powder are installed, the water inlet valves are fastened and the wiring is connected. You must remember to connect the water level sensor tube.
Washing machine disassembly diagram
Once the work on connecting the lock is completed, the front panel is installed, behind which the hatch seal is mounted. The last step is connecting the electronics to the wiring and installing the control panel. The readiness for the work process and the absence of water leaks are checked. If the result is positive, the panels and covers are screwed and latched.
For the information of consumers, this technique is applicable when replacing the heater (heating element) in Samsung washing machines with one difference: in this case the tank is not removed.
Phased renovation
To replace the bearing in an Indesit washing machine, you will need a tool and a general understanding of the operating principles of household appliances. The complexity of disassembling the machine is determined by the design of the tank. In new Indesit models, the tank is non-dismountable, plastic; in older models, the iron tank is disassembled. A non-separable tank will have to be sawed and then glued.
Disassembling the washing machine
For those who decide to change the bearing on an Indesit washing machine on their own, it is recommended to photograph the disassembly process while working in order to later assemble and connect the machine correctly.
First, the washing machine is prepared for repair work. It is disconnected from the power supply, water and sewerage, the remaining water is drained, moved to the work site and the detergent dispenser is pulled out.
Then you need to remove the cover of the washing machine by unscrewing the screws on the back of the case, as well as the cover of the service hatch on the rear wall, which is also held on by screws.
Next, opening the machine door, remove the outer clamp of the cuff, separate the cuff from the outer part of the body and tuck it inside.
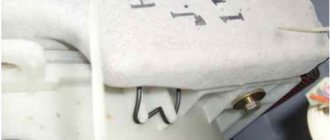
The top of the tank must be emptied. To do this, the dispenser hopper and pipes are removed, and the counterweight is disconnected (if it is located on top). The terminals are removed from the control unit.
At the bottom of the machine, remove the contacts from the heating element and temperature sensor from the tank. After this, remove the clamp from the tank, and then disconnect all the wires that are attached to the tank. Then the wire belt is removed, the motor and heating element are disconnected and removed.
The tank is pulled out and placed on a horizontal surface for further work.
Removing the Drum
If the tank is collapsible, then you need to remove the pulley from it (it is attached to one bolt) and recess the shaft inside the tank. Now you can remove the top part from the tank and take out the drum.
If the tank is not dismountable, it will have to be cut along the outer edge or along the seam. Then the tank is turned over, the pulley is removed and the shaft is pressed in likewise.
The drum is removed, and access to the oil seal and bearing appears in the tank.
Removing old bearings and seals
Before dismantling the oil seal and bearings, it is recommended to clean their visible parts from dirt mechanically (this will make them easier to remove). The bearing is carefully knocked out with a blunt chisel and hammer, distributing blows around the entire circumference so that it comes out straight. All actions should be carried out very carefully so as not to damage the tank.
The bearing most often flies out at the same time as the seal. Or the oil seal is taken out separately after the bearings.
Replacement with new parts
Before installing new bearings and an oil seal, it is necessary to wash the shaft, clean it from dirt and treat the places where they are attached with lubricant (for example, Litol-24), select bearings and an oil seal of the required size, identical to those used previously.
First, the outer bearing is installed. It is hammered along the outer edge of the part. Next, the internal bearing is installed in the same way. It is recessed relative to the inner surface of the tank. An oil seal is placed on top of it, which is generously lubricated with grease.
The drum is mounted in the tank in its original place.
The quality of the repair work can be checked by unscrewing the drum in the tank with your fingers. If nothing interferes with the movement of the drum and there are no extraneous sounds, then the bearings are installed correctly.
Reassembly
First, the tank is assembled (or glued together). Then a pipe is installed (its fastening can be sealed with sealant), a cuff, a heating element and a temperature sensor. The tank is placed back into the housing. It is recommended to clean and rinse all removable rubber parts before assembly. Assembly is carried out in reverse order.
What bearings are installed in different machines?
Almost anyone can replace damaged bearings. It will be more difficult to determine on your own which part is ideal for your existing machine. It is worth understanding that even within the same brand, the size range of components varies greatly, so you will not be able to buy a universal spare part.
It is best to find out the type of bearing in the instructions supplied with the specific unit. If you don’t have a technical manual at hand, you can go the other way and “punch” the machine’s serial number on the Internet. The easiest option is to remove the old unit and find a similar one among the assortment offered by the store. True, there is no guarantee that the previous owner did not improve the design of the washer with a bearing that was inappropriate in diameter and thickness.
You can also choose the bearing size for a washing machine based on the company that produces the equipment. Each manufacturer gives preference to certain diameters:
Attention! The list of bearings is for informational purposes only, as brands can change the configuration at their discretion.
- The most commonly used bearings are 203-204, less often 205-206. Only the WF-R105AV has non-standard markings, for which 305-306 are suitable.
- LG. The bearing system is similar to Samsung washing machines: 6203-6204, 6205-6206 and extremely rarely - 6305-6306.
- Bosch. There are parts of the ZZ type and the size range from 6203 to 6206 and from 6305-6306.
- Ariston. Most washing machines are equipped with a double-row mono-bearing brand SKF BA2B 306037. In other cases, for example, from the Ariston ALS 1048 CTX machine we purchase numbers from 203 to 206 ZZ.
- Ardo. The highest frequency option in models WD, A, FLZ and S is 6204 and 6305. For TL and FLS only 6202 and 6203 are needed.
- Indesit. It is better to focus on specific sizes. So, with an internal diameter of 2 cm, an external diameter of 4.7 cm and a height of 1.4 cm, we choose 6204-2RSR, and with values of 2.5 cm, 5.2 cm and 1.5 cm, respectively, we choose ZVL 6205- 2RSR. If the measurements do not match, then we settle on bearings of type 203-204.
- Beko. Only metal bearings are suitable, the number of which varies from 6203 to 6205 depending on the model.
- Standard bearing systems of type 203-205 and 204-205 are provided.
- Atlant. Suitable markings are the fewest - 6204 and 6205.
Knowing the standard sizes used by a particular manufacturer, you can check the recommendations of the sales consultant and confirm the selected option. But don’t forget that a lot depends on the specific model. Therefore, we do not neglect the opportunity to remove the old bearing and use it as a sample.
The main thing is, in addition to the size, to think through the other nuances of the upcoming repair. For example, give preference to original spare parts or Korean-made products. And remember that you cannot replace just one bearing. The entire assembly is dismantled and reinstalled, or it is better to immediately install new seals.
Interesting:
- Bosch washing machine makes noise during spin cycle
- What bearings are on a Samsung washing machine?
- Ariston washing machine makes noise when spinning
- Beko washing machine does not spin
- The Atlant washing machine does not spin
- How to replace bearings on a Vestel washing machine
Reader comments
- Share your opinion - leave a comment
Replacement features for top-loading models
In top-loading machines, the drum is mounted on two axle shafts. Therefore, such machines have two sets of bearings that must be replaced at the same time. After disassembling the machine, they first change the bearing on the side where there is no pulley, then on the opposite side. When disassembling, the direction of the thread should be taken into account. As a rule, it is different on opposite axes.
Armed with the necessary tools and theoretical knowledge, you can independently remove the bearing from the drum of the Indesit washing machine, select an identical one and install it back. It is useful to photograph the disassembly process. This will help with assembly.
Who has how much
You can find out how many bearings are in an LG or Atlant washing machine by looking at the instructions for any of the units of this manufacturer or by consulting with service technicians or household appliance sellers. The owner of the machine may need such information only in one case - the unit has failed because the internal parts have worn out.
The main cause of breakdowns of this kind is damage to the oil seal, which plays the role of a protective seal. The oil seal protects the bearing from contact with water and if it does not perform its functions, the liquid slowly seeps inside, damaging the most important working unit.
It is important to remember that if the oil seal and bearings are not replaced in time, the entire drum will have to be replaced.
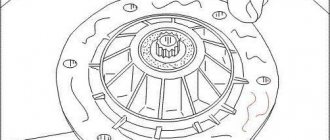
Washing machine drum
How many bearings are there in an Indesit washing machine? There are two of them, like the oil seal. Indesits may include:
In LG top-loading direct drive washing machines, components have specific serial numbers. For equipment from this manufacturer, these are numbers 6204-6206. Parts with the same numbers are also suitable for Atlant.
Set of bearings and oil seal for washing machines
Bearings in a Samsung washing machine are marked 203-204. At Bosch, depending on the model of equipment, the size of the parts also changes. Bosch bearing numbers are 6203, 6306. For different Ariston models, spare parts marked from 6203 to 6206 are suitable. Almost all Zanussi models are also repaired with components from this series.