Anyone can determine that a bearing in a washing machine needs to be replaced. It doesn’t matter what brand - Samsung or another model. Bearings break, usually gradually. And noise begins to arise during washing, and in the spin mode it becomes unbearable. The machine often vibrates and moves. Buying special pads for the legs does not solve the problem. Sometimes the drive belt slips. You can do this work yourself, without the involvement of a specialist, if you have the desire and the necessary tools. Let's look at the example of the Samsung Diamond model.
- Determining the need for replacement
- Sequence of repair actions
- Disassembling the Samsung washing machine
- Removing the tank and bearings
- Installation
- Assembling a Samsung washing machine
- Samsung washing machine catalog
Determining the need for replacement
You can diagnose that the bearings are worn out as follows:
- Open the hatch and turn the drum manually. If you hear a characteristic crunch, as if something is rattling, as if over bumps, then the problem is in the bearings.
- After opening the hatch, grab the edges of the drum with your fingers and try to move it. If it moves up and down by 5 mm or more, then the bearings or crosspiece are worn out.
To make sure that the problem is in production, you need to remove the back cover. Spin the drum and listen near the pulley. You can take off the belt, then only the bearing will be heard.
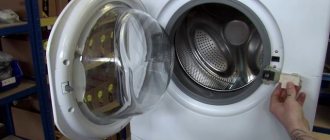
This is what the washing machine looks like with the lid removed.
Online diagnostics of a washing machine
If your machine stops washing or rinsing clothes normally, then some kind of malfunction or breakdown has occurred.
You can try to find the problem yourself. Run diagnostics
Select which operation your washing machine does not perform:
1. Doesn’t drain 2. Doesn’t rotate the drum 3. Doesn’t spin clothes 4. Noises, knocks, buzzes when spinning 5. Doesn’t turn on
Checking the operation of the drain pump Is the drain pump of the washing machine working? Yes No I don’t know << Back
Clogged hoses in the washing machine If the sound corresponds to the normal sound that has always been observed when the device is working, the cause is probably a clog.
Was there a blockage in the drain hose? Yes
<< Back
The drain pump does not work! If the sound matches the normal sound of the drain pump, it is recommended that you check the drain filter first.
After cleaning, does the drain pump work and does the washing machine drain water? Not really
<< Back
Operation of the drain pump The sound of the pump is usually immediately audible and noticeable. If there is no sound, the pump is not working. We are looking for how to separately enable the water drainage program. As a rule, this is a separate option. After the program has been turned on, the pump should start working in 1-3 seconds. If everything is done correctly and the pump is operational, a buzzing sound will appear. If you hear no buzzing or other sounds when you turn on the program, the pump is probably faulty.
Is the washing machine drain pump working? Not really
<< Back
Clogged car hoses If you have identified a clog in the hoses, you need to disassemble them, clean them, and then reassemble everything.
Does the washing machine drain well? Not really
<< Back
Hurray, you did a great job, you fixed it.
<< Return to the beginning of diagnostics
The drain pump is faulty, call a professional.
<< Return to the beginning of the diagnosis.
The washing machine does not rotate the drum. During the operation of the washing machine, such a problem may occur. Each model has a different drum operation. It rotates according to a given algorithm, which is set by the program. This principle applies to spinning and washing. If you are not sure whether the drum is not spinning or whether it is working, put the laundry in the washing machine. Start the spin program. If the machine is running, it will first drain the water and then start spinning. In this case, a rotational process will be observed. If rotation is not visible, then check the belt. First, turn off the program, then unplug the wire from the outlet so that power does not flow into the device. Now you need to remove the back cover. You will need to carefully inspect the drum belt. It is quite easy to determine whether it is in the wrong position or damaged.
Is the washing machine belt torn or stretched? Not really
<< Back
Broken drum drive belt If the belt breaks, it will be immediately visible. There are also often cases when the belt simply stretches, which is why the drum, accordingly, does not rotate. Do not allow the machine to operate if the belt breaks. It is important to check whether it has wound around the engine pulley or broken the wiring to the engine. The heating element and temperature sensor may also be damaged if the belt does catch the wires. It is imperative to ensure that the belt model is original. If you choose an unsuitable or low-quality product, this will affect the performance of other devices. How do you know what kind of belt you have? There will be a marking written on the old one, compare it with the one indicated on the belt offered to you. You can also find out belt information by car model.
<< Return to the beginning of the diagnosis.
Washing machine motor malfunction If a malfunction is not found, the block with wires must be disconnected from the electric motor. Carefully remove it. We visually evaluate the engine. It may have melting, cracks, or other effects that clearly indicate damage. We call the windings of the tachogenerator and the engine. It is important to understand that you can fully study how correctly the engine operates and whether there is a malfunction only at the stand. If rotation does not occur, there may be a problem with more than just the motor. Sometimes the cause is a malfunctioning electronic module. If a short circuit occurs in the engine, the module could be damaged, while the engine remains operational. Also, the wires could be damaged.
<< Return to the beginning of the diagnosis.
Repairing a washing machine that does not spin clothes After completing the washing process, the washing machine may not spin properly or may not start spinning. Firstly, look, perhaps another mode is set, which does not involve turning on the spin cycle at all. This happens, for example, with programs related to washing woolen items and delicate fabrics. To check, run the spin cycle separately. If the washing machine does not drain water, we proceed to check the pump.
Does the washing machine now spin clothes? Not really
<< Back
Congratulations, you have solved your problem!
<< Return to the beginning of the diagnosis.
Repair of washing machines, imbalance Modern washing machines place the laundry on the drum before spinning. This is necessary for quality work. Check if this feature works. Sometimes a situation occurs when things get wrapped up in a ball that cannot be unwound automatically within a certain time. At this point the work stops. You need to unwind this laundry yourself, lay it out and continue operating the washing machine. In this case, it is important to turn off the machine, and then, when the laundry is laid out, turn on a separate spin program.
Does the washing machine now spin clothes? Not really
<< Back
Washing machine repair, drum drive repair Now you need to check the drum drive belt. We remove the cover and visually assess the condition of the belt. There should be no damage. If the tension is weak, the spin may not turn on. If you need to replace the belt, you should only replace it with the original one. After replacing, we try the program again.
Fault found, does the washing machine spin? Not really
<< Back
The engine or electronic module is faulty, call a repairman to your home.
<< Return to the beginning of the diagnosis.
The washing machine hums, makes noise during the spin cycle, rumbles, and makes a jet plane noise. If the washing machine makes noise during operation, making unusual sounds, it’s time to pay special attention to it. In this case, a visible breakdown or lack of functionality may not be observed, but the appearance of strange sounds indicates that it is time to look for a malfunction. It is important to understand that a new car that has just been delivered should be inspected for shipping bolts. If you forget to remove them, noise and vibration are inevitable. So, let's begin! We turn the washing machine drum and listen to extraneous sounds.
When rotating, do you hear extraneous noise, hum, balls rolling, does the drum move unevenly with slight jamming? Not really
<< Back
If the drum rotates and uncharacteristic sounds appear, including vibration, it’s time to check the bearings. If they malfunction, they will have to be replaced.
<< Return to the beginning of the diagnosis.
The counterweight of the washing machine has come loose. The fastening of the counterweights must also be of high quality. If they are “loose”, it’s time to eliminate this defect. In some cases, you can notice that the bolts that secure the stones are completely missing. In this case, the connectors for mounting will be visible. The bolts need to be found and put in place - they probably simply came loose. A rumble heard while the washing machine is operating may indicate that the bolts have partially loosened. To check the bolts, you can simply push the drum. If it is secure, the bolts are fine. If it moves, there is a defect.
Do you hear any noise, clanging or rattling noises when moving the washing machine tub? Not really
<< Back
The counterweight has come off
<< Return to the beginning of diagnostics
Checking the shock absorbers of the washing machine Checking the shock absorbers. If you hear vibration or excessive noise during the spin cycle, there may be a problem with the shock absorbers. Sometimes the washer moves. Now let's check the functionality. Remove the top cover. Click on the tank, move it five to seven centimeters down. A normal reaction will be observed if the tank rises sharply, jumping a little and stopping in its normal place. If this does not happen, the shock absorbers need to be replaced.
Are the shock absorbers of the washing machine working? Not really
<< Back
If a visible defect has not been identified, check whether a foreign object may have entered the machine. Replacing shock absorbers. The problem with shock absorbers wearing out occurs quite often over time.
<< Return to the beginning of the diagnosis.
Replacing washing machine shock absorbers. Malfunction and wear of shock absorbers is a fairly common phenomenon.
<< Return to the beginning of the diagnosis.
The washing machine does not turn on. It is worth trying to find the cause of the problem yourself and fix it. We start by connecting the device to the network. Next, click on the “network” button. In different car models, different indications are triggered: here either the display will start working, or, on the contrary, some other button.
Does the washing machine have an indicator? Not really
<< Back
Hatch lock lock (UBL) You can check it by turning on any of the programs. We choose what we will use. Click on the corresponding button. Don't forget to pay attention to the inclusion. As a rule, the process of activating a function is characterized by the presence of a certain sound, for example a click, with which the device makes it clear that pressing again is not necessary and the machine is already working. If there is no sound, the button may be broken. In this case, the main thing that must be done is to block the hatch and start working. If this happens, everything is fine.
The washing machine is blocking the hatch and the UBL is triggered? Not really
<< Back
Water fill valve malfunction
<< Return to the beginning of the diagnosis.
The washing machine hatch does not lock
<< Return to the beginning of the diagnosis.
No indication Checking the electrical circuit. If you notice that the washing machine does not respond to being turned on, it is first recommended to check the power supply. The outlet may be faulty. Try connecting another device. If the outlet works, you need to check whether the circuit that conducts energy through the washing machine from one element to another is intact. To do this, you will need a multimeter, which will help you fully analyze the ability to respond to an electrical signal at several stages of operation. If there is no network connection anywhere, this is probably the problem. We carry out this manipulation until we reach the electronic module. If we are talking about an old washing machine, here it will look like the device’s program. When you turn on the button, there should be no breaks in the circuit. If the circuit works, everything is fine electrically.
Is the washing machine's power supply OK? Not really
<< Back
Repair of electronic module (unit)
<< Return to the beginning of diagnostics
Contact circuit fault
<< Return to the beginning of diagnostics
If you do not change it in time, the situation will worsen. The fact is that backlash occurs when the drum rotates. And this is the cause of two additional damages that will lead to an increase in the cost of repairs.
- First problem. The bearings are pressed into their seats. In the case of the washing machine that we are considering in the article, they are pressed directly into the plastic tank. And operating a machine with worn bearings leads to the destruction of these seats.
They can break to such an extent that it will be impossible to install new ones. In this case, the entire tank will need to be replaced. And this is another cost of repairs.
- Second problem. Shaft destruction or damage. In our machine it is connected to a cross, which is attached to the drum. The shaft rotates inside the bearings, and if they operate with play, this will lead to shaft wear.
As a result, you will additionally have to change the tank crosspiece. Difficulties may arise in finding it. Some models are difficult to find and must be ordered from suppliers in Europe or China. Wait - 2-3 months!
In this Samsung Diamond washing machine we are changing the bearings.
Sequence of repair actions
The required spare parts for a specific model can be found in the correspondence table.
All work can be divided into several large steps:
- It is necessary to remove the tank from the washing machine, having first disconnected and unscrewed all the attached elements from it.
- It is necessary to disassemble the tank and knock out the bearings and seal.
- Buy new ones and install them in the seats.
- Place the tank back into the washing machine, and hang and connect all the equipment.
These are the main stages, you can break them down into smaller ones. After completing the replacement, you need to check the operation of the washing machine in all modes, and be sure to make sure there are no leaks.
View with the top panel removed.
Disassembling the Samsung washing machine
First, remove the top cover by first unscrewing two screws. Then slam your palm down on the front. It will come out of the latches and can be easily removed.
Remove the counterweight, which is located on the top of the tank. To do this, we will use a size 10 socket wrench with an extension. Usually there are no problems here.
Tank with counterweight removed.
It is necessary to remove the front panel with the control unit and buttons. To do this, first remove the container for washing powder from the dispenser tank: pull it out and press the button highlighted in blue.
By pulling the dispenser, it will come out without any visible effort. Two self-tapping screws will become available, which are screwed through the front panel to the dispenser tank, ensuring the tightness of the structure.
We remove three screws from the top - they secure the dispenser tank to the metal body. Then we unscrew the screws that connect the front panel with the control unit to the frame of the machine.
The photo shows screws that need to be unscrewed (above and top right).
After this, pull the panel with the module towards you, and the dispenser tank in the other direction. It should disconnect.
Next we need to pull out the front panel. This must be done carefully, because it is attached to the body from below using latches.
The latches are plastic and often break if handled carelessly!
One or two can be unfastened by sticking your hand between the tank and the panel. The junction can be seen if illuminated with a flashlight.
Removed panel. One of the latches is visible at the top left.
It makes no sense to completely remove the panel and disconnect all the cables. Just move it to the side. It will not interfere with our work.
Panel pushed to the side.
We disconnect the intake valves from power, having previously marked or photographed the location. We unhook the rubber hoses from them.
To remove them, you first need to move the metal springs away. This is best done using pliers or special clamp pullers.
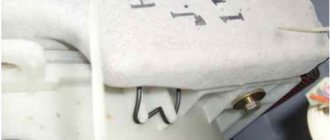
There is no need to remove the valve. They will not interfere with removing the tank. But the “pressostat” must be dismantled. It is located in the lower right corner when looking at the washing machine from above from the front. You can see it in the general photo above.
Before removing the water level sensor, it must be unhooked from the rubber hose, having first removed the small iron clamp. Then unscrew the screw that secures it to the body.
Expert opinion
I work in the household appliance repair industry. Extensive experience in restoring washing machines and dishwashers.
Ask a Question
The water level sensor hose and other rubber pipes do not need to be removed from the tank! They won't bother us.
We unhook another small pipe from the dispenser. You can see it in the photo below.
Second pipe from the dosing tank
Between the dosing tank and the main one, there is another pipe, and this is the main one. Located at the bottom and clamped with a large and dense iron clamp. It is most convenient to unfasten it after the front panel with the door is removed.
After its dismantling, free access to the pipe opens. First of all, disconnect the cuff. The rubber is pressed with a metal clamp with a spring.
Let's use a slotted screwdriver. First, find the location of the spring and use a screwdriver to pull out the clamp. Let's pull out the cuff with our hands.
Removing the rubber from the front panel.
We unscrew the screws with which the front part is attached to the body of the washing machine. Two on top, three on bottom. Let's use a Phillips screwdriver.
The top left screw that holds the panel.
Screw securing the front panel
Carefully remove the front part, but not completely. The panel is connected to the body by an emergency drain and a hatch lock (UBL).
The drain hose must be removed from the mounting. It is a rubber hose with a cap and is located at the bottom right.
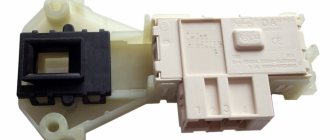
Then unfasten the UBL. Here you can go 2 ways. Pull out the chip with contacts from the lock, or unscrew the two screws with which it is attached to the body.
This is what the castle looks like from the inside.
Contacts sometimes become sour and it can be difficult to remove the chip. In this position, it is better to unscrew the UBL from the body.
Important advice! When disassembling a washing machine, a dilemma arises about what to do with the bolts and screws. How not to get confused later when assembling. You can lightly screw them back into their seats. Not completely, but lightly bait it.
The connection between the tank and the dispenser is now accessible. It is perhaps the most difficult to dismantle and install.
Upper pipe
After removing the pipe, remove the powder container and remove the counterweights that are located around the cuff. We use a socket wrench. There is no need to remove the rubber itself.
View without front panel
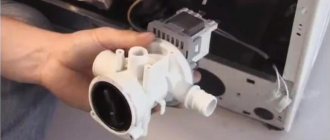
We detach the pipe connecting to the drain pump. It's at the bottom right. Can be disconnected from the tank or from the pump. For further disassembly, it is better to remove it from the drain pump.
At the bottom right is the pipe between the pump and the tank.
Remove the top horizontal bar. She will disturb us. Unscrew the four screws.
Metal strip and panel with module
After this, all work on the front and top of the Samsung washing machine is almost completed. It remains to disconnect the shock absorbers, but it is better to remove them after dismantling the engine. Let's move on to the back.
We reset the contacts from the heating element - this is a tubular electric heater. You will need pliers or round nose pliers.
Heating element contacts.
Remove the right chip carefully! With your hands!
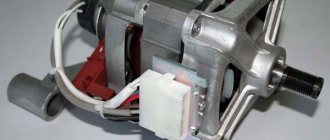
Removed heating element contacts and motor
We remove the chip from the electric motor. This will require patience and pliers. Contacts sometimes turn sour. There is a plastic latch on the side. It needs to be picked up with a slotted screwdriver.
Electric motor chip.
Remove the drive belt. We unscrew the two bolts that secure the motor to the housing and pull it out.
After that, we return to the front part and unscrew the bolts that secure the shock absorbers to the tank body. For a Samsung washing machine of this model, you can unscrew the fastening both at the tank and at the body.
Expert opinion
I work in the household appliance repair industry. Extensive experience in restoring washing machines and dishwashers.
Ask a Question
It should be noted that this is not always possible with other models. After all these procedures, we are ready to dismantle the tank.
Step-by-step algorithm for disassembling the machine
First, we dismantle the top cover on the washing machine by unscrewing the two fastening screws (or self-tapping screws) on the back side, which are located in the corners, then move the cover and lift it.
We recommend reading: How many grams of sour cream in a spoon (tablespoon, teaspoon)
Then we remove the detergent dispenser; this is easy to do without special knowledge and skills:
- open all the way;
- With your thumb, lightly press the tab in the central section, at the same time slightly lift the device and pull it towards you;
- If you did everything correctly, the dispenser will come out of the place where it is secured.
Now let's dismantle the hoses supplying water to the dispenser sections and the pipe through which water with dissolved powder enters the tank. Maximum care is required so as not to damage the fastening of the clamps: using pliers, loosen the fastening, pull the hoses from their connection points.
We remove the counterweight - we disconnect it very carefully, holding its body with our free hand. We unscrew the two bolts using the appropriate head and remove it to the side.
When unscrewing the last mounting bolt, hold the counterweight because it is heavy and if it accidentally slides down, it can damage important parts of the machine.
Removing the hatch cuff
The cuff interferes with the removal of the front panel, so we remove it first. It is attached to the panel using a clamp, and the other side is placed on the drum. We find the spring connecting the ends of the holder, pry it up and remove it along with the clamp. Now you can remove the edge of the cuff and tuck it into the tank so it doesn’t interfere.
Removing the front panel
We close the hatch, find the screws at the top and bottom and unscrew them. Now the panel is held only on a small hook. Carefully remove it so as not to damage the wire connecting the hatch lock to the rest of the car's wiring. Disconnect the wire by removing the connecting chip. We put the panel aside so that it does not interfere with us.
Removing the bottom panel
To do this, carefully place the machine on its side, unscrew the four mounting bolts, and move the bottom to the side. Now we can clearly see the electric motor and drain pump. First, you need to disconnect all the wires, taking a photo, so that you don’t get confused in connecting them later.
Pay special attention! The connection contacts are quite delicate, so we show maximum caution; if you notice burning, replace the terminal.
We dismantle the tank mounting racks from the bottom of the washing machine by disconnecting the fasteners on the tank itself and the lower part of the body. There is no need to unscrew anything else except the engine: the drain pump does not interfere, you just need to disconnect the supply pipes.
We recommend reading: Openwork summer sweater with knitting needles
Fill valve
The machine is also on its side, and we move again to its upper part and dismantle the sensors and filler valve pipes. First, disconnect the wire, then the mounting bolts, remove the valve body and put it aside.
Now you can disconnect the counterweights in the form of four springs, which hold the tank suspended with the drum inside. We dismantled everything that prevented the tank from being freely removed from the top; all that remained was to remove the control panel. It must be removed carefully so as not to damage the wires and connection terminals. We removed the front wall in advance; we still need to remove the small counterweight at the bottom of the machine.
Removing the tank
We carry out this operation with the utmost care so as not to damage any contact, otherwise additional repairs may be required, which is not our intention.
Let's turn the tank over so that there is free access to the belt drive: remove the belt, dismantle the pulley housing using a hex key.
Advice! The pulley mounting bolt may become stuck on the thread. To avoid damaging the thread when dismantling, treat it with WD-40 lubricant - after a while it will unscrew quite easily.
The tank has been dismantled and is located outside the machine body, all the necessary photos have been taken, so we begin to disassemble the tank to get to the drum and replace the bearings.
Removing the tank and bearings
After removing the counterweights and the electric motor, our tank was not too heavy, and one person of average build could pull it out. The most convenient way is to put one hand inside the drum and slightly lift the tank, and unhook the springs with the other.
Springs on which the tank hangs.
And we carefully take it out.
Removed tank
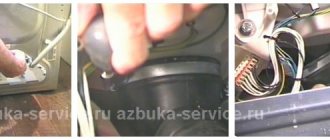
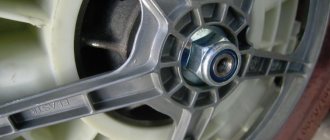
The pulley needs to be removed. This will not be easy to do because the bolt is glued on. To work, we need a 13mm wrench, preferably a socket wrench. Tube for lever. Pliers.
If there is an assistant, he should hold the drum. If it is absent, pliers are used to block the rotation of the shaft relative to the tank body. Using two handles, insert between the stiffening ribs and the pulley.
Holding the pliers with one hand and holding the tank with your feet, with the other we move the bolt that secures the pulley. I repeat that without a lever this will be extremely difficult to do. Almost impossible.
After removing the pulley, do not remove the bolt; it will be useful to us. Unscrew the screws holding the two parts of the tank together. We don’t immediately separate the halves. We tighten the bolt that secures the pulley to the shaft completely, and hit it with a hammer through a piece of wood. It must be moved at least 1 cm.
The process of unscrewing bolts.
After this, you need to divide the tank and knock out the shaft. As the pulley moves, unscrew the bolt.
Bolt securing the pulley.
After the drum is pulled out, carefully inspect the shaft and crosspiece. It is necessary to examine the production seats (shiny). Check the crosspiece for integrity.
Shaft with a cross on the tank.
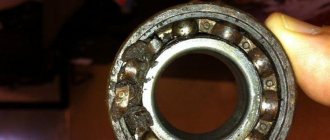
The inside surface is usually covered with a layer of dirt and soft scale. We clean the area around the bearings and first take out the oil seal. You can pull it out with a large and strong slotted screwdriver.
We place something under the half of the tank with bearings to raise it above the floor surface. You can use semicircular counterweights for the stand.
First we knock out the outer bearing. We use a hammer and an iron drift. A chisel can be used in this capacity.
My bearing removal tools.
When knocking out, it is necessary to ensure that the bearing does not jam. To do this, we use uniform blows on different parts of the rim.
Then we dismantle the inner bearing in the same way.
Removed bearings and seal.
Thoroughly clean and wash the inner surface of the tank and the outer surface of the drum.
We take out the gasket from the joint of the halves. Clean the groove and wash the rubber band.
Reasons for dismantling the crankshaft
Dismantling the crankshaft on a VAZ-2114 may be required in the following cases:
- The reason that comes first is most often the replacement of the timing belt and other work
that is somehow related to the gas distribution mechanism. Work should be carried out in accordance with the regulations, or if the mechanism fails. - Another reason for dismantling is the crankshaft. They are changed when oil leaks occur in the places where they are installed.
Pulley fastening
On all VAZ-2114 vehicles without exception, the crankshaft pulley is fixed using a massive bolt, which can cause problems when removed.
A curved spanner wrench is good for fixing.
- First of all, this is due to its location, since it is difficult to securely and securely fasten the key or socket head.
- Secondly, even if you managed to position the key correctly, you will have to make every effort to dismantle it
. This is due to the fact that at the factory it is tightened as tightly as possible in order to avoid the facts of self-unwinding. Also, the right-hand thread may not be the best for unscrewing it, which during operation only screws the pulley in tighter and causes the part to stick.
When performing work to remove it, it is best to keep WD-40 on hand.
Tool for getting the job done
To make the work easier, you need to prepare the following tool:
- Jack.
- Wheel chocks.
- Pry bar and flat blade screwdrivers.
- A set of keys.
- Socket heads and extension.
It is best to carry out such work on a lift or inspection pit.
Installation
It is necessary to buy a repair kit consisting of new bearings, oil seal and special lubricant. You can purchase all this only from specialized suppliers of spare parts for washing machines.
You need to read the markings on the bearings and seals, or use the CMA product number, which is located on the sticker.
Serial number on the tag
Our Samsung WF 8590 NFW washing machine requires bearings 203 and 204, and the oil seal of the next standard size is 25*50.5*10/12.
Then we install in the reverse order - first the internal one, then the external one.
Expert opinion
I work in the household appliance repair industry. Extensive experience in restoring washing machines and dishwashers.
Ask a Question
Important! We strike only on the outer rim!
We move the drift evenly in a circle or using opposite edges. It's better to take two approaches.
Installing bearings using a chisel.
We clog the oil seal, first applying a special lubricant for washing machines to the inner surface.
Important! It is necessary to fill the rim (groove) entirely. This will guarantee long service life of the bearings.
We insert the drum with the shaft into place. Most likely, he will not be able to enter without effort. Then use a pulley and bolt. Tightening the bolt will set the drum in place.
Then you can reassemble the tank, not forgetting to put back the rubber butt between the halves. You can additionally use silicone sealant to avoid leaks, coating one edge in a circle.
Expert opinion
To do this, you can only use plumbing and high-temperature (at least 100 degrees) silicone sealant!
Purpose of the crankshaft pulley
The design serves as a transmission from the drive to the attachment and consists of a massive disc-shaped cast iron part that is located on the axis. In addition, it contributes to cushioning during changes in rotation, balancing of the rotating device, and cooling of belts.
The design has a gap, with the help of which the disc is mounted on the camshaft in the front part, which comes from the carburetor or from the valve injector. The fasteners will be placed on it. And on top there are holes for attaching V-belts and poly-V-belts. The structure itself is quite heavy, so during manufacturing at the factory holes are made to reduce weight.
The part comes in two types - a crankshaft damper pulley and a regular one. Unlike the damperless part, the part has massive rings. There is a gasket on the outside, which is located separately from the base. The gasket reduces vibrations. In addition, the part is equipped with an outer disk and periphery connected by durable rubber. The rubber gasket protects against temperature changes and other influences. With prolonged use of the vehicle, the gasket wears out. Therefore, it needs to be changed from time to time in order to keep intact the more important part - the massive disk. External aluminum car part with irregularities. The toothed coating facilitates the operation of the part position sensor.
Assembling a Samsung washing machine
Strictly speaking, the main titanic work has been completed. Next, you need to perform all the same steps as during disassembly, only in reverse order.
If a sealant is used, it must be allowed to dry according to the instructions before water is applied to the SMA.
Are you using citric acid?
Oh yes! No
Before installing the back cover, you need to test the washing machine in different modes. And use a flashlight to observe the bottom yourself to see if there are any leaks. If they are not there, then you can safely put the lid on and use it.
Video
Replacing bearings in a washing machine with a collapsible plastic tub is not fundamentally different depending on the brand or model. You can use this technique on other SMAs, not just Samsung Diamond. For example, on the Eco Bubble models, wf6450n7w, wf6450s7w, r1033, s821, wf s861.
What are the options for mounting the unit?
To remove the pulley from the electric motor that drives the tank using a belt, you must first determine the type of its fit.
Mounting methods differ in appearance and are defined as:
- spline connection (has a serrated edge of the shaft end);
- “hot” landing (the end of the engine axis is visually smooth and completely round);
- keyed fit (a groove is visible at the end);
- fit on a cone with a lock nut (the presence of fasteners is visually noticeable).
Automatic washing machine drive pulley
The vast majority of modern front-loading washing machines (Indesit, Bosch, Electrolux, Elgie and others) are equipped with a serpentine belt drive. Their pulley looks like a cylinder with transverse annular grooves. The fit of the part is usually splined or hot. The large wheel that turns the tank is usually secured with a locknut or screw.
Activator-type machines and older frontal models with a bottom-mounted motor are equipped with a conventional V-belt, and the pulley for them has deep flanges that prevent the belt from slipping off. These parts often have a keyway and a threaded connection.