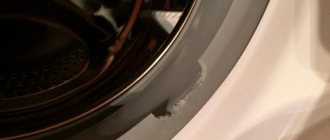
Suspicions that the cuff for a washing machine has become unusable arise when water drips from under the door of a working unit. If the cause of the leak is indeed a violation of the integrity of the rubber gasket, do not be too upset. If desired, the tightness of the tank can be restored independently.
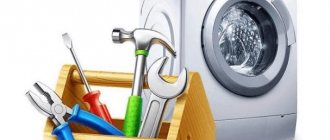
We will tell you how to replace this important type of seal yourself, which ensures the tightness of a tank filled with water during washing. In our article, the process of removing and installing a new cuff is described step by step. Our advice will help you achieve an impeccable result.
What is a cuff?
The main purpose of the rubber part installed on the hatch of an automatic washing machine is to hermetically seal the loading tank during operation of the machine. This layer does not allow even a drop of water to seep out.
The location of the cuff and its appearance completely depends on the model of the machine. If loading is frontal, a rubber layer connects the tank to the front wall of the unit and has a round shape. In models with vertical loading of laundry, the part combines the tank with the upper wall and has the shape of a rectangle.
Without a door seal for loading laundry, the machine door cannot be closed tightly. The special composition of rubber or silicone from which the part is made ensures complete sealing of the tank during washing
Previously, seals were made of very flexible rubber. In modern models, cuffs are almost always installed from a similar material of artificial origin - silicone. It does not lose its elastic properties over a wide temperature range and does not “tan” over time.
Cuffs of different models differ in size and shape. If the washing machine has additional functions, for example, drying and aquaspray, the part may have additional holes.
Functions of the rubber seal on the washing machine drum
The design of the washing machine has remained virtually unchanged since its invention - a body with a tank installed in it, inside which the drum rotates. With the development of technology, the design changed and improved, but remained classic. Modern machines, both vertical and front loading, have added a hermetically sealed lid and electronic control of the washing process to their design. To ensure that the lid closes hermetically, there is a rubber seal (sleeve).
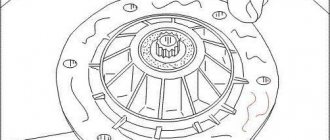
The coupling itself is a rubber sleeve of a complex profile with numerous folds. This allows the rubber to be firmly secured to the tank of the machine on one side and to its body on the other. The outer edge, which faces the door for front-facing machines and the lid for vertical machines, perfectly follows the shape of the door. When closed, it simply “sticks” to the door and hermetically seals the internal volume of the tank.
The washing tank and the drum inside it experience constant vibration during the washing, spinning, rinsing and final spinning process - that is, almost from the very moment the process begins until its completion. 4-5 kilograms of wet laundry, when constantly rotating in water, create noticeable vibration, while at the same time the body of the machine is almost not subject to this vibration. The fact is that the body and tank are connected by shock absorbers that dampen vibration, and the rubber seal with its folds and rigid fixation to the body and tank simply does not transmit vibration to the body.
Thus, the main functions of the rubber seal of an automatic washing machine are:
- sealing the internal volume of the tank;
- connection of the washing drum cavity with the outer door of the machine.
| The best geodome structures of various types can be purchased or rented from the manufacturer on the website https://fullerdome.com/. On the website you will find a wide selection (mobile geodomes, glampings, media domes, long-span structures), quality guarantees and high service. Delivery available throughout Russia and CIS countries |
What are the reasons for wear of a part?
There are not many reasons why the cuff stops performing its functions. Moreover, most of them occur when the rules for using household appliances are not followed.
The main ones are the following:
- mechanical damage from rough objects;
- strong vibration of the drum during spinning;
- exposure to aggressive agents;
- mold on rubber;
- inaccurate loading of dirty items or removal of already washed items;
- natural wear and tear.
Damage from objects occurs when rough items are often washed in the machine, for example, sneakers, outerwear with hard “snakes,” etc. Metal products (nails, keys) and plastic that have fallen into the drum due to user carelessness can also cause the formation of significant defects on the rubber.
Cracks, cuts and tears in the rubber part can appear either as a result of a malfunction of the washing unit or due to the carelessness of users. Before loading clothes into the machine, be sure to check pockets for rough or sharp objects. They can easily damage the cuff
The washing machine drum tends to vibrate strongly if the machine is not installed correctly. Accordingly, the cuff attached to it suffers. The use of bleaching agents frequently and in high concentrations causes the rubber to become rougher. And the loss of elasticity, as is known, is fraught with the rapid appearance of defects.
The acids and alkalis used to clean the machine act in the same way. But again, if they are used incorrectly. For example, some users believe that the higher the concentration of the product, the more effective the cleaning. At the same time, they do not take into account the aggressive influence on the parts available for processing.
Mold is microscopic fungi that live in colonies. Having settled on soft rubber, the mycelium of these tiny creatures is able to germinate deeply. If the damage is severe, dark gray spots that emit an unpleasant odor cannot be removed with anything. In this situation, only replacing the cuff with a new one will save you.
The washing machine does not last forever. Even if you handle it very carefully, the parts gradually wear out. The rubber seal is no exception. It constantly experiences friction from the rotating drum of the washing machine and laundry, temperature changes, and exposure to detergents. All these factors make rubber brittle and brittle over time.
How to properly replace?
First you need to check the condition of the cuff. To thoroughly inspect the seal for damage, it must be almost completely removed from the machine. To do this, simply remove the clamp that holds the part of the cuff that is attached to the front wall.
After the inspection, a decision may be made to replace the rubber band with a new one or to repair the existing one. Consider instructions for step-by-step cuff replacement.
Step #1 - remove the front clamp
The clamp is attached to the front wall in different ways for different models. It all depends on the material used to make the part.
There are 3 options:
- using latches;
- spring tension;
- screw fastening.
The first method is used for plastic clamps, the rest for metal ones. In any case, you will need a flat-head screwdriver to remove the part.
On most models, in order to pull the cuff towards you for inspection, it is enough to remove the clamp holding the curved part of the elastic in the front groove. By slightly moving the edge of the cuff, you can always determine whether it is plastic or metal
Then they act depending on the fastening: the screw is unscrewed, the spring is pulled back and weakened, and the plastic clamp is pulled towards itself in the place where the latches meet. After this, using the same screwdriver, removing the clamp will not be difficult.
However, not all so simple. Some companies produce models of washing units in which dismantling the “elastic band” requires necessarily removing the front wall.
These include:
- Samsung;
- Beko;
- Siemens;
- LG;
- Bosch;
- Hansa.
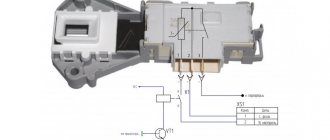
It is quite difficult to perform this manipulation on your own, but it is possible if you wish. The main thing is to act very carefully to avoid damage to the wires and contacts connected to the lock located on the wall.
Step #2 - remove the front panel
The first thing you absolutely need to do is disconnect the device from the power supply and make sure that there is no water in the drum and sump. Only after these steps can you proceed directly to removing the front panel.
To get to the screw holding the wall at the top, you should remove the powder receptacle. For this purpose, pull out the tray all the way, press the locking key inside and remove it from the machine.
In most models of washing machines, the powder container has a so-called “tab” located above the conditioner filling compartment. This powder receptacle can be removed without any problems. You need to simultaneously press the button and pull the tray towards you
Now you need to open and disconnect the hatch located at the bottom of the front wall of the machine. To do this, use a screwdriver to unscrew the fixing screw of the base panel, move it to the right until it clicks and move it toward you.
Next, open the hatch door and remove the clamp securing the cuff to the front panel. This is done by prying up the tension spring with a slotted screwdriver and removing it together with the clamp from the groove of the rubber seal.
Afterwards, the edge of the cuff is pulled out of the recess in a circle, the elastic is “sinked” into the body and the hatch door is latched. All the above actions provide access to the lower and upper screws. They are unscrewed, after which the panel is moved a few centimeters forward and carefully separated from the body.
Holding the front wall suspended, disconnect the plastic wire fastenings from it, and then the hatch locking contacts. Now you can safely put the front panel of the machine aside, remove the clamp and begin examining the cuff by pulling its front part towards you.
Step #3 - pull out the working cuff
After removing the front clamp (how to do this was discussed above), the rubber seal is completely removed.
It is necessary to remove the old cuff both in case of replacing the old cuff with a new one, and if minor repairs of this part are necessary
Proceed as follows:
- Carefully pull out the front part of the rubber seal, which is held on the machine body, due to its own tension.
- Find the mounting mark. It is located on the cuff itself.
- Using a marker, mark the response mark on the tank.
- Remove the second clamp in the same way as the first.
After the work is done, the cuff can be easily removed from the machine. The part just needs to be pulled well towards you.
Step #4 - inspect the rubber seal
At this stage, you will carefully examine the removed elastic band from all sides, paying special attention to the places on the folds. If, after examination, cuts, holes, cracks and other damage are detected on the cuff, it is advisable to replace the part with a new one.
The replacement cuff must match the machine model exactly. Otherwise, the seal may not fit, and all the work will go down the drain.
When selecting a new part, you should keep in mind that you cannot purchase rubber bands from other models of washing machines, even if they have significant similarities in appearance. Only a cuff designed for a specific brand of unit can be absolutely suitable. Only a master can select analogues and only in a hopeless situation.
Step #5 - prepare the installation site
When the cuff requires replacement, as is clearly evidenced by cracks and other damage, you can safely begin installing a new “elastic band”. The preparatory step before installing a new cuff is to thoroughly clean the edge of the tank. Typically, dirt and detergent residues accumulate in this place.
In order to clean the area of upcoming installation, a saturated soap solution is ideal. Alternatively, you can simply soap the sponge heavily.
It is better to clean the edge with a sponge, moistening it generously in a soap solution. In this case, there is no need to wash off the remaining foam and wipe the part dry. The soap will serve as a kind of lubricant and will help you complete the installation faster.
Step #6 - install a new cuff
Putting a new seal on the tank is not entirely easy. The material is difficult to stretch very much, and besides, it “exerts resistance”, stubbornly refusing to fall into place.
The first step is to apply the cuff to the upper edge of the tank so that the mounting marks coincide. Next, sliding the thumbs of both hands over the rubber, pull the seal onto the edge.
Movements when putting on an elastic band proceed from the center to the sides. It is important to show patience and maximum accuracy here.
At the next stage, soapy lubricant comes to the rescue. The cuff is stretched at the bottom and is quite difficult to put in place. Therefore, here the seal is forced onto the tank. After these manipulations, the “elastic band” is held tightly on the edge.
The last point is to check that the part is installed correctly. If the cuff does not adhere tightly to the metal in some places, leaks will occur while the machine is running.
Step #7 - tighten the inner clamp
Installation methods for internal clamps vary depending on the mounting. If the tension is spring-loaded, then installation is carried out using a screwdriver. The tool is inserted into the hatch blocking hole and a spring is put on it. Thus, the fastening stretches freely and the clamp is easily put on in the right place.
Clamps removed from the cuff can be put back in place only if everything was done without damage. If defects appear on the parts, they need to be thrown away and new ones purchased instead.
If you have a clamp with a screw, the task is somewhat simplified. The tension is almost completely unscrewed, and the clamp is placed in its seat. To strengthen the part, all that remains is to tighten the screw back.
If the washing machine is equipped with a wire clamp without tensioners, round nose pliers are used as an auxiliary tool. They carefully tighten the metal ends, and the resulting knot is hidden in the recess on the cuff provided for this purpose.
The easiest way is to put on a plastic clamp. It is secured using special latches. After the work has been done, the cuff is pulled onto the edge of the front panel of the machine and also secured with a clamp.
Finally, check the seal for leaks. To do this, start the fastest washing program. If no leaks are observed during operation of the unit, the cuff is installed correctly.
How to choose and install the sealing collar in the sewer?
Stores sell cuffs of different sizes, configurations, and colors. Most apartments have a plastic pipeline installed; it has a standard diameter of 40 or 50 mm. To connect the drain, you should buy a 45 or 90 degree tee with a diameter of 50 mm, insert it into the pipe without removing the thin O-ring. It happens that the tee is manufactured according to other standards and does not fit into the main pipe. To do this, remove the sealing ring, lubricate it with plumbing sealant in its place, also treat the outer edge of the plastic tee and insert it with a force of several centimeters. If you don’t have sealant on hand, a soap solution will serve as a substitute. There is another option: to do this, take a 40 mm tee and connect it through a 50 * 40 mm cuff; such a joint will be more reliable.
It is more convenient to put the seal on the tee, and only then insert it into the sewer pipe.
For drainage, reductions of 50*25 mm and 50*20 mm are produced, where 20 and 25 mm are the diameter of the internal hole. The most suitable option is 50*20 mm, it allows you to insert the hose most tightly. But this size is difficult to find in stores; they usually offer 50*25 mm and even 50*32 mm. It is not recommended to buy the latter even after much persuasion from the sales consultant - the seal does not wrap around the hose at all, which makes its stay in the sewer useless.
The procedure for connecting the SMA to the drain is shown in the video:
Important! If the diameter of the tee is 40 mm, then the seal for the drain should be 40*25 mm or 40*20 mm.
Subtleties of cuff repair
Sometimes situations arise when the “elastic band” located on the hatch of the washing machine breaks, and it is not yet possible to replace the cuff.
When might repairs be needed?
For example, at the moment it is impossible to find a part suitable for the existing car model, or it is on order, and delivery will take a long time.
There are also circumstances when right now it is impossible to allocate money from the family budget to purchase a new part. In such situations, repairing the cuff, that is, sealing the damage site, will help out.
High temperature, detergents and constant friction of the laundry will soon take their toll, and the hole in the cuff will make itself felt again
Please note that gluing the patch is a temporary measure. Therefore, you need to try to replace the worn seal with a new one as quickly as possible.
How to select and prepare a cuff?
First of all, you need to inspect the leaky cuff and determine the cause of the damage. This is the only way to find out whether it is advisable to repair the seal or whether there is no point in it. To do this, you will have to remove the cuff from the machine using the method described above.
Only by removing the front clamp and pulling the cuff towards you can you detect damage, assess its size and the possibility of repair
If the cut, puncture or abrasion is small, then repair definitely makes sense. And when the damage is large or there are several of them, it is better not to rush with sealing.
After determining the cause of the repair, the material for the patch should be selected. It must be durable and at the same time elastic. Some experts recommend using condoms or medical rubber gloves for this purpose.
A great option is special patches designed for repairing swimming air mattresses. You can find them in sports stores.
The glue planned for use must have excellent adhesive properties. In this case, the substance must remain elastic after complete drying. This is exactly how products intended for repairing shoes and rubber products behave.
Instructions for sealing the seal
Sealing a rubber seal is a task that does not require special knowledge and skills. However, to ensure that the result does not disappoint, it is better to strictly follow the instructions.
We offer the first repair method - gluing . It is performed according to the following scheme:
- They are preparing a patch . Pieces of the selected material are folded into several layers and glued together. The size of the patch should be 1.5-2 times larger than the defect itself.
- The damaged area and the area around it are degreased . To do this, use alcohol, acetone, white spirit, etc. Wait until the degreaser dries completely.
- Glue is applied to the cuff and patch .
- The lubricated surfaces are pressed against each other either immediately or after a few minutes - this depends on the instructions on the tube of glue.
- The cuff is fixed in its natural position using suitable objects. So the part is left for a day.
After the glue has completely dried, the seal can be reinstalled.
The repaired cuff should be returned to its place using the same method as putting on a new one. Since the rubber is already stretched, you won’t have to put in as much effort as if you were installing a new part.
There is a second method, which is considered more reliable. It combines stitching and gluing.
The method is performed as follows:
- The damage is stitched end-to-end with a thick synthetic thread. In this case, a football seam is used.
- Afterwards, everything is generously impregnated with silicone sealant for rubber and plastic.
Next, as in the previous method, the cuff is left in its natural position for a day, after which it is installed back into the machine body.
After the repair has been completed, you must check the quality of the work. To do this, load the drum with laundry and start the wash on the shortest program. At the end of the cycle, the gluing site is inspected to identify repeated ruptures.
You can change not only the cuff that hermetically seals the hatch of the front washing machine with your own hands. Home craftsmen are quite capable of replacing the washing machine belt. Step-by-step instructions for carrying out this work are described in detail in the article we recommend.