Every household appliance can malfunction, and an automatic machine is no exception. There are breakdowns that only a service center or specialist can handle, but there are those that the owner of this household appliance can try to fix.
The latter includes replacing the bearing on an Indesit washing machine. Of course, to take on this, you need to have certain skills in handling and restoring various mechanisms.
Anyone who has never picked up a screwdriver should not take it up.
If you feel confident enough in repairing home appliances yourself, then you can handle replacing the bearing.
To decide whether you will undertake to change the bearing yourself or whether it is better to invite a specialist, check out this article, which will give you a general idea of the process.
Causes of wear
Before we talk about how to change bearings in an Indesit washing machine, let’s go over the basics:
- What is a bearing used for in a washing machine?
- Why does it break?
The wisl 103 indesit washing machine, like any other, has two bearings that ensure the rotation of the drum.
When the machine begins to make excessive noise or the rotation of the drum slows down, one of the reasons may be the poor condition of the bearings, and it is time to think about replacing it before a more serious bearing failure occurs.
These bearings are different in size. One, the largest, is located in close proximity to the drum. The second, smaller one, is on the other side of the shaft. They provide a connection between the drum and the pulley, making rotation uniform.
Normally, an indesit bearing should serve without problems for at least five years, gradually wearing out. If it fails earlier, then we are no longer talking about natural wear, but about bearing failure.
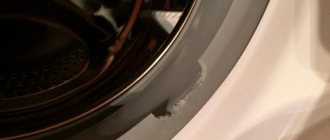
Water leaking through the bearing assembly
Not everyone knows how to change bearings in an Indesit washing machine and, as already mentioned, water from the tank can leak through the bearing assembly. The oil seal plays a significant role in this process. It must be positioned so that the ring on the spring fits correctly into the depth of the bearing assembly. It is worth saying that sometimes the oil seal is installed incorrectly at the factory. As a result, the steel ring on the spring maintains contact with the water in the tank and, of course, is subject to destruction at an incredible rate. The oil seal ceases to perform its function, the bearing assembly is immediately exposed to liquid, which has a destructive effect on the drum axle bearings.
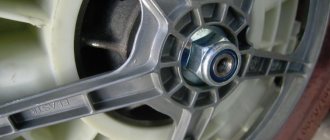
The repaired bearing assembly is installed on the drum axle. After this, automotive or any other sealant is applied to its entire area, as can be seen in the figure below.
Disassembling the washing machine
How to replace a bearing in an Indesit washing machine should first be studied using the video and instructions for your Indesit model in order to have a good idea of its structure.
Before you begin the process of replacing the indesit bearing, you need to thoroughly prepare the washing machine for this:
- Unplug it from the outlet;
- Turn off the water, disconnect the machine from the sewer;
- Separate the hoses for draining and supplying water from the machine;
- Remove any remaining liquid that is always present in the pump filter. To do this, unscrew it from the bottom of the case and drain the remaining moisture from it;
- Move the indesit away from the wall and prepare yourself a comfortable workspace where you will not be cramped and there will be space where you can lay out the removed parts of the machine.
To replace the bearing, you will have to disassemble the entire washing machine yourself, from the body to the drum. Moreover, first disassemble it, and then, after replacing the bearing, reassemble it. Therefore, you need to be very careful and careful not to damage the equipment or create new problems for yourself.
We disassemble the washing machine
First we need to remove the upper part of the case (cover).
It is secured with two screws from the back. After you have unscrewed them, you need to slide the cover towards the back of the case. And we take it off. Then remove the machine dispenser completely. In some models, to remove the dispenser we need to press the latch. Next we need to remove the control panel. To do this, unscrew the fixing screws. The panel can be carefully placed on the side of the case. Next, open the hatch and remove the outer collar of the cuff. Clamps are different. Some can be removed with pliers. Others can be removed using a slotted screwdriver. When the clamp is removed, we need to separate the cuff from the front of the body and tuck it inside the machine. This way she won't bother us.
Then unscrew the lock. It is secured with two screws. We twist them and stick our hand inside between the cuff and the wall and separate the locking device from the inside of the machine wall. We remove all the remaining fastening elements and remove the front part of the case. We’ll also remove the back part of the case in advance, so that we don’t have to mess around with it later.
Then we disconnect the dispenser hopper with the pipe from the machine tank. To do this, we need to remove everything that is in the way and loosen the clamp. We put everything away where it won’t get in the way. Next we need to remove the counterweight (if it's on the front). If it’s behind us, then we’ll get to it too and definitely take it off. Typically the counterweight is bolted in place. We will unscrew these bolts using a screwdriver.
Next, we approach the heating element (heating element). For most models it is located at the back. Some have it in the front. Before removing it, we’ll take a photo of the wires so that we can connect everything in the right order later. Then remove the heating element mounts. More often it is attached to one nut. We loosen it and press in the screw. Then use a flat object (for example, a screwdriver) to pry it up and take out the heating element.
After this, remove the pipe that is attached to the tank. We have already learned how to disconnect the clamps, so we can do it without any problems. Then we remove any wires that may be attached to the tank.
We approach the machine from behind and remove the drive belt. Next, disconnect the connector of the wires leading to the machine motor. Then we twist the screws that secure the engine. Then we take out the engine by pulling it in our direction.
Then we tighten the screws that secure the shock absorbers. And we separate their lower parts from the wall of the car. All that remains is to remove the springs. And the tank can be taken out. All this should be done carefully so as not to drop the tank.
Common replacement mistakes
Before you start replacing the bearing in an Indesit washing machine, let us draw your attention to the mistakes that non-experts make.
These violations when disassembling an Indesit washing machine can either simply slow down and complicate the process, or lead to new breakdowns, which will be much more difficult and expensive to fix:
- Do not use brute force when removing the pulley from the drum axle. They do this by rocking it from side to side, while gently pulling;
- Excessive force may cause the bolt heads to break off. Fixing this breakdown is possible, but quite troublesome;
- Haste and carelessness with the tank cap can damage the temperature sensor and break its wire. Then you will have to replace it too;
- Breakage of the moving unit;
- Do not forget to replace the gasket of the moving unit so that you do not have to repair it again;
- Also, so that you don’t have to disassemble everything again, before assembling the front and rear parts, carefully check all the wiring, especially at the connection points, sensor connections, etc.;
- How to change the bearings on a washing machine of other models, you can watch the video and make sure that there will be no fundamental differences for different Indesit models.
Removing parts from the tank
At the next stage, the top panel must be removed from the powder receiver box. To do this, you need to unscrew the bolts from the back of the car. All screws holding this panel in place must be removed. The panel can be dismantled, but wires and pipes will interfere with this. They must be disconnected to move this part of the machine to the side. Then the technician disconnects the drain pipe by unscrewing and removing the clamp. Sometimes water remains in the nozzle, so you should prepare a rag.
All wires leading to the heating element must be disconnected. To do this, sometimes you have to remove the back cover. If you are faced with the question of how to change the bearings in the Indesit W84TX washing machine, then you should know that in this model the wiring is fixed to the tank with ties. They should be disconnected and the wires disconnected from the engine. The remaining wiring can also be disconnected from the pump so that the wires do not interfere when removing the tank. The upper and lower counterweights can be unscrewed, now they will not add weight to the tank, it can be easily removed.
The technician should disconnect the pipe that goes to the water level sensor. Now you should unscrew the shock absorbers. To do this, you need to find the lower bolts that hold this unit, and then unscrew the fasteners using a wrench. If you are faced with the question of how to change the bearings in the Indesit WG835TXC washing machine, then you should know that it is more convenient to unscrew the shock absorber bolts of this model using a head with an extension. At this stage, the shaft will be supported only by springs. You need to lift the tank with one hand, and with the other, unfasten the springs on which it rests. The tank is removed along with the engine, which must be unfastened by removing the belt.
Removing the top cover
Getting started with replacing the bearing for an Indesit washing machine always starts the same way with removing the top cover. We unscrew the 2 screws holding it from the back and carefully push the top cover of the washing machine forward.
Remove the top cover of the washing machine from the body, set it aside and move to the back. Here you have to unscrew all the fastening bolts, after which we remove the back panel and also set it aside.
We do the same with the front panel of the Indesit washing machine, but here disassembly will take more time:
- We take out the compartment for detergents by pressing the clip in the center;
- Behind the compartment there are 2 self-tapping screws that hold the control panel in place.
- We unscrew them and another one located on the other side. Then use a flat screwdriver to press out the panel latches;
- We don’t do anything with the wiring, we just put the control panel on top of the case;
- Let's start disassembling the hatch: moving away the sealing rubber, remove the clamp, unscrew the 2 screws on the hatch, and separate the wires. We will put the cuff in the tank;
- Unscrew the door along with the glass and remove it;
- Only now can we unscrew and remove the panel. Now, as you understand, we have opened access to the main internal mechanisms of the machine, which we will also have to work with before we can change the bearing.
Step-by-step repair guide
After accurately determining the failure of the bearings, you can begin to repair the washing machine. The repair includes several steps, which are described below.
Dismantling the elements of the washing machine
It is necessary to disconnect the device from the power supply and turn off the tap. This will not only allow you to change the bearings, but also clean the water filter, which can be pulled out by removing the water supply hose. Then you need to carefully remove both panels of the washing machine without damaging the rubber seals. First of all, the top cover, which is secured with bolts, is dismantled.
After which you need to turn the back of the car towards you and unscrew all the screws in a circle. This way you can remove the back panel and gain access to the plastic tank that houses the drum. In addition, under the rear cover there is a pulley, motor and drive belt.
The front wall is somewhat more difficult to remove and dismantling takes place in several stages:
- To begin, remove the powder cuvette, which is removed by pulling it all the way and lifting it up,
- After removing the cuvette, access to the screws that hold the front panel of the washing machine is available. They need to be unscrewed
- You need to remove the rubber cuff and unscrew the bolts that hold the hatch locking element. After this, you can remove the front panel of the machine.
As a result of these manipulations, access to the internal structure of the washing machine becomes open and replacement of bearings and seals will take place without difficulty.
Removing the pulley and motor
- First you need to remove the belts from the drum pulley and motor drive. This will allow you to firmly secure the pulley with a wooden block placed in it and unscrew the main retaining element of the pulley fastener,
- During the next step of dismantling, special care and precision must be taken, as the drum pulley will need to be carefully removed. The complexity of this procedure lies in the fact that the pulley with the drum fits tightly to the axle. And if you try to rip it off using improvised tools, there is a high probability of causing damage. If the pulley is successfully removed, you can begin dismantling the spacer bar,
- The next step is to remove the fasteners from all counterweights and remove them,
- The fastening elements will also need to be removed from the movable drum assembly. It is possible that the screws during the operation of the washing machine were damaged by rust and “stuck” to the metal, so it is recommended to treat them with WD-40 before unscrewing. You should not try to unscrew stubborn screws, as you may strip the threads.
Another important stage is disassembling the drum and replacing faulty elements. All manipulations must be performed directly according to the instructions:
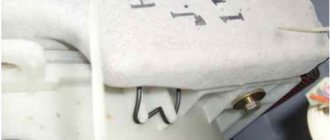
- the clamps holding the tank lid are removed,
- remove all seals and the lid on the tank,
- the drum and the moving unit on which the bearings are located are removed,
- It is recommended to check the gasket under the moving unit and, if worn, replace it with a new one,
- the rubber cuff is treated with WD-40 and can be easily removed with a screwdriver,
- After removing the cuff, you need to take a chisel and begin to carefully knock out all the bearings. You can also use a wrench
- The knocked out bearing needs to be inspected and the markings found. With its help you can choose the right replacement.
Bearing replacement
Most often you can find two bearings in the assembly: on the outside there is a small one, and on the inside there is a large one. Both bearings must be removed as described above. It is also important that the larger one is usually the most worn. And it is so worn out that it is not possible to recognize the markings. But this is not a problem, because bearings are often marked sequentially in the case where the small one is marked with the number 203, the large one is marked with 204, and so on according to the same principle.
After removing the broken parts, the fitting of the purchased bearings begins. You will need several wooden blocks of the required size and a hammer. You can select the diameter of the bearing pads by observing how the hammer hits its edges. By tapping the block you need to seat the bearing.
It is recommended to pay special attention to the moment of seating the cuff, since it must not be deformed and not fit tightly to the socket. For a more accurate fit, you can apply a wooden block to the cuff and tap it until it is completely and evenly in place.
To improve the sliding of the bearing, you can use dishwashing detergent, which is applied in a thin layer to the cuff, but do not clog the bearing with other lubricants.
Reassembly
After installing new bearings into the assembly, you can put the cover on the drum axle and begin reassembling the Indesit washing machine.
Installation also has its own sequence:
- Before installing the drum in place, you need to make sure that the heating element does not interfere with the rotating parts moving. After checking, you need to clean the edges of the tank so that the gasket fits tightly to it and the seal is not broken,
- A pulley is installed on the drum, and this structure is placed in the tank,
- It is necessary to fix the tank with the rim and tighten it with a screw,
- After this, you can reinstall the motor, wires, install the counterweight and grounding,
- The top cover of the washing machine is installed in its place,
- The motor and pulley are connected by a drive belt, which must fit exactly into the grooves,
- The back panel and filter with water hose are also installed in place.
By following the instructions and having experience in working with household appliances, you can replace the bearing on an Indesit washing machine without involving a technician, which will cost a much smaller amount.
Removing the pulley and motor
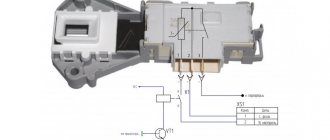
Before solving the problem with the wear of the seals, we need to remove the pulley and remove the motor of the Indesit washing machine. As you can see from any diagram or photo, to do this you will first need to remove the drive belt. To do this, rotate the pulley and pull the belt towards you.
Now we fix the pulley by inserting any strong pin into the wheel. Unscrew the pulley by unscrewing the bolt holding it. Rocking it slightly, remove the pulley from the shaft. We disconnect the heating element and the washing machine motor from the wires.
It is not necessary to remove the heating element, but take a moment and look at its condition to see if there is a little scale on it.
Unscrew the mounting bolts and remove the engine, rocking it slightly. Now it is possible and necessary to separate the pipe. They do this through the bottom, for which we place the machine on its side, loosen its clamp with pliers and separate the indesite from the tank of the washing machine.
Removing the Drum
The next step in replacing the bearings on the drum of an Indesit washing machine is to remove the drum. First, we have to remove the tank by carefully pulling it up.
Most models have a solid indesit tank and will have to halve it using a grinder in order to work with the drum of the washing machine.
But before dividing the tank and deciding how to remove the drum on a washing machine, you need to take care of the upcoming reassembly of the Indesit machine. Therefore, before cutting the tank, holes are made on it for the bolts, and only after that they start sawing.
To disconnect the drum from the tank, remove part of the tank and knock the drum out of the bushing. Let's see what the drum looks like and whether there is any damage on it.
It is worth checking the gasket under the moving unit in order to replace it if necessary.
Now we have to remove the seal that protects the bearing. We do this with a screwdriver, prying it off. Some people advise taking this moving part and the remains of the drum to a car service center, where they can press out the bearings, because they have the necessary equipment. But if you do not have such an opportunity, then you will have to think about various devices that can replace it.
Preparation for work
If you also have a question about how to change the bearings in the Indesit washing machine, then you should stock up on some parts and prepare the necessary tools, among them the following should be highlighted:
- metal hammer;
- pliers;
- screwdrivers;
- waterproof lubricant;
- set of open-end wrenches;
- metal rod;
- silicone sealant.
If you have not encountered repairing a washing machine before, you should also prepare a camera with which you can capture the stages of disassembling the device. Subsequently, you will not have any difficulties assembling the machine. When preparing spare parts for repairs, you should make sure that you have an oil seal and a bearing; these components must be purchased. In order to be sure that you purchased the correct spare parts, you need to take the old bearing and oil seal to the store, which will allow you to find the necessary components by numbers.
Before changing the bearings in the Indesit washing machine, you must prepare original spare parts; only this approach will ensure a long service life of the device. When purchasing bearings, you should prefer those that are specifically designed for washing machines, as they usually have a closed design.
How to choose a new part
In order to change the bearing of an Indesit washing machine, it is important to purchase exactly the same new parts. If you don’t know what bearings are in your Indesit washing machine model, then go shopping after you get the old ones.
They are usually marked, allowing you to accurately select a replacement. If after work the inscription on one of them is erased, then you can find out what the bearing is worth by looking at the second one, since their markings are consistent.
If the large bearing is numbered 203, the smaller one will be marked 202.
You need to immediately purchase both oil seals and bearings for Indesit washing machines, so that you don’t have to go through this procedure again later, disassembling the drum during the next breakdown. Find out how much parts for an Indesit washing machine cost by looking at online stores.
Causes of problems with the bearings of the Indesit washing machine
When the bearings deteriorate, this indicates that the seals have most likely also become unusable, as a result of which water begins to spill through the above-mentioned bearing assembly. Although the opposite situation often arises. Due to the fact that the oil seals fail, water penetrates into this unit, and then problems with the bearings occur. It is extremely rare, but it also happens that the drum rubs holes in the tank, after which it is impossible to make any repairs at all.
How to change bearings in an Indesit washing machine? To do this, you need to have strong nerves, a sufficient amount of time and at least a little experience in this field of activity. It must be said that if you send your washing machine for repair due to this particular malfunction, they will charge you a fairly decent amount of money, although in fact there is nothing complicated about the repair. Replacing the bearing and oil seal of a washing machine can be done by hand.