Owners of home appliances from a famous South Korean brand will be interested to know how to repair a Samsung washing machine with your own hands. Unfortunately, breakdowns and malfunctions occur with any household appliance, regardless of its price segment. You need to know how to eliminate them competently and in a timely manner.
In the article we have proposed, all typical types of breakdowns and ways to deal with them are analyzed in detail. The process of disassembling the unit and replacing damaged parts or assemblies is described in detail. We will introduce you to the decoding of error codes that the self-diagnosis system of Samsung machines warns about.
Characteristics of Samsung washing machines
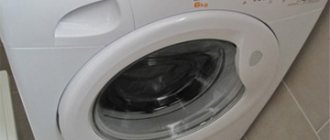
First, you should familiarize yourself a little with the main features of these machines. Firstly, it is a stylish design.
The appearance of Samsung devices is always elegant. It is recognizable at first sight, and this indicates a responsible approach to design and high quality assembly
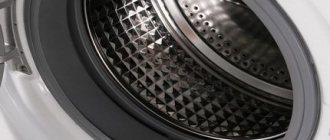
Secondly, this is the original drum design. Modern modifications of Samsung washing machines are equipped with a fundamentally new technical solution - Diamond Drum .
It refers to an innovative type of honeycomb drum with a surface covered with many convex pyramids and small holes for water into which the fabric is not pulled in.
Thanks to this design, a gentle washing regime is ensured. These drums can be very spacious - with a load of up to 12 kg of laundry, depending on the model of the machine.
Thirdly, heaters with double ceramic coating that do not become covered with scale, as well as an inverter motor attached directly to the drum in some modifications, are worthy of attention.
In addition, interesting functions are Fuzzy Logic and Smart Check , which are responsible for the correct calculation of the washing mode depending on the amount of laundry loaded, as well as for diagnosing various machine malfunctions.
The appearance of Samsung devices is always elegant. It is recognizable at first sight, and this indicates a responsible approach to design and high quality assembly
The number of washing programs depends on the model of the washing machine. Even the simplest modifications are equipped with all the necessary set of programs, and new models have a washing mode called ECO Bubble - with the help of air bubbles, laundry is easier to wash even in cold water.
Samsung washing machines can provide spin speeds of 800, 1000, 1200 and 1400 rpm, but at the same time produce little noise, unlike machines of other brands (according to customer reviews)
If the machine is marked with the sign WF , then this means that this model has a front loading, and if its name contains the abbreviation WD , it means that the machine is equipped with a built-in dryer.
But Samsung branded machines also have one small drawback - their instability to voltage surges in the network, which is important in our Russian reality.
When the voltage becomes either too high or too low, a control system called Volt Control simply turns off the washing mode to resume it immediately after the mains voltage has stabilized. This is not always convenient, so it is better to connect the washing machine through a voltage stabilizer .
The structure of a standard type machine: the diagram shows all the main parts of the body and rear part. The designs and operating principles of machines of different brands are similar (+)
After a brief introduction to the parameters of this brand, let’s move on to considering the main breakdowns.
Basic faults
Assessing the experience of many owners of Samsung washing machines over the years of operating such equipment, the most common malfunctions were identified:
- Damage to the heating element. Most often it is caused by impurities from tap water settling on the heating element.
- Damage to the drive belt. The breakdown is manifested by uneven rotation of the drum, deterioration in the quality of washing and strong knocking during operation. At the same time, the function of draining and collecting water is also disrupted, so the washing cycle is interrupted.
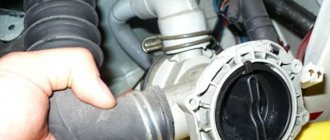
- Malfunction of the water intake device. It usually manifests itself as a leak and is a fairly common problem with Samsung machines.
- Bearing wear. This problem can be judged by the appearance of humming and knocking noises during washing. To fix the device, you often need to call a specialist.
- Failure of pipes. This type of malfunction is usually caused by poor-quality rubber or the spread of fungus. The consequence of this problem will be the appearance of rust on the body of the device.
Replacing bearings in a Samsung washing machine is shown by Vladimir Khatuntsev in the following video.
Typical breakdowns of household units
To understand the problem that has arisen, you need to consider the most common of them and the reasons for their occurrence.
Here is a list of common problems:
- Water is not being filled into the tank of the machine - this means that the heating element, or the inlet valve, or the drain pump may be faulty, or the pressure switch may not be working;
- The machine does not turn on - the hatch is not closed very tightly, the locking system or the “Start” button does not work, there is a break in the power cord, poor contact. It could also be more serious problems, such as a breakdown of the heating element or motor;
- The drum does not rotate when the motor is running - the drive belt is torn, the bearings or motor brushes are worn out. It is possible that a foreign object has gotten into the gap between the drum and the tank;
- Water does not drain - this problem means a blockage in the drain hose, or in the washing machine filter, or in the sewer system;
- The car hatch does not open - there is a malfunction in the locking system or the handle is damaged;
- Water leakage - occurs when the seams or parts of the machine are depressurized, as well as the drain hose or pump leaks;
- Self-draining of water - if the water is drained before it has yet accumulated, then this is either a connection problem or a malfunction of the control system;
- Problems with the spin cycle – the “Spin off” button does not work, problems with the drain or with the electric motor of the washing machine;
- Unusual sounds for washing – the bearings and seal are worn out. They will have to be replaced, and the drum may also need to be replaced;
- Large vibrations may be caused by a large load of laundry or improper installation of the appliance;
- Problems with the control system - the terminals on the buttons have oxidized or the contacts have shorted due to water ingress.
Next, we will consider methods for repairing them with your own hands, because it is not always possible to call a specialist. And for this you need to have a set of necessary tools.
A list of the most common problems that occur with a Samsung washing machine can be found in the manual supplied with the product by the manufacturer. There you can often find a solution to the problem.
Before starting repairs, you need to make sure that all the tools from this list are available:
- flat and Phillips screwdrivers or screwdriver;
- set of wrenches;
- pliers, pliers, nippers;
- tweezers – elongated and curved;
- powerful flashlight;
- long-handled mirror;
- soldering iron;
- gas-burner;
- small hammer;
- knife.
In addition to the tools listed, you may need a magnet for pulling out small metal objects caught inside the machine, a long metal ruler for aligning the drum, a multimeter or a voltage indicator.
A set of the most necessary repair equipment will be needed to carry out repair operations accessible to the home craftsman. Most of the tools can be found in the household, the rest can be borrowed from friends
But that’s not all; in addition to the necessary set of devices, you will need to purchase the following consumables for repairs:
- sealant;
- Super glue;
- insulating resin;
- materials for soldering - rosin, flux, etc.;
- wires;
- clamps;
- current fuses;
- rust remover;
- electrical tape and tape.
Sometimes a multimeter is not needed, just turn on the machine and select a mode with high water temperature. Based on the operation of the apartment electric meter, it can be easy to understand whether power is supplied to the heating element.
Device disassembly sequence
If you are a beginner, we can advise you to use a camera to shoot a video or photograph the work process, so as not to confuse the sequence of actions and then assemble the machine correctly.
There are several important rules to remember that must be followed before starting repair work:
- it is necessary to drain all the water from the machine;
- Before disassembling the washing machine, it is necessary (!) to turn off the power to the device;
- choose a bright and spacious place for repairs.
If the unit cannot be moved to a convenient location, then maximum illumination of the workplace should be ensured.
The first step is to remove the top panel of the washing machine.
Removing the top panel is not difficult - just unscrew the two screws on the back of the case, move the cover back a little, then lift and remove it
The second step is to remove the container for powders; this is not difficult to do. Next you need to remove the cuff from the hatch. Caution is needed here. Use a screwdriver to pry up the locking collar, remove it, and then remove the O-ring. This must be done carefully, trying not to tear the soft rubber.
Carefully remove the O-ring - the main thing is not to damage it through carelessness. You can push the cuff inside the drum - it will be safe there
Now it's the turn of the control panel. In order to remove it, you need to unscrew two screws on the front of the panel and another one located on the right.
Then you should carefully separate the control unit from the housing and set it aside. The control panel can also be removed after removing the cuff from the loading hatch
Next, you can begin dismantling the lower front panel. By pulling the latch lever, we separate the base part of the facade - access to the drain filter and the hose for the emergency filter is open. Now you can remove the front panel by unscrewing the eight mounting screws. The heating element and drain pump open.
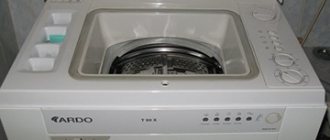
If the repair process requires removing the tank and drum, we advise you not to do it alone. Be sure to involve an assistant in this matter. Before removing the tank, you need to turn off the power to the heating element, disconnect all the pipes, as well as the electrical wiring from the motor.
To do this, you need to lay the machine on its side, then remove the 4 screws on the bottom cover. The engine is opened with a counterweight fixed with shock absorbers.
Disconnect the wiring from the connectors. Here it is important to remember what is connected to what, so before disassembling it is advisable to photograph everything, so that later you can repeat everything exactly as in the picture.
Let's start dismantling the tank. First you need to remove the bolted counterweights, and then the springs, and unfasten the shock absorbers. Only after this can you, together with an assistant, remove the tank from the machine body
But all that remains is to disconnect the drive belt from the engine. To do this, simply remove the belt from the pulley. Remember that when putting on the belt, you should first put the drive belt on the small drive pulley, then put it on the large driven pulley and align it with the center of the pulley.
Trouble-shooting
Let’s figure out how you can eliminate frequent breakdowns yourself at home.
The washing machine does not pump out water
Check the drainage system - the main cause of the problem is clogging of the pipe or pump with small objects or threads. Follow these steps:
- unplug the unit and turn off the water;
- disconnect the hoses;
- pull out the powder tray;
- open the drain filter door on the panel below, to do this, press the latch in the center;
- drain the remaining liquid and rinse the filter;
- lay the washing machine on its side and reach the bottom;
- at the junction of the pump and the pipe, loosen the clamps and disconnect the pump wires;
- unscrew the pump mounts;
- remove the pump and pipe, clean it from clogging, and inspect for damage. If cracks are detected, replace with new parts.
We recommend reading: Why doesn’t the washing machine drain water?
No water heating
This problem is caused by a malfunction of the heating element. You will need to spin up the washing machine and get to the heating element. To do this, unscrew the top and bottom panels, remove the control unit, pull out the dispenser, and remove the front panel.
The heating element is located at the base of the drum. To pull it out, you need to disconnect the wires, unscrew the nut in the center, and press out the central bolt. Then remove the thermostat from the heating element, and if it is working, insert it into the new heating element and put the washing machine back together.
If the heating element is covered with scale, it must be cleaned. Read about it in this article.
Water does not fill or too much water is poured in
A common cause is blockages. To carry out repairs yourself, follow these steps:
- turn the shut-off valve;
- check the water pressure in the pipes;
- check the inlet hose for kinks or kinks;
- disconnect the hose and rinse under water;
- Clean the filter mesh.
If too much water is poured in, check the fill valve:
- remove the top panel, the inlet valve is located on top of the wall;
- disconnect the valve wires and unscrew the mounting bolts;
- loosen the clamps and separate the hoses.
We recommend replacing the rubber seals or replacing them with a new part.
Physical wear of the drive belt
To replace the belt, you must remove the rear panel of the unit:
- Unscrew the bolts and remove the panel;
- remove the belt from the pulley;
- If it is worn or cracked, install a new one. You need to put it on by moving and turning the pulley.
Noisy washing machine
The cause is wear of the bearing, which can be replaced yourself. To do this, you will need to remove the panels of the washing machine, get to the drum, remove it and replace the bearing with a new one. The video describes the DIY replacement in more detail.
The washing machine does not respond to button presses
It is necessary to check the contacts of the buttons for sticking; they may also be pressed through.
Also, the cause of the malfunction may be a breakdown of the electronic board; in this case, it is not recommended to carry out repairs yourself; it is better to contact a service center for qualified repairs.
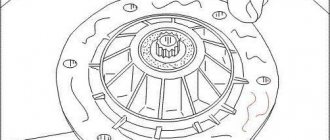
Repairing damage to a Samsung machine
We present to you a diagram of the device, which will come in handy for repairs. The technical content of machines of different brands is approximately the same. If you have already had to deal with replacing spare parts for a washing machine, then it will be easier for you to cope with the next repair.
List of components of the washing container: 1 – heating element (heating element); 2 – front part of the tank; 3 – front brackets, 5 pieces in total; 4 – heating element bracket; 5 – heating element spacers, 2 pcs.; 6 – screws, 3 pcs.; 7 – overlay; 8 – washer; 9 – screw; 10 – drum; 11 – sealing collar; 12 – rear part of the tank; 13, 14 – tank clamps, 9 pieces in total
Now you can start talking about certain types of breakdowns and how to repair them.
No. 1: unexpected stop during washing
The most common reason is insufficient water pressure. Then the machine stops, and to start it again, you need to turn it off and then turn it on again. If you have a lot of laundry loaded, in order for the machine to work, you just need to turn it off and remove the excess.
All problems with the washing machine stopping during operation can be dealt with quickly enough if you correctly determine the cause, which is not related to the failure of parts of the equipment
If there is a break in the power cord or an initially poor contact in the power button, then the device periodically turns itself off. The machine may also stop if it is not level and there is some misalignment.
No. 2: difficulty getting water
To fix this problem, you should first check the water pressure in the plumbing system and also make sure that the valve supplying water to the machine is well open.
If everything is in order, then you should check the filling valve, hose, and cleaning filter located at the inlet for debris and foreign objects.
You should know that the free end of the drain hose connected from below must be located at a height of more than 2/3 of the height of the device, otherwise water will immediately pour out of the machine.
No. 3: leakage from the unit
There are many reasons to explain this problem. Sometimes it is enough just to clean the powder container well - if it is clogged, water may simply leak out of it.
The most common cause of flooding caused by a washing machine is a damaged or disconnected drain or fill hose. Leaks can also occur when connections become depressurized.
If, after checking these hoses, you are convinced that everything is in order with them, then the reason lies in the o-ring.
It is necessary to check the tightness of the seals, both in the door and in the connection of the filling hose. If they are worn out, they should be replaced. Then you need to check the drain pump and hose for any foreign objects stuck in them.
No. 4: breakdowns and wear of the heating element
Therefore, the washing water does not heat up. This happens due to the failure of the heating element, but do not rush to change it - this may also be damage to the electrical wiring.
Therefore, you should carefully check the entire electrical circuit, as well as the contacts of the heating element itself, using a multimeter. If the tester shows the presence of voltage in the entire circuit, this means that the heating element will still have to be replaced.
In order to remove the heater, you need to disconnect all the wires and sensors, and then unscrew the nut securing it, then remove the heating element
The place where the heater is installed should be thoroughly cleaned, only after that it will be possible to install a new heating element.
No. 5: noise and vibration during operation
The most common cause of noise is improper installation of the machine. Because of this, the unit produces a strong hum during the spin cycle. To do this, the position of the machine must be leveled using a level.
But sometimes excessive noise can occur due to severe wear of the bearings. It is impossible to repair them - only change them. For an inexperienced repairman, this is a rather difficult task, because it may require sawing and subsequent gluing of a non-separable tank, behind which the bearing is located.
Therefore, if you are not confident in your skills, then do not take on this matter; it is better to call a specialist from the service center. But if your car's tank can be disassembled, then this task may be up to you. To do this, you need to remove the tank, then disassemble it by unscrewing the bolts and disconnecting the fastening latches.
The bearing must be removed using a special puller or hammer. We warn you that you need to use a hammer very carefully so as not to damage the parts.
After the bad bearing has already been removed, you should thoroughly clean the shaft, check whether it is worn, and then just install a new bearing.
Tips and prevention of breakdowns
By keeping your Samsung washing machine clean, you will improve the performance of the device, extend its service life and avoid minor problems:
- To clean the outside of the machine, use a soft cloth and non-abrasive cleaning products. Be careful not to allow water to come into contact with the outer surface of the device.
- To clean the detergent compartment, remove it by pressing the lever located inside the compartment. Rinse the compartment under the tap, and use an old toothbrush to clean the niche for it.
- Clean the debris filter every two months after draining the water from the emergency drain tube. Remember that to perform an emergency drain, you must first turn off the power to the machine. Using a key or coin, open the filter cover and remove the drain tube by pulling it forward slightly. When you remove the plug, water will flow into the container. Then remove the debris filter and clean it. Next, return the cap to its place, attach the tube to the hook and close the lid.
- Clean the strainer located in the water supply hose at least once a year. To do this, disconnect the machine from the water supply, disconnect the hose from the back wall of the device, covering it with a cloth. Using pliers, remove the mesh filter and rinse it under water, not forgetting to clean the threaded connection. After installing the filter back, connect the hose to the machine and, after checking the reliability of the connections, turn on the water supply.
- If you need to store the device for a long time without using it, be sure to drain the water from all internal elements and hoses, and also unplug the machine. It is better to leave the door open during storage.
Related article: Insulation thickness for loggias and balconies
Basic preventive measures are universal and apply to all brands of washing machines. Watch the Ukrainian program “Everything Will Be Good,” which clearly explains the basic steps to take care of your assistant.
Error code overview
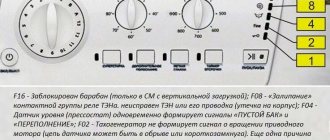
In conclusion, we present a short list of error codes most often issued by the unit.
E1 – system error when filling water. This means that the required water level during filling is not reached within 20 minutes. Eliminated by turning off and then turning on the machine.
E2 – error during draining. Most often it occurs when the drain filter is clogged.
E3 – too much water. You don’t need to do anything; within 2 minutes the water is automatically drained.
E4 – too many things. Their weight does not correspond to the parameters of the machine. We need to extract the excess.
E5 – water heating does not work.
E6 – malfunction of the heating element.
E7 – malfunction of the water level sensor in the tank.
E8 – water heating does not coincide with the selected washing program. Most often due to problems with the heating element.
E9 – water leak or drain detected more than 4 times.
DE, DOOR – bad blocking. Most often, the hatch door is not properly closed.