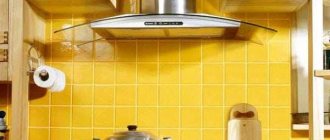
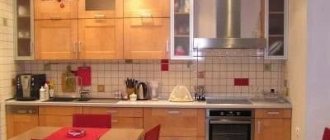
In modern houses and apartments, the presence of a spectacular hood above the hob has long become commonplace. And this is no coincidence: in addition to its purely design function, the hood also plays the role of a “cleaner”. Installing a modern kitchen hood gives you the opportunity to breathe air devoid of the tart taste of borscht, cutlets, fried potatoes and other dishes. To the question: “Is it possible to do without a hood?”, we will answer by asking you to imagine a small apartment - a studio in which the kitchen area and living room are combined. If you don’t install a hood in such a studio, then it’s easy to guess what kind of gastronomic air will permeate everything around you. Not to mention your neighbors, who will always be aware of what you are preparing for breakfast, lunch and dinner. To avoid this, we will tell you in detail how and how you can install a hood in the kitchen exclusively with your own hands.
Necessary tool
Before proceeding directly to the process called “Installing a hood,” you need to prepare everything that may be useful for this: additional materials and a tool kit. To comfortably install a hood in the kitchen with your own hands, you must have:
- a hammer drill and a drill (mounting a hood to a wall requires a full set of burs for drilling concrete and tiles);
- screws, self-tapping screws and dowels designed for working with foam concrete, shell rock and porous material;
- screwdriver, hammer and scissors;
- a simple pencil and a triangle;
- level and plumb;
- access to an external outlet, extension cord for working with a hammer drill;
- ventilation corrugation with a cross-section of 150 mm, purchased with a reserve;
- two clamps with the same cross-section, casing and clamps for fastening the casing;
- mounting tape made of polypropylene and a roll of tape;
- grille, for installation on the exhaust vent;
- a mesh that protects against the penetration of insects, birds and bats;
- a stable stepladder or stool;
- an electric jigsaw to make holes in the wall of a kitchen cabinet;
- polyurethane foam and silicone.
Note! Before you begin installing a modern kitchen hood with your own hands, before drilling, it is convenient and practical to build small “pockets” of adhesive tape to prevent crumbs and dust from getting inside the hood.
Installation nuances
The operation of the exhaust device is impossible without connection to the electrical network. Therefore, regardless of how the product is installed, it is necessary to provide an electrical line to it. Most often, hoods are equipped with a small piece of wire connected to the necessary terminals in the middle of the product and without a plug on the other side.
On the one hand, this is very convenient, since there is no strict connection to the distance to the nearest electrical outlet. But on the other hand, self-installation often requires extending the cord and screwing in the plug. It is important, even at the construction stage, to provide for a hidden installation of the electrical cable, for example, under the tiles, leading to the area where the hood is attached. Then all the wiring will be hidden behind the decorative overlays of the product.
But be that as it may, there are two options that allow you to correctly connect the hood in the kitchen:
- connection directly to a cable directly connected to the electrical panel;
- using a plug into a socket.
In this case, it is worth ensuring that the cross-section of the supplied cable is no less than that already connected to the device or indicated in its passport. If the supplied wire is already equipped with a plug, then it must be replaced with your own or an outlet must be installed in the immediate vicinity of the device. The use of all kinds of extensions, tees and twists is not allowed.
In addition to the electrical requirements, there are other specific standards. The basic installation rules for hoods are as follows:
- all air duct connections must be sealed, so rubber gaskets are used;
- the entire structure must have a rigid fastening;
- the performance of the hood should not exceed the capacity of the ventilation duct;
- if there is a gas boiler in the room, forced ventilation should be installed only in its outlet channel, and natural ventilation should also be present;
- To avoid backdraft, valves are used that allow air to flow in only one direction.
Preparatory work
In order to properly install a hood in the kitchen with your own hands, you will need to carry out a number of preparatory operations. First of all, this concerns the layout of the air duct. According to SNiP requirements, the ventilation duct should not have sharp bends, so most often the connection of the hood to the outlet is made through a corrugated hose.
A mandatory element of flow ventilation will be a corrugation and a check valve. The latter is necessary to prevent foreign odors from penetrating into the room from the outside. The cross section of the corrugation is selected depending on the type of device model. An integral attribute of using corrugation is a clamp. With its help, the air duct is securely fixed both in the hood itself and near the entrance to the exhaust duct.
In addition to the air duct elements, you will need to prepare sealant and any putty. Possible pipeline joints are treated with sealant, and the voids around the junction of the air duct with the exhaust vent are filled with putty. Instead of putty, you can use polyurethane foam.
The following tools may be needed:
We recommend that you read: Ventilation in the sewer system in a private house
- hammer drill (impact drill) - it is used to expand the ventilation shaft window and drill the necessary holes for attaching the hood;
- Phillips screwdriver or screwdriver;
- roulette;
- building level;
- hammer;
- screws, self-tapping screws, dowels.
The surface to which the hood will be attached must be smooth, without obvious bulges. The kitchen set must already be installed and all communications connected to it. The correct solution for replenishing air reserves when using a flow-through type device is to install a supply valve. To install it, you will need to drill outwards into the wall, and then insert the valve pipe into the hole. It is fixed with an o-ring, onto which the head cover and filter are then put on. The outside of the tube is covered with a mesh.
If the original ventilation system was not provided in a private house, then an attached shaft is attached to one of the walls. To improve traction, it is insulated.
Duct connection
There are two options for connecting the hood to the air duct. The first is a direct connection to an existing channel, but on the condition that there is also an additional channel used for natural ventilation. If there is only one channel, then a special adapter with two inlets is used. An exhaust hood is connected to one, and the other is used for natural ventilation. The disadvantage of this option is that some of the air may penetrate back into the room. Therefore, it would be better to make an additional hole in the channel and close it with a ventilation grille with a check valve.
The second method involves connecting to already installed ventilation, for example, coming from the bathroom. That is, a box is laid under the ceiling to which the exhaust vents of all rooms are connected. They usually have an active fan installed that draws air into the duct. The end of the pipeline is led out into the street, where a check valve and a protective grille are attached to it.
If the hood is island hood, then there is no point in pulling a separate ventilation duct for it with an existing system, so using a tee, the device is inserted into the system. To prevent the exhausted air from entering the kitchen through the hood, a check valve is installed. Such a system is especially easy to make for a kitchen hood in a private home.
It should be noted that work on organizing the air duct will not be necessary if you plan to install a recirculation type hood.
How to hang a hood over the stove
Distance from the hood to the gas and electric stove.
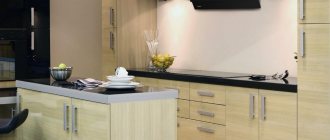
If the hood is selected correctly, then its width should be either equal to the stove or slightly wider than it. In order to install the exhaust system, it should not only be correctly placed, but also secured. It should be located exactly above the surface of the slab.
Note! The height parameters for installing the hood directly depend on the type of hob. If you have a gas stove , then the distance from the hob to the hood in height should be 75 cm; and if the stove is electric - at least 65 cm. Thus, in order to hang the hood over a gas stove and an electric stove, it is necessary to take into account different distances.
When deciding how to install a hood, before installation, you need to decide on the height, based on the housewife’s height. If a woman stands up straight, the bottom edge of the exhaust system should be slightly higher than her head. We do not recommend setting below this figure. If you set it higher, it won’t be critical.
Good to know! When answering the question of how to properly install a hood above your gas stove, you need to understand the following nuance: if there is a need to install the system higher than 90 cm from the hob, then you need to purchase a hood with increased power.
Let's talk about the topic: “Mounting for a modern hood.” The mounting of the exhaust system depends on its type:
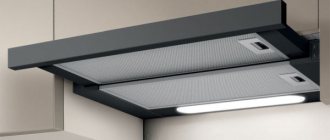
- The built-in kitchen hood should be attached to the surface of a cabinet specially designed for this purpose.
- The hanging system (flat) and the dome (fireplace) hood are attached to the wall surface.
- The island hood is attached to the ceiling surface: upon purchase, the kit always includes clear installation instructions and the entire suspension system.
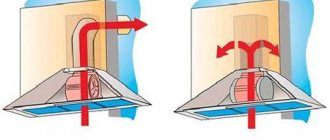
Operating principle and features of a suspended hood
Installing a wall-hung hood is a fairly simple task and is carried out under the bottom surface of a wall-mounted kitchen cabinet or directly to the wall above the stove. The principle of operation of the hood, unlike more complex analogues, is not to remove, but to freely circulate and clean contaminated air using special filter cartridges.
Most often, carbon filters are installed; with their help, the air is purified, and small suspensions of fat are deposited on the grease trap. Sometimes manufacturers complete hanging hoods with disposable acrylic filters for cleaning. The efficiency of such devices, which maintain a comfortable atmosphere and fresh air in the kitchen, directly depends on the systematic replacement of cleaning cartridges.
Typically, models have a square shape with sides of 60 cm, which in some cases may not be enough. Electric motors are usually used with low power and low noise levels. The suspended hood operates autonomously and does not require special ventilation ducts in the room.
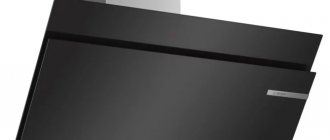
Along with standard hanging hoods, dome or fireplace type hoods are used as effective air purifiers. They are installed on a wall or ceiling surface. They are distinguished by their specific design and decoration. The body is usually made as an all-metal structure, sometimes with glass or wood inserts. In terms of functionality and technical parameters, dome hoods do not differ from their suspended counterparts.
Installation stages
We propose to divide the entire procedure for installing and connecting the exhaust system into three stages:
- Step No. 1 – we install the system taking into account the correct location, which involves fixing it either to the wall or to the ceiling.
- Step No. 2 – connect the hood to the power source. If the outlet is located close, no special problems will arise. If the source of electricity is far away, then you will have to run a wire to it (you can temporarily use an extension cord).
- Stage No. 3 – This stage is required only when your hood model needs to exhaust the exhaust air flow into the ventilation system. You must connect the air duct and discharge it into the ventilation duct.
Hood installation
When discussing how to install a hood over a gas stove, you should take into account the characteristics of the existing general ventilation.
There are only two ways to remove exhaust air:
- Make a new window to the street.
- Connect the exhaust system with the general building ventilation of the shaft.
It should be recognized that method No. 2 has many disadvantages. This hood requires the installation of a check valve. At the same time, it happens that the supposedly removed air returns to the apartment.
It is much more rational to use an additionally made window for the hood. In order to combat condensate formed inside the system, it is necessary to install a specialized aluminum damper.
Remember! The size of the window under the air duct should have a size corresponding to ¾ of the diameter of the air duct. To tighten the damper, you need to use a special spring that helps it open as air flows through it. This is how the process of self-regulation occurs.
Installing a hood in your kitchen requires taking into account one of the most important functional elements - an odor neutralizer . Today it is presented in three types:
- chemical neutralizer (it needs systematic replacement);
- The neutralizer is electric (it works on the principle of a conventional ionizer, but is capable of creating a larger discharge). The fact is that there is an accumulation of many odors above the hood, unlike in the living room. If a person cooks for a long time, the ionizer will have a detrimental effect on his health;
- ultraviolet neutralizer (it must be taken into account that it requires a systematic procedure for cleaning and replacing lamps). This is the only neutralizer safe for human health. Using ultraviolet light, you can solve two problems at once: purify the air and brightly illuminate the cooking area.
Installing a built-in hood in a cabinet
Let's talk about how to install a hood in a kitchen cabinet on your own. For convenience and clarity, we will divide the process of installing a hood into a cabinet into a sequential algorithm of actions:
- First of all, it is necessary to make an anti-return mechanism in the form of a box. For this you will need either sheet aluminum or galvanized steel. But, it is much more convenient to purchase a check valve for this, which is installed directly in front of the ventilation hole.
Tools required for this : jigsaw, drill and foam, sealant, screws and dowels.
- Then the hood must be installed on the cabinet, and its base must be marked. To cut a hole for a hood in a cabinet, a jigsaw is suitable. First you need to make small holes with a drill, and then cut out the marked shape. This way you can preserve the cabinet, preventing it from being damaged when cutting.
- Then you should install the corrugated air duct inside the cabinet, cut it to the required length and bend it outward.
- After this, the cabinet, with the air duct already installed in it, must be fixed to the wall. To seal all joints, use a silicone-based sealant.
- Then proceed to the process of joining the corrugated sleeve with ventilation. To close all the cracks, using polyurethane foam is ideal, and for small flaws - silicone sealant.
- Secure the hood installed in the cabinet with screws and dowels. Use a clamp to secure it completely.
To install a plastic air duct, we recommend using the same diagram. There is only one “but”: to ensure angles, it will be necessary to use special adapters, and place the pipes with a minimum number of bends (each turn is a loss of 10% of power).
Do not forget! Due to the fact that the kitchen is a place of high humidity, a cabinet made of wood quickly becomes unusable. In this case, the hood should be installed on the wall, without using a cabinet. To do this, you will need U -shaped frame: to make it you need a metal corner.
Having completed all installation work, you should connect the exhaust system to electricity, with the obligatory condition of grounding, and test its operation.
Attaching a wall or dome model to a wall
In appearance, the hoods above the stove of the wall-mounted and dome models are very different from each other, but at the same time, they both must be attached to the wall surface. To do this, their rear housing has four holes: two on each side. In addition, manufacturers supply their products with installation diagrams, installation instructions and templates, with marks for fastening locations.
All you need is to place the industrial template against the wall and make marks (if there is no template, you need to measure the distance between the holes and then transfer it to the wall).
Then everything is much simpler: you need to take a drill and make holes. Insert plastic plugs into them and hang the hood on the dowel - nails, checking the horizontal level of the installed system.
This option is especially suitable if you have a perfectly flat wall, when nothing gets in the way. But, often there is a gas pipe next to the wall, which does not allow the hood to be hung close to the wall.
Take note! If this happens, then nail wooden blocks to the wall. Then attach the exhaust system to them. But, do not forget that over time these bars will become covered with a layer of soot and fat.
There is also a second way to install a hood in the kitchen with your own hands behind the pipes. To do this, you need to use screws - studs (or plumbing studs).
How are these studs attached? They have a thread for screwing into the wall. Their use will allow you to secure the kitchen hood, moving it away from the wall (at the same time, the studs are available in various sizes, and all the nuts are made for a bit or an octagonal wrench).
How to connect the hood to electricity
Due to the fact that the power consumption of hoods is rarely more than 1 kW , it is possible to connect them using standard sockets (preferably with grounding).
With old and dilapidated wiring, you need to ground the wire yourself. You cannot attach it to the surface of water or heating pipes: you can get an electrical injury, not only to your family members, but also to your neighbors (with fatal consequences).
Take note! To pull the grounding wire, you need to go to the panel and find a busbar with wires attached to it, or a pipe to which a stranded wire is screwed. You can also connect your own stranded wire to them (but without touching those that are already installed). For normal operation, the cross-section should be 2.5 mm. The conductor must be stranded copper with a non-flammable sheath.
For ease of installation, many kitchen hoods are equipped with a plug at the end of the wire. They are very easy to connect: you only need an outlet.
But, there are also models whose cord has wires at the end rather than a plug. This is done so that the consumer himself makes the decision on how to connect the system: either using a plug or using a terminal block (by the way, Wago terminal blocks are perfect).
How to position the equipment
To keep the kitchen always fresh, it is important to know at what height to hang the hood above the gas stove. It is important to take into account the manufacturer’s recommendations, which are described in detail in the instructions.
Not the last factor in determining the location of the hood is convenience during subsequent use.
Different standards for the location of hoods for electric and gas stoves:
- the minimum height from the electric stove to the exhaust system is 65 cm;
- The minimum height between the hood and the surface of the gas stove is 75 cm.
First of all, the difference in standards is made for the sake of human safety. Sufficient distance provides protection against spontaneous combustion. Often the exhaust system housing contains plastic elements that can catch fire due to being too close to the fire and high temperatures.
A small distance between the hood and the oven can create great inconvenience when cooking. For example, there are large saucepans. If the exhaust system is located too low, the housewife will not have free access to such dishes, which can also lead to injuries and burns.
At the same time, the installation height of the hood above the stove should not be too high. A large distance between the stove and the hood will mean that contaminated air cannot be fully removed from the room, but will be spread throughout the kitchen.
The installation height of the hood above the gas stove is considered normal if it is in the range of 70-90 cm
When deciding at what height to hang the hood, it is important to take into account the height of the cook. When the exhaust system is too low, you may hit your head on it
Additional terms
It is important to take into account not only the distance from the stove to the hood, but also the working area of the system. Under no circumstances should it be less than the area of the slab
If the oven width is 60 cm, then the hood can be 60 or more centimeters. In cases where the placement of the exhaust system needs to be higher than normal, the dimensions of the hood must be larger.
There are inclined air intakes. Most often, they do not absorb polluted air so effectively. This should be taken into account when installing an exhaust system. In such cases, it is permissible to neglect the minimum height of the hood. The bottom edge can be fixed at a height of 55 cm.
After you have managed to select a suitable exhaust system, you should figure out how to install the hood in the kitchen correctly.
Air duct for kitchen hood
The palette of air ducts used for kitchen exhaust systems differs greatly in three parameters:
- Material of manufacture.
- Form.
- Hardness level.
Products used to install hoods in the kitchen can be flexible (corrugated) or made of solid, smooth and hard plastic.
Exhaust pipes are made of several types of plastic:
- PVC;
- fluoroplastic;
- polypropylene;
- low-pressure polyethylene.
To connect to the hood, the first three types of plastics listed above are used: they are resistant to high temperatures and have decent rigidity.
Air ducts, in turn, have two types of sections:
- rectangular;
- round.
The rectangular plastic channel has a more compact size, it is easy to disguise it under a suspended ceiling, and it is more convenient to install.
The round shape of the pipes promotes better air passage and has a low noise level.
Air duct sizes for hoods
Do not forget that when buying a PVC air duct, you should also buy adapters . They are needed to connect the plastic tube to the hood. In addition, they are used for air duct bends and the possibility of attachment to the general ventilation system of the entire house. Therefore, if you decide to use corrugation, you can save on unnecessary adapters.
You should know! The length of the PVC pipe should not be more than three meters . Otherwise, the performance level of the exhaust system will decrease with each additional meter of its length. Each piece of bend also has a bad effect on the performance of the hood, so you should try to avoid ninety-degree angles . You can make no more than three bends and bending points .
The diameter of the plastic pipe should be selected strictly according to the cross-section of the ventilation hole:
- The size range of rectangular and square PVC air ducts has standard sizes. The most commonly used sizes are: 110 X 55, 120 X 60 and 204 X 60 mm;
- indicators of round plastic pipes: from 110 to 150 mm. (diameter).
How to attach corrugation to the hood and ventilation
If you intend to install a hood using an aluminum corrugated hose, then you need to decide on the method of attaching it to the body and to the ventilation. For this purpose, you need to purchase a clamp of the required size (there are metal and plastic).
In addition to the clamp, a special ventilation grill with a hole at the top for connecting the air duct tube is useful. At the bottom it has a hole to remove “dirty” air from the kitchen using natural circulation during the time the exhaust system is not functioning.
Note! To secure the corrugation, you need to use a grille with a protrusion: in this case, a small side surrounds the hole. It is on this that the corrugation is put on, and then it is secured with a clamp of the required size. The corrugation should also be secured to the hood: also using a protrusion.
How to attach an air duct to walls
Plastic air ducts have special fasteners in the form of a latch. They are first mounted into the wall using dowels. Most often, only one fastening is sufficient for an area of up to 60 cm. It is into these latches that pipes are inserted during installation, with little effort.
When you want to attach to the ceiling , use exactly the same fasteners. If it is necessary to maintain a certain distance from the ceiling, this type of fastening is not suitable. Then you will need to take perforated hangers (plasterboard), fix them to the ceiling, and then attach the PVC air duct to them with small screws.
The corrugated air duct should be secured to the wall using a clamp or plastic ties.
Where and how to remove the air duct
As a rule, the air exhaust system from the hood is carried out into the ventilation hole (this is where the natural process of general house ventilation takes place, and draft is present).
But this is not a competent approach, because a significant part of the grille turns out to be closed by the air duct, and a full exchange of air mass is not possible through the remaining tiny hole.
You should know! Installing a hood in the kitchen requires connecting the air duct to a separate channel dedicated to it.
- If there is a separate channel, the same grille as in the photo should be installed on the hole:
- When installing a hood in the kitchen on your own, if there is no separate channel, but there is an outer wall nearby, you will have the opportunity to route the pipe to the street side by placing a grille outside.
These are the two main methods of installing well-functioning ventilation with a long period of operation.
How to take it outside
First of all, in order to bring the air duct into the wall, you need to make a hole in the wall. It is the production of the hole that is the main difficulty of this work.
When the hole is ready, you need to insert the “body” of the air duct into it, and close the remaining gaps with a solution. From the outside, the hole must be covered with a grill (to prevent dirt, unnecessary objects, birds, etc. from getting into it).
To prevent street air from blowing into the apartment, it is necessary to install a check valve - in the figure below we have indicated it with a beveled line:
If you carefully examine the picture, you will notice that the non-return (non-return) valve is a light plate made of plastic or metal. It is fixedly fixed at two points to the pipe (top and bottom), and the “petals” are supported by a weak spring.
When the exhaust system is not working, the valve blocks the access of air masses from the street. As soon as the hood is turned on, the plate, thanks to a spring, returns to its place.
Remember! If you decide not to install a check valve, then in winter the kitchen will be very cold due to the icy outside air entering the apartment.
So that the hood does not interfere with natural ventilation in the kitchen
Using a regular tee and check valve, you can install the exhaust system in such a way that it cannot interfere with the natural ventilation of the kitchen area. To do this, it will help you:
- specialized ventilation grille;
- presence of a check valve;
- the presence of a regular tee.
How should this be installed? You must attach a tee to the ventilation grille: connect the air duct from the hood to its lower inlet, and install a check valve on the free outlet so that it closes when the air flow passes from the pipe, as shown in the picture:
Let's talk about how such a system functions.
When the hood is at rest, the “petals” of the valve are bent, and the air flow from the kitchen area enters the ventilation duct, passes through the grille and the open outlet of the tee.
As soon as the system is turned on, the air flow from the hood rotates the valve plate, and the air flow enters the ventilation system. When the hood is turned off, the springs again open the passage of air through the tee.
Take note! From the outside, such a system is not entirely attractive, and, of course, it should be disguised. But, it is the only way to connect the hood to the only existing ventilation outlet, while maintaining air exchange.
Output to the ventilation duct
In many modern panel houses of various series, you can often find both separate and combined ventilation ducts. To find out which ventilation duct is in your home, you should contact your service company for information.
You should know! If you can smell food from your neighbors in the house, it means there is a single network in your house. Then connecting your exhaust system to this single network will automatically complicate life for your neighbors below.
Many modern hoods are capable of operating in various power modes. If there is a single ventilation duct in the house, you should not turn on the hood at full power.
By connecting the exhaust system to a single exhaust duct, you will deprive your kitchen of natural ventilation. It will be possible to install a special combined grid, but it will not be able to solve the problem entirely. The fact that there is natural ventilation when the hood is not working will not go away, but the quality of the exhaust system will sharply decrease: the removed air will be able to flow back to you.
Important note! It is better not to occupy the natural ventilation channel, but to vent the hood to the street through the outer wall of the house.
Installing a kitchen hood: installation stages
It is worth installing the equipment taking into account all the manufacturer’s recommendations, which can be found in the packaging.
The installation diagram, safety rules, and general recommendations must be taken into account without fail. If this is not done, the operating life of the device may be reduced, and in the event of breakdowns, the manufacturer will refuse warranty repairs.
Before you begin installing a hood in a private home, you need to choose the appropriate model:
- built-in;
- ceiling;
- wall;
- corner;
- fireplace.
The list of mandatory work when installing a hood in the kitchen includes the following steps:
- Equipment installation. To do this, the device is attached to the wall or directly to a wall cabinet, which is located above the gas stove. The fastening must be reliable and of high quality so that there is no vibration and the equipment does not break under its own weight. All cracks and holes should be sealed with polyurethane foam. This will eliminate vibration and the system will become sealed.
- Connecting the device to the power supply. Usually this is not difficult to do, since the electric motor comes with a wire and plug installed by the manufacturer. For beauty and convenience, the wires can be hidden in the wall or carefully laid in the closet itself. To do this, the cable is laid in a cable channel. It is not recommended to install a socket to connect the unit close to a heat source. This may cause the wire to overheat and cause a short circuit.
- Installation of the ventilation pipe. To pass the corrugated pipe through the cabinet, you need to make holes in it of the appropriate diameter. The air duct is fixed with clamps; universal silicone is used to seal the system. The corrugation is connected to the ventilation system via an adapter. This is a special grille that can be purchased separately at a hardware store.
- Connecting ventilation ducts into a single system and connecting to a centralized ventilation system in the house.
Do-it-yourself air duct installation for a kitchen hood
The optimal height of the hood from the stove is about 70-80 cm. If you raise it higher, the fumes and gases will be poorly captured, and the efficiency of air purification will be lower. When installed below 70 cm, overheating of the equipment, engine and other parts inevitably occurs. This will cause parts to fail and, in some cases, may cause a fire.
When calculating the length of a corrugated pipe that serves as an air duct, you also need to take into account some features. For example, the longer it is, the less efficient the exhaust system
It is important to remember that the larger the diameter of the pipe, the better the hood will work. A large number of corners and turns slow down the speed of air movement through the system
If a water heater is installed in the house, then the hood cannot be connected to its ventilation duct.
Even if everything is done correctly, sometimes the quality of air purification in the kitchen will not be sufficient. The reason may be a weak motor installed on the hood. The performance of the equipment should be determined before purchase. Typically, the larger the room, the more powerful the device you need to buy. As practice shows, the most effective air removal is observed at low or medium engine speeds.
After installing the equipment and putting it into operation, it is necessary to regularly clean the filters, external and internal parts of the hood. Here are some tips for caring for your kitchen appliance:
- The outside of the body is washed with warm water with the addition of a small amount of degreaser, then wiped dry with dry cloths;
- The metal surface can be easily cleaned using a cleaning gel and a sponge;
- the glass surface can be polished using window cleaner;
- The grease trap is the most difficult to clean. It is easier to wash off accumulated grease in hot water with a degreaser.
Video on how to install a kitchen hood with your own hands
https://youtube.com/watch?v=AvKk79fCsQo
Have you decided to install a kitchen hood yourself? This is easy to do if you read the expert advice on installing the device and follow the instructions from the manufacturer. After installing the hood, the kitchen will be much more comfortable and cleaner. Therefore, please the hostess with such a necessary device for air purification as an extractor hood.
Summary
Having chosen a hood by carefully selecting it to match the color and design of the kitchen unit, you are faced with a choice: turn to professionals for help in installation, paying a substantial fee for installing a kitchen hood; or hang it yourself, after reading our article.
The most important thing when installing a kitchen hood is: objectively assess your strengths and the possibility of receiving help from household members; evaluate the instrumentation before starting work; understand the instructions included with the hood and believe in yourself.
Installation of a hood in a wall cabinet
A hole is made in the bottom of the cabinet, the size of which corresponds to the size of the kitchen hood. The hood island is hidden in a cabinet. Fastening is carried out using holes in the lower edge, with the help of which the hood is screwed to the bottom of the cabinet.
Kitchen hood installed correctly
In the shelf located in the middle of the cabinet, as well as in the ceiling, holes are made for the passage of a hose, one edge of which is attached to the hood, and the other is inserted into the hole in the central shelf and ceiling. In the mode when the air is discharged into the ventilation vent, the hose is passed into it, and in the filtration mode, on the contrary, it is cut off near the exit from the hole.