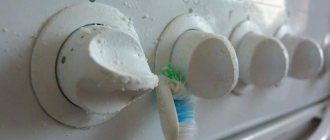
Preparation
The preparatory stage is very important when installing the panel.
The safety of the kitchen unit and the visual appeal of the room as a whole depend on the correctness of the calculations used for the insertion. An error of even 1 cm can cause damage to the tabletop. It is recommended to focus on the dimensions prescribed by the equipment manufacturer in the instructions.
Measurements
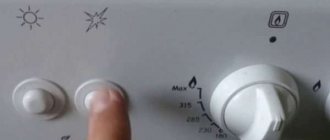
The dimensions of most panels are the same - 55-57 cm
You need to pay attention to the size of the hole for installing equipment. To take certain measurements you will need a tape measure
The panel is turned upside down. The length and width of the equipment is then measured along the inner edge.
It is worth noting that the instructions indicate the minimum distance from the edge of the tabletop. It is not recommended to reduce it, but you can increase it. Failure to comply with this rule may result in surface breakage.
Before cutting a recess, you need to make sure that the required distances are maintained between the slab and surrounding objects. These numbers are usually written on the operating sheet.
How to connect a hob - step-by-step installation and connection instructions (80 photos)
It is difficult to imagine technological kitchens without energy-consuming appliances. The main assistants: a stove, a refrigerator and a sink are indispensable attributes of the current kitchen space. If connecting a refrigerator is simple, you only need an socket into which you plug a plug, then connecting the hob needs to be done thoughtfully.
The appearance, design and principle of operation of plates placed on countertops are varied. The gallery shows photos of hobs from different manufacturers.
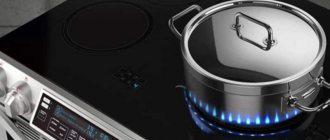
Three basic types are sold: electric, gas and combined. The names explain the principle of operation, the first ones use electricity, the second ones heat the burners by burning gas, the third ones use both heat sources.
Before purchasing, you need to make a calculation of the electrical wiring based on the power consumption of the stove and oven. Apartments in old buildings cannot withstand heavy loads; they don’t even have simple grounding. In this case, an overrated automatic machine will not help; the wiring will overheat.
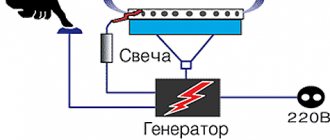
An electric hob of any type must be connected by a separate wiring line directly from the distribution panel.
The kitchens of the new apartments are equipped with separate wiring for stoves, automatic switches and grounding. The cross-sectional area of the conductors is at least 3.5-4 mm.
Connection methods
A ready-made, thoughtful kitchen design will help you decide how to connect the hob to the power supply. Two ways:
Directly. Pull the wire from the distribution panel to the panel terminals. The cable cross-section is selected depending on the power of the stove.
The electrical wiring made must be protected, and additionally have a switch to turn off the stove in an emergency. The length should be sufficient and comfortable when connecting, and not dangle.
The wiring can be hidden and led out near the connection point. Exposed wiring is simply mounted on the wall.
Through a socket. In new apartments designed for the use of electric stoves, a power outlet is already installed in the kitchen.
The selection of the plug is made according to the rated current for the kitchen appliances being installed, so when purchasing a stove and oven, you should find out their electrical characteristics from the seller. The plug and socket inputs are connected to the terminals according to the designated diagrams.
Networks in houses are single-phase and three-phase. Based on this factor, a power socket with 3 or 4-5 connection pins is taken.
A flexible multi-core connection cable is required, with a core cross-section no smaller than that of the wiring. You should calculate the length of the cable from the outlet to the connection point; there should be no excessive tension, sagging, or twisting into rings.
The cable should not be heated by hot stoves, ovens or other hot objects. It is strictly prohibited to place the connecting wire on the floor.
How to connect the hob and oven?
An independent electric oven is connected separately, the combined panel is connected to the oven through terminals according to the attached diagram. Manufacturers of kitchen appliances make connections and terminals in their own way. But everyone has “ground, zero and phase”, only the number of phases varies.
If the apartment wiring is single-phase, the stove is connected by first connecting the ends of the phase with a jumper. Manufacturers supplement the equipment set with jumpers suitable for connection.
The installation instructions show you how to connect the hob yourself. The diagrams are shown on the back of the instrument housing. From several options for cases of different numbers of phases and pins, you should choose the appropriate one.
Example. Electrolux stove models are equipped with two phase terminals. They can be connected to two separate phases or pre-combined with a jumper and connected to one phase for single-phase wiring of the apartment.
Subtleties of connection
Use insulated wire with the required number of cores and rated cross-section.
Check the installed sockets first, builders are people too, they can make mistakes.
Follow the connection order:
- Earth-earth;
- Zero zero;
- Phases one after another, if there are many of them.
How to connect a gas hob to electricity? The useful electric ignition function does not require a non-standard connection. A simple electrical outlet will do the job.
The requirements for the connecting cable remain the same: no tension, no sagging, no heating.
Connecting a hob requires a lot of skill; if you are not confident in your abilities, call an electrician.
Method of connecting the stove to the system
To independently connect a gas stove to communication nodes, special hoses with special physical characteristics are used.
When purchasing, these parts are checked for strength and flexibility, and they also look at the quality certificate to understand whether the proposed product meets the requirements for elements of gas equipment.
The stove must only be connected directly to the central gas system. The rules do not provide for any extra nodes or connections. If gas workers discover them, the owner will immediately receive an order to reconnect
In some special cases, the stove is connected using a metal connecting pipe, but this method is used extremely rarely, as it is labor-intensive and has a number of inconveniences.
The hose for connecting a gas stove is not purchased at the market or at a remote point, but only in specialized stores or branded points of sale of installation equipment.
Sellers, in addition to the product itself, provide the client with information about the technical characteristics and issue a receipt, according to which, in the event of a malfunction, the product can be replaced.
When purchasing a connecting hose for a stove, you must pay attention to the markings. Elements intended for use in gas systems always have yellow identification marks.
Water hoses are marked in red and blue shades. They have much less strength and burn out in gas systems within 15-30 days after installation.
Today, in the market of related equipment, 3 types of gas hoses are the most popular. There are distinctive features between them, thanks to which the owner has the opportunity to choose the most successful option for himself.
The products are united by such parameters as flexibility and strength. Due to this, the stove connected to the system can be moved without fear of breaking or somehow damaging the gas pipeline and causing a leak.
Before installation, the slab must be inspected and determined which exit it has - angular (curved down) or straight. For an angular one, a regular hose with a standard edge is suitable, and for a straight one, you will need a piece with an angle
The rubber hose belongs to the category of the most popular connecting elements. It has a high level of strength, demonstrates excellent flexibility and is quite reasonably priced.
It is made from vulcanized rubber reinforced with textile thread. It functions perfectly in the temperature range from -35°C to 50°C and can easily withstand heavy operating loads for a long time.
The cross-section of the thread on the outlet hole of the plate must match the parameters of the connecting hose. Typically this figure is 1/2′
If the unit has a 3/8′ thread, then for correct connection to the system you will need to use a special adapter. It almost always comes with the stove. If the item is not available, purchase it from a hardware store.
The rubber hose with metal braid is an improved version of the above described option. The metal casing provides even greater strength to the product and almost completely eliminates leakage.
The product is offered on the market in the widest range and has different lengths. This allows this type of hose to be used in any kitchen area and even where the stove is used with maximum intensity.
A gas hose with a metal braid can work in aggressive conditions (heat, cold, sudden temperature changes).
The metal that protects the rubber from damage has high anti-corrosion properties, does not rust and is not afraid of moisture. A bellows hose is a flexible piece of corrugated metal-plastic tube with excellent physical characteristics. It is produced using modern technologies, is resistant to intense pressure and pressure changes, stretches well and has a high-strength surface protective shell.
The bellows hose offers an unprecedented level of reliability and ensures the safe transfer of gas from the central system to home appliances. Its service life without loss of efficiency is 25 years
The only reproach for bellows products is their rather high price compared to similar products made from cheaper materials.
However, despite this, representatives of gas distribution enterprises strongly advise owners to connect the stoves through a bellows hose in order to increase the level of safety when operating home gas units.
Additional information on the classification of gas hoses and their selection is presented in this article.
The connecting hose used to connect the stove to the central gas system must meet certain requirements^
- limited length - no more than 1.5 meters;
- flatness - the surface of the part without expansions or narrowed areas;
- absence of bends, knots and twists;
- durability - service life can be found out from the seller or from quality certificates confirming the hose’s compliance with the standards generally accepted for gas equipment;
- no cracks, cuts, rust or other visible damage.
Another important point to consider is that the hose should under no circumstances come into contact with hard, sharp corners or materials prone to combustion.
It is better if it is located freely behind the stove, without adhering to any surface. Then the owners will be able to easily monitor its condition and will not miss the moment when the hose needs to be replaced.
Connecting the stove to a centralized system using a metal pipe is a very reliable, but already outdated method. Today it is rarely used due to its complexity and the need in some cases to use specific professional equipment.
When connecting the slab to centralized communications supplying the gas resource, copper or steel pipes are used. They have a high level of strength and guarantee a clear, reliable connection
The main disadvantage of connecting using pipes is that in the future the slab cannot be moved for cleaning or moved to another place without disconnecting from the central communications.
To ensure that the connections of the stove to the gas distribution system do not leak and ensure the tightness of all communications for years, special sealants are used, for example, Loctite 55 thread or FUM tape.
Gas service employees do not recommend using connecting elements made of other materials. Their performance characteristics are too weak for such an impressive daily load.
READ MORE: How to connect a lamp if there is only a phase wire
Loctite 55 thread is a practical, modern material designed specifically for reliable fixation of connecting sections in communication networks of varying degrees of complexity.
It is a sealing fiber made from high-strength complex threads, supplied in plastic containers and has different lengths (from 12 to 160 m depending on packaging).
Loctite 55 thread is a universal element that provides threaded connections with reliable instant sealing even under high pressure. The certificate allows the product to be used in gas systems without restrictions
To create a tight connection, I manually wind the thread onto a threaded section of pipeline fittings. It instantly locks in place and no longer changes its position.
The second reliable sealing element is the FUM tape, made of 4D fluoroplastic.
There are three types of FUM tapes on the market:
- Grade 1 is equipped with additional lubricant based on vaseline oil. It is used in industrial systems and communication networks with caustic, aggressive media.
- Grade 2 has no lubricant and works best in complexes operating on various oxidizing agents.
- Brand 3 is produced using edge fragments of the first two types and is suitable for both industrial and domestic purposes.
It consists of thin threads laid in a film.
FUM tape demonstrates high anti-corrosion qualities, exhibits good heat resistance and does not emit toxins during active use.
FUM tape allows for a strong connection of pipe elements, which will ensure complete tightness of the system for many years. The guaranteed shelf life of the tape in the container is 13 years.
Directly. Pull the wire from the distribution panel to the panel terminals. The cable cross-section is selected depending on the power of the stove.
The wiring can be hidden and led out near the connection point. Exposed wiring is simply mounted on the wall.
Through a socket. In new apartments designed for the use of electric stoves, a power outlet is already installed in the kitchen.
The selection of the plug is made according to the rated current for the kitchen appliances being installed, so when purchasing a stove and oven, you should find out their electrical characteristics from the seller. The plug and socket inputs are connected to the terminals according to the designated diagrams.
Networks in houses are single-phase and three-phase. Based on this factor, a power socket with 3 or 4-5 connection pins is taken.
Standard sockets for connecting heating electrical appliances are prohibited.
A flexible multi-core connection cable is required, with a core cross-section no smaller than that of the wiring. You should calculate the length of the cable from the outlet to the connection point; there should be no excessive tension, sagging, or twisting into rings.
The cable should not be heated by hot stoves, ovens or other hot objects. It is strictly prohibited to place the connecting wire on the floor.
Features and nuances of installation
The installation rules stipulate that any work on connecting or moving the location of gas equipment must be carried out in accordance with current standards and rules, warning gas services about replacing the heating device. When purchasing a panel, it is better to immediately clarify how it is attached to the countertop. The material of the base itself also matters; if you can handle chipboard yourself, it is better to entrust cutting into artificial stone to professionals.
You can easily install hobs yourself. The main thing is to correctly mark the countertop on which the installation is being carried out. If the panel is purchased for a ready-made set, it is worth measuring the available width and thickness in advance, especially when the furniture module is non-standard, created to order. Typically, installation dimensions vary in the range of 55-57 cm. It is worth considering other important points:
- the connection to the pipe should be connected before installing the headset - this will simplify the installation of the nuts;
- installation of the bellows hose should be carried out not through the valve directly, but through a fitting or plumbing drain;
- when forming a connection, a linen winding must be used and coated with gas paste;
- if there is electric ignition, the connection point to the network should be removed in advance;
- to increase the level of safety, you can embed a valve with a thermal shut-off element in the pipe, which is activated when the temperature reaches 80 degrees Celsius;
- the hole cut in chipboard or wood must be carefully coated with sealant along the sides;
- By default, the hobs are supplied with nozzles for the main gas supply; to connect to a cylinder/gas holder, they must be purchased separately.
This is interesting: Typical electrical wiring diagram in a house: let’s understand it from all sides
Photo tips on how to connect a hob
Self-installation of a gas stove is carried out in strict accordance with safety rules governing actions when in contact with gas networks.
Mandatory standards:
- The flexible hose connecting the unit to the gas supply system is placed in plain sight in an easily accessible place and in no case is blocked by anything. This item should always be available for inspection or routine replacement.
- The gas hose is made in strict accordance with generally accepted regulatory documents, without exceeding the permitted size by an inch.
- The connecting sleeve itself is not painted, since paint damages the surface and contributes to its premature cracking. If the appearance of the sleeve is not very aesthetic, it is disguised under self-adhesive paper.
- The hose is connected directly only to the supply tap and gas stove. The adapter is used only in the case of a non-standard threaded connection of one of the outlets.
- Before installing the stove, the gas is turned off by turning the shut-off valve on the pipe from the supply riser all the way, and everyone in the room is notified about the work in progress.
- During installation, use only special tools, consumables and components intended for working with gas fittings.
- All pipes opened during connection are immediately plugged. To lower, use a thick wet rag as a plug. Water, absorbed into the fabric, gives the material a high level of gas impermeability.
- To temporarily close the supply pipe with a 1/2″ thread, use a wine bottle stopper. It is cut along the narrowed edge into a cone shape, treated with sandpaper and tightly “screwed” into the pipe hole. If the part is stuck, remove it using a corkscrew.
At the end of the work, the joined areas are coated with a soap solution of medium concentration, the gas shut-off valve is opened and the system is tested for leaks.
If the soapy liquid begins to bubble, the gas is shut off again and the joint areas are brought to a complete seal.
When a hissing sound is heard or the smell of gas is felt during the test run, the valve is immediately closed, windows and doors are opened and a team of emergency gas service employees is called.
Sometimes, when connecting or moving a stove, it may be necessary to replace the gas tap. This work is carried out only by representatives of the gas service with a preliminary shutdown of gas throughout the riser.
The requirements for connecting bottled gas for domestic use (a mixture of propane and butane) and related devices are regulated by several documents. The main ones are SP 62.13330.2011 “Gas distribution systems” and “Technical regulations on the safety of household gas equipment”.
Plus there are also various fire regulations and building codes. Moreover, on some issues these documents slightly contradict each other.
To connect the stove to the gas pipe in the apartment, you will have to call a specialist from the organization supplying the house with gas and conclude an agreement for the supply of blue fuel. And in a private cottage or country house you can connect the cylinder yourself
Bottled gas has a number of features that directly affect the rules for its use and standards for connecting equipment. And the main thing here is that it is not methane that is pumped into the cylinder, as in a pipe, but a propane-butane mixture (LPG). Although on the container they usually write only “propane”.
LPG is obviously heavier than air. When a burner leaks or goes out, the balloon gas mixture does not rise or evaporate, but descends to the ground.
READ MORE: Garbage disposer for sink, connection instructions
Therefore, it is recommended to place gas cylinders outside so that in an emergency the gas cannot accumulate in the underground or basement to dangerous concentrations. They should also be placed as far as possible from wells and any electrical appliances.
If gas equipment malfunctions, at best the room with the stove and LPG container will suffer from a gas explosion, but the whole house can also collapse from the cotton
It is legally permitted to place cylinders inside in dachas and on summer verandas, as well as in attached kitchen-dining rooms in cottages. It is only prohibited to choose a place for them in living rooms, near emergency exits, in closed dark corridors and basement or basement rooms.
Another important feature of LPG is the existence of “summer” and “winter” fuel. The first differs from the second in the ratio of propane and butane, as well as the ability to “work” at low temperatures.
The summer mixture can also be used in winter if there is not severe frost. However, when a metal container is cooled below zero, only propane will evaporate from it for combustion in the stove. But the butane will remain inside in liquid form, taking up wasted space and gradually accumulating.
At the same time, when filling the cylinder, you will only be partially topped up with LPG. This is how careless gas station operators often deceive inexperienced owners of gas stoves. Plus, at some point, the accumulated liquid condensate will have to be drained from the container in order to simply free it up for the working gas.
To connect a gas cylinder to a portable or regular indoor stove, as a rule, it is enough to have only a wrench on hand. It is needed to tighten the nuts on the inlet and gas valve.
But if you plan to install a cylinder container with LPG on the street with the installation of a special cabinet there, then you will additionally need:
- drill for punching a wall under a pipe (hose);
- a shovel with a sledgehammer for installing and grounding the cabinet;
- screwdriver;
- roulette.
No specialized tools are required.
It is best to choose an outdoor cabinet from a specialized company. It must be made of steel with a thickness of 1 mm and covered with special paint so as not to rust immediately in the first year of operation, and also have ventilation holes and a lock with a key.
To check the tightness of the connections after connection, it is recommended to use plain soapy water - the soap will bubble when gas escapes
Materials you will need:
- Jets for LPG.
- A pipe made of steel or copper or a hose special for gas.
- Dielectric insert (if a metal supply is mounted).
- Pressure-reducing "frog" reducer.
- Seals.
- Tap.
You will also need a stove and a gas cylinder. Hobs for main methane and LPG are practically no different in design. They only change the jets.
Household cylinders come in volumes of 5, 12, 27 and 50 liters. When fully charged, they weigh about 6, 11, 26 and 43 kg, respectively. Plus, there are disposable gas cartridges of 220 and 400 ml, used as a source of gas for portable stoves and blowtorches, they are connected with a small hose or directly to the device.
The best option for a private home and cottage is a 12- or 27-liter container. It will have to be refilled more often than a large 50 liter analogue, but such a small piece of hardware is easier and easier to carry.
Cylinders are offered on the market with a valve and valve. It is best to choose the valve option. It allows you to drain condensate without additional tricks and independently.
Household cylinders for permanent use with a stove can be placed directly next to the gas appliance. There are even tiles with an internal LPG container. In this case, all responsibility for the safety of using this option rests solely with you.
Fire safety standards recommend placing the gas cylinder outside (this is safer), and from there connecting it to the stove with an outlet
When installed inside the kitchen, the cylinder must:
- keep a minimum distance of 1 m from heating appliances and gas ovens, and 0.5 m from the tiles themselves;
- provide unobstructed access to taps and valves;
- remain visible and unobstructed by any flammable finish;
- placed in a place where there is no direct sunlight.
The outlet from the cylinder to the stove is made of a steel or copper pipe, as well as a rubber, rubber with metal braid or bellows hose. A pipe product is more reliable, but makes it more difficult to rearrange gas equipment. A gas hose is more practical, but you should select one that is suitable for gas.
Regardless of the material used, the inlet must be without connections. It is allowed to connect it with threaded fittings or a tie clamp on the fitting only at the connection points of the shut-off valves and gearbox.
If the cylinder is placed outside in a closet, then a place for it should be chosen at a distance (to a minimum):
- from woodpiles with firewood - 3 m;
- from windows – 1 m;
- from the entrance to the house – 5 m;
- from ventilation ducts in the walls and basement - 3 m.
Also, cabinets should be moved at least 1.5 meters away from external fans, air conditioners and other electrical appliances on the facade of the building. It is necessary to completely eliminate the risk of sparks appearing near the gas from short circuits in the wiring and any electrical equipment nearby.
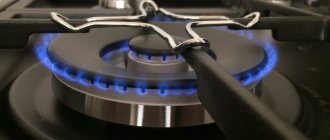
The combustion gas in the burner is supplied through special nozzles. For methane they are connected in one size, and for LPG in another, with a smaller hole.
For bottled blue fuel, jets with a diameter of 0.5–0.75 mm at 30 mbar from the gearbox and 0.43–0.6 at a gear pressure of 50 mbar are needed.
If the gas injectors are not selected correctly, the gas will burn with a yellowish color and soot due to lack of oxygen and excess pressure.
To replace the jets, you need to remove the burner body (in some cases, the top panel of the stove) and unscrew a 7 or 8 mm hex “bolt” with a small hole in the middle from the seat sleeve. Then the new nozzle is simply screwed into place of the old one.
How to choose the right hose when connecting yourself?
It is important to be aware of the dangers of connection work, entrust this task to specialists, or work independently under the supervision of a qualified gas service worker. The main task is to choose the right hose
Before purchasing it, you need to check it for defects. A certificate must be included with the hose. It is given out in the store
The main task is to choose the right hose. Before purchasing it, you need to check it for defects. A certificate must be included with the hose. It is given out in the store.
You can purchase either a metal hose or a rubber one. The second option costs less than the first. They are usually plain.
Installation nuances
Kitchen hobs are gas, electric and induction. Each of them has its own characteristics and requires a specific approach to installation. But there are general rules that apply to all types of kitchen installations.
Before proceeding with installation, you need to make sure that the following nuances are observed:
- the presence of a ventilation system and an exhaust hood equipped above the stove or the presence of a powerful fan in the window;
- tabletop material with a heat resistance level not lower than 100 °C, and the surface itself is not thinner than 25 mm;
- if you plan to install a panel between two cabinets, make the distance between the walls and the stove at least 15 cm;
- the gap between the wall and the slab must be at least 5 cm, and if it is smaller, then heat-insulating material is laid.
Any discrepancy in the installation of equipment is fraught with its incorrect operation and the occurrence of a fire hazard.
Electrical panel
Electric stoves are especially popular among users. They are easy to use, durable and beautiful. If they break down, you can carry out repairs on your own without calling a specialist. Of course, if you do not have at least minimal knowledge in the field of electrical engineering, then it is better to leave the installation and subsequent repairs to specialists.
On the back wall of any built-in electrical panel there is a diagram according to which the connection is made. If you do something wrong, it can result in a short circuit and incorrect operation of the burners. Some models are equipped with a wire for direct connection of the stove to the panel. This eliminates the need to make an additional electrical point for the socket. Installation in this case consists only of connecting the cable to the panel, installing it in the hole made and sealing it.
Gas hob
The gas stove, built into the countertop, is installed by the owner of the equipment himself. But a representative of the relevant service must make the connection and check the fault.
Typically, gas panels are attached to the countertop using special brackets that come included. After installation, you can connect the power cable and open the gas supply. At this stage you need to be extremely careful and take into account all safety regulations.
You need to make sure there is no leakage. For this, a special gas analyzer or the “old-fashioned” method is used. The joints between the panel and the pipe are lubricated with a soap solution and the gas is opened. If bubbling is visible, there is a problem that needs to be fixed.
Installation rules above the oven
Induction panels have many advantages over gas and electric stoves.
The following advantages can be highlighted:
- the surface quickly heats up to a certain temperature;
- easy to care for and keep clean;
- savings in energy consumption;
- the absence of open flame and too high temperatures makes the equipment safe for children.
When installing a stove above the oven, you need to take into account some subtleties. The oven must be equipped with a cooling system and forced ventilation.
The countertop into which the panel will be mounted must be perfectly flat. If you neglect this rule, then perhaps the deformation will disrupt the normal operation of the equipment, and it will quickly fail.
The main advantages and features of stoves with electric ignition
Naturally, not everyone needs such a function as electric ignition. Many people still use matches or a lighter to light the burners. At the moment, it is unlikely that you will be able to find a stove that does not have an electric ignition function. But there's nothing wrong with that. Prices for stoves with and without electric ignition are practically the same.
You may be interested in: Design and installation of a single-lever kitchen faucet
In fact, a stove with electric ignition has several advantages:
- You don't have to run around looking for matches or a lighter to turn on the gas. Moreover, this technique is very easy to use.
- There is no way you can get burned while lighting the burner.
- If you have used an electric stove for quite a long time, then the process of getting used to gas appliances will be more painless for you. You simply need to press a button or, as in the case of automatic electric ignition, turn a switch.
Installation work
First of all, you need to determine the type of oven and hob. These elements can be dependent on each other and autonomous. If the first option is chosen, two elements are placed in one niche. In the autonomous version, the hob can be installed in the center of the unit, and the oven in any convenient place where the gas supply hose can be reached.
Connecting the gas oven cabinet and starting it up begins with installing the equipment in the niche of the unit. To do this, the back panel of the niche must be removed and the oven placed on two bars that are pre-attached to the surface of the furniture set. This will ensure ventilation of the oven and niche to avoid fire. Next we connect the electricity. This is necessary for the operation of the fan, electrical control panel and other mains-powered functions.
The next stage is connection to the gas supply system. This installation stage involves connecting the oven cabinet and gas pipe using a hose. It is also necessary to connect the hob to the gas pipeline. In this case, you can use a welded pipe connection. Before starting work, do not forget to turn off the gas supply to your house or apartment.
After the gas oven and hob are connected to the fuel supply, it is necessary to configure all functions of the equipment, check the functionality of the burners and the gas control system. The valve responsible for the gas supply is subject to checking and adjustment.
Detailed instructions for connecting a gas hob and oven are presented in the video.
We follow safety rules
When connecting the oven to the power supply, remember that the wire should never come into contact with the gas pipe. The maximum heating temperature of the conductor should not be higher than 70C. Do not use extension cords or double or triple sockets. All additional wires and connections may cause a fire. Before you start cleaning the oven cabinet, it should be disconnected from the electricity supply.
Before final completion of installation work, it is recommended to check all joints for gas leaks. To do this, use soap foam, which must be applied to the connecting elements. If, when you turn on the gas, the soap begins to foam in some places, it means there is a hole there. Once the crack and leak are repaired, you can safely use the equipment. https://www.youtube.com/watch?v=gZhAjE8tk2k To summarize, we note that it is better to entrust the gas connection to the hob and oven to professionals
In this matter, it is important to take all precautions in order to avoid future accidents. If you decide to make the connection yourself, it is recommended to study the instructions for the equipment from the manufacturer. Also, study in detail the advice of experts
Only with step-by-step installation work, subject to safety precautions, can gas equipment be connected on your own
Also, study the advice of experts in detail. Only with step-by-step installation work, subject to safety precautions, can gas equipment be connected on your own.
Connecting a gas hob with your own hands
Connecting a gas hob is a more labor-intensive and serious process than an electric one. You can do all the work yourself, but you will need the presence of a gas service worker.
Advice. If you are not confident in your abilities, entrust the installation of a gas hob to specialists.
For those who still decide to install the gas hob themselves, step-by-step instructions with photos are offered.
- Selecting a panel installation location. The hob can be mounted anywhere on the countertop, regardless of the location of the gas communications. Gas is supplied to the hob through a corrugated hose in a metal braid. The limitation of the use of such hoses is the presence of automatic ignition in the gas panel.
- The hole for the panel is cut out in accordance with its dimensions.
- After the hole is ready, foam tape should be laid around the perimeter.
- Only after laying the foam rubber can a gas hob be installed on top.
- The next step is to connect the panel and the gas line using a hose. Invite a gas service employee to carry out connection work
- If your panel is equipped with automatic ignition, you will need to connect to the gas supply system. The best option would be to install a separate outlet next to the hob.
When choosing a gas hob, pay attention to the main criteria: surface material, number of burners, location of the control panel and additional functions. The choice of panel material determines how to care for it.
You can connect the gas hob yourself, but the presence of a gas service employee in this case is still required.
What tools are needed to cut the hole?
To correctly connect a gas stove, use the following tools and parts:
- a flexible hose of the required length - universal - about 1.5 m, or individual rubber - from 1 m or more;
- ball valve made of brass with nickel coating, designed for operation in systems that supply subscribers with natural and liquefied hydrocarbon gas of low and medium pressure;
- keys – gas and adjustable keys;
- gasket - usually sold complete with the stove;
- screwdrivers of various types;
- sealing tape or thread - for example, FUM tape or Loktail 55 thread;
- medium concentration soap solution and a brush to check the correctness and accuracy of the connection for leaks.
READ MORE: Hidden ceiling lighting with your own hands: step-by-step installation instructions
As soon as all the necessary components are at hand, they begin to work directly.
Installing and connecting a gas hob requires certain tools. To cut a hole for the hob, you will need at least three tools: a milling machine (preferably a manual one), a jigsaw, and a drill. To make the hole perfect, it is best to use a manual milling machine.
You should stock up on a set of screwdrivers. A knife and spatula will come in handy. If you have a set of wrenches, then you need to prepare it too. Every home owner should have a drill.
You should start cutting the hole using a drill. As a rule, you end up with sloppy edges that have to be corrected later. It is better to take drills from 8 to 10 millimeters. Gradually, many holes are made around the perimeter of the future panel. Afterwards, using a drill, a slot is immediately made. It is important to understand that you can only drill from the inside of the countertop.
When a piece falls, it can damage the kitchen unit. It is better to place a chair or cabinet under it. Cutting with a jigsaw is much easier than with a drill. First, you need to use a drill to mark the hole that the person will cut. It is possible to do it without resorting to using a drill.
Care must be taken when installing a gas hob. It is important not to injure yourself or damage the furniture.
Connecting an installed hob
Electrical panel
It is advisable to provide a connection point for the electric hob before installing the kitchen unit. The socket must meet all electrical safety requirements:
- have a grounding line;
- The supply copper cable must have a cross-section of at least 4 square meters. mm.
A hole is cut in the back wall of the base cabinet opposite the electrical outlet of such a size that you can easily insert and remove the plug from the hob by hand.
Sockets installed for self-connection come in two types:
- three-pin;
- four-pin.
If there is a plug installed on the hob cord, then to connect it, just plug it into the outlet. The power cord must be of such length that it is not too tight when connecting the device.
Plugs and sockets for connecting hobs
For models sold without a plug, certain steps will be required:
- If the socket is three-pin and there are four wires in the wire, then you will need to connect a two-phase model to a single-phase network. To do this, wires with black and brown insulation are connected in the cord. This connection is connected to the socket phase. The blue neutral wire is connected to the socket neutral, and the green-yellow wire is connected to ground. All connections must be securely insulated.
- If the placement of the wires in the socket is unknown, then using a multimeter you need to determine the phase and zero. If necessary, they are swapped so that they match the wiring in the plug of the device.
Induction hob
An induction panel is connected according to the same general principles as an electric one. Many models do not have power cords, and only have terminals for connecting an external cable.
The connection diagram is printed next to the terminal block
In this case, the connection is carried out in the following order:
- Remove the protective cover from the back of the device.
- The external cable is passed through the cover.
- The cord is connected to the terminal plate according to the diagram supplied with the panel.
- If a jumper is installed connecting zero and ground, it must be removed.
Gas panel
Household gas is a source of increased danger, therefore special requirements are imposed on the kitchen area:
- Availability of ventilation hood.
- Air flow of at least 2 cubic meters. per hour for each kilowatt of panel power.
- The distance to the wall is at least 130 mm.
- The supply gas hose must be located in such a way that it is not subject to excessive heat and allows for periodic inspection by the inspection organization.
The hob is connected with a flexible hose
The panel connection is carried out by a certified specialist in the following order:
- Sealing fum tape is applied to the threaded connections.
- Paronite gaskets are inserted into the gas hose.
- The hose is connected to the hob and the gas supply point.
- The joints are checked for leaks using soap foam.
- The power cord plugs into a spill-proof outlet.
To operate gas models, they must be accepted by the service organization responsible for this work in your area of residence.
You can install a hob into a kitchen unit on your own, carrying out the work carefully in accordance with the recommendations presented.
Connecting a Bosch electric hob
This device is usually connected using a four-wire wire and terminals that are located in a box on the back of the cooktop. In addition, there must be a special circuit on the surface of the device. To avoid errors, it is necessary to connect the device taking into account the information indicated in the mentioned figure. If you need to connect a power plug to a wire, you must first carefully study its markings. In a socket with three contacts, you need to connect two phase conductors of black and brown colors into one. Thanks to these simple steps, you will be able to connect a Bosch electric hob.
However, the device can be connected directly to the panel. The main thing is to carefully study the instructions and determine the number of phases in your home network.