Before we begin the actual process of dismantling the top control panel, we need to gain access to the screws that secure it.
One of them is located under the tray where the powder is poured. Therefore, first of all, with a slight movement of the hand and pressing a special button (on LG machines of recent years there is always a button that allows you to easily remove the tray), the tray is removed from its usual place.
One or two more screws are located on the opposite side, but we already have access to them, since we removed the top cover in the first step, and therefore, without thinking for a second, we begin to dismantle the top control panel, unscrewing the screws. After unscrewing all the screws, try to slightly pull the panel towards you: if this is successful, then you can safely remove the panel, because nothing is holding it in place.
Depending on the model of the machine, the control panel can either be hung on a service hook specially prepared by the manufacturer for such cases, or simply carefully moved to the side without breaking the wires: do not forget that we are not breaking the washing machine, but trying to do something to “heal” her.
Removing the front wall
The time has come to remove the front wall, which has long been looking at us with its sad glass gaze and asking us not to remove it. Let's not listen to the pleas of modest components: necessity is necessity.
But in order to dismantle the front wall, you must first disconnect the cuff (the elastic band located immediately behind the door) so that it no longer blocks the panel. Removing the cuff is not a difficult process: just feel for the spring holding the cuff and press on it, and the cuff will immediately loosen, and you can put it in the tank so it doesn’t get lost.
Now, by the way, you can begin the process of removing the front wall. To begin with, the screws connecting the front panel to the top are unscrewed, and, accordingly, they are located at the top. The number of screws is usually 3-4 pieces, no more.
By unscrewing them, the front panel can be lifted: it is held on hooks, in other words, hanging. Most likely, you won't succeed the first time. The tank lock will interfere, preventing the door from opening at the most inopportune moment during operation. It needs to be disconnected. On many models of LG washing machines, this is done by simply removing the lock from the groove with a screwdriver even before removing the front panel.
Call the master
Lack of experience in repair work and lack of knowledge of the internal structure of an LG washing machine is a reason for a professional service center to replace the motor. Contacts can be found on the Internet or use reviews from acquaintances and friends.
A specialist will quickly identify and fix problems , the main thing when submitting an application is to provide accurate information about the model of the washing machine, all visible signs of a malfunction.
The cost of replacing the engine of an LG washing machine starts from 1,750 rubles. The estimate includes: fault diagnosis, dismantling of the old and installation of a new engine. The new electric motor itself is paid separately.
The master never announces (let alone demands to pay) the cost of services in advance. When submitting an application, only a preliminary amount is announced, which may change depending on the urgency and complexity of the order.
Removing the back wall
Perhaps removing the back wall is the simplest thing we will have to do in the process of disassembling the LG washing machine. Business: unscrew two screws on the very back wall and remove it with a slight movement of your hand.
It’s even somehow uninteresting and undignified, but without this banal and, if I may say so, boring action, the entire next process will not make sense. We deliberately separated it from everything we had been doing so far, since the previous processes were rather mechanical, and ingenuity and accuracy came to our aid. Now the actions will become more difficult, and the risk of breaking the machine will increase.
How to disassemble the tank and drum
To disassemble the drum, you must first remove the stands. They are attached using plastic rods. From the back side of the rack, put a 14mm socket on the bolt. This will disable the latches that prevent the removal of the rods. You can get them out using pliers. You just need to securely fix them and pull them towards you.
Now you can disassemble the tank. It hangs on hooks. You just need to lift it up and remove it. Place aside. At the final stage, the drum is disassembled:
- unscrew the bolts that hold it around the perimeter,
- remove the top part
- flip the bottom half over
- lightly tap the bushing with a hammer,
- remove the drum from the tank.
This is how the washing machine is disassembled and prepared for further repairs. Inspect all main parts of the equipment for defects and contamination.
We remove what interferes and distracts
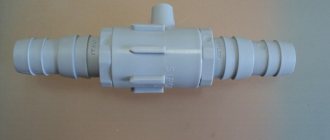
Having removed all the covers and panels, we saw all the ins and outs of the washing machine in the literal and figurative sense of the word. All unnecessary parts now need to be removed, and therefore the pressure switch hoses, the hose coming from the place where the tray (powder receptacle) was, the inlet hose and the drain pipe are removed from the car overnight.
The word “hose” is too much, isn’t it? Briefly speaking, we can assume that all the large hoses that catch your eye when looking at the washing machine in its current form are removed. To remove the hoses, you will need to unscrew the clamps securing them, and then directly remove the hoses. It is advisable not to remove the clamps from the hoses, especially if the latter are of different diameters.
Where and at what price can I buy a new one?
In order not to make a mistake in choosing a new drum, before purchasing you need to find out the exact serial number and model name, and year of manufacture of the washing machine. As a rule, complete information is indicated on the label, which can be found on the back of the household appliance.
It is better to purchase a new drum on the official websites of spare parts for LG household appliances (this will protect you from low-quality fakes). It would also be a good idea to ask the seller for quality certificates for the selected product before purchasing.
The cost of a drum for an LG washing machine varies from 2000 rubles. up to 4000 rub.
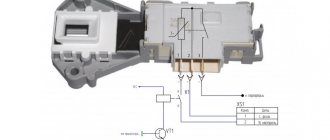
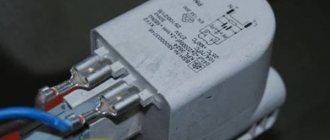
Disconnect the wires from the tubular electric heater (TEH)
The time has come to meet the electronics and start turning off the heating element, an item that is almost the most important part of the entire washing machine as a whole. There will be no electric heater - the water will be icy... well, or rather, the temperature set by the management organization.
In order not to confuse anything, take as clear a picture as possible of how the heating element was connected before dismantling. At the beginning of the article, we already recommended making a photo report of the entire process, but special attention should be paid to disconnecting the wires from the heating element.
Any mistake can cost a fatal breakdown of the tubular electric heater, and replacing it will cost a pretty penny... although, of course, if the LG washing machine is being disassembled precisely because of a faulty heating element, you don’t have to think too much, but still take precautions.
The structure of the washing machine element
A container made of perforated stainless steel located inside the washing machine tub is called a drum. It is into it, through the hatch, that dirty laundry is placed .
On the reverse side, the drum is connected to the motor through a shaft. The inner walls, in addition to perforation, are equipped with special ribs (loops). They help to better mix the laundry during the washing process.
The stainless steel drum capacity is enclosed in a plastic tank body (the two elements are connected using a pulley). Most often, LG washing machines are equipped with collapsible tanks (two parts are connected with latches and bolts). Very rarely, in older models of washing machines the tanks are solid .
The engine undergoes a similar process.
The wires of the electric motor of the washing machine also need to be disconnected, and we strongly recommend taking a photo of them: the photo will only take 1-3 MB, but it will give you self-confidence and the opportunity not to make mistakes when subsequently assembling the machine.
Wires for some unifying reason can be fastened with a plastic tie, and therefore all such “sets of wires” should be carefully removed from the machine so that they do not interfere and are not subject to any influence in case the situation gets out of your control .
More: LG washing machine does not drain water, what to do
How to put it back?
The process of installing the lid of an LG washing machine is simple. It is enough to perform all the steps in reverse order.
Quick Guide:
- wipe the cover from dust, remove dirt from the screw holes;
- install the part on the body, pressing it with your hands;
- move it away from you so that it falls into place;
- screw in the screws.
When the cover is in place, the machine is installed back, after which communications and electricity are connected.
Removing the LG washing machine tank
The machine is already ready to remove the tank, and only one thing prevents us from starting this: the shock absorbers of the tank itself.
Before removing the tank, you need to unscrew the shock absorbers using a wrench and remove the tank directly from the springs. On most models of LG washing machines, removing the tank does not imply preliminary dismantling of the electric motor, and therefore these processes have to be combined. So, having removed the tank from the springs and having full access to it, we need to remove the engine. Before doing this, you need to remove the belt from the tank and also remove the shock absorbers. After this, you can remove the engine by unscrewing several nuts securing it. Without neglecting photography, having done everything that was required, reassemble the machine
You disassembled the washing machine for a reason, didn’t you? You had a specific goal, after which you need to do the opposite - assemble the washing machine, which you recently so carefully disassembled, following our advice. Remember how at the beginning of the article we strongly recommended taking photos or videos? If you heed this advice, assembling the machine will not be difficult for you: you will only need to reproduce all the steps in reverse order. Voila!
Let us note once again: everything you do with your favorite and unique household appliances, you do at your own peril and risk. Today we found out how to disassemble LG washing machines. Let's hope that our advice has been at least somewhat useful to you.
What breaks in the engine?
New LG washing machines have so-called inverter motors. They have a whole lot of advantages: no brushes or other rubbing parts, they break extremely rarely, they accelerate instantly, maintain stable speed, and in addition they work very quietly. The manufacturer of modern washing machines, LG, trusts inverter motors so much that it boldly guarantees them for 10, and in some cases even 15 years.
If you have an LG washing machine with an inverter motor, then it is unlikely that you would be interested in this topic and read this article, since the engine is the last thing that breaks down in such machines. This means you have an old LG model with a brushed motor and something is clearly wrong with this motor. To understand what is wrong with the motor, you need to remove it, disassemble it and check it, but first you need to determine what to look for, that is, identify a list of possible faults. So, what can happen to the commutator motor of an LG washing machine?
- The brushes were worn out and the engine lost significant power.
- Perhaps the winding has broken.
- The lamellas are worn out, which leads to unstable operation of the engine and also affects its power.
For your information! Most often you have to change the motor brushes; this is the most common breakdown. In second place in terms of frequency are problems with the winding, and only in third place is wear of the lamellas.
Progress
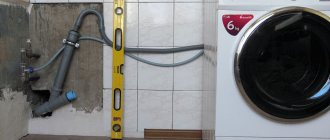
To get to the drum, we first disconnect the machine from the power supply, water supply and sewerage. We drain the residual liquid from the drain hose, and then remove the water through the garbage filter. Don’t forget to take the laundry out of the machine and move the equipment away from the wall, providing free access to the back panel . Then we successively remove the top and front covers, remove the counterweights, instrument panel, pressure switch, hatch door, cuff and other elements of the system until the tank appears before our eyes.
- We find the drain pipe at the bottom of the tank, loosen its hold and remove it.
- We unscrew the central bolt on the electric motor, fixing it in a stationary position, and remove the engine from the machine.
- We twist the fastenings of the dampers, take them out, and then remove the tank from the suspension springs.
- Having secured a pair of hands from a friend, we remove the tank from the washing machine.
- Place the removed container on a flat surface.
- Using a screwdriver, unscrew all the bolts on the body.
Life hack from repairmen: turn over the top cover of the washer and use it to store all small components (clamps, screws, nuts, terminals, connectors).
- We divide the tank into two parts, moving the upper half to the side.
- Turn the bottom part over with the cross facing up and treat it with WD-40.
- After 40-60 minutes, knock out the drum by hitting the bushing with a hammer.
- We pry off the oil seal with a negative screwdriver and remove it.
- We install the bolt on the outer part of the opened bearing and knock it out by tapping it in a circle with a hammer.
With the removal of the inner bearing, disassembly of the drum is completed. All that remains is to thoroughly clean the surface of its walls, insert a new bearing assembly and a pair of seals. Next, we assemble the washer, following the instructions described, but in reverse order.
Interesting:
- How to replace bearings on a Hansa washing machine
- How to change a bearing on a Samsung washing machine
- Do-it-yourself disassembly of a semi-automatic washing machine
- Disassembling the drum of a Bosch washing machine
- How to disassemble the drum of a Beko washing machine?
- Do-it-yourself disassembly of the Ariston washing machine
Reader comments
- Share your opinion - leave a comment