The bracket is the holder to which the projector is attached. Ceiling models are most often used. They are more convenient because, even when placed in the center of the room, they do not interfere with movement. Another advantage is the high quality of the projected image, since the broadcast is carried out directly on the screen. The image is not blurred along a horizontal line, as when placed on a wall. But brackets for ceiling-type projectors are different. And beginners who purchased video equipment for the first time cannot always select and install this accessory correctly. Let's take a closer look at the existing types of brackets and figure out how to mount the projector to the ceiling.
Types of Ceiling Mounts for Projectors
Holders are made mainly of metal; products made of plastic and wood are much less common. The bracket consists of several parts: a holding part (mount for a video projector), a rod and a support that is installed on the ceiling. The design can be different, which allows you to choose the right model for any projector. Let's look at the existing options.
Crabs (spiders)
This is one of the most popular types of ceiling brackets. The design consists of the following parts:
- mounting foot - the upper part attached to the ceiling using anchors or dowels;
- housing grip unit (the so-called “crab” or “spider”) - consists of several strips that are screwed to the projector cover;
- swivel joint - a part that connects the heel to the “crab”, which makes it possible to rotate and tilt the video projector.
If the upper part of different manufacturers is almost the same, then the design of the “spiders” is different and comes in several types:
- X-shaped with fixed slats;
- with movable adjustable legs;
- with sliding parallel clamps.
“Spiders” are universal fasteners that provide many possible positions for connection to the device. The mobility of the legs or fasteners ensures correct balancing of the equipment and center of gravity.
Three bolts
Some projectors only have three mounting slots on the lid. For such models, special types of “spiders” are produced - with three bolts. But if such a bracket is not found, then take an ordinary “crab” with movable legs and remove one bar. In most cases, it is possible to set the desired position.
Retractable (telescopic)
These brackets are equipped with a retractable rod. The ceiling stand is a round or square pipe that connects the mounting foot to the “crab”. There is an adjustment mechanism on top that allows you to align the bar vertically.
Telescopic bracket models are usually chosen for rooms with a height of 3 m or more.
Elevators
These are motorized elevators that are installed in a suspended ceiling or in a special niche. When the equipment is not in use, it is raised, reducing the likelihood of damage to the equipment.
Elevator brackets are designed somewhat differently. They represent a platform on which the projector is placed and secured. Instead of the usual barbell, a scissor mechanism is used here.
An elevator bracket is one of the most convenient options for high office spaces and conference rooms. Such models are quite bulky, although compact products for apartments are also produced (30-40 cm in the folded position).
Elevators are the most expensive and difficult to install devices. The most difficult thing is to set up the mechanism for extending and lifting the platform, so specialists are involved in the work.
Types of projection screens
Before you buy a screen for a projector, you should take into account the most significant parameters and features of the equipment. After all, most buyers know perfectly well why they need a projector, but are not well versed in the characteristics and technologies of such a system. So, first of all, you should choose the type of projection screen.
Types of projection multimedia screens:
- Stationary screen (tension or roll).
- Mobile screen.
The wall screen for a stationary type projector is a durable and reliable design that is quite easy to use. This type of screen is presented on the market in roll and tension types.
The roll-up projection screen is easy to use and compact because it can be deployed immediately before showing video files and hidden when the need for viewing disappears.
Such a screen can be motorized or spring-loaded. The first option rises and lowers using a special electric motor.
The second option must be unfolded manually and folded using a spring mechanism.
The tension screen is attached to a special metal or polycarbonate frame, so it will always be deployed on the wall. The choice of this screen depends on the functionality and its purpose.
Mobile projection screens are characterized by compact dimensions and vary in type of mounting and design. The most popular today are canvases on a tripod, which are characterized by their low weight and the speed of changing their positions.
Screen selection by technical parameters
Before you start choosing a multimedia screen, you should distinguish between design features and its technical features. Among the most important screen parameters are size and format.
Media screen size
Manufacturers of projection equipment recommend paying special attention to the following characteristics:
- The distance from the canvas to the first row of the audience should be similar to the width of the screen itself or a value equal to twice the height of the canvas.
- The height of the canvas must be at least 1/6 of the distance at which the last viewer will be located.
- The selection of a projector screen size should be based on the following data: the height from the bottom border of the canvas to the floor should be at least 120 cm. This is a comfortable value for the viewer, which does not apply if the screen is fixed at an angle or the hall has several tiers.
Multimedia screen format
This parameter is the ratio of the width of the illustrated image to its height. Many projection devices for home cinema viewing are equipped with a 9:16 aspect ratio screen.
While for the office version the most suitable screen format is 3:4.
To improve the quality of the video image, it is necessary to ensure that the format of the canvas matches the format of the image itself transmitted by the projector.
Selecting a screen by surface material
Manufacturers of projection screens offer designs with different surface finishes to ensure the highest quality video images. The choice of screen based on the surface material parameter depends on its purpose and the room in which the structure is planned to be located.
The main parameters of the surface material are the following:
- The gain indicator is a value that indicates the light reflection of the canvas. The higher the ratio, the brighter the video clip will be, allowing viewers to see it from a far distance.
- Contrast is an indicator of the accuracy of displaying light and dark fragments of video material.
- Viewing angle is a value that characterizes the part of the space where it will be most comfortable for viewers to look at the screen.
A universal option for home movie viewing would be a screen with a white matte surface. Thanks to the wide viewing angle and accurate color reproduction, the screen will convey the quality characteristics of the video and make viewing comfortable. This screen is labeled Matte White.
To achieve the brightest image on the screen, you need to choose a bead-coated canvas, which is labeled by manufacturers as Glass Beaded. It has a mirror reflective surface.
And the bead coating is a spraying in the form of glass chips, which helps to reflect the light flux. This allows the screen to be mounted close to the audience or even on a table in front of the audience.
This screen is used in rooms with fairly bright external lighting.
To enhance the contrast of the image on the canvas, you need to install a screen with a gray surface, which manufacturers call HiDef Gray or High Contrast. This projection screen clearly conveys rich black shades, without darkening the light gamut of the image.
You can learn more about the intricacies of choosing a projection screen here:
Projection screen installation
To make a smooth installation of a projector screen, you need to follow simple rules. These recommendations will help you get a good result and avoid serious mistakes during the work process.
Selecting the blade position
First you need to decide on the location of the projection screen. When choosing, it is important to take into account the data prescribed in the instructions for the device. You also need to think about how much space needs to be freed up for the screen and where possible points for connecting to the network are located.
- The screen plane should be positioned so that the projector lens is perpendicular to the canvas.
- The ratio of screen dimensions should be in accordance with the image format.
- The projection screen should be fixed so that the image is displayed across its entire surface.
- Any obstacles should be removed between the screen and the audience seats.
- It is important to ensure that each viewer in front of the canvas has an optimal viewing area.
- In a home theater, the distance from the projector to the screen should vary between 60 cm and 90 cm between the bottom of the screen and the floor. This will ensure that the image remains in the person's field of vision at all times. For business presentations, this distance indicator should be within 120 cm.
It should also be remembered that the quality of the illustrated video material depends on the illumination of the room itself. For this reason, it is necessary to ensure that there are no additional light sources near the screen. To make the image as optimal for viewing as possible, it is recommended to darken the room.
Mounting the screen on the ceiling or wall
The main recommendations for reliable and high-quality mounting of the projection screen are the following:
- To install the screen on the ceiling surface or in a vertical position, it is recommended to use the fastening components that are supplied with the device. These materials have been tested for suitability and provide high-quality fixation of the canvas on brick or concrete surfaces.
- If the multimedia screen has a built-in electric drive, it is necessary to provide space for the switch. It must be installed at a level of at least 1.5 m from the floor, and ensure that the place is not accessible to children and pets.
- To install a projector screen on a suspended ceiling, you must use a special ceiling-type mount. It is available upon request as an additional component. The brackets look like a set of two independent components - a ceiling rod and the mount itself. They are often produced with the option of adjusting the height of the structure, rotating the lower center horizontally, and also the ability to adjust the angle of the screen.
In this case, installing the screen to the ceiling is quite simple and quick:
- Remove some finishing boards for a while.
- Secure the outlet to which the power wire will be connected.
- Cut a hole in any ceiling element for the rod and cables.
- Take them outside.
- Lock the trim board in place.
It is important to provide for the nuance that the switch should not be located in the unfolding area of the projection screen. All moving components of the screen must be placed in the field of view in order to control the process of unfolding/folding the canvas.
How to choose the right bracket
The holder must meet the following requirements:
- The permissible load must correspond to the weight of the projector (indicated in the technical specifications and accompanying documents). Compliance with this requirement will not only ensure the safety of the equipment, but will also protect residents from injury.
- The layout of holes and sockets for connection to the device must match. If the model is universal, it is chosen so that the platform is configured as accurately as possible. This is also a safety factor.
- The size of the boom must match the projection distance. Even sliding parts have a limited length. Therefore, you first need to carry out all the calculations and find out at what height the screen will be suspended. We'll look at how to do this below.
In addition, they take into account whether additional functions are needed: the ability to rotate or tilt the optical axis, and if so, in what increments. They allow you not only to clearly adjust the picture, but also to change the location of the screen. It is also necessary to take into account the design of the ceiling. For example, in attics the roof is located at an angle, so you will need a bracket with the ability to adjust the slope. In this case, the degree of inclination is selected depending on the degree of bevel of the ceiling.
How to assemble and install a projector screen?
A high-quality projection screen offers the user maximum projection possibilities. This statement is equivalent both for users of budget projectors and for owners of more expensive and professional models.
Unfortunately, many people ignore this fact for a number of reasons, the main ones being the complexity of assembling and installing the projection screen, as well as the high cost of the necessary components.
And here Chinese manufacturers come to our aid again, offering to purchase a ready-made solution at a relatively affordable price.
We recommend that you familiarize yourself with the options for popular projection screens from Aliexpress in our article , which, by the way, is regularly updated. And in this material we will try to understand in more detail the installation and features of installing a projection screen.
So, let's go.
Projection screen equipment
The scope of delivery of a projection screen can vary greatly in composition and installation features. Very often you can see options when the user is offered to buy only the canvas itself, without a frame and any components for installing the screen. Indeed, many people use the projection surface without bothering with its installation.
And they simply hang it on the wall, securing it with anything, from nails to tape. We still do not recommend using the projection surface in this way. Since without proper installation it will not have the required level of uniform tension, so necessary for a clear projection.
We also don’t really want to consider the option where the user crafts his own frame and fastenings from scrap materials. So let's focus on a more or less ready-made solution. Namely, kits that include both a projection surface and materials for mounting the screen.
The most popular versions of such kits from China are found under the brand name Visualapex . The standard components of the kits can be seen below.
As a rule, some consumables, such as screws and dowels, that the Chinese include in the kit are not of high quality. And it’s better to immediately replace them with your own. Moreover, they are found in almost any home. Well, it's not that important.
But what really matters is the quality of the canvas and frame. And here things are much better. Of course, there are exceptions, so when choosing a projection screen kit, never forget to analyze the reviews of users who have already purchased it.
The kit may have additional fasteners in the form of metal strips that connect the frame, and other additional components.
The screen size can be chosen based on personal preferences, financial capabilities, and, of course, the characteristics of the projector used and the conditions in which it operates. The most common screen parameters can be seen in the table below.
Size(inch)/Aspect Ratio Projection Area(inch) Overall Screen Size(with Edge)
| 60″/16:9 | 52″ x 29″ (132x73 cm) | 53″ x 30″ (134x75 cm) |
| 72″/16:9 | 63″ x 35″ (160x89 cm) | 64″ x 36″ (162x91 cm) |
| 80″/16:9 | 69″ x 39″ (177x100 cm) | 70″ x 40″ (179x102 cm) |
| 84″/16:9 | 71″ x 40″ (181x102 cm) | 72″ x 41″ (183x104 cm) |
| 90″/16:9 | 78″ x 44″ (199x112 cm) | 79″ x 45″ (201x114 cm) |
| 92″/16:9 | 80″ x 45″ (203x114 cm) | 81″ x 46″ (205x116 cm) |
| 100″/16:9 | 87″ x 49″ (221x124 cm) | 88″ x 50″ (223x126 cm) |
| 106″/16:9 | 92″ x 52″ (233x132 cm) | 93″ x 53″ (235x134 cm) |
| 110″/16:9 | 96″ x 54″ (243x137 cm) | 97″ x 55″ (245x139 cm) |
| 120″/16:9 | 104″ x 58″ (265x149 cm) | 105″ x 59″ (267x151 cm) |
| 133″/16:9 | 115″ x 65″ (294x165 cm) | 116″ x 66″ (296x167 cm) |
| 150″/16:9 | 130″ x 73″ (332x186 cm) | 131″ x 74″ (334x188 cm) |
| 180″/16:9 | 157″ x 88″ (398x224 cm) | 158″ x 89″ (400x226 cm) |
| 200″/16:9 | 174″ x 98″ (442x249 cm) | 175″ x 99″ (444x251 cm) |
If you are the happy owner of a modern ultra-short throw projector (up to 1.5 meters), be sure to take this into account when choosing a projection surface.
Since for short-throw projectors the microstructure of the canvas has its own characteristics. The material of such canvases has a ribbed structure aimed at capturing the light flux emanating from bottom to top.
The principle of the structure of this type of canvas can be seen in the example of a UST ALR screen below.
Projector screen assembly
Installation work on assembling the projection screen begins with careful unpacking of the components. Particular care should be taken in relation to the projection surface. It is better not to touch it with dirty or greasy hands, and carry out all necessary manipulations with gloves.
After you have laid out and checked the presence of all the components necessary for assembly, you can begin the actual installation.
- The first step is to assemble the metal frame, securing its joints with screws using metal strips, usually included in the kit.
- When the frame is assembled, prepare a special flooring made of soft paper (usually included). The flooring will serve as a kind of mounting platform that will protect the reflective surface of the projection surface from damage.
- Carefully unfold the projection surface with the reflective surface facing down. Insert straightening bars into the mounting holes of the canvas.
- Place the finished frame on top of the projection surface. And secure the projection surface to the frame using tension springs. In this case, one side of the spring should be attached directly to the frame, and the other to the straightening bar inserted into the mounting holes of the blade.
- After installing the springs, adjust their tension with a wrench so that the canvas is evenly distributed over the frame. As a result, you should not be left with wrinkled or warped areas. The finished screen must be perfectly flat.
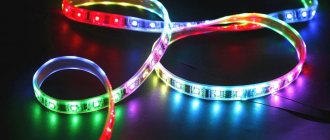
Installing LED backlighting on a projection screen
Many people have probably noticed that the promotional images of projection screens from China show LED backlighting.
Alas, cunning sellers forgot to mention that such lighting is often simply not included in the basic package, and its installation lies entirely on your shoulders, like other installation work. Actually, the LED backlight itself is quite easy to get.
Essentially, it’s just a strip with built-in LEDs, which can be purchased on Aliexpress. It’s better to immediately take a tape with a controller and mains power, like here or here .
As a rule, on the back of the screen profile there is a small indentation or groove along the entire perimeter of the frame. That’s exactly what he planned on installing LED backlighting. The LED strip has a layer of double-sided tape onto which it is attached.
You just need to carefully remove the protective layer and evenly glue the tape around the perimeter. The backlight power is usually output to the bottom of the screen. The backlight is controlled from the remote control.
The whole operation takes no more than 20 minutes, and the result looks very cool.
Installing a Projector Screen
So, after completing the installation work, we have a projector screen ready for installation. Ideally, even before purchasing and installing the projection screen, you understood exactly where you would like to install it.
Naturally, as we wrote earlier, the size and installation location of the projection screen, as well as the features of the projection surface, should be focused on the specific model of the projector used and its characteristics. The optimal distance between the projector and the projection screen can be calculated using a metric called throw ratio.
Typically its range is from 1.4:1 to 2.8:1. By multiplying the throw ratio by the screen size, you will get the minimum required distance to the screen.
Example: 1.4 (throw ratio) x 182.88 (screen size 72 inches = 182.88 centimeters) = 254.032 (distance in centimeters).
In other words, the minimum recommended distance of the projector to the projection screen with a throw ratio of 1.4 and a screen size of 72 inches is 182 centimeters.
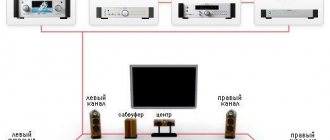
Installing the projector on the ceiling
Attaching projection equipment to the ceiling has its own characteristics. This is harder to do than with a TV or speakers. The image on the screen should be transmitted as clearly as possible. Only with proper installation will watching a movie bring pleasure and delight you with a bright picture.
Determining the height and installation location
Where to hang the projector is determined by the shape of the room, the size of the screen and the characteristics of the equipment itself. Also take into account obstacles in the path of the rays - chandeliers, air conditioners and other devices. They check whether pets or people can damage the equipment (this is likely if there is a high podium in the house).
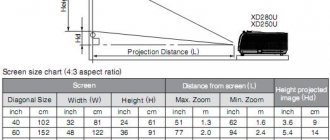
Before installation, calculate the projection distance between the screen and the lens. To do this, you need to find the projection ratio in the instructions for the device. The value is represented by a numeric range or a single digit. To obtain the desired value, multiply the screen width by the projection ratio, expressed in inches or centimeters. So, for a screen with a diagonal of 100 cm with a projection ratio of 2:1 to 3:1, the distance should be 200-300 cm.
Using the same formula, they will find out what size screen is needed if the equipment must stand at a certain point. Then the distance to the planned location is divided by the projection ratio and the required width is obtained. For example, 10 m/2:1=5 m.
When choosing a location for the projector, you need to consider:
- seating arrangement - they are not placed at the bottom if the equipment is heavy, especially when the home theater is used to show cartoons to children;
- places of sockets - the cable length should be enough to connect to the power supply;
- image quality - the picture will be different depending on the distance even if the calculations are correct, so you need to try several positions.
Next, find the amount of vertical displacement of the projector (in percent) at which the image is displayed correctly. This parameter is also indicated in the instructions. With a positive value, the image is located above, with a minus value, below the lens. Positive numbers are more important because the equipment is mounted upside down.
At the next stage, the optimal height is calculated using the formula: the screen height is multiplied by the vertical displacement indicator. For example, if the screen height is 124 cm, and the vertical offset is +/-96.3%, or 0.963, the result is: 124 * 0.963 = 119.4 cm. This means that the equipment must be installed accordingly up to 119 cm above or 119 cm below the middle demo panel.
Another important value to figure out before mounting your projector to the ceiling is the horizontal lens offset. The lenses should be aimed at the center of the screen. The position is calculated using the previous formula, but takes the horizontal offset (%) multiplied by the screen width.
Complex calculations are more often used when installing demonstration equipment in large rooms. At home, it is often enough to calculate the height of the bar (X), which is determined as follows:
X=A-B-C , where:
- A is the height of the walls;
- B is the distance from the floor to the bottom edge of the demonstration screen;
- C is the vertical length of the canvas.
For example: 2.5-1-1= 0.5 m.
Most brackets make it possible to move equipment vertically. This allows you to find the most suitable point. If the rod has a fixed length, then the bracket is mounted at the height recommended by the manufacturer.
Mounting the bracket and securing the projector
When all the calculations have been made, select a mount that matches the brand of the projector and connect the cables. Then proceed to installation:
- Screw the projector to the legs or lower platform of the bracket in accordance with the manufacturer's recommendations. Check the reliability of the fastening.
- Open the screen on which the broadcast will be carried out.
- Adjust the height of the suspension.
- Check the picture quality by first attaching the projector to the ceiling. The boundaries of the frame when zooming in the middle position should coincide with the edges of the screen, as well as the center of the image and the demonstration canvas.
- From the middle of the screen, draw a perpendicular line along the ceiling, marking the place under which the center of the lens should be placed.
- Holes are drilled in the concrete ceiling and plastic dowels are inserted. In wooden houses, beam ceilings are used for this.
- Center the device so that the corners do not outweigh.
- Screws are tightened securely.
- Adjust the position of the projector along the X, Y, Z axes.
Wires can be hidden in the ceiling. To do this, a groove is cut into the ceiling. After laying the cables, the surface is leveled with putty. An easier way to hide wiring is to use a plastic cable duct.
Final projector settings
After installation is complete, turn on the projector and adjust focus, lens shift and other parameters: brightness, contrast, color. If you cannot install the equipment perpendicular to the screen or if it is above or below the acceptable zone, you will not get a rectangular frame. Then use digital keystone correction - this function is provided by the projector software. But if the deviations are significant, the picture quality will deteriorate.
Sometimes it turns out that the distance to the screen is not enough or it is too large. This may be dictated by the configuration of the room. Then a long-focus or short-focus lens will correct the situation. The accessory is sold separately from the multimedia system.
Incorrect installation of the projector will affect the image quality. If it is located too close, the picture will be small; if it is too far, it will go beyond the boundaries of the screen canvas.
Canvas dimensions
Before clarifying how to properly install a projector in a room, we need to consider in detail what affects the size of the screen onto which video from the film projector will be broadcast, namely:
- here the optimal expansion of the output image is taken into account;
- Additionally, the size of the room where the film projector is installed is influenced;
- It is important to take into account the quality of the broadcast and optimal settings;
- Additionally, free access should be taken into account;
- Also, when mounting (installing) a projector in an apartment, you should calculate the color scheme and the presence of lighting in the room.
Taking into account all these points, it is possible to determine how to correctly select and install the display in front of the device to transmit high-quality images. As in the case of format height, there are additionally standard values that are used in production by all brands that produce similar equipment.
Important! To choose the optimal canvas size for the room, you should additionally rely on the existing factory parameters that are inherent to the purchased film projector.
Features of fastening to suspended and suspended ceilings
The method of mounting the holder depends on the finish of the floors. For suspended and frame structures, the process is slightly different.
Plasterboard ceiling
The total weight of the projector and bracket is taken into account when working with this type of finish. So, with a weight of up to 5 kg, equipment is hung on gypsum boards. For this purpose, you can use butterfly dowels, which open after screwing in the screw and hold the device.
For greater weight (up to 10 kg), the holder is attached to a metal frame, to which drywall is hemmed. The location of the profile is determined with a magnet.
If heavy equipment is used, a hole is drilled in the drywall and the holder is secured to the base ceiling. Then the slot can be hidden with decorative polyurethane overlays.
Armstrong cassette ceiling
This finish is the most convenient because it allows you to easily dismantle one slab. Install the bracket like this:
- Remove the cassette.
- Wiring is laid between the base and finished ceilings.
- A hole is drilled in the panel for the stand and cable.
- A holder with a rod is attached to the rough ceiling.
- A drilled cassette ceiling tile is placed on the stand and the wires are passed through the hole.
- Return the removed elements to their place. Then the “crab” is screwed on and the projector is attached.
Stretch ceiling
This is one of the most problematic options, so it is better to contact the company that installed the ceiling. A beginner will most likely ruin the film coating and the canvas will have to be changed.
There are two ways to install the projector on a suspended ceiling:
- On the embedded part . At the point where the bracket is attached to the floor slab, a wooden beam or plastic platform is mounted flush with the suspended ceiling. After stretching the canvas, the holder for the projector is screwed to the embedded part located in the interceiling space.
- On a concrete floor with outlet to the outside . If the length of the bracket rod allows, the rack is attached to the sub-ceiling. Then a hole is cut out in the tension fabric, after gluing a tread ring so that the hole does not come apart. This method is more complicated, since you need to accurately calculate the location of the cutout, otherwise folds will form after stretching. In addition, the integrity of the canvas is compromised.
Due to the high risks and large amount of work required, it is best to install the projector in the ceiling. If such a need arose after the repair, then the tension fabric is partially dismantled.
Read more: How to remove a suspended ceiling
It is also important to consider that most popular projection equipment models become very hot during operation. From high temperatures, the PVC film, which is used as a canvas for a stretch ceiling, can be deformed, therefore, the further away the projector is located, the better.
Equipment installation principles
The projector mount can be wall or ceiling mounted, with a design that allows you to adjust the position of the unit. Before choosing a mounting bracket, keep the following points in mind:
- the bracket for the projector must be selected taking into account the weight of the device, its type and dimensions;
- It is recommended to purchase high-quality fasteners, since cheap ones have a short service life, often become loose and position the equipment incorrectly;
- Before installing the projector on a suspended ceiling with your own hands, you will need to buy a special mounting kit.
Installing the mount
Using the included instructions, screw the mount to the device. Make sure the mounting plate is the correct size for your unit model. Also, before hanging it on the ceiling, check that the mounting screws are securely tightened.
Next, using a tape measure, determine the distance from the optics of the unit, that is, its front plane, to the center point of the bracket. This value is added to the previously defined range of distances to the screen. For example, the length of the segment from the edge of the lens to the central mounting point is 20 cm, and the projection distance is 5 m. It follows that the projection distance needs to be increased by 20 cm (5 + 0.2 = 5.2 m).
Mounting the bracket on the ceiling
For overhead installation of equipment, the type of ceiling is taken into account, since it can be concrete, tension, suspended or plasterboard.
- If the room has a concrete ceiling, then using a tool such as a hammer drill, you should make holes in it, and then drive plastic dowels into them. Next, you need to align the holes on the bracket plate with the same ones on the ceiling and tighten the screws. Of course, the cable connected to the equipment does not look very aesthetically pleasing. Therefore, if you know in advance before starting renovations in your apartment that the room will be used as a cinema, you need to cut (drill) a groove in the ceiling for laying wires. In extreme cases, the wires are perfectly hidden in a plastic cable channel.
- A plasterboard ceiling is ideal for hanging a projector and making all the wires invisible. But, if you are dealing with a previously installed and painted coating, then you can hang the unit using a butterfly dowel (if the unit weighs no more than 5 kg). This fastener is different in that when you screw in the self-tapping screw, half of the plastic dowel opens and is securely fixed to the plasterboard panel. Before inserting the dowel, you need to drill a hole of the correct diameter so that it fits very tightly. Otherwise, when tightening the self-tapping screw, the dowel will rotate. In the case of a large mass of the device, the projector is mounted on a metal partition, which is used to fasten sheets of drywall.
- The collapsible suspended ceiling consists of cells that can be easily removed, after which the bracket is fixed directly to the concrete in the manner described earlier. Next, a hole is cut in the tile pulled out of the cell for the bracket rod, after which it is installed in place.
- To mount the projector to a suspended ceiling, you cannot do without the help of specialists. If you are going to install the equipment before installing the stretch ceiling, then first a mounting plate is attached to the base ceiling, to which the mounting plate will be attached. But if the length of the rod is sufficient, then you can not use the mortgage. After carrying out this work, stretch ceiling specialists will burn a hole in the canvas and strengthen it with a special ring. The bracket rod will pass through this hole. In the case when the suspended ceiling has already been installed, the only way out is to partially dismantle it, followed by installing it in its original place after securing the bracket.
How to make a ceiling mount for a projector with your own hands
Manufacturers recommend hanging the projector on standard or factory universal brackets. But if the device is broken or there is no replacement, you can make the accessory yourself using this master class.
To make the bracket you will need:
- square aluminum tube;
- 4 galvanized corners;
- mounting plate to fit the projector;
- 4 bolts for mounting to the ceiling;
- bolts 4x32 and 4x16, nuts and self-tapping screws.
The structure is assembled in this order:
- We make a bar: we cut the pipe in half and glue the parts with superglue.
- We screw the corners in pairs to get an H-shaped structure. We screw two nuts onto each bolt. For reliability, you can “seal” the fasteners with superglue.
- We cut the mounting plate to the size of the projector. Then we drill holes corresponding to the mounting points on the device body.
- We screw the rod.
- Drill 4 holes in the ceiling.
- Attach the bracket.
- We screw the projector.
Mounting the Projector
To ensure that the device is held firmly, you need to choose the best mount for the projector. They differ depending on what they are attached to. Also be aware of the type, size, or weight of the projector that these mounts can support. All this must be kept in mind when choosing suitable fasteners. Choose durable, high-quality materials, as low-quality projectors will move and distort in relation to the screen over time.
Also, the need to purchase special adapters depends on the type of ceiling and walls. They are sold for both suspended and precast ceilings. Buy only the option that suits you. Once your selection is made, attach the mounting brackets to the projector. Before moving on to the next step, make sure the mounting plate is level with the installed projector.
Gamers are very sociable, study shows
Green beans and other foods that should be scalded with boiling water before eating
Blonde with silver-gray tints: 10 spectacular “cold” coloring ideas