How does a projector work?
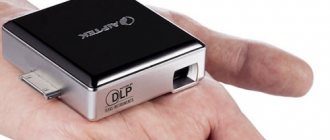
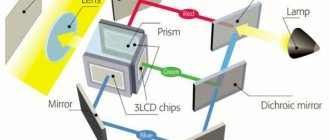
In order to assemble the right projector, you need to understand how it works. In fact, almost all projectors are designed according to the same principle. It includes an optical system, an image modulator, a lamp, a cleaning and cooling system, and in more modern devices there are various electronics.
In addition, most multimedia projectors are equipped with ZOOM lenses, with which you can change the image without moving the device.
The image enters the lens through a matrix that operates through transmission. Each pixel projected onto the screen increases in size. This helps to get the highest quality image possible. The quality of the image depends on the number of pixels and the more there are, the better it will be.
The brightness of the lamp also depends on the size of the screen on which the film will be viewed.
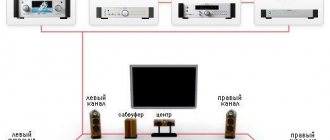
Wireless connection
It is very convenient to use a wireless connection in places where there is a risk of wire breaks. For example, at school. In these cases, a connection via Wi-Fi is relevant. Data transfer in this case takes place via the DLNA protocol. By connecting your smartphone to the projection installation, which acts as an access point, you can turn the projector on and off using your phone.
Important! Do not forget that to use a Wi-Fi connection from a laptop or PC, you will need to install additional software. This applies to Windows OS. Whereas on the Android system such software is installed by the manufacturer.
To be able to turn on the projector from your phone, you need to follow these steps:
- go to the projector settings and specify Wi-Fi as the signal source;
- connect to your phone’s Wi-Fi using the network name and code that are specified in the projector settings;
- enter the “Screen” menu in the system settings of your mobile phone;
- activate “Wireless Projection”.
This method works well for all Android phones, but you need to make sure that the system software is updated above version 4.2.2 . Earlier versions did not yet have support for wireless screen sharing.
What you need to make a projector for your phone with your own hands
Before starting to create a homemade projector, the user must understand that the image quality will not be the best. You can improve the quality of the picture with the help of good tools and a smooth canvas. To create a budget projector you will need a smartphone, tablet or laptop. The image from the device will be enlarged and projected onto the screen.
A home projector will be sufficient for watching a variety of feature films, but the image will be too blurry for watching broadcasts or scientific films.
In the process of creating a home projector, you may need the following tools:
- Box;
- Magnifier;
- Insulating tape;
- Stationery knife;
- A device that will act as an image source;
- Clip;
- Construction pencil.
It should be noted that this list may increase depending on how the projector is created. For example, if the user decides to make a projector without using a magnifying glass.
Projector out of the box (DIY)
A projector is a good thing, but expensive, and it’s not needed often, so rarely does anyone have one at home. After my post, I scoured the Internet and found a way to make a projector from a phone/netbook/tablet and a simple box.
For a projector from a phone, we need: - a shoebox (preferably with a black interior, but you can also paint it), - a telephone, - a magnifying glass - a magnifying glass, - a pencil, - a knife/cutter, - dark adhesive tape / electrical tape, - a paper clip for fixing phone (how to make a stand can be seen in the source).
We draw a magnifying glass around the middle of one side and cut it out.
We insert a magnifying glass and carefully glue the joint so that there are no gaps and light does not enter there.
We place the phone, fix it at the required distance - the projector is focused by moving the phone in the box relative to the magnifying glass, move the phone starting from the back wall of the box until the image begins to come into focus. When light passes through the lens, it is reflected and the image coming out of the projector lens is upside down. It's not a problem - just figure out how to flip the image on your phone. Close the lid, turn off the light and enjoy the slides. Source Source Source
But the image from the phone is quite blurry, since the picture is small and the screen brightness is not high. To improve the result, you should use a laptop or tablet.
For this we will need: - a cardboard box - should be about half a meter on the long side, and the front part should be larger than the screen of your tablet or laptop. - tape, - pencil, - knife/cutter, - Fresnel lens made of hard plastic, for a tablet - a box or books the size of it and rubber bands.
It can be bought on ebay (keywords: Fresnel lens). The price is around 6-10 dollars. For this project, a Fresnel lens measuring 20x25 centimeters was used.
Ideally, the hole on the front panel should be a couple of centimeters smaller than the Fresnel lens. Use the lens as a template to draw a rectangle. Draw a second rectangle inside the first, stepping back a couple of centimeters.
It is not necessary to draw a rectangle drawn with a bank card. This hole will be used as an iris inside the projector to enhance the image if you decide to use a smartphone.
Use tape to secure the Fresnel lens to the front of the projector. The corrugated part of the lens should be directed towards the inside of the box. Once the lens is installed, the box can be folded.
We secure the tablet with rubber bands to the box/books and insert it into our “projector”.
When using a laptop, this design will be too small.
In this case, you can cut a hole on the side of the box and turn the laptop upside down. At the moment, this is the easiest and fastest way to assemble a projector. In addition, the laptop gives better results, because... its screen is the largest and brightest.
The image you project onto the screen is flipped horizontally and vertically. You can fix this by turning your tablet or laptop over. Note that the image will still be flipped horizontally, although the top-bottom orientation will be correct. This means that the numbers and words on the screen will be from right to left.
Since the Fresnel lens is flat, there is some optical distortion in the image. For example, the edges of the screen may be slightly blurred, but the center will be in focus. The brightness of the device should be set to maximum to obtain maximum luminous flux. If you can keep the room completely dark, the image will be clearer and brighter. An image with a diagonal of 120 centimeters is quite watchable when using a laptop and also when using an iPad. Of course, the closer you move the projector to the screen, the smaller the image will be, but it will be brighter and more in focus. Source
PySy: the images turn out to be quite small for transferring the picture to the wall, but if it is an image without a background and, again, without very small details, then moving the projector further away, we get a blurry, but large picture, which should be suitable for tracing the outline.
How to make a projector from a phone and a box
This method for creating a projector is considered the simplest, but at the same time effective. Moreover, a similar design can be ordered on various websites, and its cost is within 200 rubles.
If you decide to make the projector yourself, you will need to prepare the following tools:
- Any box must have a lid;
- Styrofoam. Its piece must be much larger than the phone that will be used in the design. Also, it should be approximately 6 centimeters thick;
- Stationery knife;
- Magnifying glass. You should not use cheap magnifying glasses, since this design requires the use of glass, which can magnify at least ten times;
- Insulating tape.
Step-by-step process of creating a projector with your own hands:
- First you need to put the box on its side and place a magnifying glass on top;
- The lens should be located exactly in the center of the box. After this, you need to outline the contours of the lens with a pencil;
- The resulting circle must be cut out. A stationery knife will help with this;
- Next, you need to secure the lens in the hole using electrical tape. If possible, the creator can also use hot glue or silicone to make the resulting design more attractive;
- Now you can begin the process of creating a holder for your mobile device so that it is firmly attached while watching movies and videos. To do this, you will need to place the gadget so that one of its sides coincides with the edge of the foam, and then you need to circle it;
- Using a pencil, you need to make small allowances on each side, excluding the side that was on the edge of the foam;
- After this, you need to cut out a small rectangle using a stationery knife;
- Now begins one of the most difficult stages, in which you need to cut out the remains from the center of the foam so that you get a hole;
- Next, you need to check whether the mobile device will fit into the cut-out hole. If it fits without problems, then you can proceed to the next step, and if not, then you need to expand it;
After this, you will need to make a base from a large sheet of foam, to which you need to glue the finished holder for your mobile device on top.
It is worth making sure that the resulting design fits into the box with the lens; At the end, you need to turn off the lights in the room with the projector, set the brightness on your phone to maximum and open any image. Then you need to put the mobile device in the box in the holder next to the lens. The design blank must be installed opposite the wall on which you plan to watch movies. The distance from the phone to the lens needs to be adjusted until the image appears clearly. To do this, you need to move the device forward or backward in the box.
You should not glue the phone holder in a certain place, as you may need to move it a little.
Also, it should be noted that as the image passes through the lens, it will turn upside down. This can be fixed by installing a special application that will allow you to fix a specific position of the phone screen.
Follow the link to watch a video that shows how to create a projector at home from a box and a phone:
https://www.youtube.com/watch?v=YmDqpdjTsIU
Step-by-step instruction
To make it clear to you how to make a projector from a box and a phone, let’s look at all the steps step by step with photo examples:
- We prepare materials and tools for assembly: a shoe box, a 10x magnification lens, a stationery knife, a simple pencil, electrical tape, a paper clip and of course a smartphone.
- We cut out a window for installing a magnifying glass. The magnifying glass must be installed centrally. To center the lens yourself, we recommend drawing diagonals on the desired side of the box. This way you will know where the center is and then it will be easier to make an even cut. After measuring the diameter of the magnifying glass, use a compass to make a marking along which you can simply and accurately cut the hole.
- We secure the magnifying glass to the box with electrical tape. You can use any other fastener that you have on hand, for example, silicone or a glue gun. You need to try to make the mount strong so that the lens does not come off and break.
- We prepare a stand for a smartphone. You can use a regular paper clip, bending it accordingly, or you can make a stand with your own hands from scraps of cardboard. The stand should hold the phone in an almost vertical position.
- We turn off the lights in the room and test the homemade projector. You need to choose the right distance from the smartphone to the lens in the box. By experimenting with the location of the device, you can choose the most suitable angle at which a clear and bright image is projected.
- Download an application to your phone that allows you to flip the image. This is necessary because when projecting a video or picture from a phone, the image is flipped 180 degrees according to the laws of optics. Android users can install Ultimate Rotation Control, and iPhone and iPad owners can use Video Rotate And Flip or something similar. On some phone models, it will be enough to simply turn off “auto-rotate screen” and turn the phone upside down.
- The final touch is to make an input in the box for charging your mobile device so that it does not run out of charge while watching.
You can clearly see the entire assembly process in the video:
A simple way to make a cheap movie theater
Using these instructions, you can make a projector with your own hands at home. As you can see, there is nothing complicated and there is no need to spend money on purchasing materials, because... box, tape and even a magnifying glass can be found in your own workshop.
How to make a 3D projector
To create a 3D projector you will need the following parts:
- Pieces of transparent plastic or glass, you can also use transparent CD boxes;
- Ruler;
- Stationery knife;
- Scotch;
- Mobile device through which the image will be broadcast;
- Simple pencil;
- Glue.
You can make a similar projector in about 10 minutes as follows:
- First you need to take transparent plastic. In this case, a transparent disc box will be used;
- Then you need to make a pyramid, having decided in advance on its dimensions. A pyramid can be made by printing a template on paper;
- Next, you need to use this template to cut out four trapezoids from plastic using a stationery knife;
- After this, the resulting pieces will need to be glued together to form a pyramid. To do this, you can use both glue and tape;
- The finished design must be placed on a mobile device on which the image is open. The picture will be much better visible if you place the structure in a dark room.
In a bright room, the 3D image will be very faintly visible.
How to make a phone projector from a film strip projector
Apart from the above projectors, anyone can also create a projector without using a magnifying glass. To do this, you will need to use a filmstrip projector on which you can show various slides. It is recommended to use a device that can illuminate the slides.
The advantage of this method is that it displays a fairly high-quality image, since the lens inside the overhead projector is already adjusted. To watch and show movies in good quality, you need a matrix, so it is better to use mobile devices with a screen diagonal of 10.1 inches.
It should be noted that if the projector uses reflected light to display the image, the picture quality may be much worse.
The process of creating a phone projector from a slide projector is as simple as possible, since you just need to put a suitable matrix from your phone or tablet on the filmstrip projector, leaving a small gap of half a centimeter. After this, the slide projector needs to be connected to a personal computer.
It is important to note that you must remove the matrix from the mobile device as carefully as possible, trying not to damage it. If the user doubts that he can do this on his own, then he should either call a person who knows how to do this, or use a regular projector made out of the box.
It is also necessary to adjust the cooling of the matrix, since it can deteriorate due to overheating. To do this, you will need to make sure that a small stream of air enters the gap. This is done using a miniature fan, which can also be purchased online.
How to Adjust and Enhance an Image
The process of setting up a high-quality picture on the canvas is quite complex and lengthy, since the user will have to try to configure the projector and its parts. This can be done without any problems by following these tips:
- You can increase the clarity of the displayed image by painting the box black inside;
- When making a pyramid for holographic images, it is better to use glue for soldering individual parts;
- The brightness of the mobile device installed in the box should be at maximum. Also, if possible, you need to adjust the image contrast to the maximum;
- It is better to install the image three or four meters from the viewer;
- If the room with the projector is dark enough and the canvas is of high quality, then the picture will be as comfortable as possible for viewing;
- The matrix from a mobile device heats up quite quickly, and therefore you will need to install a miniature fan next to it.