Operating principle of juice extraction devices
To create a good juicer, it is important to understand how it works. Obtaining fruit, vegetable or berry juice can occur simultaneously or sequentially. Screw models remove it immediately at the time of processing, but their assembly will require time and money. Centrifugal devices first grind the raw materials in a centrifuge, and then pass them through a press.
Based on the principle of operation, juicer designs are divided into the following types:
- hydraulic;
- mechanical;
- pneumatic;
- electrohydraulic.
The simplest structure is a mechanical type device. This is what is most often created independently at home. The principle of operation of such a juicer is to apply pressure to the raw material with a piston, which begins to work under the influence of a simple screw mechanism. First, berries and fruits are sent to a perforated container. Next, under strong pressure, juice is squeezed out of the products, which drips into the tray through special holes in the walls of the basket.
It doesn't matter what design of the device was chosen. To make a homemade apple juicer, you will need a basket for raw materials, a mechanism for chopping and squeezing, and a container for the squeezed juice.
Hydraulic
Mechanical
Pneumatic
Electric juicer
How do juice extraction devices work?
Before wondering how to make a juicer with your own hands, you should understand the principle by which it works. To extract juice from fruits or berries, you need to apply pressure to them. According to their design and operating principle, juicers can be of the following types:
- mechanical devices;
- hydraulic;
- electrohydraulic;
- pneumatic.
The simplest in design are mechanical type juicers, which are most often made by home craftsmen with their own hands. The principle of operation of such devices, which are not distinguished by high productivity, but are quite suitable for domestic use, is based on the fact that a piston acts on the raw material, the pressure on which is applied using a screw mechanism. Fruits and berries are loaded into a perforated basket, through holes in the walls of which the finished juice flows into a storage tray.
Screw press device for squeezing juice
The basket of screw presses can be made of stainless steel sheet or solid wood. Wooden baskets are drainage grates consisting of two halves connected to each other using metal hoops. Screw presses of the design described above can even be used for squeezing apple juice. In this case, the raw materials are loaded into the basket of such a juicer in finely ground form.
DIY methods
From time to time, apple trees produce crops on a huge scale. In such cases, summer residents do not know where to put the fruits to get the maximum benefit from them. Apples can be processed not only into compote and jam, but also into juice. Many gardeners avoid this type of winter harvesting, considering it too complicated. This is because devices for household use are not able to cope with such a volume of work. Purchasing professional equipment for one season is unprofitable. An excellent alternative to a purchased model is a homemade one. She also quickly and efficiently performs her main task. In addition, you can make a juicer for both apples and pears from scrap materials.
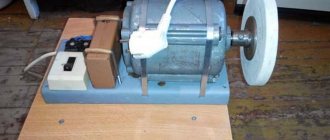
From a horizontal loading washing machine
You can assemble a device for squeezing centrifugal juice from an old washing machine. Such household appliances are equipped with many different modes, one of which is spin. It will allow you to obtain juice from vegetables and fruits.
Instructions on how to make a juicer with your own hands from a washing machine are as follows:
- Check the engine for operation and the drum for integrity.
- Disassemble the machine and remove the drum.
- Wash the device thoroughly. Pay special attention to the rubber seals.
- Places affected by scale and rust must be cleaned with sandpaper.
- Check operation in spin mode using a tester. If this is not possible, find the wire responsible for operating the motor at high speeds. Install a switch in this circuit.
- Remove the drain pump and filter.
- Rinse the old drain hose thoroughly or install a new one.
- To control and control the flow of juice, install a ball valve in the drain.
- Seal any excess drains. There should only be a hole left for the water supply, which is needed to wash the juicer after use.
- Return the drum to its place.
- Fix the machine so that the loading lid is on top.
- Check the housing for leaks. To do this, fill in the water for 15 minutes, closing the drain tap.
Small leaks do not need to be fixed. When they are detected, you must first evaluate the importance of the location of the crack, and then decide whether repairs are needed.
You can create a juicer from a machine without a housing. This makes the device less bulky. In addition, the lid will have to be replaced with a metal one during the conversion. It must have a hole for loading raw materials without stopping the operation of the equipment.
Remove the drive belt
Bend the sealing rubber
Disassemble the drum
Insert a grater into the drum
Ready-made juicer
From a mortar mixer
A juicer made for apples may have a simpler design. To complete it, you don’t have to specifically look for the necessary parts that are not at hand. Fruits can be crushed with a construction mixer. The instrument must first be prepared. To do this, several bolts are drilled into its lower part. You will need a large iron bucket. It is necessary to make several holes in its walls through which the juice will come out.
Fruit processing process:
- To increase productivity, the mixer is mounted on a drill. Thus, the number of revolutions increases.
- The fruits are placed in a clean bucket and crushed.
- The resulting mass is sent to a bag, which will separate the cake from the nectar.
- Squeeze under pressure. To get the maximum amount of juice, it needs to be quite heavy.
The complexity of this method lies in the manufacture of the press. It must be very heavy to fully extract the juice. You can use a jack as it.
Mixer for mortars
Apple chopping
Squeeze chamber
Finished product
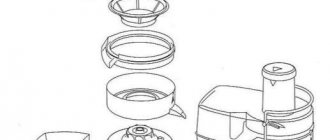
From a meat grinder
From a manual meat grinder, you can create a screw juicer with your own hands. To do this, you need to install a special attachment that will collect liquid into the bowl when grinding apples. Usually it can be found in a kit or purchased separately in a store.
The material of the product must be given special attention. Its service life directly depends on its quality. They produce a high-quality unit from non-toxic plastic and high-quality steel.
Before starting work, you must install the juice nozzle. Installation instructions:
- Remove the metal attachment that cuts the meat.
- Insert the screen and threaded release sleeve.
- Place the chopping head.
- Secure the installation with a special bolt.
The advantage of a manual meat grinder juicer is its simplicity. The device is reliable; it does not need to be connected to an electrical network to operate. The device has a simple mechanism; its parts are not afraid of water and are easy to clean after use.
The only disadvantage of the device is that it is not suitable for processing apples in large quantities. Although it handles minimal load easily and quickly. You can avoid this drawback if you create a juicer from an electric meat grinder. The engine power allows you to produce much more juice.
Making a juicer from an electric meat grinder step by step:
- The central head for grinding minced meat is removed.
- The filtration mesh and squeeze sleeve are placed in the base.
- The assembled structure is installed to the body along with a bowl for receiving processed raw materials.
Next, the structure is fixed with a rotary lock. The device is ready for use.
From the jack
A 3T car jack is much more efficient than using a screw. This type of press turns out to be more powerful, so you won’t need a nut for fastening. In addition, obtaining juice does not require much physical effort.
Assembling a juicer with your own hands has a number of features. Its design includes a frame that can withstand high pressure. The jack can be mounted from above or below. It all depends on the desire of the user.
After assembly, the raw materials are sent into the container, placing a circle of wood at the bottom. This technique helps the structure not to burst under high pressure. On average, in 5 minutes you can get about 2 liters of apple juice.
Making your own juicer
An example of a homemade juicer is shown in this video. We recommend viewing!
There is another way, but it takes longer. The base of this structure is cut out of a thick wooden block. We make a small hole in it, maybe a couple of holes. Juice will drain from them.
Next, we attach two racks to the wooden base, it can be made from any available material, be it wooden or metal. After that, between the racks we place a crossbar with a large nut, and a movable screw will be attached to it.
You need to attach it so that it doesn’t cling to anything, otherwise the whole process will stall. If the movable screw is larger and thicker, it will work better.
Also, the length of the screw should be long, not small. If, of course, you want a lot of servings of juice and you can say that the main part of the juicer is ready. All that remains is to take a large saucepan, a large basin into which the juice from fresh berries will flow.
An example of a DIY juicer
We place fruit in a wooden block and turn the movable screw by the handle. It will rest against the block, thereby crushing the berries. Juice will flow out through the holes cut in the block. True, the second method is better used for small berries.
You can put raspberries, strawberries, wild strawberries there, although if you finely chop the apples and remove the seeds, then this method will also work. If you decide to make juice from cherries, then it is better to get the seeds in advance, they can slightly interfere with the cooking process. Or slip out of the block and end up in the container along with the squeezed juice.
To make apple juice, you can use the first option; of course, many apples won’t fit there. But if you have time and an old automatic machine, then you can still come up with an interesting option. And in such a juicer, a whole bucket of apples is converted into fresh juice in 10 minutes.
You will need a washing machine drum, drum mount and casing. It’s quite easy to get such things in modern times, since models are quickly updated. It is imperative to wash everything very well and remove scale and powder.
We throw out all the other unnecessary parts from the casing, the temperature sensor, etc. We inspect the holes in the drum and carefully seal them. Anything, but better with a thin rubber band. Leave only one hole, as juice will drain from there.
We clamp the thin elastic band with stainless steel plates on the bolts. It is better to take nuts and bolts made of stainless steel. Next, for a large hole you need to find a tube with a suitable diameter. You will need it to load apples into the drum.
Another example of an apple juicer
The tube is attached to the drum on four sides. The bolts must be secured from inside the casing. Further chopping of apples will depend on this. Then we make a grater. The grater is made on a stainless steel machine. Cut a circle 3 mm thick and 230 mm long.
Then again we cut out a second circle from stainless steel, only 0.6 mm thick, and the diameter is the same. The second circle will be the spacer for the grater. It is placed at the bottom of the drum and secured with screws. This prevents the grater from sagging.
The grater itself is attached to it and secured with five screws. Next, drill holes along the entire diameter. We make ten-millimeter markings around the entire circle; there you will have to fill in sharp teeth.
The grater should be in the center of the drum. Therefore, we mark everything accurately. In this video, they will show you how to make a very ordinary press for extracting juice from fruits and berries.
Now all that remains is to make an apple pusher. Cut out a small circle with a diameter of 80 mm, you can take plywood. And a thick stick from under a shovel. Install a small stop to prevent the pusher from falling towards the grater.
And finally, the engine, preferably with a power of 1.1 kW, will only give in at 1500 rpm. The final touch is to stretch a small hose to the hole at the bottom of the drum that we left. Juice will flow down it.
You also need to take a saucepan so that the juice is collected there. Before adding apples, you must wash them, select the rotten ones, remove the seeds, and then throw 3-4 apples into the resulting juicer.
Of course, this option is quite heavy, but it is more convenient. You can process several buckets in just half an hour. But then there will be a large supply of apple juice.
When creating this juicer, follow safety precautions. Do not plug in the device until it is completely finished. Also make sure that you have assembled all the parts correctly and that the voltage is appropriate for your use.
Twin screw juicer. Features of this type, operating principle, as well as other useful information, you can find on our website.
How to make a simple car antenna with your own hands is described in detail in this article. We advise you to read and listen to the advice!
If you do not know how to repair a Termex water heater, here you will find all the necessary information.
What is an apple press?
Depending on your skills and knowledge, you can create several types of press with your own hands. Each of them has its own manufacturing and operating characteristics.
Common types:
- Mechanical. The most popular among amateur gardeners. It's easy to create with your own hands. Does not require large expenses. You can assemble such a press in just a day, but it will last at least 10 years.
- Hydraulic. You don't need to put a lot of effort into using it. The most popular press of this type is made from a jack. By pressing the handle, the mechanism comes into action. The device is capable of squeezing up to 75% of the juice from the total volume of raw materials.
- Combined. The device has a jack and a screw. This feature distinguishes the device from others. First, the raw material is processed using a screw, and then using a jack. This approach reduces the time it takes to obtain a drink, delighting the summer resident with the amount of juice.
Making apple juice at home is very beneficial. The resulting product is more natural than store-bought drinks.
Using an apple press has a number of advantages:
- providing the family with high quality drinks;
- the ability to regularly process the harvest and make preparations for the winter;
- ease of manufacture of the device and its use;
- possibility of operation for several years;
- the mechanism operates silently.
During operation, several disadvantages of the press can be noted:
- achieving great productivity is difficult; it will require a lot of time and effort;
- the device requires constant maintenance;
- all parts of the press must be thoroughly washed under high pressure of water;
- A homemade juicer is quite bulky and requires a lot of space to store it.
Stainless steel sheet blank with drilled holes
Bending the workpiece into a cylinder
The lower part of the frame is made of profile pipe
Top part with nut for screw
Ready press
Juicer repair: what breaks
When it comes to attachments for meat grinders, you will have to change the plastic gears and couplings. They come in quantities of 2-8 per set, sometimes you have to buy new ones. Steel gears of meat grinders and juicers are rare, and there is a risk of failure of the precious engine. You are surprised how industrial units work...
It is clear to readers that the main types of malfunctions relate to the engine. First check the power, then the continuity of the windings begins. Having localized the fault, they attempt to wind the coils again. In the case of a commutator motor, this is feasible; the stator is a dull inductor strung on a magnetic circuit. The commutator motors ring for each section position until the drum completes a full rotation. The rotor of a squirrel-cage asynchronous motor is unable to burn out. The current is small, the copper wire is often inseparable from the base of the “squirrel cage” by insulation. The design of the juicer is so primitive that the mechanics (bearings, seals, gears) and drive break down.
We have talked about repairing power supplies more than once. Pulse sources are found in expensive models equipped with the rudiments of intelligence.
Tips for work
After creating an apple juicer with your own hands, an equally important stage begins - fruit processing. Harvesting and preparing the fruit for it takes time.
For the assembled device to operate effectively, the following sequence of actions must be followed:
- The apples are carefully sorted, washed and dried to remove excess moisture.
- Large fruits are cut into smaller pieces. The core should be removed.
- Rotten parts of the fruit are thrown away. Otherwise, they will spoil the taste of the finished drink.
- The chopped fruits are placed in the working basket of the unit. The smaller the pieces, the easier it will be to squeeze out the juice.
- They put the mechanism into action.
After the juice extraction process is completed, dry pulp remains. It can be used as livestock feed or left to ferment. Don't be alarmed if the drink contains pulp. In this case, the juice should be allowed to brew. After this, it is filtered and boiled.
A DIY juicer is a useful invention. With its help, you can bring your engineering ideas to life and save money. The device will last for many years, allowing you to preserve all the beneficial substances contained in apples.