Installation and connection of new equipment
The gas stove replacement scheme is as follows:
- dismantling obsolete or unusable equipment;
- faucet replacement;
- installation of a new slab;
- its connection;
- leak testing;
- acceptance of work by the Mosgaz service in Moscow, Lenoblagaz in St. Petersburg, and so on.
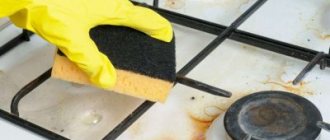
Dismantling a gas stove
To dismantle outdated equipment, you must:
- close the tap located on the pipe to turn off the gas supply;
- check the absence of gas by turning on one of the burners;
- disconnect the gas supply;
- Disconnect the stove from electricity (if necessary).
After completing these operations, the stove can be removed from the kitchen.
Disconnecting old equipment from gas and electricity supplies
Replacing the faucet
If the gas valve does not meet safety requirements or does not completely shut off the gas supply, then before installing new equipment, it is recommended to replace the valve.
As a rule, the equipment is installed and connected by the gas service, since in order to increase the level of safety, it is recommended to disconnect the entire entrance from the gas supply. However, if it is possible to cover it in an individual living space, then having certain skills and all the necessary equipment, you can do the work yourself.
The valve is replaced according to the following scheme:
- crane dismantling. In most cases, threaded valves are installed on gas systems in apartment buildings, the dismantling of which is quite easy. However, in old houses, welded valves can also be installed, the dismantling of which is carried out using a grinder (exclusively after turning off the media supply);
If the work is carried out without turning off the gas and by one person, then after dismantling the tap, a special plug is installed on the pipe. If there are two or more workers, you can plug the pipe with your hands.
- if the thread on the gas pipe is damaged or missing because welded equipment was installed, then at the next stage the thread is cut using special equipment;
- thread sealing;
- removing the plug and installing a new faucet.
Sequence of actions when replacing a gas valve
Installation and connection of a new gas stove
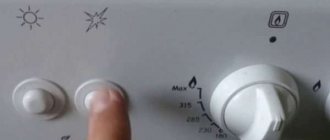
A new slab is installed in the prepared area. When installing, you must level it horizontally. To achieve this, most modern Hephaestus stoves are equipped with adjustable legs. In the absence of such a function, alignment is carried out using various spacers.
Alignment by level
Next, the flexible line is connected to the plate and pipe. For this:
- the thread on the liner (pipe) is sealed with the selected material;
- the eyeliner is fixed;
- Connection to a gas stove is made in a similar way;
Gas hose connection
- if necessary, the stove is connected to the power supply system.
How to install and connect a gas stove yourself, watch the video.
Leak test
After completing all work, you need to check the connections for leaks. The operation is performed in the following order:
- preparing a soap solution;
- applying the solution to the connecting nodes.
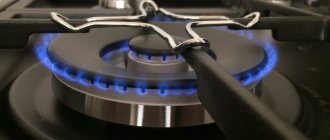
If the solution begins to form bubbles, the connection is not sealed and the problem must be corrected before putting the system into operation. The absence of bubbles indicates that the system is completely sealed.
Presence of a leak in the gas supply system
Acceptance of work by the gas service
After all the work has been completed, an application is sent to the gas service to put the stove into operation. At the appointed time, specialists will check the correct connection and tightness. Based on the inspection, permission will be given to use the gas stove or an order to eliminate the identified deficiencies.
If you carry out all the work according to the attached instructions and in a well-ventilated area, you can completely avoid negative consequences when performing the work and save on paying for specialist services.
Expert advice
To summarize, we can highlight a number of rules that experienced craftsmen adhere to:
- access to hose connections and valves must be free;
- the hose should be positioned freely behind the stove, without bending or pressing against the wall;
- the hose cannot be painted, as paint can damage the material of the product and cause it to crack;
- all work is carried out with the gas turned off;
- if necessary, plug the pipe, use a damp cloth made of thick fabric;
- upon completion of the work, be sure to wash the docking units to detect possible gas leaks. The appearance of bubbles indicates insufficient tightness of the unit.
Built-in equipment is very popular in the kitchen.
Features of the technology
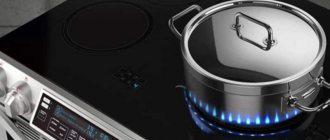
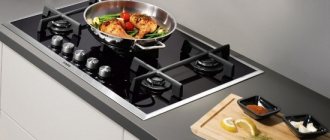
A standard household gas stove consists of two parts: a hob and an oven. In the classic version, both the oven and the hob have one solution: they run on gas or electricity. In combined models, gas is burned in the burners, and the oven runs on electricity.
Stove with gas hob and electric oven
Hobs can be made of enameled or stainless steel, glass ceramics or anodized aluminum. Most modern models are equipped with burners of different diameters. The larger the burner, the higher its power. The combination of burners of different power allows you to cook food in dishes of various capacities as conveniently as possible.
Cooking surfaces can be equipped with very good functionality and safety systems: electric ignition, simmering function, continuous burning, gas shutoff when the flame goes out, etc.
Electric ovens in combined gas stoves can be of two types:
- Classic. Structurally, classic ovens include an upper and lower heating element. Optionally, they can be equipped with a spit and (or) grill grate;
- Multifunctional. In addition to the classic arrangement of heating elements, multifunctional equipment can have additional side and rear heating elements, be equipped with convection, self-cleaning and even microwave functions.
Classic oven device
It should be understood that the presence of a lot of options in the oven not only simplifies the operation and maintenance of the device, but also significantly increases its cost
That is why, in order not to overpay when choosing a gas stove with a multifunctional electric oven, you should pay attention to models with only the options you need
Electric oven with convection
Connecting the cylinder to a gas stove
If a person does not know the rules for connecting a gas cylinder, it is better to contact a qualified specialist. But there are times when it is impossible to call a specialist; most likely, such cases occur in summer cottages. If you follow the installation rules, then anyone can connect the cylinder.
Preparation of materials
Preparation for connecting the cylinder must have the following required elements:
- A special stove for a country house, designed for installing a cylinder.
- An appropriate container, that is, a propane gas cylinder.
- Special mechanism for normalized gas use, reducer.
- The gas hose must be at least a meter long, this is in accordance with the correct distance between the stove and the gas container. In this case, the hose should not be taut. The best length option is 2 meters.
- For a rubber hose, you must have fittings and screw clamps that connect to each other. If the hose is bellows, you need adapters with threads.
- To check the connections between the hose and the cylinder, you must have a soap-based solution. After installation, it is used as a testing tool; if there is a leak, soap bubbles appear. Then you need to carefully reconsider the connection.
Reference! For high-quality installation of the cylinder to the stove, it is better to buy elastically flexible hoses to avoid deformation and cracks leading to leakage.
How to choose the right jet
Gearboxes with the possibility of reverse regulation are recommended for use in propane tanks. One requirement is that the reducer must match the size of the cylinder used.
When choosing a reducer, you need to take into account the temperature of the room in which the gas cylinder will be used. It often happens that the supply of gas through the reducer is difficult, since low temperature makes the gas liquid. In such cases, you need to buy a gearbox with a special heating system.
Features of equipment selection
Installation of a cylinder in an apartment, house or country house must follow all safety rules.
When installing gas equipment, there are several options. Let's consider three types of connection.
- Use of bendable hoses designed for combustion media. The gearbox is installed using a standard fitting and a screw clamp; a fitting is also installed at the inlet of the gas stove. To connect the gas pipeline, use a conical thread. When choosing a hose, you need to adhere to the length, it should not be more than one and a half meters, for a good overview of the condition of the shell and to identify various types of damage. You can also use bellows hoses; they are resistant to temperature changes and various damages. Installing flexible hoses through walls is strictly prohibited. If such a need exists, you must adhere to all the instructions, which means that the concrete hole in the wall must be with a special metal foil. In the middle, there should be a smaller metal pipe. The remaining space can be filled with silicone-based sealant.
- The connection has a gas tap installed, it is used to stop the supply of the flammable mixture. Locking is also necessary for the safety of the oven. There are two types, ball or plug valve, used for periodic maintenance.
- Additional materials, this is a metering device, it is connected to the gas supply unit. Accounting is necessary, since when gas is consumed, the device reacts and delivers the combustible mixture. Such a device is installed on backbone networks.
- When connecting several cylinders, a connecting ramp is used. The device reduces gas evaporation and minimizes the risk of cooling in the nozzle. You can install the device yourself, if you have the gas pipeline material.
Determining a place for a gas cylinder
For the correct installation of the gas cylinder and stove, there are some recommendations that will ensure people's accommodation. After all, the most important thing is safety. It is prohibited to install containers in rooms intended for the habitation of house residents. Propane gas is heavier than air, and at the slightest leak, the gas will accumulate on the lower floors.
Installation of liquefied gas cylinders in residential buildings.
Gas supply to residential buildings, public buildings and consumer service enterprises is carried out on the basis of natural and liquefied hydrocarbon (LPG) gases.
Since natural gases and LPG are interchangeable, instruments, apparatus, gas burners, many requirements and solutions are suitable for both types of fuel. But there are also differences that take into account the characteristics of LPG. For example, issues of gas supply based on LPG are more difficult to resolve.
In accordance with the requirements of SNiP 2.04.08-87 and “Safety Rules in the Gas Industry”:
- an individual cylinder installation should be considered - an installation that has no more than two cylinders with liquefied gas;
- group cylinder installation - an installation that includes more than two cylinders.
READ ALSO: Tips: how to use a gas stove
The need for the above classification of LPG installations is due to the fact that, depending on the type and total rheometric volume of the cylinders, the method of placement, minimum permissible distances and other requirements are established for them.
Currently, three types of gas cylinder installations
.
- The simplest is an individual one with one cylinder with a capacity of 50 liters
or with two cylinders with a capacity of
27 liters
installed directly in the kitchen. - The second type is individual installations with two cylinders placed outside the building in a metal cabinet.
- The third type is group (10-cylinder) installations with cylinders with a capacity of 50 liters
, installed both outside the building in a metal cabinet and in a heated room.
According to SNiP 2.04.05-91* - Intake openings for air removal by general exhaust ventilation
from the upper zone of the room should be placed:
- under the ceiling or covering, but not lower than 2 m
from the floor to the bottom of the holes to remove excess heat, moisture and harmful gases; - not lower than 0.4 m
from the plane of the ceiling or coating to the top of the holes when removing
explosive mixtures of gases
, vapors and aerosols (except for a mixture of hydrogen with air); - not lower than 0.1 m
from the plane of the ceiling or covering to the top of the openings in rooms with a height of
4 m or less
, or
not lower than 0.025
of the height of the room (but not more than
0.4 m
) in rooms with a height of more than
4 m
when removing
a mixture of hydrogen with air
.
Reception openings for air removal by general ventilation systems from the lower zone should be placed at a level of up to 0.3 m from the floor
to the bottom of the holes. The air flow through the lower suction units located within the working area should be taken into account as removing air from this area.
Installation of gas cylinders
NOT ALLOWED:
- in premises under which there are basements and cellars
, if the entrance to them is from these premises; - in basements and basements
; - in living rooms
; - in kitchens
located directly under hospital wards, auditoriums and classrooms of educational institutions, as well as under foyers, auditoriums, dining rooms, sales areas, etc.
For residential buildings, individual installations of two types can be used:
- external cabinet
with two cylinders with a capacity of
50 liters
and supply of the vapor phase
of gas to the stove
located in the kitchen, via a gas pipeline from the outer cabinet to the stove (see below Fig. 1); - indoor
installation with installation in the kitchen
- 2-3- and 4-flare plates
with
50 l - 3-flare plate
with built-in
27 l - 2-burner gas stove
with a cylinder capacity of
5 l
The maximum hourly costs for heating, ventilation and hot water supply for all categories of consumers are determined in accordance with the instructions of SNiP 2.04.01-85, SNiP 2.04.05-85 and SNiP 2.04.07-86.
When implementing gas supply systems designed to supply liquefied gases to consumers located in areas with seismicity of 7 points or more, in areas of permafrost soils and in other special conditions
, it is necessary to additionally take into account the requirements provided for in section 10 of SNiP 2.04.08-87.
How to connect using a pipe?
This option is rarely used due to the complexity of installation. Installation using this technology is carried out using a pipe of a certain length, bent at a given angle, with a thread. The latter will be required for screwing on the couplings through which the household appliance is connected to the gas pipeline.
In practice, two connection options are used. The first involves the use of two couplings, with the help of which the pipe is connected at one end to the gas pipeline, and at the other to a household appliance. The second option is more complex in terms of execution technology. In this case, one end of the pipe is welded to the gas pipeline, and the second is connected to the outlet pipe of the stove using couplings.
A third option is also used. In this case, copper pipes are used, to the ends of which fittings with union nuts are soldered. But, regardless of the chosen connection method, this type of connection does not allow the gas stove to be moved to the side if necessary.
Gas cylinder for the dacha: advantages and disadvantages
When a person moves into a private house that is not connected to a gas pipeline, he is faced with a choice: use an electric stove, or is it possible to connect a gas stove to a cylinder? Both solutions have both advantages and disadvantages. The benefits are as follows:
- A gas burner heats up much faster. Cooking time is shorter, which means more free time.
- The cost of refueling is lower than the price of electricity. The exception is the use of electricity at a reduced rate. For example, for village residents. There is also a discount on utility bills for low-income people.
- In some regions, the rate of electricity consumption per person is limited to 50 kW per month. Once the limit is reached, the price increases significantly.
The disadvantages include:
- Fare. Gas stations are less common than gasoline stations.
- Inability to accurately determine how much fuel was filled into the cylinder.
- Installing a gas stove in a room not equipped with ventilation is prohibited.
Difference in slabs
Kitchen stoves sold in stores use natural gas - methane - for combustion. The nozzle, which is located inside the burner, is designed to operate on this type of fuel. If such a stove is correctly connected to a gas cylinder, as many try to do, it will not work effectively. The flame will not create the required temperature and will smoke. This happens because the propane-butane mixture is in a liquefied state, while methane is in a gaseous state under pressure. More liquefied gas flows per unit of time, so the jets must be smaller. Therefore, before connecting the gas cylinder to the stove, the nozzles should be replaced. They come complete with the stove.
To change them, you need to remove the top surface of the kitchen appliance. To do this, remove the burners. Then release the side clamps and remove the top cover of the stove.
Changing the nozzle in the oven is also not difficult. To do this, you need to remove the back wall of the oven, after which access to the inside of the oven will open. The nozzle is connected to a gas supply tube, which is fixed with a metal bracket on the body. There is a rubber gasket between the tube and the nozzle, which must be installed when replacing the nozzle. It is very small and may not be noticed. It must be removed carefully so as not to damage it.
Jets for bottled gas
One important point must be taken into account: the stoves, originally designed to operate on mains natural gas, have jets (nozzles) that are not suitable for operation on bottled propane.
The jet is like a bolt with a hole in the top through which fuel flows to the burner. Bottled gas injectors have a smaller hole diameter because the pressure of liquefied propane is higher than that of natural fuel. Consequently, to connect such a stove to a liquefied gas cylinder, you will need to purchase and replace the entire set of nozzles.
USEFUL INFORMATION: Types, sizes and costs of kitchen countertops made of chipboard
A new set will cost an average of 200 rubles. (the cost depends on the brand of the stove), it can be bought at a gas equipment spare parts store or ordered from the manufacturer.
If the jets need to be replaced, do the following:
- The burners and the burner table cover are removed.
- Using a hex wrench, the old injectors are removed and the new ones are screwed in.
You can understand all the nuances of the process of replacing jets by watching the video.
Why do you need a gas stove for a summer cottage under a cylinder?
Modern man is accustomed to convenience. He is not satisfied with decisions that are accompanied by unnecessary difficulties. From this point of view, the most convenient option is electricity. A stove equipped with an appropriate heater is easy to use. The position of the regulator precisely sets the temperature regime. The requirements of safety rules are easily met.
Such exotic “equipment” is used as an entertainment attraction. The practical value of a classic samovar is minimal
The advantages of electric heating are obvious. But it is necessary to note the disadvantages that complicate its use:
- high cost of energy resources;
- dependence on the functionality of centralized networks;
- high power consumption;
- stationary placement.
The use of solid fuel causes significant inconvenience. Wood-burning ovens create a unique aroma in dishes. But they take a long time to melt. They take up a lot of space and unnecessarily raise the indoor temperature after cooking is complete. Such equipment must be connected to the chimney. To implement the project, significant financial investments and labor costs will be required.
Stoves in dachas perform decorative functions. They are used as an effective means of heating when weather conditions worsen.
If you evaluate the significant factors as a whole, it is not difficult to draw a preliminary correct conclusion. A gas stove for a summer house under a cylinder is a profitable option:
- It weighs little and takes up little space.
- A personal fuel supply provides good autonomy.
- The equipment is ready for immediate use after connection.
- Its movement is not accompanied by unnecessary difficulties.
Is self-connection allowed?
Almost all gas workers unanimously claim that connecting a propane cylinder to a gas stove should be done exclusively with their participation, having paid them money for calling a technician. However, this connection can be done with your own hands without additional costs.
There is nothing fundamentally complicated about this issue. Connecting a gas hob to a cylinder involves choosing a place for a container with fuel and organizing an outlet from there in the form of a pipe or flexible hose to the stove.
Whether the cylinder is connected to the stove yourself or by calling a gas fitter - according to the law, all responsibility for the safe operation of gas appliances lies solely with the owners or tenants of the residential building
To perform such work, you only need to have basic skills in handling wrenches. Plus, you will have to carefully study and fully comply with fire safety rules for gas-powered equipment.
A household propane cylinder can be installed both inside and outside a residential building. But fire safety standards recommend choosing a place to store gas outside, and not in the kitchen or utility room of the cottage. If installed outdoors, you will need to install a longer pipe or hose, but the likelihood of a fire and/or explosion will be less.
Connecting bottled gas at the dacha
There are always special requirements for working with gas. A small leak or improper operation may result in an explosion or fire. Therefore, leave the connection of the propane cylinder to the burner to specialists.
But if you have the necessary experience and knowledge, you can carry out the installation yourself.
To understand how to connect a cylinder to a stove, you need to follow a certain diagram:
- the gas container can be installed in the kitchen next to the stove. An outdoor location in a specialized metal cabinet is also suitable;
- the connection must be made through a special corrugated or rubber or gas hose;
- when connecting, the hose does not need to be pulled; its length should be 50-100 cm longer than the distance from the container to the tile;
- the maximum distance of the gas cylinder from the stove or heating battery must be at least 100 cm;
- the outdoor cabinet must be built on a concrete foundation, the height of which is 20-30 cm.
It is forbidden:
- place the container in living rooms;
- install the cylinder below floor level, since the gas is heavier than air and if there is a leak, it will not be able to evaporate, but will accumulate in the room;
- block a passage that can be used for evacuation in case of fire.
If the gas cylinder is placed in an outdoor closet in a private house, then you should know that when the air temperature drops below 0 ° C, the propane-butane mixture thickens. Then it will not be able to reach the tile. During the cold season, it is better to buy a winter mixture.
How to proceed?
You take any of the steps described below at your own risk. The site administration is not responsible for any negative consequences associated with such an installation. To work you will need:
- jigsaw (can be replaced with a circular saw);
- FUM tape;
- mounting adjustable wrenches;
- toilet soap solution.
To properly connect the hob, you first need to select the installation location. Most often they try to bring the equipment closer to the gas mains. But if redevelopment is necessary (or possible), bellows corrugated hoses are used. Next, using a cutting tool, prepare a hole of the required size in the tabletop. Remove all dust and remaining sawdust.
The next step is to stick a special foam tape around the perimeter of the recess. It is either taken from the delivery kit or purchased separately in specialized gas equipment stores.
Next, you need to connect one of the ends of the flexible hose to the main pipe or to the cylinder. The opposite end is connected to the inlet channel of the hob. The required hole is located at the bottom of the household appliance.
Therefore, when connecting gas hoses to a built-in model, you need to open the doors and remove the shelves on the corresponding cabinet. The hose is screwed tightly, it must be sealed with FUM tape. Next, turn the valve to the “fully open” position. The burners are not lit.
It is necessary to cover all joints with soapy water. Normally, no bubbles should appear. But let’s assume that foam still appears. Then you need to tighten the nut again in the problem area. Then they check it again with foam. The procedure is repeated until even small gas bubbles stop appearing.
Most standard kits include two types of jets. The one with the thicker hole is for main gas. The one with a smaller inlet is for connecting to cylinders. By default, the nozzle for connecting to the gas pipeline is always installed. If there is a need to change it, use the keys included in the kit.
Gas panels with electric ignition will need to be connected to the electrical network. You need to place an outlet near the household appliance. Its permissible load is determined very carefully. Ideally, not only the maximum current consumption should flow freely through this outlet, but a reserve of about 20% in power should be provided. Hobs are always mounted on thick countertops (wood layer at least 3.8 cm).
If you try to install the panel on a thin base, the system may suddenly fail. According to standard rules, hobs with electric ignition are installed using any hoses except those with a metal braid. No matter how good such hoses are, they can lead to fire and gas explosion if a short circuit occurs.
To learn how to properly connect gas to the hob, watch the following video.
Features of operation of gas cylinders
The liquefied gas in the cylinder is under pressure, and when it is supplied to gas equipment, it transforms into a gaseous state.
This process is accompanied by a sharp decrease in temperature, and with intensive use of the equipment, the temperature can drop to a critical value at which further conversion becomes impossible.
The simplest solution is to reduce gas consumption. You can also resort to additional heating of the cylinder, but it is prohibited to use heating sources with an open flame. Insulation of gas cylinders is not allowed, but it is possible to use special “heating jackets” and thermal covers.
Thermal covers protect gas cylinders from critical temperature drops
Owners of gas cylinders may encounter similar difficulties in winter if the cylinders are located in an unheated room. In this case, it is best to use special propane-butane mixtures with different percentages of components.
The standard gas mixture for the warm season contains 60% butane, 40% propane. A winter mixture for critically low temperatures may contain 80% propane and 20% butane, but such a mixture is much more expensive.
Choosing a place to install the cylinder
Before connecting the gas stove to the cylinder, you need to choose the place where the devices will be installed, since the distance between them must be at least 100 cm. Safety instructions require that there be a window in the room with connected gas equipment.
When using a shielded cylinder, the distance between it and the stove can be reduced to 50 cm.
- If the gas container will be in the same room as the kitchen appliance, it is advisable to place it in a metal cabinet or make a wooden mount.
- The cylinder may be located in the pantry located behind the kitchen wall. In this case, you will need to make a hole for the hose.
- The best option in terms of safety is to install the cylinder in a special metal box located outside and locked with a padlock.
USEFUL INFORMATION: Characteristics and features of a carbon filter for a kitchen hood
Important! You can place a cylinder in an apartment only if the building has no more than 2 floors.
Installation of gas supply
Installation of the bellows gas hose is carried out in compliance with the following rules:
- it is unacceptable to hide the liner in the wall, since any leak that is not detected as soon as possible can lead to emergencies, damage to property and loss of life;
- Do not install a hose with a large number of kinks;
- condensation on the equipment will help reduce the service life of the liner.
Installation diagram:
- choosing an installation location in accordance with the recommendations given above;
Optimal connection diagram for a gas stove
- turning off the gas supply to the premises. To make a temporary shutdown, you can use the tap installed in the apartment, and if it is missing, you need to contact the management company;
Individual gas shut-off valve
- dismantle the old eyeliner (if any);
- if the supply line and tap are missing, then before connecting the equipment, it is necessary to cut a thread on the pipe and install a tap that allows you to shut off the gas supply directly in the living room. For example, to troubleshoot equipment;
- dielectric installation;
- A flexible hose is connected to the tap. As a rule, in this situation, the “nut” connection method is used;
When connecting the liner, special attention is paid to installing the sealing gasket. A connection without a gasket will not be completely sealed. To increase the tightness, you can additionally use FUM tape or other similar material
To increase the tightness, you can additionally use FUM tape or other similar material.
- connecting the supply to gas equipment using an o-ring. All nuts and fittings must be fixed using an open-end wrench without unnecessary effort. Even slight overtightening can lead to damage to the seal and rapid depressurization;
Connecting the liner to the equipment
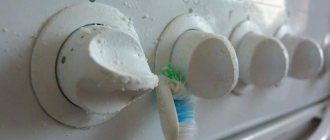
- examination. To identify a leak, you can use a soap solution and an ordinary brush (sponge). If soap bubbles appear on the surface when applying the solution, then the connection is not airtight.
Leak detection with soap emulsion
How to connect a gas stove yourself, watch the video.
If you cannot install the equipment yourself, it is recommended to contact gas service specialists. Replacing the eyeliner will cost approximately 300 - 500 rubles.
What you need to connect
Before connecting the gas stove to the cylinder, you need to prepare the equipment. For this you will need:
- Special jets. Standard models are designed for centralized supply of natural gas. If you use such a stove for bottled gas, it will come out weakly, the gas will burn with a yellow flame, slowly heat the dishes and even smoke. In this case, you need to either purchase a special tile or replace the jets with smaller ones.
- Gas reducer. This is a device that equalizes the gas supply pressure when its concentration in the container decreases.
- Special bellows or rubber hose with union nuts.
- Metal clamps for attaching the hose.
- Gas tap or valve.
- Soap solution. It is needed to check the tightness of the connections.
Connecting the hose to the gas stove
To connect the hose to the stove, look at the back of the stove. Here you can see the inscription “exit”. You will immediately need to determine what type it is. Perhaps it will be made absolutely straight or have a slight angle.
This is very important, so the hose is not allowed to bend too much. If the pipe is located a little to the side, and the outlet is made straight, you will have to purchase an additional metal elbow with a thread. When the thread diameter is 3/4 inch, you will also need to install an adapter (foot) with a diameter of half an inch
When the thread diameter is 3/4 inch, you will also need to install an adapter (foot) with a diameter of half an inch.
Usually in all kitchens the gas riser is installed in a certain corner. A welded tube equipped with a ball valve extends from it to connect a gas hose.
The union nut is screwed onto the tap. When the faucet has an internal thread, the hose must screw into it.
Before connecting a hose to the “output” of the system, you need to install a paronite gasket. It is usually sold as a set.
But it is better to purchase such a gasket on the market, equipped with a metal mesh. It will serve as protection against possible contamination.
Having installed the gasket, the flexible hose is screwed to the outlet of the stove and tightened with an open-end wrench.
Then a gas leak check is carried out. All connections must be thoroughly washed. Open the tap and let in the gas. The absence of bubbles at the connections indicates that the system is ready for use.
Is self-connection allowed?
Almost all gas workers unanimously claim that connecting a propane cylinder to a gas stove should be done exclusively with their participation, having paid them money for calling a technician. However, this connection can be done with your own hands without additional costs.
There is nothing fundamentally complicated about this issue. Connecting a gas hob to a cylinder involves choosing a place for a container with fuel and organizing an outlet from there in the form of a pipe or flexible hose to the stove.
To perform such work, you only need to have basic skills in handling wrenches. Plus, you will have to carefully study and fully comply with fire safety rules for gas-powered equipment.
A household propane cylinder can be installed both inside and outside a residential building. But fire safety standards recommend choosing a place to store gas outside, and not in the kitchen or utility room of the cottage. If installed outdoors, you will need to install a longer pipe or hose, but the likelihood of a fire and/or explosion will be less.
Read also: How to wean a chicken from hatching eggs
What hoses and tubes to use for connections
According to the rules for the safe operation of gas equipment, oxygen and hydraulic hoses are not allowed to be used for laying gas pipelines. This is due to the high temperature difference between the transported gas and the external environment, which leads to accelerated degradation of the hose material and the appearance of microscopic leaks. Given the properties of liquefied gas to accumulate in rooms, such phenomena pose an increased danger.
There are three options for connecting a gas cylinder to a stove. The first is to use special flexible rubber hoses for flammable hydrocarbons. In this case, their connection to the gearbox is made through a standard fitting reinforced with a screw clamp. The same fitting is installed on the inlet pipe of the gas stove, the hose is connected to it also with a clamp. If it is necessary to connect two sections of hose, the use of double-sided fittings is not allowed; instead, threaded connectors with double crimping of the shank with clamps should be used. A distinctive feature of such connections for gas pipelines is the tapered thread and the absence of elastic seals.
Connecting the plate to the cylinder using flexible hoses has a number of limitations. The length of the hose should not exceed 150 cm, its gasket must remain visible to constantly monitor the condition of the sheath and avoid damage. Some of the prohibitions can be partially circumvented by using metal bellows hoses. They form a semi-rigid structure, which can have an almost unlimited extent, while maintaining resistance to temperature influences and mechanical damage.
At the same time, safety rules prohibit the passage of flexible and semi-flexible ducts through walls, where their condition cannot be assessed visually. If it is necessary to connect a kitchen stove to a cylinder installed outside, a steel pipe case should be embedded in a hole in the wall using cement mortar. Inside the case there is a steel tube of smaller diameter with threads at both ends; the space between the walls is filled with a plastic sealant, for example, polyurethane foam or silicone. Connection of bellows or flexible hoses must only be made through threaded adapters of the appropriate type.
Construction of a summer house in SNT. Part 31 - Introducing bottled gas into the house
Last time I wrote about how a metal box for bottled gas was installed on the street. Now I’ll tell you about how I introduced this same gas into the house before the Darina gas stove. You can read about replacing jets in a stove here. Initially I planned to introduce gas like this:
- we take a metal pipe 1/2 - we cut it into the required lengths - using tow and gas paste we pack it in turns (in total it was necessary to make three turns at the corners. In this case, the pipe would go up the facade of the house, through the sleeve in the wall of the house inside the house, in the house it would go down to a distance of about 50 cm, after which you would install a tap, a dielectric gasket and then connect it to the stove with a flexible hose.
This decision arose due to the fact that I could not weld the turns efficiently - I have no experience as a welder, although I have a Forsazh-161 inverter.
For these purposes, a 6-meter black VGP pipe was purchased (two sections of 3 meters each).
At first I thought of bending this pipe with a lever right on the spot:
- cut a thread on the edges, pour water into it, plug the ends with plugs and bend it on a mandrel as needed...
We bought from Leroy:
- a mini set of clamps (1/2, 3/4 and 1 inch) for 1,600 rubles (prices June 2016) - steel bellows hose for connecting gas "female-female", - ball valve for gas 1/2 "female-female" and - dielectric spacer 1/2 "male-male" But here’s the problem - when I started cutting this very thread, I discovered that this same thread on the pipe came out not clean, but crumbled. This really stressed me out. In the markets in the area, I could not find a similar pipe for supplying bottled gas, and since the gas had to be connected quickly enough, it was decided to make a gas supply according to a different scheme:
— We make a passage through the wall of the house with a steel sleeve directly from the cabinet with bottled gas. — Pass this sleeve (32 mm in outer diameter) directly from the cabinet into the house, which will also serve as an external protection for the gas hose.
— We connect the reducer to the cylinder with a rubber hose. — We lead this hose through a metal sleeve into the house. — In the house, the gas hose comes out at a level somewhere in the middle of the gas stove. — then carefully lift the gas hose up the wall and attach a ball valve for gas to it. — we screw a dielectric spacer onto the gas valve (there is no longer a need for it, but since we already have it...) — we connect a bellows steel hose to the ball valve with which we connect the gas stove. This way, I still have the opportunity to later replace either the rubber hose with another one or subsequently run a steel pipe through the sleeve instead. In the cabinet itself for bottled gas, in an additional shelf, I drilled a hole and inserted a fitting there for attaching Cofulso steel corrugated pipes through which I passed a rubber hose for gas. This will avoid the danger of cutting the rubber hose on the edges of the metal shelf. Accordingly, the edges of the pipe sleeve were freed from sharp burrs. Then, having connected everything, I started checking: - shut off the ball valve in the house, - opened the valve on the cylinder, - applied foam to the connections: gearbox with cylinder, gearbox with rubber hose, rubber hose with ball valve. As a result of the inspection, no gas leaks were found. Next, I opened the ball valve and checked the leakage from the valve to the stove in the same way. I found no leaks. Next came the time to check the combustion of the gas stove. I opened the burner and lit a match... And then a surprise awaited me! The burner did not light up, although I heard gas coming out. I refilled the 27-liter gas cylinder literally the day before... I don’t know what the problem was, but none of the 4 burners were burning. And only after some time had passed—probably about 15 minutes—I was able to light the gas on the stove. Before that, I closed the valve on the gas cylinder once and opened it again. I still can’t figure out what the problem was... But the oven never caught fire... It’s not clear. UPD Regarding the oven: - Everything is fine with igniting the oven... As it turned out, “Darina” uses gas control for the oven (in my simplest version of the stove), so in order to light the oven you need to: 1. Light a match 2. Press and turn the oven knob 3. WITHOUT RELOSING the pressed knob after 5 seconds, bring the match to the oven burner 4. That's it! The burner lights up... A few photos:
32mm passage under a steel pipe from the kitchen side:
The same passage from the front of the house:
Pipe supply to the stove and to the gas tap:
Inserting a pipe from the house into the gas shield:
Side view of the steel pipe entering the shield:
Passage of a rubber gas hose from a steel pipe into a shield with bottled gas:
Burning of the burners of the Darina gas stove from bottled gas:
The other day there was a very heavy downpour with a crazy wind... just after I installed the cabinet - and then immediately there was such a check for bad weather. I must say that after the rain, I didn’t find a single drop of water inside the closet - I was even surprised... But the wind was such that it broke huge birch trees that fell on the fences - you can see what it looks like... It was the neighbors who had a problem...
News edited by: Summer Resident
— 1-07-2016, 13:38 Reason: new information about igniting the oven burner