Delicious homemade sausages, homemade cutlets or fruit purees. This is just a small list of what can be prepared using a meat grinder. It is in the kitchen arsenal of any housewife. They love it for its simplicity and ease of operation and quality of work. It turns pieces of meat into beautiful, tender minced meat, which in the hands of skilled cooks turns into works of art.
All sorts of models of blenders and food processors have still not been able to supplant the good old meat grinder. She is simply irreplaceable in the lives of thousands of housewives. It's so functional and comfortable. It is simply impossible to imagine a kitchen without this device. However, sometimes, having bought an incredible model of the device, we come home, install it and are disappointed: it chews food and does not make minced meat the way we wanted it to be. This can be very frustrating. But don't despair. You just need to learn how to assemble a meat grinder correctly so that it does exactly what you want to get from it.
We will also introduce you to different types of these devices. We'll tell you what the advantages and disadvantages of electrical and mechanical devices are, and how to assemble each of them correctly. In addition, we will share with you the nuances of caring for them and even debunk some myths.
Design Features
Before you begin assembling the device, you need to study the parts that make up it. This is necessary so that you understand how the meat grinder works and how it is assembled, and so that you do not lose unnecessary parts in the process. Devices are primarily divided into two large groups: electrical and mechanical. The first are more modern machines that have different functions and in addition have many different attachments for preparing anything. From sausages to juices. But the second ones are such “grandmother’s” devices. Housewives had them in every Soviet house. Today many consider them to be a relic of the past and outdated. However, you shouldn’t formulate your thoughts about them in exactly this way, since sometimes they show themselves better than electric ones. Now let's move on to getting to know these devices.
Manual meat grinder device:
- Housing and metal meat receiver.
- Screw shaft (spirals inside).
- Two knives chopping food.
- Lattice. It is needed to adjust the degree of grinding.
- Nut for clamping. It is needed to fasten the elements of the meat grinder.
- Handle and lock (or nut).
Soviet hand-held devices are attached to the edge of the table using a special claw. It is screwed to the surface. To prevent slipping, place a soft cloth between this foot and the tabletop.
The shaft looks like a spiral. It is needed to grind excess meat and move it to the attachments with knives.
Our service center offers its services for repairing household appliances at a competitive price. We repair any breakdowns of modern household appliances. Leave a request and get a 15% discount - Leave a request
Cutting elements, of course, are needed for grinding, cutting or crushing the product. As a rule, they are made of stainless steel. In order for the device to work as efficiently as possible, they need to be sharpened from time to time. The mesh can be very different: very large, large, medium and small. The first is used for preparing minced meat and sausages. The second one is simply ideal for sausages. The third one is best used for cooking cutlets. Well, the latter is intended for pate and puree. The clamp holds all these elements. If you find it difficult to remove it after washing, use a cloth. Throw it on the latch and it will turn easier.
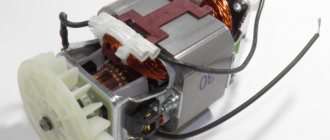
The electric one is almost identical in design to the manual one. The only difference is that there is a plastic body and handle. Some models have an additional pusher. They also do not have a clamp on the body. There are differences on the knife as well. It is equipped with bulges so that the products are crushed more efficiently. Polaris meat grinders, for example, have exactly this type of device, and therefore you need to know how to assemble it. In addition, some of them add a special pusher. It will help push products through the process.
Next, we will describe in detail how an electric meat grinder and a manual device are assembled, and how to use the meat grinder correctly so that it serves you for a long time and does the job efficiently.
Subtleties of work
A meat grinder is a fairly unpretentious household appliance, however, it must be handled correctly so that it lasts as long as possible.
If you follow a number of rules, a meat grinder in the kitchen will always be in order:
- You need to put cut-up products into the device. Especially meat: you need to cut portions and remove unnecessary parts (bones, cartilage and veins).
- Knife sharpening should be done in a timely manner.
- To facilitate the operation of the meat grinder, it is a good idea to lubricate its parts with sunflower oil.
- Do not leave the device unwashed for a long time. Metal parts may rust if grinding or moisture remains inside. Therefore, immediately after cooking, the device is disassembled, and each part is thoroughly washed and dried.
- The meat grinder is stored in strictly disassembled form.
Types of meat grinders
Since meat grinders have been around for a very long time, there are many types of them. In addition, they tried to replace them with combines and blenders. And the manufacturers of meat grinders had to come up with as many interesting functions and “tricks” for them so that they would not lose their necessity. They are equipped with a huge number of knives and attachments, which give the devices incredible functionality and ease of use. With them you can turn meat into minced meat, make sausages and pasta. In addition, they can be used to prepare homemade sausage and even juices and purees. But in order not to get confused in the many types of these devices, we will consider two global and main types of these devices.
These are manual and electrical appliances. It is the latter that are now super popular among most people. In order to twist the meat with them, you do not need to exert much physical effort to stuff the sausage and twist it. Just press the “Start” button and watch the process of preparing minced meat. True, they also have a number of disadvantages. For example, if you missed a bone, the device will definitely be damaged because it will not be able to cope with it. Besides, if the lights in the house suddenly turn off, you won’t be able to make minced meat. And sometimes the motor in the devices burns out, and then you just need to buy a new one.
For many, mechanical Soviet models (knowing how to assemble them correctly is very important) are antiquities that it’s time to forget. However, they are incredibly reliable and durable. This has been proven in practice. And it is almost impossible to break them. The only thing that can become faulty is the knives. But you can sharpen them yourself at home. And they will last for a very long time.
As a rule, their body material is cast iron, stainless steel or durable plastic. However, some can be made from aluminum. Cast iron devices are almost impossible to break. They are practically eternal. And many people love them and consider them much better than their electric counterparts. But they are very heavy. And they can be a little tricky to install. You may even have to ask a man for help every time you install and remove it. Although maybe this is better. But modern aluminum devices are much lighter. Here you no longer have to put in additional physical effort. At the same time, they can serve you just as long as steel or cast iron and do their job with the highest quality.
As for plastic models, they are lightweight and functional. But at the same time, they are very fragile, they must be handled with extreme care, and they must be avoided from falling or sharp blows.
Devices also differ in power. It is important to know how much meat you plan to process. For example, if the power of the device is 1000 W, then you can grind up to 1.3 kg of meat without fear that something will break. Each device has a power reserve, which will be needed if veins or cartilage get into pieces of meat. In this case, the device goes to maximum operation. This is very harmful for him. So try to avoid this.
Devices are also divided into household and professional. The latter have much greater power. They are needed so that the kitchens of restaurants and cafes can quickly process orders and prepare dishes. But the first ones are not so powerful, they are much smaller in size, but are ideal for use in the home. Moreover, you don’t need any huge power in everyday life; you won’t be doing too much work.
Also, some models are equipped with a reverse system. It allows the screw in the meat grinder to rotate in the opposite direction. This helps a lot if veins accidentally get into pieces of meat. The device slows down, and you can get them out.
But in practice this function is not always needed. Stuck wires can also be removed on conventional devices. Of course it takes a little longer. But it saves money.
Operating principle of a manual meat grinder
The operating principle of a manual meat grinder is incredibly simple. It is based on the fact that you need to turn the handle, the product is pressed through, falls on the knives and turns into minced meat. The operating algorithm of a mechanical meat grinder is as follows:
- Place food in the top hole.
- They fall onto the auger.
- Then they are pressed against the grate and cut off with special knives.
They are very convenient to use for creating sausages and sausages, as well as fruit purees. A little further on you will find some valuable tips on assembling meat grinders of these models. Read carefully to connect everything correctly, and then your device will serve you very well, work great and fulfill all your desires.
Operating principle of an electric meat grinder
According to the principle of operation, an electric meat grinder is not much different from a mechanical one. The only and main difference is that for the meat grinder to work, you just need to load everything into the receiver and press the button. And nothing else needs to be done. Using a device from Mulinex as an example, we will tell you what happens next and how to insert the knife correctly. After the meat is loaded into the meat receiver, it is also pressed against the mesh with a screw and cut off by cutting elements. After work, you need to disassemble all the elements, wash them, and leave the meat grinder in the disassembled state until it is completely dry. Only after this can you put the device in a box and place it on a shelf for storage.
How to properly assemble a manual meat grinder step by step
You already know what a manual meat grinder consists of. Now it’s time to find out how a manual meat grinder is assembled. Because this is the key to good and correct work. If you make even the slightest mistake, then everything will not work as it should. And you will be disappointed with the quality of processed products.
The surest way to properly assemble a meat grinder is to find the instructions, open the required page and follow what is written step by step. This is how you can best assemble the device. As a rule, manufacturers even indicate assembly tips and tricks there. But if there are no instructions, or something is unclear, then follow our recommendations. First, lay out all the elements on the table. The screw shaft is installed first, then you need to know how to insert the knife into the meat grinder and do it correctly, and the last thing is to put on the grate and screw on the handle.
A large number of devices come in sets with a variety of nozzles and grilles. They help make sausages, sausages, juices and other goodies. However, inserting the nozzle, blade, or grid into the device correctly can be challenging. And all because their presence leads to a change in the order of assembly of the device. First, the screw shaft is inserted, then the gratings, then the nozzles, and finally the entire structure is fixed with a nut. The device should be assembled only if all its parts are clean and dry. Do everything very carefully and carefully so as not to get hurt and assemble everything correctly.
Installation of auger shaft
Whichever model you choose from the many hand-held appliances, first in any case we install the meat feeding cylinder. Then proceed to inserting the auger shaft, with its wide part towards the handle, that is, the narrowest hole of the device. The thin side must be installed so that it is in a wide and round hole. Then you will need to attach the cutting edges of the meat grinder to the same place.
Thus, the first stage of assembling a conventional mechanical meat grinder occurs.
Make sure you do everything correctly because this is one of the main parts of the device. And if you do it incorrectly, then the mechanism may not work.
Therefore, we repeat: the narrow part of the auger should be in the widest part of the device, and the widest part should be in the narrowest part. Check that this is exactly the case.
How to properly insert a knife into a meat grinder
Once you are sure that the auger is inserted correctly, begin inserting the knife into the electric meat grinder. This is an element that many people have problems with, and it is the one that is most often installed incorrectly. And its incorrect installation leads to poor operation of the device, “chewing” of food and disappointment of housewives. So before you despair, take a look at how to properly insert the knife into the device.
It must be installed with the back side facing the auger. That is, so that its flat part is adjacent to the mesh, and the convex part is near the auger. When you process food, it will slide along the grate. Again, we emphasize that you need to install it correctly, otherwise the product will simply choke. This may even cause the device to jam. But cutters that have a double-sided cutting part can be placed on either side. There is no difference at all. He will cut anyway. Therefore, you don’t have to worry that your device won’t work if you install the cutters incorrectly.
If you have a disk cutting element, then install it with the corrugated surface outward. If you are in doubt about the correct installation of this element, look for relevant videos on the Internet. There are quite a lot of them, and you will definitely be able to install all the necessary elements correctly. Another option is to find installation instructions on the website of the manufacturer of your particular device.
Installing the grille and screwing the handle
After you have installed the knife in the meat grinder according to the step-by-step instructions, proceed to the stage of installing the grate and screwing the handle. Insert the grid first. This is the easiest thing to do. In order for it to fit correctly, the notch and protrusion on the device body must coincide. This entire structure is then fixed using a clamp on the body of the device. You just need to screw it on top. Then proceed to installing the meat receiver. And screw the handle onto the back with a screw.
That's all. The device is fully assembled. In order to start working, all that remains is to install the meat grinder on the table. This is not difficult to do. Next we will tell you the details of installation. But be sure to make sure that all elements are installed correctly. If something is wrong, fix it.
If during operation you see that the minced meat is not scrolling well, do not try to press it further. Disassemble, clean and dry the device, and then reassemble.
Most likely, you simply put the knives on the wrong side, and they cannot cut the pieces. All you have to do is flip them over. You need to be very careful with this, because due to the accumulation of product near the knife, the device may jam and it will be impossible to continue working.
Installing the meat grinder on a work surface
This is the last and easiest stage of assembling the meat grinder, the sequence of which is very important. There are special “paws” for this purpose. To ensure a strong fixation of the kitchen unit, you need to arm yourself with newspaper or soft cloth. You place it on the tabletop and secure the device on top. It’s even better if you take thick rubber instead of a rag. This is the assembly order that must be followed so that the device can work correctly and you will get a beautiful minced meat. We hope that our recommendations on how to assemble a meat grinder correctly will help you do everything perfectly and install your mechanical device.
Then you can start working with it. It will do a great job with sausages, sausages, minced meat, and even juices. But sometimes special attachments may be needed for this. They need to be installed after the grille, and then put on the retainer. Just be sure to check that there are no chips or roughness on it. If this happens, then, for example, the intestine may rupture while cooking sausages. And your dish will be spoiled, and your efforts will go down the drain.
How to properly assemble a manual meat grinder if you need to install an attachment
Most meat grinders are equipped with various attachments and grates for making sausages, sausages, juice and many other delicacies. But not everyone knows how to correctly insert an attachment, knife or grid into a meat grinder. After all, the procedure for assembling a meat grinder with an attachment is slightly different:
- Insert the screw shaft into the main body . The wide part of the shaft is placed in the place where the handle is attached. The thin one should be in the place where the grille is attached;
- then install the grate . It can have very large or medium holes. It all depends on the recipe and your preferences;
- then install the nozzle . Just make sure that there are no chips or roughness on it. Otherwise, you risk tearing the intestine, which is put on the nozzle when making sausages and kebbe;
- secure the structure with a clamping nut , and now all that remains is to screw the handle. That's all. Nothing complicated. Is not it?
When making sausages and kebbe, no knife is used. And all because ready-made minced meat is put into a meat grinder with such attachments;
How to assemble an electric meat grinder
Now we’ll move on to how to assemble an electric meat grinder. This process is similar to how everything happens manually. Follow our instructions and you will succeed. Assembling the meat grinder must begin by connecting the gearbox housing and the metal housing of the auger. To do this, there is a groove into which the last part must be inserted and turned counterclockwise. A characteristic click will indicate that you did everything correctly. In some models of devices, the meat receiver must be mounted separately. It is inserted from above. A special pusher also comes with it.
In addition, some devices are equipped with special rubber feet. They help him stand more stable and not slip while working. It is very comfortable. If, when assembling an electric meat grinder, you do something incorrectly or loosely, then the motor will not have full control of the auger. It must fit clearly into the corresponding hole. Then the assembly of the electric assistant proceeds to the installation of the blades and grille. This happens in the same way as in mechanical. Look at what knives you have so you can place them correctly.
The convex side of the knives must be inserted into the auger, and the flat side into the grate. If you have a disk cutting element, then install it with the corrugated surface outward. But if the set contains double-sided cutting edges, it makes no difference how you install them. After this, the installation is completely finished and you can start cooking. Just as in the case of mechanical devices, the nozzles must be inserted after the grille and secured with a lock. As for attachments, they are specially designed for sausages, sausages, juices, pastes, purees, grating and cutting vegetables, making spaghetti, pasta and cookies.
Also be sure to ensure that all parts are dry and clean during assembly. Yes, this is very banal advice. But if you do not follow this rule, then your actions can lead to a decrease in the performance of the mechanism.
Sometimes, after using the device for some time, it may need repairs. If it requires removal of the reduction gears, which are located in the transmission unit, then remember that one of them is pressed on. In order to work with it, you need to arm yourself with a vice or heat up the parts. The second method is used much less frequently, because the engine rotor can be accidentally damaged.
Your device may be equipped with two, three or more gears. Each of them rests on its own shaft. You can clean the parts located in the gearbox from dirt and old grease with a rag. And lubricate the places where the gears are located with Litol or a special silicone compound. After this, everything needs to be installed in its place.
Please note that if you plan to do this, be sure to first disconnect the device from power.
If you have difficulty assembling, try following the tips from the video. As a rule, everything is clearly shown there, and even a child can do it. But if even after this nothing works for you, then perhaps the problem is in the device itself. Then we advise you to contact the service center or the store where you purchased the device.
What is a manual meat grinder
A manual meat grinder is a mechanical device that is necessary for grinding meat or fish for minced meat. The device is used for processing other products used in the production of noodles, spaghetti, juice, and cookies. The main advantage is the price, the ability to quickly assemble, chop, disassemble, and clean. The only negative is that it is a very labor-intensive process when working with meat, requiring the use of little physical force.
There are several types of devices for grinding meat. They differ in their operating principle:
- Manual or mechanical. The process of processing products by hand, made of cast iron, aluminum, plastic, stainless steel.
- Universal. They resemble a food processor, equipped with many functions and modes. Ideal for squeezing juices, making cookies, noodles. Safe.
- Combine harvesters. There is no auger (torque shaft) familiar to users. A special knife (impeller) turns all products into a homogeneous mass.
Based on the manufacturing materials, devices for mechanical grinding of products are made of cast iron, aluminum, plastic, and stainless steel. Peculiarities:
- Cast iron is considered durable. The disadvantage is that if there is a sharp fall, there are splits in the case.
- Aluminum depends on the composition. A device with added silicon is considered durable and can withstand impacts. Aluminum-magnesium alloy is very brittle.
- Plastic models are lightweight, equipped with a press for pushing meat, a vacuum mount that can be easily held even in the middle of the table.
- Stainless steel meat grinders are practical.
The choice of many housewives falls on mechanical models of devices. This is explained:
- Low cost.
- It is believed that minced meat processed using a manual device is much tastier than using an electric meat grinder.
- Independence from the power grid. You can work in any conditions, for example, in the country.
- Durability, the ability to quickly and cheaply replace parts if necessary. If the knives become dull, they can be sharpened; if the attachments are lost, they are always on sale.
- Compact size.
- Silent operation.
- Easy to assemble and use.
Device
The design of the device includes several components. The entire mechanism will only work if it is assembled correctly. Classic set of mechanical meat grinder - 7 parts. This:
- frame;
- meat receiver bell;
- Archimedes shaft or auger, which feeds the meat to the knife;
- wing or disk knife;
- nozzles;
- grinding grid;
- fastening in the form of a clamping nut for a knife;
- pens;
- screw or suction cups.
The composition of the parts included in a mechanical device for processing products is similar to an electrical one, but there are still differences. Each of them has its own purpose. Characteristics:
- metal or plastic body - a cast container with a meat receiver (a tube-socket that expands upward);
- spiral shaft - pushes the meat towards the incisors;
- knives – cross-shaped or disc-shaped;
- a grid with holes of different diameters to regulate the degree of grinding;
- the clamping cap is shaped like a large nut;
- handle - attached to the rear on the protruding part of the shaft, secured with gaskets and a screw;
- clamp – secures the device to the table.
The first thing you need to consider when assembling this household appliance is that all the parts fit snugly together. The quality of minced meat is affected by the density of contact between the knife and the grid. The classic version of the incisors is four-blade. As for the grates, they have different slots, but the smaller the holes, the more tender the meat will be. The kit includes additional parts in the form of metal (plastic) attachments of different sizes and shapes, which are intended for making cookies, purees, chopping vegetables and fruits.
How to assemble correctly
To assemble a manual meat grinder, you need to follow a certain algorithm. The sequence is:
- Take the body, the largest part with three holes.
- In the large round slot, place a shaft (helical-shaped) designed to push the contents towards the incisors.
- Attach the knife for a manual meat grinder with the concave part to the shaft (this position grinds the food).
- Install the grid, fit tightly to the flat side of the knife. You need to make it so that the cut (groove) on the part sits on the protrusion of the body. This will secure the grille.
After all the parts are installed, the next step is fastening. This is done in this way:
- Everything is fixed with a large ring (clamp cap), which is threaded onto the body.
- The handle is attached to the reverse side using two spacers and a screw.
- The final stage is to place the device on a flat surface. To do this, you need to install the meat grinder on the edge of the table, using the screw located at the bottom of the case, screw it into the tabletop using the principle of a vice.
The operating principle of such a device is to supply ingredients for grinding into the meat receiver. It is not recommended to take very large pieces because they may get stuck, causing the work to stop. You will have to disassemble the device and remove the meat. A spiral shaft pushes the meat towards the knives, which cut it into pieces (depending on the type of cutter). They go to the grate, the holes in which grind them to the desired state. The resulting minced meat comes out of the nozzle and falls into a bowl, which must first be placed on the side of the clamping lid.
- Ammonia-anise cough drops. Instructions for the use of ammonia-anise drops for adults and children
- Couscous - what is it, recipes with photos. Benefits of couscous
- Flat warts: treatment and reviews