What is a toaster and what is used to cook with it?
The word “toast” comes from the English toast and refers to thin slices of dried or lightly browned bread served for breakfast. To quickly prepare toast without overcooking it, special ovens have been invented - toasters. Toasters come in three main types: classic toaster, toaster roaster and sandwich toaster.
Classic toaster
A classic toaster is a vertical box with narrow slots. Inside there are baskets in which pieces of bread are placed. The user presses a lever, the baskets are lowered and locked in the lower position, and the bread is placed between the heating elements.
The finished toast is thrown out by a spring
As soon as the timer goes off, the heating stops and the spring returns the basket to the top position. Ready toasts appear from the cracks, you can have breakfast.
Toaster-roaster
You can brown pieces of bread in a regular oven, but heating up the oven just for a couple of loaves of bread for breakfast is ineffective. The industry produces mini-kitchen ovens (volume no more than 20 liters), which are also called “roasters” (from the English roast - to fry).
The bread is placed horizontally in the mini-oven roaster.
The bread in the roaster is positioned horizontally between the upper and lower heating elements. Unlike a toaster, a roaster can heat sandwiches and pizza, fry sausages and sausages.
Sandwich toaster
A classic toaster can only dry and brown bread slices. Since the bread in it is installed vertically, it is impossible to make a full-fledged hot sandwich in a toaster - the ingredients will fall down. A special sandwich toaster can make a real sandwich.
In a sandwich toaster, bread and filling are baked between hot panels
This device looks more like a waffle iron than an oven or toaster. The assembled sandwich is placed on the bottom panel and covered with the top panel. Both panels are heated, so the sandwich bakes evenly on top and bottom, turning into a flat pie. The shape of the sandwich is given by the recesses in the panels.
Is it possible to disassemble the toaster and repair it yourself?
When disassembling any electrical device, you need to make sure that it is disconnected from the network. This rule will not be an exception for repairing a toaster. It is completely turned off only when the lever is in the raised position, like the basket. As for the breaker, it is used specifically to forcibly break the power supply circuit of the electromagnet.
An electrical appliance turned on for operation is characterized by a heated heating element; slices of bread are placed in a movable basket to be baked. The locking bar holds the basket in place when the toaster is operating, and when it is lowered, the contacts are closed by means of a wedge-shaped plate. The created electromagnetic field acts on the locking bar, which will be attracted to the core - the basket will lock and the timer will start.
How does a toaster work and how does it work?
A classic toaster is a closed case with slots, inside of which there are heating elements, as well as a movable bread basket. To prepare, the slices are placed in a basket.
Toaster diagram. Non-working (upper) position
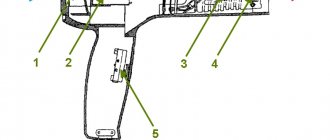
The diagram shows the following parts of the toaster in the non-operating position:
- Lever arm. Used to lower the bread basket and turn on the appliance.
- Heater. Hot nichrome wires heating the bread.
- Breaker. Placed on the building and about. Designed for emergency power outage and early termination of cooking.
- Lock. Locks the basket in the down position.
In the off state, the lever (1) is in the upper position, the heating coils (2) are turned off, the circuit breaker (3) is closed, and the basket is raised. The basket lock (4) is open.
The breaker is needed in order to forcibly break the power supply circuit of the electromagnet and interrupt the process if something goes wrong.
Toaster diagram. Working (lower) position
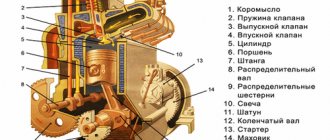
The diagram shows the following parts of the toaster in operating position:
5. Hot coil heater. Emits heat that bakes bread.
6. Movable basket. Lowers the product to the heater.
7. Locking plate. Holds the basket during cooking.
8. Electromagnet. Magnetizes the locking bar while the bread is cooking.
9. Wedge-shaped plate. Closes the contacts when the basket is lowered.
When the user presses the lever, the basket (6) moves down, and the following processes occur simultaneously:
- A wedge-shaped plastic plate (9) lowers and pushes the spring contacts.
- The spring contacts close and turn on the control circuit, heaters and electromagnet.
- The electromagnet creates a magnetic field that magnetizes the bar (7) to the core, thereby locking the basket (6) with the lock (4) in the lower position.
- The control circuit starts the countdown timer.
Infrared radiation (5) warms the bread until the timer goes off. As soon as the cooking time has expired, the control circuit removes power from the electromagnet, the basket is released from engagement and returns to the upper position under the action of a spring. The wedge-shaped plate (9) releases the spring contacts, they open and turn off the heaters and the control circuit.
Video: demonstration of the toaster operation
Repair with passion.
Hello repairmen! Let's talk about the intricate repair of a toaster, in detail about the operating principle of its electrical and electronic fillings, about the interesting power supply of the control board and about the layout of electrical parameters at the control points of the circuit.
toaster (board FTC-208 shch-4 GW12) came to me as a gift, not in working order and without a power cord. Externally, the button and knob were fine. I opened it, washed the plastic case from sticky dirt, examined it with a careful eye, everything was in order. I removed the board, turned it over in my hands - everything was fine too. It was useful to take voltage measurements - it turned out that the power supply did not come to the board when I pressed the main large button-lever.
Front view
As usual in toasters, this lever, also known as a button, supplies power to the electrical network for the entire unit. And as usual in toasters, the low-voltage power supply to the board is provided by ATTENTION! …. THE HEATING ELEMENT ITSELF, i.e. part of its turns (you will see in the diagram)! No transformers or AC-DC converters for you!
I personally like this simple and reliable solution!
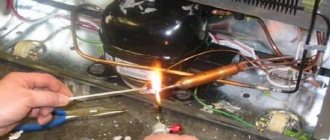
I measured the integrity of this heating element with an ohmmeter and found that it was broken. I started digging for a metal stand with a thermal wire wound in it. I came across a break at the fastening rivet (broken off) to this very wire.
Again, as is usually the case in toasters, the structural parts of the stand with nichrome wire are connected to each other by metal jumpers, which in turn are welded by contact welding! In such cases, this usually complicates the repair, since not everyone has a resistance welding machine at hand, and instead, using collective farms for something like twists or “on screws” and terminal blocks, in this case it is a thankless task, fraught with overheating and oxidation contacts.
I had to restore this break without destroying this same contact welding, simply manipulating the tool like a surgeon!
Since a small part of my wire had burned off, the length of the rest was no longer enough to restore contact, and it was not possible to rewind everything at all due to the lack of such a flat heating wire. Therefore, I had to slightly pull and tighten it.
To do this, I cut and deepened the mica base from the opposite side in the slots in two places (these slots hold the wire at turns) and thus the wire was pulled to the rivet with the necessary margin.
Thermal wire tension
Anticipating your sensible exclamations that they say: “So it will burn out again later”!!! – I retort – what could I do, for the above reasons?
After repairing the toaster, go to my mother-in-law... :-), I’ll tell her to use it without overloading, and as they say, “I’ll take a look”!
Also, to prevent the wire from burning out, the new power cable was deliberately set with a cross-section of 0.75 mm (ShVVP-0.75) in order to reduce the load on the heating element and thereby extend its life.
Instead of a rivet, I installed a regular screw, washers, a screw, a nut and clamped the wire with them.
Before and after restoration of the thermal wire
Turned it on, tested it, it works.
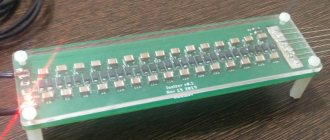
For clarity, I drew a diagram from the board.
Just in case, I checked the capacitors, etc., everything turned out to be normal. I took measurements from control points, current and voltage, and the resistance of the heating elements - maybe some of you, dear ones, will find it useful.
Board diagram with measurements at control points
The scheme is interesting, simple and therefore reliable. As I wrote earlier, the board is powered from a small part of the turns of the heating element, i.e., removing the reduced voltage. The voltage rectified by the diode is supplied to the smoothing capacitor C1 connected in parallel with the resistor R8 that discharges it when the toaster is turned off. R7 lowers the voltage to the required limit to power the timing circuit.
C2, R4, R5, W is actually the timing circuit itself. C2, discharging to the required current level (as is known, bipolar transistors are controlled by current), closes transistor Q1, which closes Q2, which in turn closes Q3, and the latter turns off the relay.
R6 discharges the condenser, for the clarity of the circuit after turning the toaster on and off. It also creates the necessary voltage bias at the base of transistor Q1. Those. for the stability of its operation (so that the base does not “dangle in the air”!). R2 and R3 are collector loads and resistive dividers of the bases of Q2, Q3. R1 creates the necessary operating mode for the Q3 base.
Q3 is the direct key that controls the operation of the relay, which in turn closes and opens the power contacts and is also the collector load. D2 is installed for the stability of the circuit.
I gave it to my mother-in-law and as long as she doesn’t complain, it means the toaster is working.
This is how the renovation turned out!
For this, let you all bow to the ground until the next meeting!
Good luck with your repairs!
2
Author of the publication
offline 22 hours
Vasya
252
Thoughts tend to materialize!
Comments: 89Publications: 28Registration: 03/25/2018
How to use a toaster correctly?
A toaster is an electrical appliance with exposed heating elements. The luminous coils are heated to very high temperatures and can cause injury and ignite flammable materials.
General rules of use
- The toaster should be installed in a free space. The curtain should not hang over the cracks. Do not place the device on the edge of the tabletop, so as not to accidentally pull it down.
- The toaster only cooks dry bread. Ready-made sandwiches with cheese or sausage, soaked bread are unacceptable: they will fall, burn and clog the device.
- You can't toast anything other than bread in a toaster. There is a special toaster for preparing hot sandwiches, and a roaster is used for sausages.
- It is recommended to plug in the appliance only while making toast. Do not cover a toaster while it is running.
- If water gets on the wire, the heater coil will burst with a fireworks display of hot particles.
- The heating coils are hot and energized. You cannot check the readiness of bread with a steel fork - you will get an electric shock. If you really need to straighten a piece, use wooden tongs.
How to make toast correctly
- The spirals should not run idle - they will overheat and burn out. Occupy all the free slots of the toaster with bread.
- Choose the right bread. Homemade pieces are rarely the same; they will protrude from the grill, may touch the spirals and burn. It is recommended to take slices cut at the factory; they are always the same in thickness, so they will fry evenly.
- Toasted bread creates a lot of crumbs. Good toasters have a pull-out tray underneath the basket. After each cooking, it is recommended to shake out any crumbs. Perform general cleaning and cleaning of the toaster at least once a month.
Automation for toaster
A toaster is a household electrical appliance for preparing bread toast. The quality of bread preparation does not always satisfy the buyer; sometimes it seems too raw, sometimes there is no crispy crust. An electric device—a toaster—helps improve the appearance and taste of bread.
Despite all the positive properties of making toast, there are several drawbacks, and one of them, according to consumers, is that you can’t guess the state of the final result - after cooking in the toaster, the toast may turn out to be uncooked or burn to ash. Several factors are to blame for this: the absence of any gradation of bread according to its condition before cooking in the toaster; influence of unstable power supply voltage; an electromechanical lock with a spring that stretches over time of operation and unstable operation of a mechanical time relay.
The network voltage on the thermoelements is not regulated and they operate with overheating when the power network parameters are too high. While the toaster is operating and after the toast is cooked, it is necessary to cool the internal space of the toaster body to reduce the temperature after switching off, which will prevent accelerated burning of the thermocouples. There is no forced ventilation in the toaster. It is inconvenient, burning your hands, taking toast out of a hot toaster or using sharp objects to remove fallen pieces of bread; you can accidentally damage the thermoelements of electric heaters. According to operating conditions, the toaster should not turn on without toast in the baskets, although this is not true; not a single baker will start baking bread in an unheated oven.
The toaster consists of a housing, inside of which there is a metal device with heating elements and a mechanism for feeding toast into the frying oven. When you press the toaster lever, the baskets with toast are lowered, and the mains voltage is supplied to the electrical circuit through the limit switch. To keep the mechanism in working condition, an electromagnet is installed with a time delay set by the baking intensity regulator.
The shortcomings identified when using the toaster were modified based on the type of bread: rye, wheat, butter and gradations of condition: fresh, dried, dry. Increased bread moisture requires more energy consumption and baking time. These gradations are marked with signs on the device body. Part of the operating time of the appliance should be spent on drying the bread, and most of the time on frying the outer surface of the toast. In the second case, voltage and power increase. Drying takes several tens of seconds; as the voltage on the heater increases exponentially and then at full voltage, the toast is baked. In the scheme, we regulate the toast drying time - with dry bread it is zero, with wet bread it is maximum, the remaining time intervals are set depending on the type of toast bread. A cooler-type fan, from computer systems, will automatically purify the internal volume of the toaster while baking toast.
The board with radio components is installed in the compartment opposite to the fan. The toast baking setting controls R2, R3 and the emergency shutdown button SB1 - “Stop” are attached to the front of the housing. The toaster circuit diagram consists of a programmable time relay on an analog timer DA1, a key mechanism blocking device with a limit switch SA1 and an electromagnet YA1, a “Stop” baking pause button and a triac power regulator of the heating element EK1. Fan M1 turns on automatically when the voltage on the collector of transistor VT2 relative to the supply plus reaches at least 5 volts, due to the presence in the cooler of an electronic circuit on transistors and a Hall sensor with a 12-volt power supply. The heating element EK1 is connected to the network by a contactless current regulator on the triac VS1. The triac turn-on delay angle is controlled through diode-thyristor optocoupler U1, the additional functions of which include galvanic separation of networks with low and high supply voltages and additional amplification of the control signal with its conversion from constant to alternating voltage, which is convenient for regulating the voltage on the load. The HL1 LED indicates the operating status of the device.
Resistors R2, R3 of the external timer circuit allow you to set the duration of baking toast according to the type of bread: wheat, rye or butter and by condition: dry, dried or fresh. The moisture content in the listed gradations differs significantly and the difference in toast preparation time exceeds one minute. Resistor R7 regulates the toast baking power. It was possible to reduce the impact of power supply voltage fluctuations using a simple method, without the use of expensive autotransformers, by introducing an RK1 temperature sensor into the electronic circuit. A small temperature deviation when the network voltage changes affects the resistance of the thermistor RK1, which leads to stabilization of the parameters.
circuit is powered by a low-power network transformer T1 with an AC rectifier using pulse diodes VD3-VD4 and filter capacitor C5. The DA1 timer and bridge resistors are powered from the DA2 analog stabilizer. The timer operates in multivibrator standby mode. When the lever of the toaster mechanism is moved to the lower position, the limit switch circuit SA1 is closed, the mains voltage is supplied to the circuit diagram, power is supplied to the timer with external circuits, zero voltage on capacitor C1 at the moment of switching on by the lower comparator will allow the timer to operate and charge capacitor C2, at output 3 a high voltage level will be established with a duration T1= 0.69(RK1+R2+R3)C2. A high level of the timer output through limiting resistor R6 will open the key on transistor VT1, and the electromagnet YA1 of the locking mechanism will work.
The voltage on capacitor C4 in the thermocouple power regulator control circuit will increase exponentially with a time delay depending on the resistance value of resistors R8. The triac VS1 will open to a certain angle of the mains voltage sinusoid, and already at a small current through the LED of the optocoupler U1, the heating elements will begin to heat up. When transistor VT2 is fully open, cooler fan M1 starts and the power on the heating elements will be maintained at the level specified by resistor R7.
When the voltage on capacitor C2 reaches a level of 2/3 Un, the upper comparator of timer DA1 at input 6 will operate, the internal trigger will switch output 3 of the timer to the zero level, and the internal transistor will begin to discharge capacitor C2 within a few seconds. The de-energized winding of the electromagnet YA1 will allow the mechanism to return to its original state, due to the return spring, the limit switch SA1 will open the power circuit of the circuit. If necessary, the toast baking process can be stopped by pressing the “Stop” button, the bias voltage at the base of transistor VT1 will drop to zero, the current through the electromagnet winding will stop, the mechanism will be released from hold and the mains power circuit SA1 will open. Restarting can be done by pressing the mechanism lever no earlier than after 4-6 seconds. Resistor R9 in the collector circuit of transistor VT2 limits the pulse current through the optocoupler LED and the network indicator HL1. Resistor R10 reduces the control current through triac VS1 to the rated value.
Adjustments: The electronic circuit of the toaster assembled on the printed circuit board should be adjusted: set the resistor sliders R2, R3, R7 to the middle position, apply voltage to the circuit by turning on the limit switch SA1, the mechanism will be blocked by the electromagnet in the lower position and, after a set time, will turn off and return to its original position. If the toast is overcooked during cooking, the heating power should be reduced by increasing the value of resistor R7; if it is not ready, reduce it. When installing the board in a toaster, a standard limit switch SA1 is used, although its open state does not meet safety requirements and, if possible, it should be replaced with a sealed limit switch. The electromagnet is also used from the factory. In its place, you can use a DC relay coil with a voltage no higher than 12 volts. The main requirement for the electromagnet is to hold the baskets in the lower position. To reduce the force of the return spring, bend its attachment points slightly, the spring force will decrease. The fan is installed on the side opposite to the control circuits, between the plastic housing and the mechanical toast feeder. The board with the radio components of the circuit is mounted vertically, the knobs for setting the baking intensity are brought out through the holes in the case, the “Stop” baking pause button is secured above the intensity regulators, and the device status LED is secured between the baking controls. Connection terminals: regulators for setting baking modes - resistors R2, R3; fan M; LED HL1; "Stop" buttons; the primary winding of the network transformer T1 and terminals “A” - the anode, YE - the control electrode of the triac - are indicated on the printed circuit board with square pins. The thermistor RK1 remains on the board and monitors the temperature between the body and the internal metal part of the toaster.
The circuit uses radio components from old monitors and radio equipment. Resistors type MLT -0.125, SP-3, capacitors type K 50-18, KM, K73. An analogue of the DA1 microcircuit type 555. The optocoupler U1 can be replaced with an AOU 115 G, AOU160A with adjustments to the pins on the printed circuit board. Diodes VD3-VD4 are designed for a current of one ampere, bridge VD5 is 300 mA, 250 volts. The triac can be replaced with a VT136 or KU 228 V. The transformer is used for an output current of at least 300 mA and a voltage of 12-14 volts AC.
Literature: I.P. Shelestov. Useful diagrams for radio amateurs, SOLON-Press.Moscow 2003.
Attached files:
- toster.lay (73 Kb)
Tags:
- 555