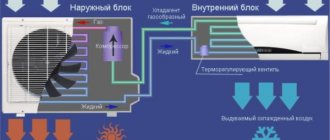
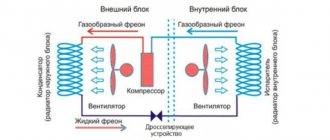
Home air conditioners and their owners can encounter a variety of types of breakdowns. And the reasons and sources are also different. These are complex devices consisting of a large number of parts and mechanisms, and therefore require more attention. That’s why it’s so important to study the main breakdowns of air conditioners in advance. There are several problems that appear most often in practice. Methods for eliminating breakdowns have also been known for a long time.
The main causes of breakdowns
Timely maintenance of equipment will be the key to its stable functioning. You can list such problems that are typical for modern devices.
Air conditioning master preparing to install new air conditioner. drilling the wall.
Filter dirty
Such a breakdown leads to the following consequences:
- Air circulation inside is impaired.
- Refrigeration equipment is malfunctioning.
- Copper pipelines become covered in ice.
As a result, excess water is often observed to flow and drip from the housing.
The standard filter cleaning frequency is every three weeks. The devices are washed under running water, then it is possible to completely get rid of dirt. All that remains is to dry the filters and return them to their original position. Such a problem is not enough to write off equipment.
Freon leak
No one is safe from leakage, even if all recommendations are followed perfectly. 2-3% per year is a normal figure, equal to approximately 150 grams. Refueling is carried out 2-3 times a year to avoid serious breakdowns. Then the freon level inside the system rises to normal levels.
But sometimes leakage exceeds any current standards. If ice and frost form on special copper pipes inside, this means that serious problems have arisen. These leaks cause mechanical problems.
Operation of the device in winter
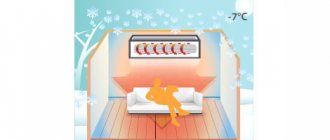
Most modern devices are not adapted to work in the cold season. -7 - +40 degrees - standard temperature ranges during operation. Normal work with negative temperatures is impossible without special technical training.
The operation of the compressor and drainage systems is disrupted if used incorrectly in winter. The drain freezes, preventing water from leaving the system. Liquid leaks into the room where the device is installed. Air conditioner problems continue to develop if no steps are taken.
Causes of air conditioner failure
Air Conditioner Leaking: This is the most common problem that occurs with an air conditioner. Due to the loss of system tightness, a freon leak occurs; in chiller-fan coil systems, a working fluid refrigerant leak occurs: water or ethylene glycol. Also, air conditioning malfunction can be caused by oil leakage from the air conditioning system. Contamination: Poor air conditioner performance can be caused by dirty filters, drainage system, heat exchanger and condensers.
If you have landed on this page, it means that you are faced with a problem with your air conditioner. Today I will tell you about the most common breakdowns of household split systems. But before we start looking at them, you should understand that there are complex systems and special cases where you need to understand them on the spot.
Malfunctions of home air conditioners can be of a very different nature. Having quite complex mechanisms in its structure, such equipment requires special attention from the user. And, if you leave your air conditioner without the necessary maintenance, it will stop working very soon. All air conditioner breakdowns can be generally classified according to the following criteria:
Main compressor malfunctions
Diplomas - Certificates - Charity. All price lists for equipment. Portable, multifunctional power supplies and starting devices. Our partners and representatives in the regions of Russia. Causes of air conditioner failure. Causes of air conditioner failure There are not so many reasons for air conditioner failure, however, you need to know them. Contamination of the filters of the indoor unit Filters are ordinary small meshes installed under the front panel through which air is sucked in. Since there is always dust in the air, the filters periodically become clogged and worse protect both the owners of the air conditioner and the radiator of the indoor unit. Treatment: self-washing and drying of filters. Freon leakage There is a normalized freon leakage that occurs as a result of connecting the interblock pipeline by flaring.
Reasons for failure of household air conditioners and split systems
Air conditioners and split systems are technically complex devices, the correct installation and operation of which determine their durability and reliability. How to avoid breakdowns? You can find the nearest service center, get advice on repairs, or order a technician to visit you through our rating of air conditioner repair service centers. Repair All service centers by brand New service centers and workshops Rating of service centers Service centers by city Feedback form. Reasons for failure of household air conditioners and split systems.
In pipelines longer than 30 m, it is advisable to have siphons; in horizontal sections - a slight slope in the direction of refrigerant movement of at least 12 mm per linear meter. In this case, it is necessary to ensure correct oil filling according to the manufacturer’s recommendations and to provide an oil lifting loop on the pipelines.
There are a whole lot of options. Next, the causes of air conditioner malfunction are determined. Which exit?
Air conditioner write-off reason
Air conditioners can be classified as highly reliable products. This is due to the fact that split systems have a small number of mechanical components and assemblies, and those that exist are represented by closed devices, isolated from external influences, electric motors and compressors, and products designed for a long service life, bearings, etc. Therefore, air conditioner breakdowns are very rare are associated with its design defects, and occur, most often, due to the low quality of components and materials, as well as non-compliance with the rules of their operation and maintenance. Most often, such malfunctions occur in the outdoor unit, which is exposed to active atmospheric phenomena, and also possible physical impact from the ingress of foreign objects, for example, icicles, large debris such as broken branches, plastic bags, etc.
.
About the main faults
It is not recommended to fix any breakdowns yourself. If you do the repair yourself, and then problems arise, the manufacturer will most likely refuse the warranty.
If there is poor cooling in the room
This is usually due to the following reasons:
- Weak power.
- The appearance of internal damage.
Sometimes it happens that the power of the air conditioner is not enough to maintain the temperature in a particular room. An example is due to a sharp change in the climate in which the operation is carried out. The average temperature range is from -7 to +40 degrees. These are the main indicators that apply to all devices.
In other situations, the problem is related to internal failures of the device. It is recommended to immediately seek technical service; it is also difficult to solve something on your own.
Short cycle unit
At first the device is turned on, but it stops working literally after 15-20 minutes.
This problem has several reasons:
- Dirty radiator.
- Failed thermostat.
- Broken control board.
- Problem with settings.
External radiators are subject to various mechanical damage and stress, especially in the summer. When foreign objects get inside, the entire system begins to overheat. Because of this, all work stops. The problem is eliminated by flushing the radiator with water and strong pressure. This will help eliminate other air conditioner problems.
Basic air conditioner malfunctions
table of contents >>
When starting and operating the air conditioning compressor, a number of malfunctions may appear, which manifest themselves as follows: the compressor does not turn on (no characteristic hum); the compressor does not turn on (characteristic hum); The compressor turns on but runs in short cycles.
The compressor does not turn on (no characteristic hum) for the following reasons:
— there is a delay for the compressor when turned on. It can reach 3... 6 minutes;
— discrepancy between the set temperature on the remote control and the room temperature. Check the set temperature value on the remote control. If it is lower than the room temperature, change the setpoint;
— discrepancy between the ambient air temperature. Check the ambient air temperature; if it is below 16 °C, the thermistor on the external unit of the air conditioner, designed to operate in the “cooling” mode, may not allow the refrigeration machine to turn on. If the air conditioner is designed to operate in the “heating-cooling” mode, and the ambient air temperature is lower than permissible (5°... -25 °C), then the thermistor of the external unit may also operate (protection against low evaporator temperature);
— thermistors are faulty: defrosting; injection; suction and boiling temperatures; capacitor. The malfunction of all thermistors can be caused by an open circuit: to find such a malfunction, first determine the presence of thermistor resistance, and then the value of its resistance. They also determine the presence of contact between the thermistor and the control board and check the control board itself;
— compressor protection is triggered when the network voltage deviates more than a specified value, phase imbalance and phase loss;
— the compressor protection against incorrect phase switching is triggered (for a three-phase compressor);
— incorrect installation of the room temperature thermistor or failure of the high and low pressure switch. Adjust the thermistor setting or troubleshoot the pressure switch (one or both);
- faulty starting capacitor;
— defrosting boards of the external unit are faulty; outdoor unit; management.
The compressor does not turn on (there is a characteristic hum) for the following reasons: - malfunction: starting capacitor; working capacitor; start relay; Compressor jamming. Signs: the starting current values exceed the rated ones, and measurements of the resistance of the compressor motor windings show their serviceability. In this case, replace the compressor;
— the compressor crankcase is filled with liquid refrigerant. If there is no crankcase heater, install a non-standard heater. Check the possibility of formation of refrigerant condensate in the suction manifold at low ambient temperatures;
— the electrical protection of the compressor is triggered at the moment the characteristic hum begins. Check the resistance of the electric motor windings with an ohmmeter, for which the power wires are first disconnected. The possibility of shorting the winding to the housing is checked with a megger;
— faulty remote control. Symptoms: the system turns on from the emergency switch and does not turn on from the remote control. Testing the remote control. Turn on the remote control and check whether the liquid crystal display is lit. If there is no light or the image is unclear, you need to replace the batteries and reset the settings. Then install a nearby medium wave (AM) radio and turn on the remote control. If, when you turn on the remote control, there is no interference with the operation of the receiver, it should be replaced. Check whether there is a source of interference to the operation of the remote control near the indoor unit (IR wave emitter, sun rays, powerful consumer of electricity). If such a source is found, it is necessary to install a filter on the receiver for IR waves. If no source of interference is found, replace the IR wave receiver on the indoor unit.
The compressor turns on but runs in short cycles for the following reasons:
— the working capacitor is faulty;
— protection against malfunction is triggered: condenser fan; drainage system pump;
- the protective relay is faulty. Check the operating current values of the compressor electric motor using current clamps. If the operating current values correspond to the rated ones, replace the protective relay; If the operating current of the compressor electric motor is higher than the nominal value, an interturn short circuit of the compressor electric motor windings occurs. The compressor is replaced;
- activation of the high pressure switch due to excess condensation pressure caused by: a closed valve on the discharge line; inoperative condenser fan; excess refrigerant in the external unit; non-condensable impurities in the capacitor; insufficient suction pressure when starting the refrigeration machine, which can be caused by: insufficient amount of refrigerant; lack of heat flow to the evaporator of the refrigeration machine.
The lack of heat flow can be caused by:
— mechanical obstacles in the path of air flow, malfunction of the air cooler fan; failure of the solenoid valve in front of the expansion valve;
— clogging of the expansion valve or its incorrect adjustment (the expansion valve is closed); inverter failure:
— if the voltage is balanced, then check the compressor windings;
Diagnostics of inverter air conditioners
They diagnose the operation of the compressor with the inverter, for which they turn on the inverter and measure the time until the inverter stops due to an increase in current. If the operating time is within 10 s, the fault is a short circuit in the compressor windings. If the inverter turns off after 10... 60 s, the compressor is jammed. If the inverter operates for 1...5 minutes, the fault should be looked for in the hydraulic circuit of the refrigeration machine;
— failure of all solenoid valves. Symptoms: the refrigeration machine operates continuously, the set room temperature is not achieved in either cooling or heating mode:
— excess refrigerant in the system. Signs of excess refrigerant in the system may appear :
— in case of insufficient heat flow to the air cooler (mechanical obstructions to the air flow, failure of the indoor unit fan, freezing of the evaporator, clogged air filters, growth of bacterial mucus, insufficient heat flow to the indoor unit). In this case, the amount of superheat decreases, since the boiling process is difficult. Boiling occurs in the suction pipe and/or in the compressor housing. The temperature of the compressor housing decreases. Dew may appear on the compressor housing due to condensation of moisture from the surrounding air or frost. The sound level from the operating compressor decreases, the temperature of the discharge pipeline decreases; when the condenser is over-cooled. This mainly happens when the refrigeration machine is turned on at low ambient temperatures. Under these conditions, the amount of refrigerant in the condenser increases, and the amount of subcooling at the condenser outlet increases. A significant portion of the refrigerant remains in the condenser. The condensation pressure decreases. The amount of refrigerant entering the air cooler is reduced. Suction pressure decreases. The suction superheat increases and the compressor housing temperature rises. The noise from the operating compressor motor increases;
- when non-condensable gases appear in the refrigeration machine. If there is a small amount of non-condensable gases in the system, part of the condenser becomes occupied by these gases. The pressure in the condenser increases and the flow through the throttling element increases. The boiling pressure in the evaporator increases. The discharge temperature increases. The temperature of the compressor housing increases. The noise from a running electric motor increases. The operating current value increases.
The subcooling of the liquid refrigerant is thus reduced. Due to the fact that the amount of condensed refrigerant decreases, the suction superheat increases;
If the expansion valve is adjusted incorrectly, when it is too open, the boiling point of the refrigerant in the air cooler increases, the suction pressure increases, and the suction superheat decreases. Due to the fact that more refrigerant enters the condenser, the amount of subcooling increases. To avoid overfilling the evaporator with liquid refrigerant, proceed as follows. By rotating the adjusting screw, the superheat is increased until the pressure fluctuations stop. Then rotate the screw to the left until the oscillation begins. After this, turn the screw to the right 1 turn (V4) turn.
After each operation with the expansion valve, stop the regulation work for 20 minutes and then check the consequences;
A lack of refrigerant may be caused by a violation of the technology for filling the refrigeration machine; refrigerant leakage from the system. External signs of a lack of refrigerant in the system may appear in the following cases:
— the presence of non-condensable impurities in the system. If there are enough non-condensable gases in the system, almost the entire condenser is filled with non-condensable gases. During the initial period of compressor operation, the temperature on the discharge line and the condensation pressure rise sharply, but since there is nowhere for the refrigerant to condense, liquid refrigerant enters the evaporator in small quantities. Evaporator temperature remains high;
— presence of moisture in the system. If the system was not drained during installation, moisture remains in the system. Moisture can enter the system along with air, as well as due to a violation of the drying technology of the electric motor windings at the compressor manufacturer. Violation of the technology for storing refrigeration oils leads to their moistening and, accordingly, to the appearance of moisture in the refrigeration system. Water is practically insoluble in refrigerants and oils used in air conditioners. During the circulation of moisture in the refrigeration machine, when the temperature in the throttling device drops, moisture can crystallize and clog the opening of this device (capillary tube, expansion valve).
Moreover, the crystallization of moisture in the refrigeration machine is due to the mechanism of formation of gas crystalline hydrates. At a pressure of 0.5 MPa (5 atm.), the formation of gas crystalline hydrate of water with freon R22 begins at a temperature of 12 ° C. Accordingly, the properties of gas crystalline hydrates cause the appearance of ice plugs in the refrigeration machine not at 0 ° C, as would be expected, but already at 12 °C;
— presence of mechanical contamination of the refrigeration system. Mechanical contamination is a consequence of violation of installation rules: cutting pipes with a saw, improper use of a rimmer allows copper filings to circulate through the system; rust, scale (free or bound). The use of incompatible refrigerants and oils, mixing mineral and polyester oils leads to coagulation of the oils. The resulting clots can also circulate throughout the system. Mechanical contaminants most quickly clog the filters of filter driers, filters in front of the expansion valves, the expansion valves themselves and capillary tubes, filters at the inlet of the suction pipe into the compressor; lack of refrigerant, which can be caused by incorrect adjustment of the expansion valve;
— four-way valve failure. Symptom - the valve for switching from cooling to heating mode in the event of a failure begins to work as a bypass, i.e. transfers refrigerant from the discharge side to the suction side. To check the four-way valve, disconnect the compressor from the inverter board. They supply power to the indoor and outdoor units of the air conditioner and turn on an emergency start for heating. 3 minutes after power is applied, check for voltage between the contacts of the four-way valve and the control board. If there is no 220 V voltage, the control board or noise filter board is faulty. If there is voltage, it is necessary to check the serviceability of the wires of the four-way valve coil and the coil itself;
When operating systems with several indoor units (multisystems), situations are possible when some indoor units do not turn on. If two units are turned on for cooling and heating, only one will work, the one that was turned on first.
Automatic diagnostics
Factory defects, poor installation and improper operation are the main reasons why the internal parts of the air conditioner fail prematurely. There is practically nothing that can be done about a manufacturing defect; in the other two cases there is a chance to improve.
Inscriptions on the display and blinking lights will help you find out in time that certain problems have arisen.
Error codes in the air conditioner usually indicate breakdowns of the following nature:
- Broken thermistor, resulting in no additional temperature control.
- Problems with the directional valve.
- Problems inside the fan.
- Voltage surges at the outdoor unit.
- Exceeded parameters related to energy consumption.
- Problems with the cable or circuitry due to communication.
- Lack of overvoltage protection.
- The work goes on both heat and cold at the same time.
- Malfunction in the thermistor of the external part.
- Faulty internal thermistor.
The instructions provide a precise definition for those who are interested in deciphering the appearing codes and designations. This allows you to quickly determine what exactly happened.
The main thing is to check in advance whether there really is a breakdown inside. Typically, the device reports problems by flashing various indicators and the appearance of inscriptions.
But not every code has a decryption for users. Most of the information is handled by technicians belonging to a particular service center.
Compressor and clutch problems
If the radiator on the external unit is clogged with dirt, this part of the structure may overheat. Heat removal becomes more difficult and the load on the device increases. The pressure level in the lines requires a separate check. Excess refrigerant must be released if the reading is higher than normal.
Never rule out the possibility that the fan on the external unit has become faulty. Clogged capillary tubes are another common cause of later problems. Replacing one of the tubes often solves the problem.
There are other signs that indicate breakdowns in this part:
- The compressor refuses to start when the air conditioner is turned on.
- Presence of oil leaks on the compressor.
- Compressor drive belt creaking.
- Extraneous noise.
- Decreased performance.
Complete compressor replacement and repair are complex operations, so it is recommended to immediately contact specialists.
Air conditioner malfunctions and their elimination
The intervention of a specialist is not always necessary to eliminate breakdowns of climate control equipment. Sometimes it is possible to repair an air conditioner yourself. To do this, you need to know the common breakdowns of this type of equipment and options for eliminating them.
The device does not turn on
The most common problem. During long-term use, every device owner has encountered it at least once. If the device does not turn on, then the problem is clearly in the electrical part. Most often, such failures occur when the device is simply not connected to the mains. There may also be problems with the control board or loss of communication between the units located outside and inside.
The reason may not even be in the air conditioner, but in a breakdown of its remote control or receiving module.
It happens that the breakdown was not due to a technical reason, but due to problems in the settings, then the device cannot turn on due to an error, this happens when it goes into “sleep mode”. Sometimes such a situation can occur when the split system does not correctly execute the owner’s commands; this can occur due to incorrect connection of the wires that connect the blocks. Then the wires must be connected correctly according to the diagram, but if this is not done, more serious malfunctions may occur. In the end, the air conditioner may not turn on due to simple wear and tear of any parts. In this case, worn parts must be replaced.
Air conditioner won't turn on
Compressor failure
If this important part in the air conditioner overheats, then it is possible that the compressor in the air conditioner will not start. Its overheating usually occurs due to incorrect operation of the control board or protective relay. It may also overheat due to contamination. Dirt interferes with the removal of warm air, causing the compressor to work harder and heat up. Cleaning, which should be done regularly for preventive purposes, will help solve this problem.
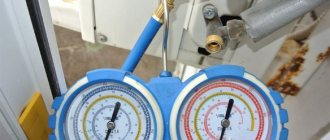
If the device has been refueled recently, then overheating of this unit can be explained by the destruction of the balance of the condenser and evaporator, as a result of which the compressor is overloaded. To find the reason why it does not turn on, you need to measure the pressure in the lines; if the pressure is higher than normal, then you need to bleed off the excess refrigerant.
There may be problems with the external unit; it may not rotate at all or rotate at low speed. Frequent causes of an increase in compressor temperature may also be due to its incorrect operation, clogged capillary tubes or the dryer filter. In this case, you need to replace one of the tubes or clean the filter.
Compressor fault
Condensate leak
During hot weather, air conditioner owners are faced with the fact that the tanks in the indoor units are overfilled. To prevent liquid from leaking from the containers, you need to periodically drain the water from them. If the heat exchanger is frozen, it should be insulated with suitable material, then water will no longer flow out. If a leak occurs in the joint area, then it is better to secure the nuts and treat the joints with sealant. If the drainage tube is clogged, you need to clean it, after which the problem with the leakage of the indoor unit will be solved.
Condensate leak
Difficulty in operating the device
One of the most common user complaints. Most often this problem occurs in the summer. In summer, the device consumes a huge amount of energy, but at the same time is not able to provide the desired temperature. This happens when the air filters are clogged or dust accumulates on the impeller (in the internal block of the unit).
The problem may occur due to dirt accumulation in the heat exchanger (on the outdoor unit) or if refrigerant is leaking.
Inefficient operation of the air conditioner
Unpleasant odors
Unpleasant odor from the device
If there is an unpleasant odor coming from the air conditioner, there are reasons for this:
- If the smell can be described as “stale air”, then the product can be called poor quality.
- If there is a burning smell, you should take it seriously; it may indicate a fire in the wiring.
- If the smell can be described as “damp” and even mold is felt, most likely bacteria has spread in the system. You can cope with this using antifungal drugs.
Sometimes, to eliminate breakdowns of household appliances, there is no need for specialist intervention.
Air conditioner repair
About standard fault codes
First of all, you need to look at how many times the sensors flash. If it “blinks” only once, most likely the problem lies in the thermistor, which is installed on the internal unit of the split system. Two signals indicate that problems have arisen on the external unit. With three flashes, the system begins to work simultaneously for both cold and heat.
Overload protection is disabled when the lamp flashes four times. Turning on the signal five times means that errors occur between blocks during the exchange of information. Six flashes mean that the consumption level is significantly higher than normal. It is recommended to carry out additional testing in different parts of the device.
With ten flashes, the directional valve is definitely broken. Finally, turning on 10 times indicates a thermistor that has failed. This means that the air conditioner no longer controls the temperature. Most brands and models of devices experience approximately the same problems. Each device has its own codes that indicate errors. The instructions will help you identify the malfunction and set the correct settings for stable operation.
Automatic fault diagnosis system
The first thing you need to do is make sure that the air conditioner is really broken. Fortunately, in modern models, most problems will be notified to you by inscriptions on the display or flashing colored indicators. Having opened the instructions, it is easy to decipher where exactly the failure occurred. Detailed information about codes is transmitted only to authorized service centers, but basic data is also available to ordinary users.
Typically, the light flashes a programmed number of times based on the detected error. Standard fault codes (number of sensor signals):
Flashes 1 time – the thermistor of the indoor unit is not functioning. 2 - the thermistor of the outdoor unit does not work. 3 - the unit works simultaneously for cooling and heating. 4 - overload protection is disabled. 5 - the cable and the information exchange circuit between the units may be faulty. 6 - power consumption has exceeded the norm (you need to check the power transistors). 7 - the voltage in the external unit has increased. 8 - the fan motor is faulty. 9 - the directional valve does not work. 10 - the thermistor has failed and does not control the temperature of the compressor housing.
Before operation, you should carefully study the instructions for controlling the climate control equipment.
If the air conditioner does not turn on and the LEDs do not light up, then most likely the control circuit board has failed. The blinking of all LEDs means that due to a power surge, the software settings of the control board have failed and it needs to be reprogrammed.
Each model has its own software settings code, but it is also known only to authorized service centers. You can find error codes on the Internet by brand name and try to reprogram the board yourself.
Diagnostic sequence
Before starting any repair or maintenance work, you should carry out a detailed diagnosis of the climate system, identify the cause of the problem, estimate the upcoming labor costs and the cost of the necessary components or auxiliary equipment. A competent check will save you from erroneous conclusions and multiple, expensive and long-term restoration of the unit’s performance.
The diagnostic sequence includes checking:
- Presence of mechanical damage;
- Block fastenings;
- Clamps of contact connections of its electrical equipment;
- Conditions of air filters;
- Cooling/heating mode;
- Mode indications;
- Functioning of mechanical blinds;
- Air temperature at the evaporator outlet;
- Pressure in the suction/discharge system;
- Tightness of all connections and drainage system.
Air conditioner won't turn on
Whatever the brand or model of the device, the reasons will be the same:
- Electrical part. Either the air conditioner is not connected to power, or its control board is faulty, or the connection between the units is broken.
- The control panel or receiving module on the indoor unit is broken.
If the receiving module fails, the unit does not respond to signals from the remote control - The security system is activated and displays an error.
- Wear of parts. In the simplest case, you will be helped by changing the batteries on the remote control, checking that it is plugged in and completely de-energizing the air conditioner for one minute. Check to see if the sleep timer has been set. Sometimes the air conditioner does not work or refuses to correctly execute remote control commands due to incorrect switching of signal and power wires between the units. This may later cause defects in the control board parts. Therefore, if such problems occur, you need to reconnect the wires as soon as possible, so as not to change or repair the board later.
The device turns off after working for 5–10 minutes
There are several reasons for this:
- the room has already been cooled to the set temperature;
- “drying” mode is activated;
- the compressor overheats;
- control board is faulty;
- The protective relay has failed.
Let's look at why the compressor may overheat. First of all, we check whether the radiator of the external unit is clogged with dirt. This interferes with normal heat removal, the compressor begins to overheat and the system turns it off. Preventative cleaning is the first thing to do in this situation.
If the air conditioner has recently been charged with refrigerant, then the balance in the evaporator and condenser circuits may well have been disrupted, so the compressor began to work with overload. After measuring the pressure, it is recommended to bleed off excess refrigerant.
It is possible that the cooling fan of the external unit may fail (the rotation speed is lower than the specified revolutions per minute). Overheating is also possible due to clogged capillary tubes during installation. One of them will probably need to be replaced. The reason may be that the filter drier is clogged due to contamination. If this is the case, then the filter must also be replaced.
Condensation is dripping from the indoor unit. Repairing leaks
In summer, the condensate collection tank often overflows. To prevent it from dripping, you need to drain the water that has accumulated there more often. If the reason is the heat exchanger freezing, then it can be insulated with any heat-insulating material. In case of leaks in the places where the pipes are attached, the nuts must be tightened and the joints treated with sealant. Do not use much force when tightening the nuts so as not to strip the threads!
The drain tube between the pan and the drain point may be clogged. It is necessary to turn off the power to the air conditioner, wait 10 minutes, then disconnect the plastic tube and clean it manually (by blowing or using a thin wire). This is the most common reason for the appearance of water. But there are others, for example:
- improper installation of the drainage system (it is too long, poorly secured, the hose is pulled up);
- mechanical damage to the housing, drainage tray or other internal units.
If the drainage pump breaks down, it must either be replaced or repaired. The raised hose should be bent at the desired angle so that the water drips down. If a freon leak is suspected, see the paragraph “Air conditioner starts but does not operate efficiently.”
When the drain tube becomes clogged, water begins to drip from the indoor unit.
Unpleasant smell
There are several reasons why a musty or unpleasant chemical “aroma” appears from your air conditioner. Let's consider the main ones:
- A burning smell indicates a wiring fire. In this situation, you need to immediately turn off the power to the unit and call a specialist.
- Smells like plastic. This usually means that the split system is made of cheap, low-quality materials. This smell is difficult to eliminate even with the help of specialists.
- The unit “smells” of dampness or mold.
This means that colonies of pathogenic bacteria or fungi have formed inside. To destroy them, you need to purchase any pharmaceutical antifungal agent, dilute it in water and treat all internal parts. Don’t forget to clean the internal filters, otherwise they become breeding grounds for bacteria
Non-standard sounds
To determine the reason for the “wrong” sound of a split system, you need to have the experience of a specialist. But this is also available to the average user.
- Uneven noise when the external unit is operating. It occurs if it is not cleaned of contaminants in time. This is especially noticeable if dust and dirt have settled unevenly on the fan blades. They become unbalanced and a characteristic hum is created. Sometimes noise appears after damage to one of the blades. To get rid of it, you should clean the fan of the external unit or replace it.
- Clattering. In this case, either the automation does not work correctly, or it is triggered due to a malfunction of internal parts.
- Gurgling. Such sounds do not always mean a breakdown, but they cannot be ignored either. For example, sometimes, when air gets into the drain pipe, the air conditioner begins to gurgle due to condensate that has not drained. Solution: straighten the tube at the desired angle. The gurgling sound appears when the system becomes airy - when air replaces the freon.
- Squelching. This sound is characteristic of a normally functioning air conditioner. The cause of increased noise is sometimes poor-quality fastening of parts and units of the unit. To eliminate it, it is necessary to tightly tighten all connections and fasteners of structural elements of the system and pipes. The outdoor block is leveled horizontally, and the sagging hinges are fastened together.
Fan
Some errors are indicated by indicators on the device's electronic display. Most often, during such breakdowns, the system turns on for a few seconds, and then immediately turns off.
The following are the main reasons for what is happening:
- Faulty capacitor in the electric motor.
- Breakdowns in the motor.
- Broken fan blades.
In any situation, the problem can be easily solved by replacing the failed part.
The impeller changes in the following sequence:
- Removing the front protective grille.
- Unscrewing the nut that secures the fan.
- The electric motor pulley is released from the impeller.
- Using a new impeller on a pulley.
- The reverse procedure is used when assembling parts.
When replacing a fan motor, it also requires a few simple steps:
- De-energize the system, remove the front protective grille.
- Unscrewing and removing the nut securing the entire fan.
- Disconnect all electrical connections.
- Unscrewing the motor itself, completely disconnecting it.
- Putting on a new spare part.
- Assembling and securing parts using reverse order.
A certain procedure remains the same when replacing the starting capacitor:
- De-energizing the system.
- Disassembly of the outdoor unit.
- Unscrewing the fixing bracket.
- Disconnect all wires.
- Replace with a new starting capacitor.
- In reverse order, the parts are assembled and secured.
Malfunctions of electronic control boards
The failure is associated with software settings and settings, when all the LEDs are constantly blinking, and the system itself does not turn on. To troubleshoot problems, the system is simply reprogrammed using special codes.
The likelihood of a burnt-out control board increases if the voltage constantly fluctuates. The same thing often happens with short circuits. New microcircuits are placed in place of the old ones, the latter are soldered out of their places. Separately, the buffer circuit is checked and the triacs are replaced with more powerful varieties.
Most manufacturers equip control boards with solid-state switches that rotate the fan. If you have problems with the operation of this part, you can take a closer look at the board. Separately, the resistance of the part is pre-measured. If the indicator is closer to zero, the broken microcircuit is also unsoldered.
A sign of a faulty control board is the following parts that work intermittently:
- Motion Sensor.
- Temperature sensor.
- Compressor.
There is no need to take measurements if the naked eye can see that one of the microcircuits has burned out. You must immediately replace the semistor when starting work.
Errors in interconnect connections are often made during installation. Even professionals are not completely protected from this. In such situations, parts like the voltage stabilizer, transformer, and diode bridges burn out first. If the air conditioner board burns out completely, its repair becomes impossible; the part is replaced with a new one.
The control board is changed in the following order:
- Turn off the power.
- Removing the top cover once the body is disassembled.
- The boards are removed from the slots by unscrewing all elements for fixation, including wires with connectors.
- Replace with a new part, assemble in reverse order.
In the case of a faulty board, it is better to immediately contact the service center employees. The work itself is expensive, and the slightest mistakes can negatively affect future operation.
Problems with the outdoor unit heat exchanger
One of the most common malfunctions in this part of the structure is freon leakage through the external unit. If R-22 was used for refilling, use a special leak detector to identify the problem. If there is an option with modern R-410-a products, the surface is simply “soaped”. And then they look to see if foaming has occurred, where it happened.
Leaks are eliminated in two main ways:
- Soldering.
Use a torch to heat the area where the leak appears. Then everything is sealed with special solder. The tubes are lightweight and thin, so processing requires care.
- Replacement.
Complete disassembly of the case begins after disconnecting the external unit from electricity. Cutting out and soldering the old heat exchanger is mandatory. The new one is placed in place of the old one, using nitrogen for connection. The module is reassembled by connecting the electrical connections. The tubes are also connected to the system, ensuring its tightness. Everything is refilled and the overall performance is checked.

