Is it possible to dismantle the air conditioner with your own hands?
It is enough to have a pre-purchased specialized tool on hand, know some technical subtleties and take your time. The question arises: why waste time and effort if you can call the appropriate specialists who will perform the necessary operations in a short time? You can, but there are two reasons why you shouldn't:
- Price is the most important aspect. The average pricing policy for dismantling a modern split system is 4,000 rubles. We are talking about small apartment models. If the device has substantial dimensions and is installed mainly in offices, then the price will rise to 10,000 rubles. Quite significant for the budget.
- The likelihood of ending up with low-quality “specialists”. The modern desire of the population to do their own business leads to the massive appearance of people who do not understand the work they do. Also with some air conditioning “masters”. Therefore, the chance increases that the procedure will be performed poorly at a high cost.
But it should be said right away that manually removing a split system cannot always be successful. A common problem is the complete leakage of freon, which is quite expensive, and the price of a new one is at least 1,500 rubles. Therefore, when removing the air conditioner with your own hands, all actions should be performed accurately.
The necessary tool and its possible replacement
If you have the means, you can hire a specialist to remove and install modern split systems, without even paying attention to the manufacturers of this tool, which changes the pricing policy. But then the point of independent dismantling, which is carried out in order to save money, disappears. Therefore, some types of tools are best replaced with cheaper ones, and some will have to be abandoned altogether.
List of tools required for disassembly:
- Gauge manifold. This is a necessary thing, as it will show the pressure when pumping freon into the outdoor unit. And this particular measuring device falls into the category of tools that you should discard (at your own peril and risk), since its minimum cost is 1,500 rubles. A more reliable one will cost 3000-3500 rubles.
Example of a pressure gauge for split systems
- Set of hexagons. This position is mandatory, since the fitting cannot be unscrewed any other way. Fortunately, the price of such keys is not exorbitant - 3000-350 rubles.
- Pipe cutter It is inexpensive (about 300 rubles), but you can reduce costs even further and purchase an ordinary hacksaw, which will later be useful for housework.
- Flat and figured screwdrivers. Now they are sold in any hardware store or hardware store.
- Safety equipment if the air conditioner is located on upper floors. It’s not worth saving here, and not paying for a product whose cost is less than 1000-1500 rubles.
And one more prerequisite is the presence of an assistant, or preferably two. Both the external and internal units have a significant weight, so it will be problematic to handle it yourself; you can accidentally damage the device.
Removing the air conditioner while saving freon
Let's consider two options for dismantling a household split system with full preservation of freon, which potential users of air conditioners have to deal with:
- Dismantling of the working installation.
- Dismantling a faulty installation.
Both options are the reality of the current practice of operating household and other air conditioners.
It is quite acceptable to dismantle a household air conditioner yourself. However, to perform such work you will need some basic knowledge regarding the design and operation of air conditioning systems.
By the way, the second option, when you have to dismantle a faulty machine, is even more common than the first. Working air conditioners are dismantled quite rarely, allowing the machines to work out the entire period stated by the manufacturer.
Option #1 - dismantling working equipment
This case of dismantling is usually associated with the user moving to another place of residence (work, etc.). True, sometimes equipment is going to be dismantled in connection with replacement with a more advanced (modern) model.
Let's consider the main stages of dismantling the system while preserving the refrigerant.
Stage #1 - pumping freon out of the system
Whatever the purpose of dismantling the working equipment, the air conditioner must first be “mothballed”.
This term implies:
- disassembling the system into individual modules;
- disconnection of linear pipelines;
- disconnecting electrical connections;
- maintaining freon in the system.
With a working (fully functional) air conditioner, completing the items noted in the list is relatively easy. It is enough just to first pump out the freon present in the evaporator (a part of the indoor module) and in the copper tubes connecting the indoor module to the outdoor unit.
Pumping out freon on a working system does not require special equipment. Often, for control it is enough to have a pressure gauge station or simply rely on the operation of the low pressure switch
It should be noted: in this option, the refrigerant is pumped out entirely by local means - in other words, directly by the air conditioning compressor.
User actions are as follows:
- Close the freon supply valve to the evaporator (on the smaller diameter tube).
- Leave the valve open on the vapor exhaust line (on the larger diameter tube).
- Turn on the air conditioner in the “cooling” mode.
- Wait until the system switches off automatically (due to low pressure).
- Close the valve on the vapor exhaust line.
This is, in general terms, what the technology looks like, demonstrating how to properly remove a household air conditioner while preserving freon in one of the system modules (outdoor module).
After completing this procedure, all that remains is to disassemble the air conditioning unit into separate modules for transportation to another installation site.
Stage #2 - disassembly into modules of a household split system
Next, we will consider the sequence of actions for dividing the air conditioner into modules. But this is subject to the procedure described above for pumping out freon with a compressor.
Thus, it is recommended to connect the pressure gauge station to a fitting specifically designed for filling/removing freon. This service port (standard specification name) is part of the gas line shut-off valve design (larger line). The fitting is closed with a brass screw plug, which must first be removed.
Classic design of shut-off valves and service port using the example of a standard household split system. Valves are opened/closed using a hex key
The connection of the pressure gauge station to the service port is carried out through a pressure gauge (pressure-vacuum gauge), designed to control the low pressure side. On branded devices, this part of the equipment (including the adapter hose) is usually blue. In this case, the shut-off valve of the blue station pressure gauge must remain in the “closed” position.
The service port (fitting) of the low pressure line has a built-in check valve. When a hose equipped with a special threaded head is connected to the fitting, the check valve opens by pressing the head crossbar onto the valve stem. Therefore, connecting/disconnecting to the service port (screwing on the head) must be done quickly but carefully.
Manometric station - a device for monitoring the pressure inside the working lines of an air conditioning installation, as well as for monitoring the process of pumping/pumping out freon if necessary
After connection, the pressure gauge will show the presence/absence of pressure in the line. If there is no pressure, you can safely disconnect the pipelines connected to the outdoor unit by unscrewing the union nuts. Otherwise, the procedure for pumping out the refrigerant with the compressor should be repeated.
Then the electricity supplied to the outdoor and indoor units is turned off, as well as the electrical supply to the module terminals. It is recommended to number the electrical conductors if you intend to use old wires for a new installation.
Stage #3 - removing blocks from installation sites
The next stage of the operation of dismantling a working household split system is purely physical. It will be necessary to remove the air conditioner modules (external and internal) directly from the installation sites.
The external module of low weight (up to 50 kg) located at a low height can be removed manually - by two people and using ladders if necessary. At a height, if the external module is located next to a window, manual removal of the device is also quite possible. Although in this case it should be remembered that this is a rather risky and dangerous undertaking.
If the external module of the split system is placed very close to the window, two people can manually remove the device from the mounting corners, even if the system is placed at a height
Of course, dismantling options from a great height, when there are no so-called “cargo” terminals nearby - windows, doors, etc., should be considered a more complicated procedure for removing the outdoor module.
For such cases of removal, as a rule, they use additional equipment and also resort to the services of after-sales services:
- climbers;
- mechanical towers;
- taps, etc.
The internal module of a split system usually does not cause any special problems when performing dismantling work. Although, if during the installation of the air conditioning system the passage of pipelines through the wall was carefully sealed, you will have to carefully open this area of the wall in order to pull out part of the linear pipes brought outside. First, before working with copper linear tubes, the pipeline connection is disconnected directly on the internal module, and the module itself is removed from its mounts.
True, sometimes it makes sense not to disconnect the copper tubes from the internal module, dismantling this block of the system together with the pipelines. However, this option is acceptable provided there is a short (no more than 1.5-2 meters) line connecting the system modules.
The internal module, raised at an angle from the wall level, provides access to the connection of linear pipelines. It is enough to disconnect the pipes to then remove the module from the wall
Since the internal module of a household split system is hung on the upper edges of the mounting plate attached to the wall, to remove it you need to slightly pull down the lower edge of the housing adjacent to the wall, and then pull the lower part of the housing towards you. As a result of these manipulations, it will be possible to tear off the lower area of the body from the clamps.
Then, if you lift the housing up a little, the internal module of the split system can be easily removed.
If you encounter difficulties during the dismantling process and a freon leak occurs, do not worry. After the new installation of the air conditioner, you will have to take care of the correct refrigerant charge.
Option #2 - dismantling a non-working air conditioner
The situation with pumping freon out of the system, when the compressor of a household air conditioner does not work for one reason or another, is much worse compared to the first option.
If the air conditioner compressor is not working, it will no longer be possible to implement the freon pumping function at the local level. What to do in such cases? How to properly remove and disassemble the air conditioner without freon leaking out?
An example of the use of special equipment - a refrigerant pumping station, when there is no possibility of using local “elimination” of freon in the air conditioning system
This pumping option usually involves the involvement of service services, since it is impossible to do without the use of special equipment - a freon elimination station.
The use of a freon pumping station allows you to completely free the air conditioning system from the presence of refrigerant. Plus, if necessary, the elimination station allows you to additionally create a vacuum inside the circuit of the outdoor module of the dismantled air conditioning system.
A non-working air conditioner is freed from freon by sequentially using two methods of eliminating the refrigerant:
- Elimination of liquid substance.
- Elimination of gaseous substances.
The process of pumping out freon from a non-working air conditioning system is accompanied at the first stage by actions to collect the liquid phase. The shut-off valves on the linear pipelines of the air conditioner are opened completely.
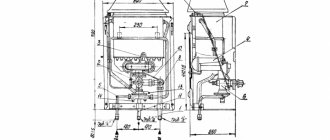
Technological diagram of the “elimination” of freon: 1 – cylinder; 2 – scales; 3 – control relay; 4, 6, 9, 11, 12 – flexible hose; 5 – pumping station; 7 – filter drier; 8 – sight glass; 10 – pressure gauge station; 13 – air conditioner (outdoor module); 14 – linear shut-off valves
In addition to the shut-off valves, it is also necessary to open the control solenoid valves provided by the outdoor module circuit.
To move to the open position, a temporary appropriate supply voltage is supplied to the valve coils (usually indicated on the valve body or in the air conditioner documentation).
Example showing the location of a solenoid valve in an air conditioning system. Depending on the air conditioner models, the location of such valves may differ.
Next, install a container (freon container) on the scales, equipped with a two-way (gas and liquid) terminal. The cylinder must correspond to the brand of refrigerant - suitable, for example, specifically for storing freon R22, if this is the refrigerant that is being pumped out.
Connect the service tubes to the cylinder and open the corresponding valves (liquid or gas) on the cylinder.
At the next stage of work, the freon elimination station is turned on and the valves of the pressure gauge station, previously connected to the circuit for eliminating refrigerant from an inoperative air conditioner, are opened. The pumping of freon is controlled by the glass of the manometric station.
In a similar way, gaseous freon is pumped out, with the only difference being that in this case the gas valve on the assembly cylinder is open.
An example demonstrating the connection of a cylinder (freon collection container) in the case where there is a need to use a station for eliminating refrigerant from a non-working (damaged) air conditioner. In this case, eliminating the gaseous substance by connecting a hose to the gas valve (terminal)
It should be noted that the refrigerant pumping system provides for filling the collection container - the cylinder - to no more than 80%. As a rule, the operating algorithm of the refrigerant elimination station is adjusted to this volume parameter. The design of the liquidation station itself is equipped with special sensors for monitoring the collected volume.
When the elimination of freon is completed, you can begin dismantling the air conditioner.
What to pay attention to when dismantling
The most fragile place in an air conditioner is the compressor pump. Despite its compact size, the design of such a pump includes complex mechanical components: rotors with cams, sealed system elements and a chamber in which the main work takes place.
If ordinary dust gets in, the walls of the chamber may be damaged, and accordingly, freon will move aimlessly around the system without performing any useful work. Therefore, the main slogan when dismantling the air conditioner is to preserve the vacuum in the system, which, in turn, requires the tightness of all external openings.
Main types of removal: with and without freon preservation
How to remove or hang the air conditioner from the wall without losing freon? As mentioned above, freon is quite expensive, and when removing the air conditioner yourself, it should be saved. But if the service life of the device is long, and the freon needs to be replaced, then when moving, you don’t have to save it, but simply drain it and dispose of it.
If you decide to keep the freon, then the sequence for removing the air conditioner is as follows:
- On the outside of the split system there are service valves with protective caps covering special slots. To access the slots, the caps should be disassembled and the hexagon should be installed only in the valve on the thin tube located at the bottom of the device.
Removing special hex splines
- Now you should set the lowest air cooling temperature and turn on the device at maximum operating mode. Some models have a turbo option.
- After switching on the enhanced operating mode, the valve (with the hexagon installed) should be tightened. From this moment, the system must operate for at least one minute, during which all the freon will flow into the external unit.
- After freon is pumped into the outdoor unit, the gas line is shut off and the device is turned off. It should be remembered that continuing to operate the air conditioner in this mode with two valves closed will lead to damage to the split system.
- Unscrew the nuts securing the copper lines covered with a heat-insulating layer, which should also be removed. Now the tubes bend neatly and can be removed through the hole in the wall.
An assistant is required when removing the external unit
After completing all of the above operations, you can begin to directly dismantle the air conditioner, which is best started by removing the external unit.
It is very important to remember that the pipes should be sealed after removal. Often, simple adhesive tape, film or electrical tape is used for this. A more reliable way is to close them using simple pliers. If you approach the problem with full responsibility, then the ends of the pipes should be securely closed using a bench vice, thus preventing the penetration of moisture and dust into the evaporation chamber.
Preparation stages
At the preliminary stage, it is necessary to retain the refrigerant in the system. It is located in a circuit that consists of a compressor, evaporator, condenser, and connecting pipes.
Freon enters the evaporator in a liquid state, so small diameter tubes lead here. As the refrigerant evaporates, it enters the compressor in the form of gas. Here the branch size is larger.
The purpose of the preliminary stage: to collect all the gas in the condenser. To do this you need to follow these steps:
We recommend that you read: The principle of operation of an air conditioner: how to turn on the device for heating
- The air conditioner is switching on in cooling mode. The lowest temperature is set. The unit operates for 10 minutes.
- There is a valve with a fitting on the external block. A thin tube approaches it, through which freon moves. There is a protective cap on top. When you remove it, splines appear. A key is thrown on them and the valve is closed.
- The pressure gauge is monitored, the needle of which should drop to zero after 1 minute. Immediately after this, the same procedure is carried out with the outdoor unit. The protective cap is removed and the second valve is screwed on. The air conditioner is then turned off using the remote control. All the refrigerant accumulates in the outdoor unit.
If there is no pressure gauge on the unit, then wait 1 minute and close the second valve, turning off the device.
How to properly and quickly dismantle the external unit of a split system
This procedure should not be performed if the system is installed on the upper floors of a multi-story building. This can be life-threatening.
Removing the external unit on the upper floors
Removal of the external unit of the split system occurs only after all the above operations have been correctly completed. Dismantling should begin by disconnecting the input electrical cable, the wires of which are suitable for the air conditioner terminal box, located under a special protective cover. To simplify the connection of the device at a new location, the wires should be marked with the appropriate colors (red - phase, blue - zero, yellow-green - ground).
All that remains is to unscrew the nuts that secure the air conditioner to the brackets. This is not a problem, but an assistant is needed to support the external unit during the entire process. Once the nuts are unscrewed, you can carefully remove the unit and prepare it for transportation.
Don't forget the brackets to which the air conditioner is attached. They are usually mounted using dowels to the outside of the wall, and dismantling takes a little time.
You should know that split system manufacturers strictly prohibit the transportation of devices into which freon is pumped. Why? The answer is simple: after all the above actions, excessive pressure forms in the system, and the air conditioner housing is not designed to withstand even the slightest mechanical impact. Therefore, without the necessary conditions (covering the block with a sealant or special film), the block body can simply break through. This can be understood by the characteristic hissing.
Dismantling a duct split system
flaring of a copper pipeline for split systems
The greatest difficulties arise when dismantling a duct air conditioner yourself, since the weight of this structure is significant, and you will still have to disconnect the air ducts from the units.
The set of tools in this case remains the same. Work begins with disassembling the air ducts. The supply and exhaust adapters with the grille are removed. Remove the air ducts by disconnecting them from the indoor unit. If they are metal, then unscrew the screws; if they are flexible, remove the clamps. Next, freon is pumped into the receiver of the external unit and removed according to the scheme for dismantling a wall-mounted split system.
The fastening nuts of the evaporator unit are loosened, the freon line, drain hose and electrical wires are disconnected. Next, carefully remove the block from the wall and pack it in a special container.
air conditioner drain hose
Some craftsmen dismantle the duct air conditioner with their own hands in the following order:
- pumping freon into the receiver of the external unit;
- removing the outdoor module and disconnecting its connecting communications;
- disconnecting air ducts;
- dismantling the indoor unit of the air conditioner and its connecting communications;
- packaging of the split system and its transportation.
Both options will be technically correct and will not cause subsequent problems with the functioning of the system in the new location.
Removing the indoor unit
After the external unit has been dismantled, it is necessary to dismantle the internal (located in the room) air conditioner unit. There are fewer problems with it, since there is no need to work even at low heights, but there is a certain dismantling procedure and additional tricks.
Don’t relax and think that it’s enough to unscrew a few nuts, remove the indoor unit, and send it to a new place. The main trick lies in the desire of air conditioner manufacturers to make the process of removing the device as inaccessible as possible for craftsmen. That is why each indoor unit has a latch system with which it is attached to the wall. You can only work with such fasteners using a special tool, but there are no hopeless situations, and it is quite possible to choose something simpler.
Two screwdrivers will help you quickly remove the latches
Another tip: when removing a block, it is best to have not one assistant, but two. This is due to the fact that the indoor unit is quite bulky and heavy, and one person may simply not be able to handle it.
The two most common options for removing the indoor unit are:
- The simplest design is sometimes the most complex, which is why manufacturers of split systems try to hide the latches under the evaporator cover. The cover bolts are located inward, so to unscrew them you will need a special short bit in the form of a shaped screwdriver and a head with a ratchet.
- In addition to securing the evaporator cover, they try to make the latches themselves internal. If you don't have a special tool, you can use two flat-head screwdrivers and push them between the bracket and the wall. Now it’s enough to press a little (you shouldn’t be too zealous, they can be removed without effort), and an assistant can easily remove the internal block.
Removing the indoor unit with an assistant
There is one circumstance that can significantly interfere with work - the presence of a large number of evaporation tubes, and they are usually located near the mounting brackets. Therefore, when working with brackets, you should be as careful as possible so as not to damage them.
How to properly re-hang an air conditioner
Situations often arise in which relocating an air conditioner is more important than completely dismantling it. In this case, one of the blocks is left in its place, and for the second the tubes are simply extended. The process of removing both the internal and external units is no different from those described above, the only difference is the need to build up copper or ordinary pipes.
When dismantling one of the units, you should also monitor the safety of freon and pump it into the outdoor unit before carrying out all operations. After undocking the split system, it is necessary to rehang it as carefully as possible, without damaging the air conditioner housing. To save more money, you don’t have to do the soldering of pipes yourself, but entrust this task to specialists. Split system service technicians have a corresponding column in their price list, which is called extension of the interblock route.
Consequences of improper dismantling
Here are some unpleasant consequences of careless dismantling of the split system:
- depressurization of the cooling circuit, resulting in freon leakage. When installing equipment again, you will have to pay to refill the system with coolant;
- mechanical damage to the external unit housing, outdoor module, any parts, freon pipes, especially if they lead to depressurization of the circuit;
- clogging of the cooling circuit with dust, debris, moisture ingress. Dust will invariably affect the operation of the compressor; it will soon have to be replaced due to a malfunction. Moisture is dangerous because it will oxidize the inner surface of the copper freon route, the metal will begin to corrode, which will render the system completely inoperable;
- fall of the outdoor module from a height. It does not matter how high it was fixed - a fall in any case will lead to its complete replacement.
The video will tell you how to properly dismantle the split system
When changing residence, they often carry an air conditioner with them; after all, the equipment is expensive. To do this without loss, it is strongly recommended to contact professional installers who will do everything correctly and with high quality. If you plan to disassemble the air conditioner on your own, you must strictly follow the dismantling rules, and do everything as carefully, clearly, and harmoniously as possible.
Some useful tips
Having prepared the necessary tool, read the instructions and watched the corresponding videos on the Internet, you should also learn several important subtleties:
- Both when completely dismantling the split system, and when partially moving the device, you should not worry too much about the safety of the copper pipes. Replacing them will not cost too much money and installing new ones is always better than repairing old ones.
- If it is difficult to understand which pipeline is liquid and which is gas, then you need to pay attention to the diameter of the pipes. The liquid pipeline, which is also the outlet pipeline, is always thinner than the gas supply pipeline.
Examples of pipes on an air conditioner
- During transportation, the system should be covered with any seal, since any blow to the housing can lead to loss of freon or failure of the device.
And the most important advice is never to rush, since these systems require precise and careful movements; strength will not always help here.