If you don’t have special equipment (rolling, torque wrenches, vacuum pump and much more) and the skills to work with them, then you’re unlikely to be able to do it yourself for the first time.
No matter how many useful tips and instructions from A to Z you read, you can still miss some subtle detail, or do the work of insufficient quality due to lack of experience.
As a result, after a certain period of time, you will still have to call specialists and redo everything.
What is this article for then? In order to invite an installer or a team of air conditioners, you can independently control the quality of work during the process, and be sure that your air conditioner will work for a long time and without any problems.
Where to drill a hole for a highway
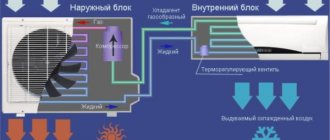
Where does the work begin? First of all, choose a place to install the air conditioner and mark a hole for laying interconnect communications.
Next, you begin drilling a through hole to the street. For this, a drill with a length of at least 800 mm and a diameter of 45 mm is used.
For powerful air conditioners over 2.5 kW, a drill with a diameter of 80 mm may be needed.
To avoid the formation of dust in the room, with an economical option, hang a plastic bag under the drilling site.
Professional installers have been using a construction vacuum cleaner for this task for a long time.
However, when wet drilling solid concrete walls, no amount of protection or vacuum cleaners will save you.
This hole, after all communications have been laid through it, is subsequently foamed.
Mistake #1
Please note that for normal condensate drainage, it is necessary to drill at a slight angle towards the street.
In this case, condensate will be removed unhindered, and water will not accumulate and become moldy in the drainage.
Mistake #2
Some people first attach a mounting plate under the block and then drill.
It is not right. The fact is that when drilling in a pre-designated place, you can accidentally hit the reinforcement.
As a result, the hole will have to be moved. Because of this, the air conditioner itself inside the room will move a few centimeters.
When choosing a place for a through hole and placing the outdoor unit on the side of the window, it is necessary to drill so that the hole ends up almost at the top level of the outdoor unit.
This will create maximum slope for the main pipes and will help prevent oil from entering the evaporator.
Placing an air conditioner in the living room
In this room, standard rules apply, which refer to the installation of the indoor unit in such a way that the flow of air at a given temperature does not fall directly on a person, but has the ability to change the microclimate around him, gradually regulating the temperature in the entire room.
Consider not only the main furniture for relaxation in the living room - sofas and armchairs, soft poufs and bean bags, but also your own zoning solutions. If the living room is combined with a dining area, sleeping or working place, the installation of an air conditioner should take these points into account.
One option is to install the indoor unit directed towards the least used area of upholstered furniture, at a short distance to reduce temperature concentration.
The second option is to place the air conditioner in the living room so that the flow of cold air is directed parallel to the seating areas, and also at some distance from the sofas and armchairs. Please note how the installation is done in the following photo:
Air conditioner installation location
Align the mounting plate strictly according to the level.
In this case, the distance from the ceiling to the air conditioner itself must be at least 10 cm. This ensures good air intake and free installation and dismantling of the indoor unit.
For reliable fixation, use high-quality dowel nails 6*40mm or 8*32mm.
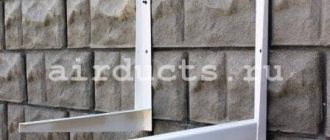
Next, you can proceed to installing the outdoor unit. Mark the mounting points for the brackets.
Again, don't forget about the level.
Use a hammer drill with a 12mm drill to make holes. Then secure the dowel brackets with 12*80mm nails.
Fasten securely, especially if the condo hangs from the side of the house where the roadway or sidewalks are located.
The distance from the rear wall of the outdoor unit to the wall of the building should be at least 10-20cm. Although much here will depend on the performance of the fan.
Where to place the external unit, under the window or on the side, is a matter of aesthetics and ease of use.
Many simply don’t like the extra meters of dangling cable and tubes hanging down the wall. In this case, a lateral location is selected.
Although competent installers can lay both the cable and the freon pipe very beautifully. Here a lot depends on the level of professionalism of the performers.
An air conditioner under a window is somewhat easier to maintain than one on the side. Especially if after a few years its bolts completely rust. In this case, you can’t do without a tower or climbing equipment at all.
When installing the block on the side of the window, it would be a good idea to be on the safe side. The order here is this.
Raise the air conditioner to the windowsill. Pass a rope through the drilled hole, pull it out from the street and tie it to the block.
Your partner belays the air conditioner with this rope, and you install it on the brackets. It is better not to untie the rope until the bolts are tightened.
Mistake #3
If after installation it turns out that the vibration of the air conditioner is heard as a strong hum in the room (this happens when mounting brackets directly into concrete using anchor bolts without dowel nails with plastic inserts), then special vibration supports or at least thick rubber inserts are placed under the legs of the outdoor unit.
Upon completion of the installation of the external unit, proceed to the preparation and installation of inter-unit communications.
Features of installing air conditioners in residential buildings
Installing an indoor air conditioner unit on a wall
The regulations for installing air conditioners in residential buildings are the same as in an apartment building. A distinctive feature is that when planning the purchase of a climate device, it is necessary to take into account the availability and capabilities of the home’s ventilation system.
Country housing is characterized by the use of multi-split systems (one outdoor unit + several indoor units). Often a central air conditioning system is used for ventilation and air purification. Also, private houses can be equipped with ducted air conditioners, which is very convenient to install in the space of a large building.
The main condition is that the climate control equipment should not create obstacles to the operation of the main ventilation system. Their work is coordinated, complementary functioning.
Improper installation of the air conditioner will definitely affect the quality of its operation in the future. The consequences can be serious; it is often necessary to replace a faulty climate control device with a new one. One of the common problems is leakage of coolant through leaky pipe joints. If not detected in time, it threatens the failure of the compressor, condenser, and other important components.
Also, a consequence of improper installation of the air conditioner on the wall of the apartment is the overflow of condensate from the drainage tank outside, into the room (the placement is not strictly horizontal).
Ignoring the basic rule for installing the outdoor unit of an air conditioner can cause it to fall down. At best, it will create a lot of noise during operation.
Professional installation of climate control equipment is a prerequisite for its reliable, efficient operation for a long time.
Installation of freon main
For a standard air conditioner with a power of up to 2.5 kW you will need the following materials:
- copper freon pipe with a diameter of 1/4 and 3/8 inches
- heat insulator, also known as insulation (K-Flex) with a thickness of 6 mm and above
- interconnect electrical cable
- drainage hose d-16mm
- reinforced tape or vinyl tape
Measure the required length of the freon line, leaving a reserve that will go to the ring behind the outdoor unit.
Mistake #4
With the total length of the route up to 2m, measure about 1m for the reserve and the ring. This loop plays the role of hydraulic compensation and is necessary on short routes.
With large lengths, the hydraulic loop creates additional resistance to freon and only interferes with the operation of the air conditioner! Although some still do it, supposedly to reduce noise.
Flaring of copper tubes
We move on to the stage of preparing the tubes.
Mistake #5
They can only be cut using a special pipe cutter, no hacksaws or grinders!
When making a cut, it is necessary to hold the end of the copper pipe strictly downward in order to prevent any chips from getting inside.
The ends are processed with a rimmer.
Use the rimmer carefully to avoid scratching the skirt. The quality of rolling is one of the most important aspects in installing an air conditioner.
Mistake #6
Flaring is carried out using a special tool with an eccentric. Don't forget to put the connecting nut on the tube before this step!
The width of the flare should be such that the connection eventually fits freely and unhindered into the nut.
The height of installation of the tube in the rolling clamp is strictly regulated.
The simplest and most proven old-fashioned way to determine the quality of rolling, at least at the initial stage, is to see your reflection in the “skirt”.
Flaring of the pipes of the outdoor unit will have to be done outdoors on weight. Otherwise, the line simply will not fit through the hole.
Mistake #7
Please note - if the installation does not take place on a hot, warm day, then when bringing copper pipes home from the street, close their ends and be sure to wait time for the copper to reach room temperature.
If you bring them in cold and open, then due to the dew point effect, condensation will form inside the tube, which, on a poorly evacuated air conditioner, can lead to dire consequences.
Connecting freon pipes
We move on to the stage of connecting communications.
Connect the flared tubes to the indoor unit of the air conditioner using adjustable wrenches.
If you have a torque wrench, it is better to use it.
Here are the recommended tightening torques for freon tubes of various diameters:
- 1/4 – 16-20Nm
- 3/8 – 35-45Nm
- 1/2 – 45-55Nm
Next, take the interconnect cable and twist it all into a single unit with the freon line using reinforced tape or vinyl tape.
Do not forget to stretch the insulation of the required diameter onto the copper tubes.
To prevent dirt from accidentally getting inside the tube, wrap its ends with electrical tape.
Mistake #8
Under no circumstances should the thermal insulation of the tubes be left unprotected.
Otherwise, from the street under the influence of UV rays, within several seasons it all turns into dust.
If your thermoflex is lightfast and not afraid of the sun, then think about the birds. Crows peck very well and take away such material for their nests.
Mistake #9
Also, do not leave any area indoors without insulation. Especially the junction points.
Condensation will gradually form here and eventually a neat trickle of water will appear on your wallpaper.
The line itself, wrapped with tape, is hidden inside the room in a plastic box.
However, if you have a short area and there are old wallpapers left, then instead of using a box, the highway can be covered with them. The result will be an almost invisible picture.
Next, pass the line through the through hole to the outside.
Drainage
Please note that the drainage hose must be located below the freon line.
Attach the indoor unit to the mounting plate.
Connect the air conditioner drain hoses.
For extensions, many use a regular metal-plastic pipe d-16mm. The factory drain tube is flared and metal-plastic is inserted into it, sealing the connection at the top with electrical tape.
However, over time, a fungus may form inside the metal-plastic material, which will not allow the water to drain away quickly enough.
Therefore, other installers use only corrugated pipes as drainage.
In addition, it is the corrugated drainage that allows you to connect directly to the bath without additional connections.
Sequence of actions when installing an air conditioner
In order to comply with all the requirements for installing an air conditioner on the facade of a house, qualified installers adhere to the following technology:
- Laying electrical wiring to allow connection.
- Installation of the outdoor unit, which according to the standard is located 2 meters above the ground.
- Fixing the mounting brackets to the anchor bolts and installing the block on them.
- Preparation of main holes with a diameter of 50-60 mm for supplying communications, installation of a waterproofing cylinder in the prepared holes.
- Installation of the indoor unit on brackets.
- Connecting wiring and copper pipes intended for freon circulation.
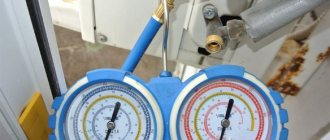
- Vacuumization. The operation lasts about 45 minutes, involves the use of special equipment and allows you to completely remove air and moisture from the system.
- Functionality check, testing on hardware and software equipment, trial run, delivery of the project to the customer.
Connecting the air conditioner to the mains
To finish with the indoor unit, let's move on to connecting the power wires.
Having opened the front cover of the indoor unit, unscrew the plastic plug to connect the cable.
Having inserted the cable, connect it according to the electrical diagram. To do this, look for the following markings on the terminal block:
- L-phase
- N – zero
- grounding icon
Check on the power cable where you have phase and zero and connect the corresponding ends to your terminals.
When connecting a low-power air conditioner (up to 2.5 kW) directly from the switchboard without an outlet, you must have a three-core cable VVGng-Ls 3 * 2.5 mm2 in the groove.
A 16A circuit breaker is installed in the panel.
With a low-power condenser up to 1 kW, you can, of course, use a section of 1.5 mm2 + a 10A automatic, but 2.5 mm2 is a more universal option and will allow you to easily change the split system with a higher power in the future.
If the air conditioner will be connected through an existing socket, then use a wire with a 3*2.5mm2 PVA plug.
There is also nothing complicated about connecting the indoor and outdoor units. Here, as a rule, a 4*2.5mm2 or 5*2.5mm2 cable is used. The terminal markings on these blocks are the same.
Accordingly, throw a cable between them (not the PVS wire, but the VVGng cable!) and connect the wires of the same color to terminals L1 on the internal unit and L1 on the external one, N on the internal one and N on the external one, etc. Just follow the connection diagram and labels.
Sometimes the air conditioner itself in the room is powered not from the outlet, but from the outdoor unit (most often with inverter models). In this case, the exterior will have several more terminals.
This is phase-zero-ground. Then you lay the power cable from the outlet or diffavtomat in the switchboard outside, and not to the indoor unit.
Connecting the freon route pipes from the outside is similar to the room connection.
Air conditioning in the nursery
Many parents do not install air conditioning in their children's rooms due to the increased risk of negative effects on their health. In addition to the problem of incorrect placement and improper flow of cold air, there is a risk of children turning on the air conditioner on their own and playing under it outside the attention of parents. Therefore the decision is justified.
But if the children are adults, and one of the risks is reduced to zero, we only have the question of choosing the right place to install the indoor unit of the split system!
- Above a crib or a play area with blinds that are strictly horizontally oriented, not directed downward to allow cold air to flow into the area where children are present;
- Installation above the child’s workplace, desk and table with the same position of the blinds, when the air flow falls behind the child one to one and a half meters;
- Installing an air conditioner above the door, opposite a wall with a closet or shelves, where the child does not study, does not sleep, or plays on the floor!
Independently regulate the temperature and operating mode of the air conditioner in the nursery, avoiding sudden temperature changes!
Air conditioner vacuumization
But for the next stage of work you will need a vacuum pump. It is necessary for vacuum drying of the freon line.
Mistake #10
You can never guarantee that all the moisture will be driven out simply by the freon itself. The air contains this moisture. Without normal vacuumization, sooner or later your compressor will fail.
If you do not bleed the air, the pressure in the system will be affected (it will rise). In this case, the compressor’s performance may drop by about 30-35%, and it will operate under constant load.
And the moisture contained in the air affects the rapid decomposition of oil and an increase in its acidity level.
This further leads to two consequences:
- destruction of the varnish insulation of the windings on the electric motor by the acidic environment and its failure
- gradual “washing out” of copper from the tubes and its entry onto the working surface of the compressor with a decrease in gaps
Therefore, if the invited “specialist” came without a vacuum pump, then know that very soon you will see him again. And you will meet him very often.
The operating time of the vacuum pump depends on the length of the line. The minimum length is 2m. If you get less, then sooner or later the oil from the compressor will definitely get into the evaporator and your air conditioner will not work for a long time.
For a standard short section, vacuumization time is from 15 to 20 minutes. It is counted after the direct creation of a vacuum (reaching a pressure of 5 torr). This can be checked on the pressure gauge manifold, or heard by the changed sound of the pump.
When the sound almost disappears, start counting the time from that moment.