Application of brackets
Typically, outdoor air conditioner units are installed on the rear or side facades of buildings. At the same time, for a classic household air conditioner, two brackets are enough. But remember, the number of brackets depends on the weight of the equipment, so it is better to double-check the technical specifications of your air conditioner.
Brackets for air conditioners on the facade
Rules for installing the external unit of the air conditioner
Installing an outdoor air conditioner unit is not as difficult as it might seem. But it is important to follow the basic installation rules. Failure to do so may result in system damage.
Basic parameters to consider when installing an air conditioner
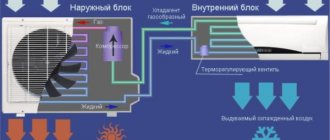
How to correctly lay the freon line when connecting an external unit
Key points to consider:
- The external unit of the air conditioner is hung level. Even a slight tilt will lead to improper operation of the compressor - the oil will be distributed incorrectly, resulting in accelerated wear;
- choose a place so that there is access to the external unit without the need to hire a lift truck - in addition to possible repairs, the device requires regular maintenance: refilling freon, blowing to remove fluff and dust from the radiator;
- It is important to calculate in advance where the condensate will go so that water does not drip on people. The best option is to insert a drainage pipe into the storm drain;
- Follow the recommended distance between the indoor and outdoor units of the air conditioner. Inexpensive models and mid-price class split systems have a maximum distance at which the compressor is capable of pumping refrigerant within 15-20 meters. In this case, the permissible height difference is: 5-10 m. The exact parameters are indicated in the instructions;
- keep the indentations: at least 20-25 cm (recommended 30) from the wall, 20-30 centimeters on the sides, top and bottom - space is necessary for normal air intake and circulation. Also about 1 m in front of the outdoor unit for hot air exhaust;
- ideal conditions are if the external unit is installed in height lower than the internal one - in such conditions, the oil contained in the refrigerant will flow by gravity into the compressor, which will ensure its proper operation and eliminate the risk of water hammer;
- if it is not possible to install the external unit lower than the internal one, for example when installing on the roof, then it is important to embed a U-shaped oil lifting loop into the freon line at the beginning (bottom) of the suction tube. If the length of the highway is more than 7-8 meters, two such loops are needed;
- When drilling a hole for the main line, you need to make a slight downward slope towards the outdoor unit. The same rule applies if the external module is installed on the roof.
Note. Most manufacturers charge air conditioners (more precisely, the external unit) before selling them. If the length of the line does not exceed 5-6 meters, refilling the refrigerant before starting is not necessary. It is enough just to perform a vacuum - pump out atmospheric air from the system.
Another pressing question that needs to be paid attention to is: in which direction does the external unit of the air conditioner blow? All manufacturers design climate control equipment so that air flows away from the house to the outside. This allows you to reduce noise and avoid temperature changes on the facade: overheating of the wall in summer and hypothermia in heating mode in winter.
Be careful. When installing on a wall between closely spaced houses or on a corner ledge, make sure that hot air in summer is not directed into the neighbors' windows.
It is also unacceptable to install two external units, one opposite the other, if the distance between them is 1-1.5 m - due to the oncoming flow of hot air, the radiators will overheat, and the cooling efficiency will drop significantly.
It is most convenient to install the device on the side of a window, balcony or under it
Pipe flaring
Flare the tube so that it fits easily into the nut
We connect the wires in accordance with the diagram on the cover
Diagram of external block taps
The last stage is checking with a vacuum pump
Bracket design
The design of the brackets must provide sufficient strength, since air conditioners weighing at least 30 kg are mounted on the brackets. At the same time, the brackets should be lightweight to facilitate installation of the mount at height.
The bracket is made in the form of an independent part or a multi-part structure with a brace, as well as in the form of a significant thickening in the base part. The mechanical principle of operation is the resistance of the material to chipping and shear. For this purpose, steel 2 millimeters thick is used.
The bracket has holes for attaching to the wall, as well as for securing the outdoor unit. There are differences in configuration depending on the manufacturer, but you should choose the brackets of the simplest design.
Types of brackets for mounting a split system
As the demand for split systems increases, manufacturers of brackets for mounting air conditioners are obliged to enrich the variety of their products.
The following types of air conditioner brackets are common on the market today:
- Welded L-shaped corners;
- L-shaped corners are connected by a threaded connection;
- universal bracket with horizontal fastening bar.
The latter type is distinguished by the fact that the horizontal bar facilitates the installation process, since it is not necessary to align each bracket individually in the horizontal plane.
Bracket with horizontal bar
There are also different types of brackets for attaching outdoor units of air conditioners. They are certified and have the permissible weight of the external unit. For example:
What determine the dimensions of the outdoor unit?
The dimensions of the case, of course, are determined by the dimensions of the component parts. Its largest parts are the condenser (radiator) and the compressor. The size of the blocks depends on their performance. The more powerful the air conditioner, the greater the “capabilities” and dimensions of its main components.
Split systems come in different cooling capacities. In most cases, there is a direct relationship between the cooling capacity and the dimensions of the unit (especially one line). But when comparing different brands or models, you may get different numbers!
Of course, the more powerful the air conditioner, the larger its parts, the larger the dimensions of the units. But now “splits” with inflated characteristics are appearing. To reduce the price, they are assembled from budget components, which hardly provide the declared cooling capacity. This is also why different brands may have significantly different dimensions for the same power.
Attaching the brackets
Here is a small list of rules for attaching brackets, following which you can extend the durability of these elements:
- if the surface of the bracket (anti-corrosion coating) is damaged during installation, then during installation it should be painted over with another anti-corrosion material;
- You cannot drill additional holes in the brackets, this will lead to a loss of structural strength;
- during installation of the outdoor unit, it is necessary to level it in a horizontal plane;
- Installation of brackets for air conditioners should be carried out using bolts and hardware, which will not make you doubt their strength.
High quality bolts
Where to buy a bracket for an air conditioner
buy brackets for mounting air conditioners at service centers, in specialized stores, on the market, and in online stores. The price of brackets ranges from 150 rubles per pair to 480 rubles. As you understand, the price depends on the type and strength of the bracket, as well as on the anti-corrosion coating.
Here are examples of price lists from some manufacturers:
Stainless steel brackets are very expensive, their price can reach 1500 rubles (25 US dollars).
Stainless steel bracket
When purchasing brackets, you should remember that often only two brackets are included in the kit, without bolts, fasteners, etc.
Consumables for installation of air conditioners.
You should pay attention to the quality of materials; the quality of installation and the durability of the air conditioner without repair depend on this.
The ease of installation also depends on this, and if an experienced installer can cope with any materials, then a beginner, for example, who is picking up a flaring machine for the first time, will find it very difficult to flare a non-ductile copper pipe from an unknown manufacturer.
So, we will need:
Copper tubes
For installation of an air conditioner with the most common capacity of 7 Btu/h (“seven”), a pipe with a diameter of 1/4″ and 3/8″ (a quarter and three-eighths of an inch) is suitable.
It is necessary to purchase a special pipe for air conditioners, and not a plumbing pipe, which is much less flexible.
Sold in coils of 15 meters or more. But on construction markets you can also find them by footage, albeit more expensive.
Thermal insulation
This insulation is hollow inside and fits over the tubes, protecting against cold loss.
It is made of foamed polymers and has different wall thicknesses; naturally, the thicker it is, the better.
Sold individually, 2 meters long.
Electrical cable
For power supply and interconnection.
The number of cores - three or five, depends on the specific air conditioner.
The wire cross-section can be found in the instructions or determined independently using this table.
It is better to take a flexible PVC wire; it will be much easier for you to work with it.
Brackets
An external unit is installed on them when mounted on a wall. But if you mount the external unit on the roof or on the ground, you will need a metal stand.
Characterized by the load they can withstand, they exist for 50 kg, 80 kg and so on. For “7”, 50 kg brackets are suitable.
Anchor bolts
These brackets are attached to the wall of the building. You can purchase separately dowels and bolts of the required size.
Attaching the external unit to the brackets
8 mm bolts, nuts and washers for them.
Indoor unit mountings
Self-tapping screws and dowels for them or a dowel-nail.
Drain hose
Length sufficient to remove condensate to a designated place (outside or into the sewer), with a diameter of 16 mm (“for seven”)
Decorative box
For laying communications in it - pipes and wires, if it is decided to do without gating.
Polyurethane foam
Seals the hole in the wall after installation to avoid heat loss.
Sold at any hardware store.
Clamps
For tying together copper pipes, drain pipe and cable, as they must fit into a decorative box or grooved channel in the wall.
You will need a lot, sold in packs of 100 pieces.
Terminal blocks or electrical tape
Will be needed to connect wires to each other, interconnect and supply.
As you can see from the list, most of the tools are available to any home craftsman. When choosing a tool, you should use common sense and remember that a professional tool is intended for daily use, while a household tool is intended for infrequent use.
In the next article you will learn about the correct choice of installation location for the fusion system.