Household gas equipment poses a high risk. Often the open fire of ovens and stoves may go out due to a draft or gas supply being cut off. To prevent leakage and gas supply, thermocouples are installed on the plates. Next, the topic will be covered: what is a thermocouple for a gas stove, the principle of operation, the main malfunctions and testing of this equipment. A description of how to do it yourself will also be given.
Device
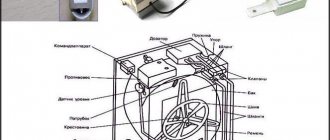
The thermocouple for the oven and gas stove is designed according to the Seebeck principle. The scientist has found a way to produce a small fraction of electric current by heating various metals. The thermocouple consists of the following elements:
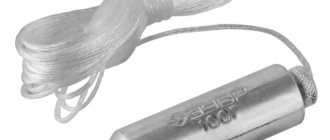
- Working tip with 2 types of metals inside. It is this part that is in direct contact with the open flame.
- Contact tube up to 1.5 meters long. This is the electrically conductive contact from the tip to the bolt mechanism.
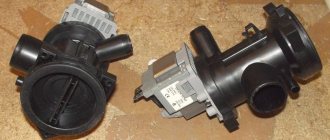
- Solenoid valve. A mechanism that opens and shuts off the gas supply to the burners and oven. The valve is metal. Raised by magnetic attraction.
There are 2 main types of this device:
- Ungrounded. This type of pair has a split-coated tip. This approach made it possible to reduce susceptibility to external electromagnetic vibrations. The disadvantage is the connection method. Often the two halves are joined together by soldering or crimping. Both options lose their tightness with frequent and prolonged heating, due to an increase in volume.
- Grounded. A more common type of device. The tip is not separated by an insulating coating. This affected the sensitivity of the tip to electromagnetic vibrations from extraneous sources. Microwave ovens must not be installed near the oven. The electromagnetic field can cause the valve to open. Despite this, grounded thermocouples are the most reliable.
The shell with metal rods is fixed to the tube using: welding, soldering, crimping. The mounting depends on the purpose of the thermocouple and at what temperature fluctuations it will operate in the future. The most reliable connection is welding. This connection is not disrupted by the expanding surfaces of the housing. The chemical composition of the rods inside the housing also depends on the temperature. The rods are:
- Chromel is aluminum. Operates at temperatures - −200 ÷ +1000 °C. Denoted by the letter "K".
- Copel - chromel. −200 ÷ +800 °С. Refers to the most sensitive elements. Denoted as "L".
- Chromel - constant. −40 ÷ +900 °C. Has increased sensitivity. Designated "E".
- Copper is constant. – −250 ÷ +300 °C. Denoted by "T".
- Iron is constant. −100 ÷ +1200 °C. They are among the cheapest devices. Designated "J".
- Tungsten - rhenium. Operates at temperatures above +1800 degrees. Used in heating boilers. Designated "A".
- Nichrosil - nisil. −200 ÷ +1300 °C. Denoted as "N". Used on high-precision heating devices.
- Double platinum rhodium. +100 ÷ +1800 °C. Designated "B".
- Platinum - platinum rhodium. There are 2 types. Operates at temperatures up to + 1700 °C. Designation "S" or "R".
Knowing the composition of the internal rods, it is easy to select a suitable element to replace the faulty one.
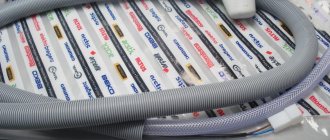
The thermocouple kit also includes a tube and a valve. The tube has a conductive element inside. Often a wire enclosed in a fireproof sheath. The solenoid valve is necessary to open and close the gas.
Thermocouple
According to the definition of the international standard, a thermocouple consists of two connected conductors used as part of a device that measures temperature. It remains to add: the wire material is selected with different signs of the thermopower coefficients. The maximum potential difference is achieved. The accuracy of measurements is directly determined by the value of the measured parameter. Since instruments demonstrate absolute and relative errors.
A common thermocouple is considered to be alumel (– 17.3 µV/ºС), chromel (+ 24 µV/ºС). At a junction temperature of 300 ºС, the product outputs a voltage of 12 mV to the contacts. The digital meter evaluates the value according to the result obtained, and the gas stove carries out the necessary operations. In the simplest case, a thermocouple detects the presence of a burner fire. The fire goes out - the safety valve is activated, shutting off the gas supply. The concept of safe use of the stove is being implemented.
Sometimes accurate temperature measurement is not required; the circuit is organized on a digital comparator that compares the thermocouple voltage with a given level. The threshold is crossed - the circuit is triggered. Further actions of the gas stove are determined by the algorithm laid down by the developers.
Thermocouples are used in household appliances due to their unparalleled reliability, low cost, and fault tolerance. Indeed, how can an ordinary wire break? If it breaks, it won’t take long to mend it. The soldering area can be easily restored. A gas stove with a thermocouple works reliably and is repairable.
The aspect of unification plays a significant role. The alumel-chromel thermocouple is easily replaced with another similar one. The alloys are easy to purchase separately; you can make your own temperature meter for a gas stove. An important criterion for the marketing attractiveness of equipment.
Seeing simplicity, the buyer is willing to spend money. Installation is simple. Anyone can lay a couple of wires. A few words about the purpose of a thermocouple.
Principle of operation
A thermocouple is a fairly simple device. The working principle of a thermocouple can be explained as follows:
- The tip is located near an open flame.
- As soon as the gas stove or oven is turned on, the metal rods heat up and create an electric current.
- Current flows through the tube and enters the temperature sensor.
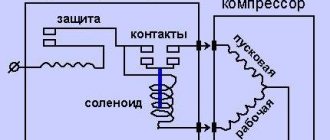
- An electromagnetic field is created in the sensor, which lifts the valve, opening the flow of gas to the burners.
If the flame goes out without human control, the thermocouple cools and the electrical voltage disappears. The electromagnetic field also disappears, thereby closing the valve. The flow of gas into the system is blocked.
Thermocouples are most often installed inside ovens. This is necessary due to the lack of visual control of the flame. This gas monitoring device has a number of advantages:
- High accuracy.
- Long working period.
- Easy to install, replace, maintain.
The gas supply control device is reliable and durable. But it also has its service life.
When is independent work impossible?
If all preliminary manipulations were unsuccessful, then the problem is in the sensor itself or in the valve. In both cases, the thermocouple for the gas stove must be replaced.
The malfunction of the solenoid valve cannot be eliminated; it must be replaced.
Despite the apparent simplicity of this control device, it is not recommended to change it yourself. This is a security system, and the well-being of the family should not be left to chance.
Every little detail affects the operation of all equipment. In addition, after installing the thermocouple, it should be tested. And this can only be done using equipment that is not available for personal use.
Malfunctions
Determining a malfunction of a gas control element is quite simple. A faulty sensor has the following symptoms:
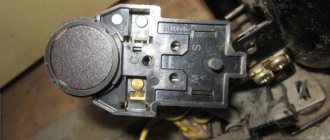
- When the burner is turned on, the flame does not light up. The reason is the gas supply valve has not opened. If the stove is equipped with a push-button switch, the button will press back immediately after pressing.
- After switching on, the flame burns for a short time and goes out again. The reason is the same. On plates with push-button control, shutdown will occur immediately after pressing.
So, there are only two reasons and both lead to the valve. Subsequent testing is necessary to determine the problem.
How does a thermocouple work?
Thermocouples are almost the only devices capable of measuring high temperatures, which is why they are used in the construction of gas stoves. This important part has the following device.
- The basis is two wires made of different metals, which are inextricably soldered together.
- Under the influence of temperature, a resistance appears, the digital value of which is displayed on the screen.
- Of course, the voltage generated is not strong, but it is enough to open the magnetic valve.
- During operation, electric currents prevent the magnetic valve from closing, which allows gas to flow freely into the burner. This allows you not to worry about fixing the stove handle. If the fire goes out for some reason, the system will stop supplying gas.
A thermocouple is, first of all, a concern for your safety, so when choosing a gas stove, pay attention to the presence of this option. There are elements for which 20 µV is enough to operate, but most often a voltage of 40-50 µV is required.
The operating principle of thermocouples is based on the Seebeck effect, which in physical terms means that transporter particles change their charge when heated. Depending on the materials chosen, electrons can move towards the cold field or be attracted to the heating point. To create thermocouples use:
- chromel and constantan;
- iron and constantan;
- aluminum and chromel;
- nikhrosil and nisil;
- copper and constantan.
In gas models, aluminum is fused with chromium. It is important to consider that the strength and performance of the structure depends on the quality of the soldering.
Examination
Checking the thermocouple for functionality is quite simple. To do this, you must first dismantle the element. You can clean it before dismantling. It is performed as follows:
- It is necessary to clean the tip body using sandpaper. Accumulated carbon deposits do not allow heat to pass through, which leads to prolonged heating of the thermoelement.
- You also need to check all electrical contact connections. Often, when several burners are turned on, the temperature rises, which melts the insulation of the wires. Uninsulated wires may touch the stove body, creating a short circuit.
- It is worth paying attention to the rigidity of the shrinkage of the terminals. Heating the copper tips can reduce contact with the conductor, causing the valve to simply not receive voltage to create a magnetic field.
- After cleaning, you need to turn on the stove again. If the problem remains the same, the thermocouple must be removed.
Often, one stove has thermocouples installed on all burners and inside the cabinet. If cleaning does not lead to the desired result, you will have to dismantle and check all the elements.
- Close the main gas supply valve.
- Understand the top panel of the slab.
- If the device is located inside the oven, remove the door.
- Find the solenoid valve.
- Using a wrench, disconnect the element from the valve body. Gas regulators have different connections, simple fitting or in the form of terminals. The terminals must be disconnected carefully so as not to break the protruding tip. It will not be possible to restore it.
Next, you just need to inspect the surface of the element. If it is damaged, no inspection will be required. The part will have to be replaced. It is impossible to repair a melted pair. If the case is intact, you will need to check with a multimeter:
- Set the multimeter to the mode for measuring the minimum constant electrical voltage.
- The tube has a conductive contact; you need to connect the “+” probe of the multimeter to it.
- Connect the minus probe to the element body.
- Heat the tip over an open flame.
When heated, a working thermoelement should produce a fraction of the electric current of 17–25 mV. If the voltage is absent or below these values, the part requires replacement. It is not recommended to test the part for resistance. Such a check will only show the integrity of the case. A non-functional thermocouple must not be disassembled for repair purposes. It will not be possible to restore the heating elements, since it is impossible to find replacement parts.
If the thermocouple is working, the solenoid valve will require checking. It is difficult to repair; if it malfunctions, it is better to replace it with a new one. To check, the valve must be removed after first shutting off the gas supply. This procedure cannot be performed on working stoves. Further:
- Check the part for contamination.
- Remove and clean the filter; on the latest models it is located on the inlet side.
Next you will need a battery or power supply. The “+” contact from the battery must be connected to the only terminal of the device, the “minus” contact is supplied to the housing using a piece of wire. Within a minute, a click should sound, indicating that the locking device has opened. After disconnecting the battery from the terminal, the click should repeat, indicating that the shutter is closing. If the valve does not respond to the supply of voltage, it must be replaced strictly with an analogue one. If it closes while voltage is applied, the valve is also considered unusable.
How can I check it?
Keeping your home safe is a working thermocouple sensor. Several times a year, the thermocouple requires mandatory checks and adjustments. To do this, invite a specialist who will perform a safe and accurate analysis of the device.
When checking thermocouple readings, consider the measurement quality of the device itself by systematically checking its operation.
Reasons for incorrect operation of the thermocouple:
- incorrect soldering of two metal rods;
- presence of electrical noise;
- you smell gas, there is a leak;
- thermoelectricity is inhomogeneous.
To resolve these issues, during device installation you should:
- choose a thermocouple with thick and large wire;
- avoid temperature changes;
- do not allow tension and vibration of the metal wire;
- use a sensor that has a working temperature spread.
You need to check the serviceability of the thermocouple by following the step-by-step instructions.
- The thermocouple has two ends. When checking, one of them must be heated with a flame from the igniter, and the second must be secured to the thread of the valve (electromagnetic) using a nut.
- The next step is to separate it from the boiler. Then you need to ensure a stable flame. A gas burner is also used for this purpose. But experts advise using a candle flame.
- The tip of the device is immersed in the flame, it should be approximately 1 cm above the flame. Here you need to remember that the fire heats the device to almost half, so it is better to hold it by the tip.
- Next, a tester is used that determines millivolts. It is connected to the output contact and to the body of the thermocouple itself.
- If the thermocouple is working properly, then 30 seconds after heating the result will be from 17 to 25 mV. But if this indicator does not exceed the minimum threshold, then this means that it is faulty.
You can find out more about how to replace a thermocouple on a gas stove.
Cooking on a gas stove or gas hob is as easy as cooking on regular electric burners. Even using a gas oven rarely causes any problems. But many people immediately raise the question of the safety of such equipment, because “blue fuel” is explosive.
Hardly anyone wants to see their home destroyed as a result of a gaseous fuel explosion. To prevent such a tragedy, a device such as a thermocouple is used in a gas stove. It represents the main element of the health monitoring system of the most popular gas appliance.
Agree that in the case of natural gas, special attention must be paid to the topic of reducing the risks of fires and explosions. The article we presented provides and describes in detail the rules for operating household equipment that processes gas. We supplemented the useful information with valuable recommendations.
Replacement
Replacing the thermocouple in a gas stove should only be performed at a specialized center. But it is quite easy to do it yourself, subject to strict safety measures. Before replacing the gas stove thermocouple, you must purchase it. The element body is marked with an English letter. It is this marking that indicates the chemical composition of the rods inside the housing. Installing an element with a different composition may affect the valve opening or closing time and the overall sensitivity of the part. Also, parts with different markings may have connecting parts, thickness and length of the tube that differ from the original. You need to purchase a complete analogue. Next you need:
- Unplug the stove from the electrical outlet.
- Turn off the gas supply at the main valve.
- Remove the top panel of the gas stove.
- Disconnect the thermocouple from the mount. The tip is constantly at high temperature and may be difficult to unscrew. Before dismantling, it is better to use a rust remover. It is strictly prohibited to bend or break the fastener.
- Replace the faulty part with a new one.
- Reassemble the plate in reverse order.
- Connect the oven to electricity.
- Open the gas supply.
- Check the operation of the device.
Before changing the thermocouple, be sure to protect yourself from gas leaks and electric shock.
When purchasing a new part to replace an old one, you need to pay attention to the length of the conductive tube. It must be identical to the factory counterpart. When installing on a gas stove, it is necessary to install the tube at the mounting points; it should not dangle, sag, or be located near the flame.
Also, when installing the thermocouple tip, you must maintain the distance between it and the burner. A close location will significantly reduce the service life of the part; if the location exceeds 1 cm, this can lead to problems with gas ignition.
Check, clean, replace
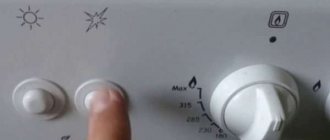
If the stove starts to light up poorly, it is likely that the thermocouple is clogged or faulty. But it is worth noting that the cause of the malfunction may not affect this element. To check, follow these steps: turn the oven knob and light the gas. If, after you release the knob, the oven goes out, this is the first sign that the gas control system does not open the gas supply valve in the stove.
Most likely, the surface of the measuring element is clogged and it does not perceive temperature changes in the environment. To repair gas equipment in stoves from Hephaestus, Ariston, Indesit, Gorenje, etc. You should first clean the thermocouple in the stove, to do this:
- First close the gas taps and disconnect the stove from the external power supply;
Rice. 4: turn off the gas supply to the oven - Open the oven and remove everything unnecessary from it - you should be able to get inside freely, if something bothers you, remove it, if necessary, you can remove the door from the stove;
Rice. 5: Remove any excess from the oven - Find the thermocouple itself - as a rule, it is located in the upper part of the oven; it must be installed near the flame divider;
Rice. 6: thermocouple in the oven - If carbon deposits, soot and other debris are found on its surface, they should be cleaned using fine sandpaper; cleaning with impact is strictly prohibited, as you can damage the thermocouple irrevocably;
- Collect the deleted garbage and test the functionality.
If such a gas control repair does not bring the desired result, you should check the thermocouple using a multimeter or millivoltmeter. To do this, you will need to get to the place where the thermocouple is connected to the electrical network of the stove. As a rule, it is located under the front panel or top cover, where the temperature switch or gas valve is located. The contacts could also come loose here, then it’s easy enough to fix them; if not, proceed to measurements.
Set the multimeter's measurement limit to around tens of millivolts. Connect the probes to the thermocouple terminals and heat the measuring element (not necessarily with open fire, but this is a fairly affordable method).
Rice. 7: checking the thermocouple with a multimeter
If the millivoltmeter shows a change in voltage at the terminals, the device is working properly and the reason is something else. Otherwise, you may have incorrectly set the limit for your thermocouple model or the automatic gas control system may be faulty.
Replacing a gas stove thermocouple
In most cases, failure is characterized by burnout of conductors. Soldering them yourself or welding them at home is possible, but impractical, since after splicing it is impossible to ensure the same measurement accuracy. Therefore, the best option is to replace the thermocouple. For this:
- Purchase a new replacement model on the Internet; it is better to do this using the thermocouple code, which can be found on the device itself or in the passport of the gas stove;
- Also disconnect the stove from the electrical network and gas supply system;
- Remove the front panel and top cover of the cooker and disconnect the electrical leads where they connect to the solenoid valve;
Rice. 8: Remove the front panel or top cover - Unscrew the fastening nut in the oven and remove the thermocouple; if the fastening element does not give in immediately, do not use excessive force so as not to break the fastening point, use WD-40 or any other solvent;
Rice. 9: Unscrew the thermocouple - Install a new thermocouple in the hole and secure it in the same way as the previous one, connect it to the internal electrical wiring circuit of the stove;
Rice. 10: Install a new thermocouple - Reassemble in reverse order and test the operation of the gas stove.
Adviсe
Operation and subsequent repair of the thermocouple must be carried out in compliance with safety precautions.
- It is necessary to respond promptly to a gas leak. Even new gas protection may not work. This happens due to debris getting into the bolt seat. Debris appears in the gas supply system due to poor quality pipe repairs.
- Do not cool the thermocouple with water. A sudden change in temperature can destroy the rods that form the current.
- It is prohibited to operate thermocouples with adhered food or carbon deposits. Foreign coatings retain high temperatures. After turning off the stove, the shutter mechanism will not work, which will lead to a gas leak.
- After replacing the element, you need to monitor its operation for several days.
- It is prohibited to purchase parts from unknown manufacturers or low-quality counterfeits. For a new pair, it is better to contact a specialized store or service center of the gas stove manufacturer.
- If you have doubts that you will be able to check or replace the thermocouple yourself, it is better to entrust this to specialists and take the stove to a service center.
Replacing a thermocouple is an easy but very responsible process. Do not neglect simple safety rules.
Why does a gas stove need a thermocouple?
The gas in the stove burner is ignited with matches, a manual piezo lighter or a built-in electric ignition. Then the flame should burn on its own without human intervention until the fuel is turned off by the valve.
However, often the fire on a gas hob or oven goes out as a result of a gust of wind or a splash of water from a boiling pan. And then, if there is no one nearby in the kitchen, methane (or propane) begins to flow into the room. As a result, when a certain concentration of gas is reached, a bang occurs with fire and destruction.
The thermocouple monitors the presence of an open flame in the burner, and if there is none, it shuts off the gas supply within half a minute to a minute to prevent a tragedy
The working function of a thermocouple is to control the presence of a flame. While the gas is burning, the temperature at the tip of the control device reaches 800–1000 0C, and often higher. As a result, an EMF arises, which keeps the gas solenoid valve on the nozzle to the burner open. The burner is working.
However, when the open flame disappears, the thermocouple stops producing EMF to the electromagnet. The valve and fuel supply are shut off. As a result, the gas does not enter the kitchen without accumulating in it, which eliminates the possibility of a fire from such an emergency situation.
A thermocouple is a simple temperature sensor without any electronic devices inside. There is nothing to break in it. It can only burn out from prolonged use.
The following article, which is entirely devoted to this interesting issue, will introduce you to a complete set of sensors designed to control and safety the operation of a gas water heater.
Thermocouple burnout usually occurs only in gas boilers and boilers that operate continuously. In gas stoves, the gas control temperature sensors in question last 20–30 years before replacement.
Among the advantages of thermocouples:
- simplicity of the device and the absence of breaking mechanical or burned out electrical elements;
- the device is cheap - about 800–1500 rubles, depending on the model of the gas stove;
- long service life;
- high efficiency of flame temperature control;
- quick gas shut-off;
- ease of replacement, which you can do yourself.
The thermocouple has only one significant drawback - the difficulty of repairing the device. If the thermocouple sensor is faulty, it is easier to replace it with a new one.
To repair such a device, it is necessary to weld or solder two different metals at high temperature (about 1,300 0C). It is extremely difficult to achieve such conditions in everyday life at home. It is much easier to buy a new control unit for a gas stove as a replacement.
Pros and cons of use
In the gas stoves of Indesit, Bosch, ElG and others, you can often find models that are equipped with this device. This addition has both a number of significant advantages and some disadvantages. To ensure that a thermocouple can be used profitably on a gas stove, we recommend weighing the pros and cons of the innovative device.
Advantages
- the manufacturing process is simple and the cost is low;
- the device can perform several functions simultaneously: control the flame supply and temperature;
- this part is durable;
- the device can record temperatures with a wide range;
- the data obtained is accurate;
- Knowing how to disconnect from the stove and connect again, there will be no problems with operation, since the algorithm is as simplified as possible.
Security Recommendations
Gas control - thermocouple - a device that is responsible not only for high-quality work, but also for safety. To prevent negative factors from manifesting themselves during the operational period, we recommend taking note of a few tips:
- Give preference to devices that are equipped with thick wire.
- Try not to load the system with sudden temperature changes.
- During use, make sure that the wire does not oscillate or is too tight.
- All sensors must work stably.
The gas supply in the gas stove is continuous until you apply the algorithm: turn on/off. The thermocouple device in Moscow and beyond is rapidly gaining popularity, as it minimizes any negative consequences. If there is no heating source, the gas will be automatically turned off.
Gas control repair manual
If the gas on the stove goes out, then the problem may lie not only in the thermocouple. However, most often this is precisely the problem.
The main sign of problems with gas control is that after igniting the burner and releasing the handle or button to open the “blue fuel”, the flame immediately goes out. This occurs due to the valve closing, since the thermo-EMF to keep it open is absent or insufficient.
The reasons for the noise of gas stove burners are described in detail in the article, the useful information of which is worth reading.
You should independently check, repair and replace the thermocouple in a gas stove with your own hands only when the gas is completely shut off. First you need to close the valve on the cylinder with the gas mixture or the methane pipe, and only then begin any work. Also, do not forget about turning off the power supply if the design contains volatile devices.
The thermocouple tip is located directly next to the burner and gas fire. And in the oven you can find it near the flame divider in the upper part of the oven. This tip should be free of carbon deposits, mineral deposits and any damage.
If the working tip of the thermocouple sensor is covered with scale, it must be cleaned off with sandpaper. The more carbon deposits, the less heat reaches the thermocouple, and the less it accordingly creates an EMF. The resulting millivolts may simply not be enough to open the solenoid valve.
How to check before replacing?
The thermocouple usually has one tip for installation near the fire. But there are also options with two or three temperature control tips. They are usually used in ovens, but it all depends on the specific model of the stove.
Thermocouples with several working tips have a peculiarity - if only one of them is not heated or fails, the solenoid valve will be closed. Therefore, in order to accurately find the cause of the problems, such thermocouple devices will have to be checked especially carefully. Only one of the sensors may be faulty.
Another point is that the thermocouple conductors in the area up to the valve must be tensioned or dangling in the body of the plate. At the same time, their connection to the electromagnet must be rigid; a connector hanging “on my word of honor” is unacceptable here.
The devices in question are produced with lengths from 40 to 130 cm. You should choose a thermocouple gas monitoring device based on this indicator very carefully. On the one hand, the conductor wire should not be over-tensioned, and on the other hand, it should not lie on heated surfaces or dangle freely.
How to change the device?
Before replacing a damaged thermocouple in a gas stove, you should inspect the device for:
- the presence of carbon deposits on the working tip (if there is any, it must be cleaned off with sandpaper);
- no burnout of this tip (in this case, only complete replacement);
- the rigidity of the connection between the contacts of the thermocouple sensor and the valve (if necessary, tighten);
- serviceability of the thermocouple itself with the output of an EMF at a level of at least 15 mV when heating.
The device in question should only be replaced when it is definitely faulty. In many cases, to get a gas stove to work again, you can get by by cleaning the tip from carbon deposits and checking the contacts.
The working tip of the thermocouple is rigidly fixed near the burner or burner using a nut. If it cannot be unscrewed due to scale, then you should not put too much pressure on the key. This can only break the fastening. It is better to use a solvent first.
The second end of the thermocouple is attached to the solenoid valve using a threaded connector or two crimp contacts. Removing them doesn't seem difficult. The new thermocouple sensor is installed in a similar sequence - one end of it is attached near the burner, and the other to the electromagnet.