Most laptops already have a microphone. This is either a separate hardware device or a device built into the webcam. However, users often encounter situations where the system does not see the microphone due to its physical breakdown. In this case, you can use an external one. But they do this not only to fix hardware failures. Easily connect a wireless microphone to your laptop for karaoke. Or use a desktop model, which provides greater sensitivity and is conveniently located in front of the user. Connecting a microphone is done in different ways, depending on its model and the type of laptop port.
Interface 3.5 mm mini-jack
You can use a regular, wired microphone on a laptop only if there is a 3.5 minijack port. It's not difficult to find. Need to:
- inspect the ends of the laptop;
- find two port holes, indicated by green and red inserts;
- Make sure that the red port is intended specifically for a microphone by looking at the icon next to it.
On a note! This way you can connect a microphone to an Asus, Acer, HP laptop. These manufacturers install exactly a pair of 3.5 mm minijack ports on their devices for connecting speakers and a microphone.
To make karaoke on your computer you will need:
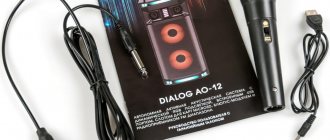
Microphone
If you have a microphone that comes with stereos or karaoke sets, then it has a different connector from the sound card. The socket in the computer is designed for a 3.5mm jack. In this case, you need to buy a special adapter from 6.3 mm to 3.5. It can be found in any hardware store and is inexpensive.
Cable (jack from 3.5 mm to “tulips”)
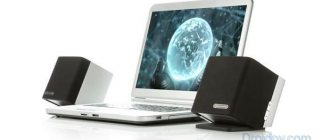
Acoustic system
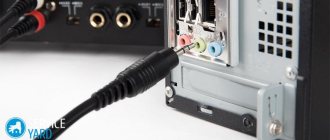
Next you need to decide on the sound source. You can, of course, use speakers in your laptop, but for better effect, sound and volume, it is advisable to use at least computer speakers. The best option would be speakers from a music center and a subwoofer. To connect them you will need a cable or a jack adapter from 3.5 mm to tulips.
The end with tulips is connected to the music center in the AUX connectors, and the opposite end is connected to the green connector of the sound card, which is used for headphones.
Connecting speakers without a music center is a more difficult task. To do this, you will need to purchase an amplifier or receiver (which is the music center itself).
After connecting the microphone and speakers, check their compatibility. To do this, right-click on the volume icon in the Start panel. From the context menu, select “Playback Devices” to test your speakers and “Recording Devices” to test your microphone. In the properties of each, you can test the performance and adjust the sensitivity level.
Combo port
Some laptops use a combo port to connect headphones and receiving devices. It's easy to plug in a headset with one cable from the headphones to the voice recording point. However, if you take a regular dynamic microphone, you won’t be able to connect it directly to your laptop.
To use an external audio recording device, you will have to buy a branded one. It may be from the same brand as the laptop, or it may have compatibility information. However, such a device is quite expensive. It is much more attractive for the average user to buy an adapter.
This adapter looks very simple. At one end there is a plug for the hybrid port, at the other there are two taps, marked in green and red for clarity. It is the latter that allows you to connect an external microphone to your laptop.
If your microphone uses a different type of plug
Today, connecting a microphone to a laptop can only be done using a 3.5 minijack interface. However, there are many models of audio recording devices on the market that may have a different plug. Meet:
- TS, monophonic sound, 2.5 mm;
- TRS, monaural, 3.5 mm;
- TRS, stereo, 3.5 mm;
- stereo and mono, 1/4 inch.
To connect an external microphone, it is recommended not to experiment with disassembling its connector and resoldering the contacts, but to buy an adapter . It's inexpensive. The product can be extremely compact, in a rigid case. Or it can offer a flexible cable outlet to the connection port, which is convenient for some users.
How to connect a microphone to an Android smartphone
To connect a microphone to a smartphone running Android OS for karaoke, you should use either an adapter or a Bluetooth connection.
The adapter should be connected to the miniJack 3.5 or USB connector, and a microphone should be connected to the adapter.
Attention! There are models of sound recording devices that can work without additional equipment. To clarify this information, the user is recommended to refer to the technical literature for the specifically selected model.
In order to make a Bluetooth connection, you need to enable this function on both devices and switch between them.
Using an external sound card
What happens if the audio recording device has a weak output signal? In this case, if you connect a microphone to a laptop, the voice will be very quiet, and it may not be possible to amplify it using software. To solve this problem, you will need a connected multimedia device.
An external sound card is a very small device the size of a regular flash drive. At one end there is a USB interface, at the other there are 3.5 minijack outputs, red and blue, needed for connecting a microphone. You just need to plug the sound card into the laptop port.
Important! Simple device drivers will be installed automatically. For more complex ones, you will need to download them from the Internet. Responsible manufacturers offer a disk with a set of software required for its operation, complete with a sound card.
Radio microphone
A radio microphone is an extremely popular device for karaoke. It consists of two functional modules. One of them, a decoder-transmitter, connects to a laptop. The second, the microphone itself, is equipped with a battery and a built-in transceiver module.
To connect a microphone to a laptop, you will need to follow the manufacturer's recommendations. Usually you need:
- connect the decoder-transmitter unit to the laptop using the USB port, 3.5 minijack, sometimes both at once;
- install microphone drivers;
- check the connection between the microphone and the data processing unit according to the manufacturer’s instructions;
- check the operation of the device.
Typically, a radio microphone has a fairly simple initialization technology. It is described in detail in its operating instructions.
Bluetooth
Bluetooth devices are gaining immense popularity among consumers. Although the communication range of such a wireless microphone is short, up to 10 meters without obstacles, it is enough for comfortable work with a laptop. To connect your device via Bluetooth, you will need to do the following.
- Connect the receiver to the laptop. This could be a very small whistle, or it could be a module powered by USB and transmitting an audio signal via a 3.5 mm minijack.
- Install drivers for the new device and software offered by the manufacturer.
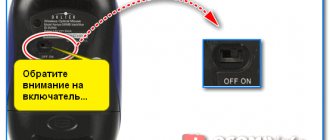
- Turn on the microphone and make sure it connects to the receiver. Usually, a small light bulb is installed for this purpose, the nature of the glow indicates the state of the communication channel.
The manufacturer offers detailed connection instructions for each Bluetooth microphone.
Important! There are models without a receiver. In this case, to use them, the laptop must have its own Bluetooth module. If the model is old and does not offer such luxury, to connect a wireless microphone you just need to buy and install one of the universal receivers.
How to start using an external device
The microphone on a laptop, even if it is faulty, may prevent it from working with a connected external device . It needs to be activated and set to be used on the system by default. This is done as follows.
- The speaker icon is located in the tray, next to the clock. If it is hidden, in Windows 10 and Windows 7 you just need to press Win+B.
- You must right-click on the icon.
- From the menu that appears, select Recording Devices.
After these steps, a window will open in which all sound recording sources identified by the system are listed. You need to select the recently connected one by its model name.
If the device name is grayed out, it needs to be enabled. To do this, right-click on the name or icon next to it and select Enable. It is easy to understand that the device is working by the indicator located to the right of the name. When you start talking or just tapping on the microphone, you can see how the output level is displayed.
Advice! In order for the system to automatically use an external audio recording source, it should be set as the main one. To do this, right-click on the model name and select Use default communication device. After this, when you connect a wired microphone, the operating system will immediately begin working with it.
It is more difficult to start using wireless Bluetooth devices. If the radio microphone only requires manipulations with the receiver or manufacturer’s software, then the model’s Bluetooth must be paired before any settings are made. To do this you will need:
- find the Bluetooth icon in the form of a blue logo next to the clock;
- right-click on it and select Search for devices from the drop-down menu;
- find the name of the wireless model in the list of found ones;
- double-click on the name with the left button or select and click the Pair button.
You may be required to enter an authorization code during pairing. The required combination of numbers is always in the device's operating instructions. Once pairing has been established, the wireless model will automatically connect to the system.
Examination
Everyone understands how a wireless microphone for karaoke works. You can check the operation of your device using standard tools in the Windows operating system and using third-party software:
- If we talk about third-party software, you can use the aforementioned Skype communication program. You can diagnose the device directly during a conversation by clicking on the corresponding communication icon.
- To check if the device is working correctly without downloading any programs, just right-click on the volume control icon, select recording devices and talk into the microphone. There will be an indicator next to your microphone model, the filling of which indicates that the microphone is capturing sound and transmitting it.
Now you can easily connect and configure any equipment of this kind to your computer. Let us remind you once again that the owner of a laptop should think several times before upgrading, and owners of desktop computers should include in the search category devices that are connected to the “heart” of the computer.
Important! A common problem you may encounter when singing songs is echo. We have prepared a separate review that will help resolve this issue. Find out all the ways “How to remove echo on a computer?”
What to do if the sound when recording or talking is very quiet
You can adjust the microphone sound volume using system tools in Windows 7, Windows 10. To do this, you need to go to the recording device settings window, as shown above. Here you just need to select the name of the model you are using with the left mouse button and click the Properties button. It is located in the lower right corner of the window.
In the device properties, sensitivity levels are adjusted on the tab of the same name. Having switched to it, you should use the slider to set the acceptable sound volume. To save the settings, just click OK and close the settings window.
Connecting a microphone to a laptop is sometimes very difficult. We are talking about old devices - their connector does not meet modern standards. Therefore, to use a very old microphone, you cannot do without qualified assistance. The device must be taken to a workshop or electronics specialist to re-solder the wires to a modern interface. Only after this can you connect the microphone to the laptop using one of the methods described above.
Checking the internal microphone
If you are lucky and your laptop is equipped with it, you don’t have to connect anything else: you already have access to voice communication or audio recording. Just check if you have it enabled.
- Find the speaker icon in the notification area and right-click on it. Select "Recording Devices" - "Recording".
- On this tab, find "Microphone". Click on the "Properties" button in the lower right corner of the window.
- Notice at the bottom of the area that appears: the drop-down menu should indicate that the device is turned on. Eat? This means the connection is established.
- It's worth checking the sound level just in case. To do this, in the “Properties: Microphone” window, go to the “Levels” tab (second from the right) and move the slider all the way to the right. This way you will set the maximum sound level so that you can be heard well in any case.
If you cannot find the notification area on your desktop, everything described above can be done through the Control Panel. If you have Windows 7 , after clicking the “Start” button, select “Control Panel” - “Hardware and Sound” - “Sound”, and then follow the instructions indicated above, starting from the first step.