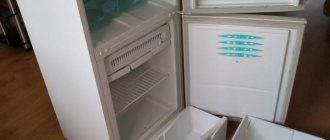
Modern comfortable life is impossible without such a household device as a refrigerator. Its breakdown entails big troubles: spoiled food and preparations for the winter, and for some, financial losses, if we are talking about an industrial freezer or commercial refrigeration equipment. One of the reasons for failure is a violation of the circuit in which the cooling gas is located, i.e. a leak. To save money and refill freon yourself, you will need special tools and certain skills, but first things first.
This article is suitable for all models of Russian, Soviet and foreign production - single-, double- and triple-chamber, including built-in ones: Hotpoint Ariston, Ardo, Beko, Bosch, Candy, Daewoo , Electrolux / Electrolux, Gorenje / Gorenje), Haier / Hayer, Hansa / Hansa, Hitachi / Hitachi, Indesit / Indesit, LG / ElDzhi, Liebherr / Liebherr, Polair / Polar, Pozis / Pozis, Samsung / Samsung, Sharp / Sharp, Shivaki / Shivaki, Siemens / Siemens, Snaige / Snow, Stinol / Stinol, Toshiba / Toshiba, Vestel / Vestel, Vestfrost / Westfrost, Whirlpool / Whirlpool, Zanussi / Zanussi, Elenberg / Elenberg, as well as Nord, Biryusa, Yuryuzan, Atlant, Oka Sviyaga, Ocean, Minsk and Don.
To start
Any refrigerator is subject to breakdown: regardless of brand, model or price category. But the price of repairs varies significantly, and can be quite high for famous manufacturers. In this regard, I would like to try to repair the unit at home. Let's look at the nuances of refilling the refrigerator with freon if it comes out and runs out.
Safety regulations
Injecting freon yourself is a dangerous activity, as it can cause harm to the human body, and it is necessary to approach it with all responsibility:
- Study the accompanying documentation for the refrigerator.
- Disconnect the device from the power supply;
- During the gas replacement process, you should not smoke or use heating devices, as it is flammable;
- All repair equipment must be grounded;
- Do not neglect fire safety rules when soldering elements;
- Refrigerant vapors are hazardous to health (it can lead to poisoning), so the room should not be isolated, and after the procedure it is necessary to ventilate for 15 minutes;
- Use gas only from trusted manufacturers who provide a guarantee.
Materials and equipment
To independently pump gas into the refrigeration system, you need special equipment and spare parts. You can rent a tool from one of the workshops, because purchasing it for a single repair is unprofitable.
What will you need:
- Vacuum pumping station;
- Scales;
- Refrigerant of a certain brand;
- Welding and soldering of a certain type, depending on the type of pipe;
- Filter drier;
- Schrader valve;
- Leak detector for checking joints for leaks.
- Nitrogen cylinder for purging the cooling circuit.
- Needle grip.
Stages of work
The work of charging refrigerant is quite complex, and you should know exactly its stages.
- Find and pinpoint the location of the leak;
- Isolate the leak;
- Replace filter drier;
- Check for tightness;
- Carry out vacuum;
- Fill the system;
- Check the quality of the work performed.
Preparation
Carry out diagnostics: carefully inspect the refrigerator. Some types of leaks can be identified by external signs: swelling, rust, smudges on the tubes. If it is difficult to do this visually, then use a match finder. Assess whether you can repair the damage yourself (especially if the leak is in a foamed area) or whether you will still need to seek the help of a specialist.
Removing residual refrigerant
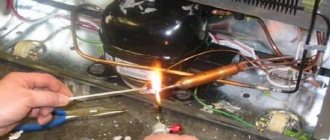
Observing safety precautions, release the remaining gas. Using a needle grip, pinch the filter drier and poke a hole where the copper is visible. The tube can be taken out through the window to protect yourself. Do not forget that it is explosive and very harmful to health.
After eliminating the leak and removing the remaining gas, replace the filter drier - this will protect the system from moisture penetration. They simply cut it off and solder a new one.
Check the tightness of the cooling circuit: constantly monitor the pressure gauge and inject nitrogen - this will determine how well the pressure is maintained in the system. After this, bleed the gas and perform a vacuum to remove air and remaining moisture. To do this, connect the pump to the Schrader valve. The pressure in it must be at least 6 Atm.
Do-it-yourself freon injection
Select the gas that matches your household appliance. The most common and widely used 6 brands are R 600 a, R 134 a, R 12, R 22, R 407 C, R 410 A. The brand and dosage can be found in the technical service passport.
To refill freon when there is a shortage of it, you must:
- Close all gas station taps;
- Install the left pipe of the vacuum pumping station onto the Schrader valve, the right pipe to the pump, and the middle pipe to the gas cylinder;
- Open the filling station tap and turn on the pump - achieve a pressure drop to a minimum;
- Close the right valve and open the filling valve until the full volume is reached;
- Turn on the refrigerator and check the pressure;
- Clamp the compressor pipe and solder the ends;
Removing remaining refrigerant
Before refilling, you will need to completely remove the remaining freon from the system. You need to find a filter drier - it is usually located in close proximity to the compressor. Using a needle gripper, a hole is made in the copper section of the element. After the work is completed, you will need to supply a new spare part to replace the damaged one.
The next step is to unsolder the circuit and prepare the place for installing the valve. To do this, it is removed from the fitting, the excess length is cut off, and then soldered onto the compressor. After removing the remaining freon, it is necessary to purge the system using a nitrogen supply.
Note! The nitrogen supply pressure should not exceed 6 atmospheres. If a different value is indicated on the cylinder, a reducer is used to reduce this indicator.
When refueling, special attention should be paid to the nitrogen supply pressure.
Blowing is carried out for 10-15 minutes to achieve the desired effect. Afterwards, the valve on the needle gripper is closed and the filter is cut. Then the purging procedure is repeated. Only after this is a new element installed.
Do not leave the system open for a long time. If left for a long time without a vacuum, the circuit may suffer internal damage, after which a complete replacement will be required.
See alsoDecoration of champagne bottles for a wedding in the form of a bride and groom
Problems encountered during the process
Violation of the filling technology can lead to complete failure of the unit.
What to watch out for:
- Moisture in the cooling circuit. If you have not paid enough attention to drying, and moisture remains in the circuit, this will lead to failure of the compressor valves or even short circuit of the windings. In this case, it is better to “over-dry”, because poor-quality drying is no longer possible to correct.
- Excess gas. An excess amount of gas leads to blockage of the evaporator channels, which, in turn, increases the pressure, reducing the free volume for boiling, and the device stops turning off. This leads to excessive load on the compressor and its failure.
We pump freon
At this stage you will need a vacuum pumping station. It consists of two pressure gauges, red and blue, and three hoses. The connection and download procedure is as follows.
- Before connecting, the valves on the pressure gauges are tightly closed.
- The yellow hose located in the center is connected to the freon cylinder;
- The blue one is connected to the pipe through which the system is supplied. A special fitting is used.
- Red is connected to the other end of the system using a Schrader valve.
- Open the valves on the pressure gauges.
- The refrigerant supply opens. To make it easier to track the volume of pumped substance, it is recommended to install the cylinder on a scale.
- After reaching a pressure of 0.5 atmospheres, the valves close;
- The compressor turns on for 30 seconds.
- A vacuum pump is connected to the yellow hose and turned on for 10 minutes;
- The yellow hose is reconnected to the freon bottle.
- The valve on the blue pressure gauge opens and refueling continues.
- The compressor is turned on to ensure that the system is functioning properly and maintaining the recommended pressure.
- If no errors are made, the pipes are sealed after disconnecting the hoses.
The steps look quite simple, but require special knowledge and equipment. You shouldn’t get down to business if you don’t have at least one of the two listed above.
Note! Before carrying out work, it is worth checking the correct operation of the pressure gauges at the vacuum pumping station. Incorrect instrument readings will lead to excess or insufficient pressure in the system, which, in turn, leads to serious breakdowns.
Freon allows you to maintain a low temperature inside the refrigerator.
See alsoOriginal ideas for decorating bottles using tights
Theory
Why do you need freon
The most important element in the technical component of refrigeration equipment is gas, designed to maintain low temperatures and freeze food. Without this component, the unit loses its functionality.
It is worth remembering that the refrigerant is odorless, and therefore the presence of problems in the cooling system and evaporation can only be judged by the temperature inside the unit.
It is also fire hazardous and poisonous. Be sure to ventilate the room after work.
Always use only the brand that is suitable for your unit.
Reasons for depressurization
The main factors causing depressurization of refrigeration equipment:
- Natural wear and tear of elements from old age;
- Blockage of the capillary tube;
- Compressor failure.
How to diagnose a leak yourself
There are signs by which you can judge a leak without resorting to special equipment:
- Poor refrigeration or freezing of food in only one local location;
- Continuous operation of the compressor or with minor pauses between cycles;
- Complete shutdown of the motor-compressor;
- Strange sounds similar to gurgling.
- Emergency indication or sound signal;
- Ice or snow coat in the evaporator area;
- Rusty stains around the perimeter of the door;
- Bulging of the housing wall.
We fix 10 typical refrigerator malfunctions with our own hands
Diagnosing the problem
The very first step is to find the location of the leak. A visual inspection will help determine. We have already mentioned above the elements that deserve special attention. Corrosion that occurs on the tubes when moisture is released will also indicate the presence of problems.
If a normal inspection does not produce results, then you can resort to the old method of treating with a soap solution and applying pressure. It is applied to the tubes, joints, and then nitrogen is supplied to the system. Bubbles will appear in areas of depressurization.
There is also a special tool - a leak detector. As a rule, it is designed for a specific refrigerant composition, so it may not show the location of the leak if it does not match.
Important! Weaknesses should be looked for both before and after downloading. This will prevent the problem from recurring in the future.
See also: Making panels with your own hands for the interior
Question answer
How to determine the excess amount of freon and release it
Turn on the device and leave it for an hour, then check the condition of the cooling circuit. If the capillary tube and filter are hot, and the return tube is covered with frost, this indicates an excess of refrigerant. Lower it to the required pressure - this information is indicated in the data sheet of the household appliance. Repeat the procedure. Normally, the return pipe should freeze no more than 10 cm from the exit from the refrigerator body.
How much refrigerant is in the system
Each brand of refrigerator has its own amount of gas required for proper operation. On average, these values range from 30 to 70 grams. Do not exceed the required level of freon. You should also adhere to the brand specified in the technical specifications for your device.
Is it possible to turn on equipment without refrigerant?
You cannot turn on the unit without cooling gas, as this will lead to failure of the motor-compressor, and equipment repair will not only become more complicated, but also more expensive.
20 solutions if the refrigerator does not cool or freeze