FDM
Fused Deposition Modeling (FDM), also known as Filament Fused Fabrication (FFF), is the most popular and widespread type of 3D printing.
A standard FDM device works like a hot glue gun controlled by a robot, which is not surprising, since the development of FDM technology once began with experiments with hot glue. The plastic rod is pushed through a hot nozzle, where it melts, and when it emerges, it is laid out in layers. The process is repeated over and over again until the finished 3D object appears.
The only difference is that 3D printers do not use hot glue sticks, but plastic filament wound on spools.
The most common materials for FDM (FFF) are ABS and PLA plastics.
Plastic thread, also known as filament, is produced in such a form so that it can easily melt at a given temperature, but harden very quickly - after cooling by just a couple of degrees. This is what makes it possible to print 3D products with complex geometries with high precision.
Simply put, 3D printing differs from traditional 2D printing only in that it is repeated over and over again, creating layer after layer, one on top of the other. After all, thousands of layers form a 3D object.
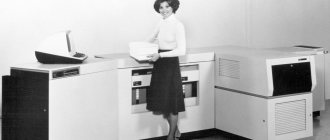
FDM printer using the example of MakerBot Replicator 2
How does a 3D printer work?
Almost all personal 3D printers use the same approach to the 3D printing process. Details may vary, but basically the structure and operating principle are the same. Let's look at the working principle of a 3D printer in more detail using the example from the figure below.
Cartesian robot
The basic idea of a 3D printer is the same as that of a Cartesian robot. It is a machine that can move linearly in three dimensions - the X, Y and Z axes, also known as Cartesian coordinates. To do this, 3D printers have small stepper motors that can move with great precision and accuracy - typically 1.8 degrees per step. These “3D” robots are controlled by a controller, like any other automated system, and thus have the ability to move a print head that extrudes molten plastic, creating the part layer by layer. Many 3D printers use timing belts and rollers in the X and Y axes to ensure fast but precise movement. Many also use a threaded rod or special Z-axis screws for even more precise positioning.
While this may all sound complicated, it really isn't, and many 3D printers contain standard elements that are used in a wide range of other industries and devices. Of course, it took years to test what really worked and what didn't to get the outstanding 3D printer results we have today. Thanks to large amounts of open technology, developers could share with each other, making it easier to create and share knowledge.
Extruder
With precision positioning capabilities, we needed an extruder that could “extrude” thin strands of thermoplastic—a plastic that turns into a semi-liquid form when heated. The extruder, the most complex part of a 3D printer, which is still constantly being improved and refined, actually consists of two elements - the drive of the filament itself and the thermal head.
The filament drive pushes out the plastic filament, which is often twisted into a spool and has a diameter of 1.75 or 3 mm, using a gear mechanism. Most, if not all, modern wires use a stepper mechanism to better control the flow of filament to the thermal head. These drives usually work through gearboxes to provide the plastic feed system with the force necessary to extrude the filament.
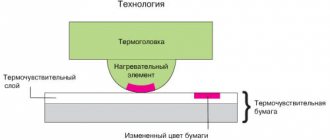
The filament, after being fed into the extruder by the drive, then goes into a thermal head (sometimes called a thermal chamber). The head is usually thermally isolated from the rest of the extruder and is made from a piece of aluminum with a built-in heater or some other heat source. There must be a temperature sensor to control heating. When the plastic reaches the thermal head, it is already heated to a temperature of 170-220 degrees Celsius depending on the type of plastic. Already in a semi-liquid state, the plastic is extruded from the print head, the hole diameter of which is usually in the range from 0.35 to 0.5 mm.
Print surface (platform)
The printing surface is the working surface on which 3D parts are prepared. The size of the build surface varies depending on the printer model, and is usually in the range of 100 to 200 square millimeters. Most, if not all, 3D printer manufacturers offer a heated bed, either included or as an additional option. As a last resort, it is extremely easy to make a heated platform yourself from available material. The purpose of the platform is to prevent tears or cracks in the model, as well as to ensure reliable adhesion between the first layers of the printed part and the working surface.
The platform surface is usually made of glass or aluminum to better distribute heat across the work platform to provide a smooth and even surface. Glass gives a smoother surface, while aluminum distributes heat better in the case of a heated platform. To prevent the printed model from falling off during the creation process, the surface is often coated with some kind of adhesive or film, creating a surface that is inexpensive to replace if necessary. Such materials often consist of Kapton or polyimide tape, PET or polyester silicon tape, depending on the type of plastic.
Linear motor
The type of linear motor (drive) that is used on a particular 3D printer largely determines how accurately the device will print, how quickly, and how often and how much maintenance the 3D printer will need to maintain. Many 3D printers use smooth, precise rods for each axis, as well as plastic or bronze ball bearings to move along each rod. Linear ball bearings have gained great popularity due to their durability and better performance, but they are often noisier than bronze ones, which are, however, more difficult to calibrate at the time of assembly.
The best linear actuator for your 3D printer depends on your preferences, just like choosing your personal car. You can use 3D printed bushings as shown in the picture above, but this will not be a very durable solution. Conventionally manufactured plastic bushings work very well and smoothly, but tend to warp after long periods of work. On the other hand, the quality of foresight also depends on the quality and smoothness of the rails on which they move. More exotic materials such as felt were also tried with varying results.
Fasteners
The range of motion of linear actuators is usually limited by a mechanical or optical lock. Roughly speaking, these are simply stops that signal to the printer that it has approached the edge of the build surface to prevent it from going over the platform.
Although the presence of clamps is not necessary for the operation of 3D printers, their presence will allow the printer to calibrate the position before each printing process, which will allow for more accurate and accurate printing.
Frame
What holds all the above elements together is called the frame. The shape of the frames, as well as the material from which it is made, greatly influence the accuracy and quality of the print. Many 3D printers use threaded rods and other materials in the frame construction. Many printers also use laser-cut plywood sheets to create the frame.
This system is based on the slot principle, where one part has a slot to connect to another part, and together they are connected with bolts and nuts. This frame is usually easier to assemble and more accurate for calibrating the printer, but it is usually noisier and the fasteners will have to be tightened over time. In general, threaded rods make the machine quieter, but complicate the assembly and calibration process.
In general, the above describes the basic structure and working principle of 3D printers. As an example, we took the simplest 3D printers. Of course, companies have long been using more complex and modern developments, many of which are confidential. Such a simple model was chosen only for the purpose of demonstrating the structure of a 3D printer. We hope we were able to give you an understanding of the basics of how 3D printers work, and now that the devices no longer seem so complicated to you, you can think about buying a 3D printer, the price of which in our store starts from only 44,900 rubles .
Stereolithography
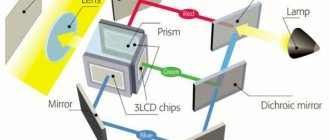
Stereolithography uses light to “grow” objects in a container of photopolymer resin. As with other 3D printing technologies, the product is formed layer by layer, here by curing a liquid photopolymer with light.
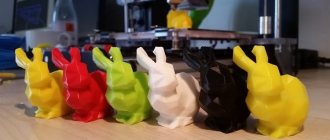
Stereolithography differs from FDM in that it produces more monolithic prints, even with the same specified layer thickness.
In the photo: FDM and SLA prints, the layer of both models is 0.1 mm.
The point is the difference in technology - photopolymer illumination produces more accurate layers than molten filament squeezed out of the nozzle of an FDM printer.
SLA and DLP are two types of stereolithography. SLA - laser stereolithography, DLP - digital projection. The difference between them is that in SLA the light source is a laser, while in DLP it is a projector.
Regardless of the technical features, the operating principle of SLA and DLP devices is similar. To start printing, you need to lower a special build platform into a container with liquid photopolymer resin.
The platform stops at a height of one layer from the bottom of the container. The printer's light source is illuminating. The liquid polymer, when exposed to light, becomes solid and adheres to the building platform. After this, the platform rises to the height of another layer and the process repeats.
SLA printer using Formlabs Form 2 as an example
SLA gives smoother surfaces compared not only to FDM, but also to DLP, which we will discuss later.
This happens because DLP projects layers with a picture of pixels, and the laser beam in SLA moves continuously, which gives a smooth, non-pixelated layer.
DLP uses a projector for the same purposes, and LED DLP uses an LCD display with ultraviolet backlighting. In these designs, light is projected onto the resin over the entire layer area at the same time, which gives a speed advantage when printing large objects with 100% infill is required - full layer exposure occurs faster than in SLA.
But when printing small or hollow objects, SLA is faster, since the intensity of illumination by the laser beam, and therefore the polymerization speed, is higher.
DLP printer using the example of SprintRay MoonRay S
Species and types
Types of printing technology
There are a dozen 3D printing technologies:
- FDM . The work is based on the solidification of the material upon cooling. The dispensing head applies the heated material layer by layer onto the base. The layers adhere to each other and cool quickly. Printing in multiple colors is supported. Printers operating using FDM technology include makerbot-like, culinary (for working with chocolate, icing) and medical units (printing with gels with liquid cells), and Stratasys printers.
- Polyjet . A technique for creating spatial objects by polymerizing a photopolymer under the influence of laser radiation, which appeared in 2005. Photopolymer is used primarily in medicine: it is light and fragile, and the printing technology ensures the highest detail of the prototype.
- M.J.M. _ Multi-jet modeling by feeding material through dozens of microscopic nozzles. Due to the fragility of finished models and the high cost of consumables, the technology is rarely used, except to create silicone molds for casting.
- Lens . The consumable material, squeezed out of the nozzle, is irradiated by a laser and immediately sintered. Creates objects from metal powder (titanium particles, steel). The powders can be mixed to create alloys while the part is being printed.
- LOM . Lamination is the formation of a composition from laminated sheets. The necessary parts are cut out with a laser, applied and glued (pressed) into the future model. The consumables used are paper, aluminum foil, which is sintered under the influence of ultraviolet radiation, and plastic. The advantage of the method is the cheap price of consumables (paper).
- SLA . Stereolithography or photopolymerization - the prototype is grown on a grid placed in a liquid bath. First, it is covered with a layer of substance up to 0.13 mm thick (resolution). The laser from above processes those areas of the polymer that must harden. The platform is lowered by 0.05-0.13 mm depending on the resolution and the process is repeated. The part needs post-processing - grinding, sometimes processing in an ultraviolet oven. Does not allow printing in two materials or colors.
- LCD . An ultraviolet LED matrix illuminates the photopolymer material through a liquid crystal screen. The latter controls the degree of polarization of light over its entire area, forming a matrix for the future layer of the part.
- DLP _ A type of SLA printing where liquid photopolymer resins are used as sources. Conventional visible light is used to polymerize (cure) the polymer. The model can be formed on either a rising or falling platform.
- SLS . Refers to methods for creating prototypes based on a leveled layer of powder that is sintered by a laser beam. The technology allows you to work with ceramic and metal powders, glass, plastic, and produce small and complex parts. Non-sintered powder minimizes the amount of consumable materials.
- EBM is electron beam melting of metal powder in a vacuum chamber. To form the model, metal clay is used: metal powder, organic glue and water. Due to the heating of the mixture, the water and glue evaporate and the chip particles fuse.
- 3DP . Three-dimensional inkjet printing. It consists of alternating the application of layers of powder and glue. The result is a model made of a material similar to plaster. Supports multi-color printing; rubber, plastic, wood, and sugar are used as powder.
- Colored . The following methods are classified as color: FDM, 3DP, EBF, LOM, MJM. To form color prototypes, machines with several extruders are needed. The second method is sublimation - heating the dye in the right places until it evaporates.
By type of consumables used
Several materials are used as consumables.
| Powders | The print head applies a layer of glue to the substrate in the right places, the roller applies a layer of powder (metal powder) sintered with the substance. |
| Gypsum | The previous option, where instead of metal powder, gypsum, putty, and cement are used, always with a binding compound. |
| Polymers | Liquid photopolymers harden under the influence of electromagnetic radiation (SLA method). Melted plastic threads (PLA, PVA, ABS) are applied layer by layer to the substrate and quickly harden. |
| Wax | Available, easy to melt material for high quality parts, easy to work with. |
By design
There are several designs of 3D printers.
- RepRap . A self-replicating machine capable of printing the parts necessary to produce its own copies. 3D printers are created for mass use at minimal cost. They are supplied as a set of metal components without plastic elements (they can be printed), and sometimes even electronics. Requires a lot of time to assemble and is cheap.
- DIY-kit . The devices are supplied as a kit with assembly instructions. Assembling the printer will take several hours or days of work. Moreover, many connections are “protected” from incorrect connection. Plastics and other polymers with a low melting point are used as consumables. Advantages: complete set, after assembly you can troubleshoot some problems yourself. Costs less than the assembled model.
- Ready . Ready-to-use models with high resolution and a closed working chamber. Works with nylon and plastic. They will cost about $1 thousand or more.
- Commercial and industrial. Industrial devices are capable of printing with metal, gels with living cells, and polymers with different properties: enhanced mechanical strength, solubility in water. Used in manufacturing, aerospace, jewelry, cooking, mold casting.
SLS
The main advantage of the technology over FDM and SLA is that SLS printing does not require the creation of supporting structures, because the support material is the material surrounding the model - this allows you to print products of any shape, with any number of internal cavities, and fill the entire working volume of the printer with them. SLS printers handle a wide range of materials, and their prints are stronger than most FDM or stereolithography prints.
Due to their strength characteristics, parts printed on SLS printers can be used for practical purposes, and not just as prototypes and decorative elements.
To create an object, the device directs a laser at a layer of fine powder, fusing the particles together to form a layer of the product. Then, the device scatters the next portion of powder onto the surface of the finished layer and levels it out, and the laser melts it, creating the next layer of the product. The procedure is repeated until printing is completed. SLS printers have one downside - their cost. They are very expensive compared to FDM and SLA/DLP. This is due to the price of the high-energy lasers required for such printing. In principle, the cost of even the cheapest SLS printers recently started at $200,000. However, some companies are currently working to make this technology more affordable, so there is a chance that they will be able to purchase an SLS printer in the near future Even amateurs can afford it. One example is the Polish company Sinterit.
SLS printer using the example of Sinterit Lisa Pro
The model removed from the SLS printer does not require removal of supports and can be used without post-processing; it only needs to be cleaned of excess powder.
What it prints with: consumables
The main consumables for 3D models are plastic and photopolymer.
- ABS plastic . Non-toxic, odorless, highly impact-resistant, heat-resistant and elastic. Melts at about 245° C. Sold in powder or colored threads. Does not tolerate direct sunlight and does not allow obtaining transparent models. It cracks, delaminates, sharp corners, thin protrusions are deformed. Ventilation is required when working.
- PLA plastic . Polylactide is an environmentally friendly plastic made from the remains of feed crops: beets, corn. Smells nice when melted. Models decompose over time in warm rooms, expensive compared to ABS plastic. Under mechanical influence, it bends, compresses, and is destroyed due to falls. At temperatures above 600 C it loses its shape.
- PET . A common polymer found in beverage and water bottles and food containers. For 3D printers, a modification of PETG is used - the plastic is cleaner and less fragile. Absorbs moisture and therefore needs to be stored in dry rooms. Despite its mechanical resistance, it is easily scratched and resists thermal influences.
- Stainless steel . Prints “long-lived” products that resist corrosion - figurines, mechanism components, key rings. Along with stainless steel, aluminum, brass, copper, and bronze are used. Prototypes require post-processing.
- Tree . Expensive and aesthetic material, consisting of a polymer base with the addition of wooden fibers (shavings, thyrsus) of cedar, pine, birch. There are also exotic samples with particles of cherry, coconut, cork, and bamboo. The products smell like wood, and after sanding they are practically no different from carpentry. Relevant when appearance is more important than accuracy and price.
- Resins . An expensive consumable for obtaining smooth, durable models with high detail. Used in multi-jet printers (MJP) and laser stereolithography printers. Resins are hard, elastic, matte, transparent, colored, and heat-resistant. When exposed to sunlight, the photopolymer resin loses its transparency. They feature a smooth surface and easy post-processing.
- Nylon . An analogue of ABS plastic with a melting point increased to 320°C, hygroscopicity and toxicity. It takes a long time to cool down and requires an extruder with spikes. Used for printing moving parts.
Polyjet
The main advantage of Polyjet technology is its multimateriality - many Polyjet printers are capable of printing an object with a large number of different materials at the same time, which allows you to create products consisting of sections with different mechanical and optical properties, that is, different hardness and color. This is proprietary technology ]Stratasys[/anchor].
Example: a Stratasys printer and sneakers printed on it.
Polyjet 3D printers spray tiny droplets of photopolymer resin onto a surface and cure them with ultraviolet light.
This process is repeated until the object is created. Unlike FDM printers, Polyjet devices can deposit material from multiple nozzles simultaneously.
Polyjet printer using the Stratasys J750 as an example
Programming the Printer
Before starting work, the created object is drawn in all dimensions using special CAD programs (for computer-aided design) or a CAD editor.
There is no need to invent items yourself, since there are a lot of ready-made options that you can simply download from the website.
If the required item is not found on the Internet, and you lack design skills, you can always turn to professionals.
Before printing, objects undergo “slicing”, i.e. Using special programs, they are divided into very thin layers, and each one is photographed.
The resulting stack of photographs is transferred to a 3D printer to create copies of all the pictures, which the printer superimposes sequentially on top of one another, recreating the original. This is how the operating principle looks simplified. Only printers work with different materials and methods.
The printer is told how to draw by a slicer, which generates the required program. It tells you how the extruder should move, the speed at which the material is extruded, and the thickness of the layers.
There is a g-code file to store the program, and to start printing it is loaded into the printer using a flash card or USB.
Next, a rod is fed into the print head, melted in it, and squeezed out through a narrow nozzle. The head can move in 2 directions, carefully drawing each layer. After the first one is completed, the printer moves the platform down or raises the head up to begin creating the next one, superimposing it on the previous one.
The process of manufacturing products using this method is called “additive technology” - from the word “add” - “add”, in contrast to other technologies such as sawing, drilling, etc., which “take away” the material and are called subtractive (“subtract”) .
In digital, the opposite happens - an object is obtained as a result of building it from scratch.