Why do you need a hood in the kitchen?
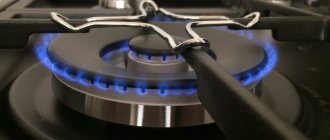
When cooking food, especially during frying, a lot of heat and pungent odors are released. Steam comes out, and smoke comes from the gas. This causes the ceiling to smoke and damage the kitchen wall or apron set. That is why a hood, which is a forced ventilation device, is necessary in this room.
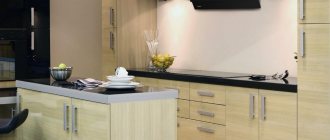
The hood can fit perfectly into any interior
Its main advantages:
- it gets rid of pungent odors;
- quickly removes steam and smoke directly into the common house pipe;
- ensures the absence of traces of high humidity, as well as various other deposits on the walls and ceiling.
Disadvantages occur only in certain types of ventilation units; for example, a cheap hood may be too noisy. But this is also easy to come to terms with.
Hood functions in the kitchen
A hood, which can be seen in any kitchen, is a simple device, and regardless of the price and the number of bells and whistles, all hoods have the same operating principle.
Working hood in the kitchen
The hood consists of the following elements:
- Metal body;
- An engine that takes in the air flow (in some models there may be two);
- Filters that purify incoming air;
- A lamp that serves to illuminate the workplace.
According to statistics, women spend more than half of the time they are at home in the kitchen preparing food. And since the air in the kitchen, containing particles of fat and harmful combustion products, negatively affects health, a hood is simply necessary.
The hood will not help to completely get rid of foreign impurities and odors, but without it the situation would be catastrophic, and those who happened to grow up in Soviet apartments can remember that the entire entrance knew when the neighbors on the first floor were frying fish. Many nuances should be thought through in the kitchen for convenience, this also applies to water-saving faucet attachments, which can be found here.
The video shows the functions of a kitchen hood:
Please note: it is believed that in modern apartments, supply and exhaust ventilation is designed to clean the air by pulling it into the ventilation shaft. In practice, this does not happen, since the shafts very quickly become clogged with dirt and dust, so exhaust hood is the most effective way to remove burning particles and harmful substances. By the way, the corrugated exhaust pipe also discharges air into the same shaft, but due to strong injection. It is also necessary to choose the right exhaust duct.
But a hood, regardless of cost, will not work effectively if its power is not enough to work in a room of a certain size. In order not to make a mistake when choosing, you can independently calculate how much power is enough for your kitchen.
There is a formula for this:
Q=12xSxH
H – kitchen height in meters
S – kitchen area
12 – coefficient indicating that within one hour the air in the room should be completely renewed 12 times (according to sanitary standards).
Multiplying these numbers, you get the number Q: this is the number of cubic meters of air that should be renewed in your kitchen in one hour. This parameter is indicated among the characteristics of each hood, and if the device you like has Q equal to or greater than according to your calculations, you can buy it. But reviews of such a meat grinder as Mulinex can be found in this article.
Calculation of a kitchen hood
But before choosing the type of exhaust system suitable for the given conditions, it is necessary to make an approximate calculation of the volume of removal of contaminated air.
Calculations are made primarily based on the size of the kitchen. The calculation of the electrical part is carried out according to the existing model of the hood.
Suppose the dimensions of the kitchen are 3 m x 4 m. Thus, the area of the room in this example is S = 12 m2. If the height of the walls is 2.5 m, then the volume of the kitchen will be V = 12 x 2.5 = 30 m3.
The performance of the hood (how many cubic meters per hour) is calculated as the product of the size of the room by the coefficient K. For electric stoves, K is approximately equal to 12 units, and for gas stoves - 20. It indicates the number of complete air changes in the entire room per hour.
In our case, we will use a gas stove. We get the following extraction capacity: P = 30 x 20 = 600 cubic meters per hour.
For a unit of this size, as practice shows, you will need a fan with a power of no more than 1 kW. When calculating electrical wiring, we will take this characteristic into account.
For a power of 1 kW, according to standard design standards for electrical conductors, a wire cross-section of 2.5 mm2 is sufficient. This parameter is used in lines in apartments. Therefore, any nearest outlet in the kitchen is suitable for installation.
The cross-sectional area of the air ducts is taken according to the following rules:
- It should be no smaller than the outlet of the hood.
- The cross-section of the air duct should be no larger than the area of the opening of the common house duct.
When installing a ventilation pipeline, you need to remember one more golden rule: the fewer bends in the line, the better the performance.
Grounding for the hood is not required.
Often in new buildings, a special two-wire wire is already installed in the kitchen specifically for the hood. Typically, in an apartment of a newly built house, this cable sticks out of the wall directly under the ventilation duct opening at a height of about a meter above the intended surface of the slab.
After calculations, you need to select the type of hood.
Features of calculating the performance of a kitchen hood
People quite often mistakenly select a hood for their kitchen based on its power. Wattage refers to how much electricity (W) the equipment consumes. However, it is more correct to take into account the performance of the exhaust hood, because its indicator will determine how many cubic meters of air will be absorbed by the hood in one hour.
The formula for calculating productivity will be as follows: the kitchen area is multiplied by a factor of 12 (sanitary standard) and multiplied by the height of the ceilings. Also, you should take into account a certain power reserve, adding 20 percent to the result obtained. For example, a kitchen with an area of 15 sq. meters and a ceiling height of 3.5 meters. Productivity will be equal to 756 (15*3.5*12*1.2) cubic meters per hour.
The average figure recommended for normal operation of the hood is 500 cubic meters per hour. Here it is important to consider what type of exhaust system is installed. If it is a flow hood, the productivity will increase by 10%, if it is a recirculation hood, it will remain the same.
It is better to purchase a hood for the kitchen with a reserve of performance. The reasoning behind this is that ventilation ducts may be dirty, kinked or leaking, leading to a drop in pressure and reduced performance.
Also, performance is affected by the number of operating fans that are built into the exhaust unit, as well as the operating modes that can be selected in the control panel. Typically, standard devices have a couple of fans and several power levels. In any mode, all fans are activated, and not individually.
This part of the article should include one more parameter that, according to people, affects performance - noise level. The harder the hood works, the louder the noise. However, today inventors have reached great heights in the design and modernization of exhaust systems, so new models are produced with minimal noise levels and high performance. You can always look at this indicator in the technical documentation or from a consultant in the store, because this factor directly influences the client’s choice and determines whether the hood suits the person’s request.
Types of kitchen hoods
The different needs of users force manufacturers to develop offers that would optimally suit the needs of a specific buyer. Therefore, the range of kitchen hoods that the modern market of household appliances offers us is quite wide. Let's try to understand their diversity.
According to the method of purifying air masses
There are many ways to purify the air in the kitchen.
Depending on which of them is used in a particular model, hoods are divided into:
- Evacuees. These models exhaust air from the kitchen outside through air ducts made in the form of a metal box or corrugated pipe. For such a device to work, there must be a ventilation duct or a simple hole. Usually the air duct is equipped with a valve that prevents the occurrence of reverse draft.
- Circulating. This model has a carbon filter, similar to a gas mask. In fact, this is not a hood, but a filtering unit that purifies the air from the main “odors”: there is no air exchange with the external environment. Such a device is attractive due to its simplicity of installation, but it is not able to protect, for example, from gas leaks.
Circulating hoods can be adjacent to standard kitchen ventilation. Their disadvantages usually include high cost and expensive maintenance: carbon filters require periodic replacement.
The circulation model of a kitchen hood will not help you if carbon dioxide or carbon monoxide has accumulated in the room, and an evacuating model can easily cope with this problem
A special feature of an evacuating hood is that it also removes excess heat, which always forms during the cooking period. The circulation model does not have such a function.
Division by type of construction
In addition to the main function, buyers pay attention to other distinctive characteristics of various models. The exhaust device should fit well into the overall interior of the room, be convenient to use, and also: it would be nice if you could save money and install it yourself.
Therefore, modern hoods differ not only in their air purification power, but also in their installation method, design, material of manufacture and the presence of additional options.
A fireplace or dome hood is often found in our homes: it is important that the area of the lower part of its dome matches the area of the stove installed in the room
According to the type of design, exhaust devices are divided into:
- Dome. This model got its name due to the shape of the air intake. It looks like a truncated pyramid, the dome of which is located directly above the slab. An air duct extends from an opening in the top of the dome, transporting air outside the kitchen through a hole in the wall or through a ventilation duct.
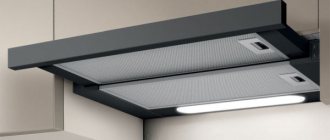
- Built-in. This hood is located inside the furniture in the kitchen. Quite often, a built-in hood is equipped with a retractable panel, which allows for economical use of room space and, at the same time, provides comfortable control of the equipment.
How hoods differ by type of installation
Now a few words about the type of installation and installation of the hood. The most common ones are wall-mounted. There are also models designed for installation in the corner of the kitchen - the so-called corner hood.
Island or ceiling hood – suspended from the ceiling and not adjacent to the wall or kitchen cabinets. Here it is important to successfully hide the wiring and air exhaust duct in the ceiling - please note: this cannot be done on a regular flat ceiling; box structures or suspended ceiling are required. Built-in hoods deserve a separate article; we will talk about them in a separate article.
Natural and forced ventilation
SNiP establish the following standards for kitchen ventilation systems:
- The air exchange volume for kitchens equipped with gas hobs must be at least 100 m³ per hour.
- For kitchens equipped with electric stoves, this figure is slightly lower - 60 m³ per hour.
There are two types of ventilation systems used to provide air ventilation in kitchens - natural and forced.
Natural and forced ventilation
Natural ventilation
Natural ventilation systems operate on the principle of pressure differences between indoors and outdoors. In this case, no mechanical devices, such as fans, are used to create air flow. Air contaminated with harmful gases is removed from the room through ventilation shafts, usually installed in the thickness of the walls during the construction of the house.
Attention! For natural ventilation to work effectively, the volumes of exhaust air must be equal to the volumes of supply air. Supply ventilation is responsible for the flow of fresh air into the premises.
There are two types of natural ventilation:
- Organized. Air enters through specially designed supply ventilation ducts and valves.
- Disorganized. There are no special devices for air flow from outside. The influx occurs through leaks and microcracks in window frames and doors, walls and ceilings.
With the beginning of mass use of plastic windows and metal entrance doors equipped with sealing gaskets, problems with unorganized ventilation may arise. To ensure the flow of sufficient volumes of fresh air, it will be necessary to install recuperator valves mounted in walls or window frames.
The advantage of natural ventilation is its low cost and completely autonomous operation, independent of the availability of electricity or mechanical fans. The main disadvantage is the insufficient air exchange rate, which often does not meet the requirements of SNiP for kitchens.
Forced ventilation
Mechanical devices - fans - are used in forced ventilation. They are usually mounted on exhaust ducts, but additional installation of fans near the supply openings is possible. If the ventilation ducts are long, additional fans are installed inside the air ducts.
Wall Fan Design
An undoubted advantage of forced-type ventilation systems is their greater volume of work per unit of time than natural ventilation. Thanks to this, the minimum volumes of air exchange established by building regulations are easily ensured - up to 100 cubic meters. m per hour if there is a gas stove in the kitchen. The downside is the dependence on the availability of electricity and uninterrupted operation of fans.
Principle of operation
The operating principle of kitchen hoods is based on purifying the air in the room. Then it is fed back to the kitchen or removed through the ventilation system.
In the process of breathing, a person takes in oxygen and gets rid of substances that the body does not need. If you put it in a completely enclosed room, after a while there will not be enough oxygen. Therefore, the houses have a ventilation system. A hood is an additional device that speeds up these processes.
The operating principle of a kitchen hood is based on purifying the air in the room. To do this, the motor drives it through the filter elements. In circulating and mixed types they consist of activated carbon. They need to be changed every six months.
Can a built-in hood work without air?
Since the kitchen hood works with air purification, work without it is impossible. But it is quite possible to work without an air duct, without connecting to ventilation. This type is called circulation; it purifies the air and supplies it back to the room.
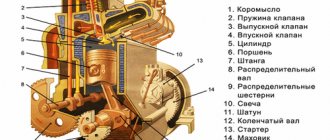
Schematic diagram of a kitchen hood
Any hood includes the following elements:
- Fan with electric motor. A multi-speed asynchronous motor rotates the exhaust fan, which forces air flow through grease-retaining filters.
- Filters. All hoods are equipped with reusable or disposable grease filters. Carbon filters are present only in circulating models and act similarly to activated carbon. They are replaced every 3-4 months of operation.
- Lighting lamps. The hob is illuminated using incandescent, LED or halogen lighting fixtures.
- Speed switching diagram. In different models, speed switching is carried out in different ways: using touch devices, using buttons or using a slide switch.
Ensuring the safety of the structure
The exhaust equipment kit must include a fan, which means that the hood must be connected to an outlet. If you have just started renovations in a new apartment, be sure to provide a separate outlet for the hood, because this equipment must always be connected.
The occupancy of the outlet by a single device allows you to hide it behind the elements of the furniture set. But don't forget to make it easy to access. There is one more important rule: the socket should be located no closer than 60 cm from the sink and from the stove.
Remember that this hood is an electrical appliance that can cause electric shock, so electrical safety issues must be taken seriously.
The kitchen, like the bathroom, is a room that can be both hot and humid at the same time. Excess moisture and grease from cooking settles on the hood grate. This creates favorable conditions for electrical breakdown on the metal casing from the fan motor. It is for this reason that the device should be connected to the electrical network using three wires.
The connection diagram for the fan included in the kitchen hood clearly demonstrates that three wires are required: phase, neutral and ground.
The wiring must include zero, phase and ground. The ground wire can be easily identified by its yellow insulation and longitudinal green stripe. Modern houses are equipped in advance with European sockets and a grounding circuit. In this case, it is enough to connect the grounding wire to the corresponding terminal of the plug. It is easy to distinguish it from others by its icon in the form of three parallel lines of different sizes.
Older buildings may not have grounding loops. In this case, you need to take care of protection yourself. In the event of a breakdown on the housing, grounding will allow the circuit breaker to turn off. In addition, it is necessary for potential equalization.
As additional protection, it is recommended to make the wiring for the hood socket a separate cable with RCD and circuit breaker protection.
Installation stages and types of kitchen hoods
All forced ventilation units for the kitchen are divided into two main classes.
- Open hoods, fully visible.
An open hood is installed between cabinets - Built into a closet, semi-hidden.
With built-in hoods, only the lower part is visible
Also among open devices there is a classification by location. Such hoods can be island or wall-mounted, and the latter can be corner.
Depending on the control method, the classification is as follows:
- remote (with remote control);
- push-button or touch.
Types of hoods
The variety of exhaust hoods is quite large, so it can be difficult to decide which hood to choose. All of them are divided into circulating and evacuating, that is, they differ in the way air masses are removed.
The circulation device draws in air, purifies it through a built-in filter and then releases it into the room. This hood has its advantages:
- Easy to install (you can do it yourself).
- Does not require installation of additional communications.
- Does not affect the functioning of standard ductwork.
At the same time, it does not clean well enough, since the filter often does not cope with its task. Consequently, incompletely purified air returns to the apartment. They cost more than evacuation filters, and the filters require periodic replacement, which is an additional waste of money.
The advantage of an evacuation hood is the removal of excess heat from the kitchen area. Of course, it is more difficult to install than a circulation device, but the result of the work will be much higher. Installation of an evacuation type hood is complicated by securing the corrugation or duct through which the air will pass.
We recommend that you read: Dome hood 60 cm wide
Depending on the location of the hood, there are:
- desktop;
- ceiling or island;
- fireplace;
- built-in (integrated).
A tabletop hood is a socket located in a horizontal position above the working part of the stove. It is an integral element of professional kitchen equipment.
Ceiling or island mounted to the ceiling. Typically, such a hood is located in the same place where the stove is installed - in the center of the kitchen, which is why it is called an island hood. Installation of the device will require a complex system of false ceilings and air ducts, which requires a professional approach.
A fireplace hood usually decorates the design of large luxury kitchens. The installation diagram and design are drawn up individually. Installation is carried out by specialists.
Judging by the technical characteristics of the available type of hoods, we can conclude that the best option for an ordinary family would be a built-in (integrated) device with simple installation and an affordable price. The retractable hood does not take up much space and is very convenient.
electrical safety
The exhaust device belongs to the category of electrical devices that pose a risk of electric shock. As a result of the settling of fat and moisture in the mechanism, a breakdown of electricity from the fan motor to the metal frame is possible. In addition, the room itself is also dangerous due to elevated ambient temperatures and high humidity.
Let's figure out how to properly make a hood, fulfilling all electrical safety requirements.
Important: the product is connected to the network with 3 wires: phase-0-ground. Before installation, perform reliable grounding. To do this, connect to a dead neutral. Do not ground the hood to a drain or gas pipe.
The protective grounding process is performed as follows:
- Open the introductory panel in the house or entrance. This requires caution and attention, because the voltage is 220 V.
- The wires come out of a pipe built into the wall.
- Locate the threaded pin with the ground connections connected to it. This is a solid neutral, which is already grounded in a special place. Do not disconnect other ground connections - this is life-threatening.
- Throw the terminal up and tighten with the nut.
- Connect a 2.5 mm² wire to the device installation location.
- Connect the hood to the electrical network through a 6.3 A circuit breaker.
Wiring for equipment is laid depending on the design of the kitchen. If the connection is made automatically, it is mounted behind the wall cladding, in a PVC box, under the baseboard, and when plugged into a socket, behind the furniture.
If there are problems with conducting electricity to the hood, it is better to use the services of an electrician.
Installation Rules
The installation requirements for the hood are the same for all types of models. Since the device is an electrical device that collects grease and moisture, a breakdown of current may occur through the housing of the equipment. To protect yourself during installation, you must properly ground the hood.
Typically, modern houses are equipped with a grounding loop and there should be no problems in this regard: you can insert the plug into the socket and the device is ready for use. If such a circuit does not exist, it is necessary to make it. Under no circumstances should you connect the grounding wire to pipes or radiators, as not only family members, but also neighbors may be injured if they receive an electric discharge through the risers.
In order to ground the device, a three-core wire with a cross-section of 2.5 square meters should be connected. mm to the electrical panel. Then find the pipe (solid neutral) from which the bundle of wires comes out, and connect your wire to it. Its end must be stripped.
Before purchasing a hood, you need to measure the cooking surface of the kitchen stove - length and width. For the device, these dimensions should be larger or, in extreme cases, the same. A hood with a smaller area will not cope with high-quality removal of polluted air.
Another rule that you need to remember when installing a hood is maintaining the distance from the surface of the stove to the appliance. The height above electric and induction stoves should be 65-75 cm, above gas stoves - at least 80 cm. If these parameters are not taken into account, inconvenience in working at the stove or fire hazards may arise due to overheating of the device.
We recommend that you read: Do-it-yourself ventilation in the garage: photos, videos.
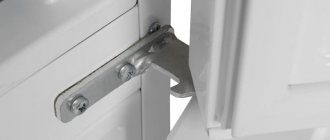
The device must be fastened to the wall firmly and reliably, otherwise the device may break and injure one of the family members. Therefore, when covering the walls with plasterboard during repairs, you need to strengthen the place and place wooden blocks in the intended area for attaching the hood.
Making a kitchen hood with your own hands
Before installing a hood in the kitchen, check the serviceability of the ventilation ducts in the house. If the ventilation is clogged or partially dirty, the traction force decreases and the hood does not work at full capacity. Therefore, first they clean the system and ensure air flow into the kitchen.
The devices are made of heat-resistant, corrosion-resistant and durable materials. Stainless steel is often used to make the case, then coated with enamel.
A simple and inexpensive way is to install the equipment in a cabinet above the hob. To do this, install a corrugated pipe and an electric fan inside. If there is no such cabinet, and the exhaust unit itself does not look aesthetically pleasing, the hood is made of plasterboard. The manufacturing process is labor-intensive and expensive, but the result is impressive.
From plasterboard
To make a kitchen hood with your own hands, you need to prepare the following tools and materials:
- Drywall.
- Galvanized metal profile.
- Corners.
- Corrugated pipe.
- Fastening elements.
- Paint, putty.
- Insulating material.
- Perforated
- Screwdriver.
- Scissors for cutting metal.
- Laser level or tape measure.
- Brushes, spatula.
The hood manufacturing process is carried out in several stages:
| Marking. | To do this, you need to determine the area where the ventilation hole will be located. If it is located away from the slab, the corrugated pipe is placed in a plasterboard box. |
| Creating a frame. | The frame for the hood has special features. The easiest way to place an air vent is in a straight line, without corners or deviations. Galvanized metal profiles are mounted to the wall using anchors along the entire perimeter. If the pipe runs with bends, first make markings on the ceiling, lay the first profile down in parts and secure it with self-tapping screws. Then install the second part and the transverse strips. The frame elements should be covered with plasterboard. |
| Manufacturing of the body. | A lower frame is made from the profile and secured. After this, parts of the frame are cut out and connected to the base. To enhance rigidity, the sides are equipped with additional jumpers. |
| Connection to the ventilation system. | A hole is made in the air duct for the corrugation to exit and the presence of draft is checked. For silent operation, they are sheathed with insulating material. |
| Decorative finishing. | Corners are attached to the corners, after which drywall must be applied to all elements of the device, treated with putty and painted. |
What are hoods made of?
The cost and service life of exhaust equipment largely depends on the material from which it is made. Now manufacturers make models from stainless steel, metal alloys, aluminum, glass and plastic. Plastic and metal alloy are considered the cheapest materials.
Plastic can be more or less durable, depending on the cost. Plastic models are easy to clean and do not rust. The plastic air purifier looks simple and strict. Built-in hoods are usually plastic.
A hood with an aluminum body is the best option. Aluminum is high quality and inexpensive. These hoods do not rust, are easy to clean and fit into any interior.
Elegant and expensive air purifiers are made from stainless steel or solid glass. This stainless steel model works for a long period of time, so it’s better to pay more and enjoy the beauty for a long time.
Correct connection of the air duct to the ventilation system
For this you will need:
- plastic air duct
- offset check valve
- tee splitter
In the end, you should end up with something like this.
How does it all work? When the hood is turned off, the valve will be open and warm air from the kitchen will quietly flow by gravity into the ventilation duct. As soon as you turn on the exhaust hood, the valve immediately closes automatically, blocking the air flow into the room.
In this case, all odors from the stove will easily go outside. When switched off, the pressure in the box drops and the valve automatically opens, connecting the ventilation shaft to the apartment.
Features of air duct installation
Correct selection of the hood, pipes, and connecting elements may not give the desired result if an error is made when installing the air duct to the ventilation shaft.
For high-quality operation of the exhaust equipment, you need to know how to connect the hood, and also take into account the following points:
- The piping assembly should be as straight as possible. Bends and deflections are not allowed. When using a corrugated air duct, you need to stretch it.
- It is necessary to use sealant to seal connections with pipes and adapters.
- In places where the duct bends, the diameter should exceed the cross-section of the corrugation itself. If this requirement is violated, the pressure will decrease, and hence the quality of operation of the entire exhaust system.
- A pipeline 3 meters long will effectively perform its functions - no more, without turns or bends. If a turn is necessary, its angle must be obtuse.
- When laying through a wall, adapters must be used to protect the pipeline from damage.
- Long corrugated pipes should be fixed every 1-1.5 m. This prevents them from bending and swaying when the hood is on.
- At the junction of the pipe being laid and the ventilation shaft, it is advisable to install a special lattice frame equipped with a check valve and a flange for fastening the edge of the air duct. The principle of operation is as follows - when the hood is turned off, air circulates freely through the grille, while the valve is open. When the device is turned on, the valve closes, preventing contaminated air from entering the room.
We recommend that you read: Retractable telescopic hood for the kitchen
You need to know that the throughput of the exhaust equipment drops by 10% with each turn of the pipeline at an acute or right angle. With several bends, the system is ineffective and operates with large overloads. If turns cannot be avoided, you should buy a device with more power, and also increase the nominal cross-section of the pipeline.
Assembly instructions - all numbers and performance
How does this all come together in practice? For capacities up to 300 m3/h (low speeds of most hoods), a d-125mm pipe is sufficient. On the device itself, the outlet hole may be larger.
For example, for 650 m3/h you will need a d-150mm pipe. However, you are unlikely to find such plastic pipes, and if you use the next standard size d-160mm, it will turn out to be a huge and awkward structure that spoils the entire interior and design of the kitchen.
Moreover, you will have to drill a factory hole for the ventilation duct in the wall, expanding it.
Therefore, in most cases, the optimal diameter of 125 mm is chosen. And you don’t need more.
The forced throughput capacity of standard channels and shafts with dimensions of 100*150mm is 400 m3/h.
An air flow of more than 450 m3/h simply will not fit there (it was tested in practice), even if it says 1200 m3/h on your hood!
Remember also that you cannot underestimate the diameter of the air duct too much compared to the outlet pipe on the hood. Otherwise, the vibration and noise will be so strong that the structure will have to be re-glued every month.
The connection of different diameters is made using special adapters.
Let's start assembling. First, install the adapter on the hood and connect the vertical section to it.
To improve its sound insulation, it makes sense to go crazy and stick a 5mm thick heat-sound-insulating material on top.
It wouldn’t hurt for them to cover the inside of the decorative casing and the noisiest part - the adapter. This is where the greatest turbulence occurs.
Next, add 90-degree elbows and other straight sections of duct as necessary to ultimately exit toward the hole in the wall.
All this is glued together with silicone, no superglues. There should be no gaps anywhere.
We reach the tee. A valve is installed in it from the side of the room.
Keep in mind that this is a gravity valve! It opens not due to air flow, but due to its weight.
One half of it is heavier than the other and at the same time it is installed at a slight angle of 2 degrees.
Operating modes of hoods - simple about the complex
Every day more and more different interior solutions appear. When improving the kitchen, furniture is installed not only along the walls, but can also be mounted in the center of the room. This led to a significant expansion of device characteristics.
After all, air purification, like water treatment, has a huge impact on the quality and life expectancy of the inhabitants of the premises. Today, we can distinguish two principles of operation of kitchen hoods, presented in our catalog and from various manufacturers.
Depending on air circulation, devices are divided into:
- Recirculation (circulation) - after air is taken from the room, it passes through a double purification system, then returns back to the room.
- Air outlet (exhaust) - outside the room: through a hole in the wall to the street; through the general building ventilation system.
The second option is considered the most effective, but it is not always available for implementation. For example, if your hob is located on an island and there is no way to lay a pipe to the ventilation, recirculation models are suitable for you.
Modern technologies have made it possible to provide hoods with a number of functions (modes):
- Built-in sensors and gas analyzers allow the device to turn on without human intervention when steam, soot, or smoke is detected. The devices can also have an automatic power control function.
- The built-in timer allows you to program the unit to turn off, saving energy and time.
- Most models have several operating speeds; the user, through electronic or mechanical control, can independently select the power that is optimal for the current moment.
- The presence of lighting makes the cooking process more enjoyable and convenient.
We recommend the product
Kitchen hood Bosch DHL555BL 1 review
To order
Productivity in withdrawal mode, m³/hour: 618 | Noise level (max), dB: 38, 56 | Depth, mm: 380 | Height, mm: 255 | Width, mm: 530 | Hood operating mode: air exhaust, recirculation | Hood installation: in a kitchen cabinet | Kitchen hood type: built-in |
Preparing the ventilation shaft hole
Before all installation work, it is advisable to plaster the entry into the ventilation shaft itself and remove all sharp corners. This will give the entrance maximum aerodynamic qualities.
You should end up with approximately the same surface as a standard 90 degree round elbow.
It is recommended to add ceresit liquid (ceresit CT99) to the plaster solution.
This hole will be exposed to fat and moisture. And ceresite contains components that prevent the formation of mold.
However, do not use gypsum plaster under any circumstances. Its use in ventilation shafts is a direct path to the appearance of mold and fungi.
Attach sections of a standard air duct to the tee on both sides. From the side of the wall, 5-7 cm, wall it up in the ventilation duct. The exit itself is decorated with a square frame.